随着技术的发展,基于linux项目的软件代码越发复杂,原来一个人可以完成的软件项目,现在可能需要多个人合作、多个部门合作、多个企业合作,每个人、每个部门、每个企业可能负责部分软件模块的开发。各个软件模块在调试过程由于涉及企业知识产权、源代码防止修改、安全性等多方面考虑,技术人员会将自己完成的软件生成库文件(含库文件和头文件(.h文件))、接口使用说明供其他模块调用,本文将从通过一个应用程序的例子,通过动态库打包、动态库调用等方面进行详细讲解,动态库生成*.so的库文件,调用时需要用到库文件和头文件(.h文件)。
(一)应用软件设计
1.设计一个获取系统时间和设置系统时间功能的软件,获取的时间转换为便于理解的bcd码格式,该软件由systime.c的源文件和systime.h的头文件两部分组成。
具体c源码文件systime.c如下所示:
#include <stdio.h>
#include <stdlib.h>
#include <string.h>
#include <unistd.h>
#include <time.h>
#include <sys/time.h>
#include "systime.h"/******************************************************************************
*FUNCATION NAME : Uint8 dec_to_bcd(Uint8 dec)
*CREATE DATE : 2023-05-31
*CREATE BY : LSL
*FUNCTION : 十进制转bcd码
*MODIFY DATE :
*INPUT :
*OUTPUT :
*RETURN :
*OTHERS :
******************************************************************************/
unsigned char dec_to_bcd(unsigned char dec)
{unsigned char temp;temp=(dec/10)*16+(dec%10);return(temp);
}
/******************************************************************************
*FUNCATION NAME : Uint8 bcd_to_dec(Uint8 bcd)
*CREATE DATE : 2023-05-31
*CREATE BY : LSL
*FUNCTION : bcd转10进制
*MODIFY DATE :
*INPUT :
*OUTPUT :
*RETURN :
*OTHERS :
******************************************************************************/
unsigned char bcd_to_dec(unsigned char bcd)
{unsigned char temp;temp=(bcd/16)*10+(bcd%16);return(temp);
}/******************************************************************************
*FUNCATION NAME : void get_systimer(systimer_t *systimerstruct)
*CREATE DATE : 2023-05-31
*CREATE BY : LSL
*FUNCTION : 从系统获取时间函数(含年月日时分秒)
*MODIFY DATE :
*INPUT :
*OUTPUT :
*RETURN :
*OTHERS :
******************************************************************************/
void get_Systimer(systimer_t *systimerstruct)
{unsigned char date; //日unsigned char month; //月unsigned int year; //年unsigned char second; //秒unsigned char minute; //分unsigned char hour; //时time_t current_time;struct tm *now_time;time(¤t_time);//获得本地时间now_time = localtime(¤t_time);//转换为tm格式的时间year=(now_time->tm_year + 1900);//获得年month= (now_time->tm_mon + 1);//获得月date=(now_time->tm_mday);//获得天hour=(now_time->tm_hour);//获得小时minute=(now_time->tm_min);//获得分钟second=(now_time->tm_sec);//获得秒// printf("the year is %d,the mon is %d,the day is %d,the hour is %d,the min is %d,the sec is %d,the dst is %d!\n",year,month,date,hour,minute,second,(now_time->tm_isdst));systimerstruct->uniondate_t.structdate.res1 =dec_to_bcd(year/100); //BCD转换,获得年 高16位systimerstruct->uniondate_t.structdate.year=dec_to_bcd(year%100); //BCD转换,获得年 低16位systimerstruct->uniondate_t.structdate.month=dec_to_bcd(month); //BCD转换,获得月systimerstruct->uniondate_t.structdate.date=dec_to_bcd(date); //BCD转换,获得天systimerstruct->uniontime_t.structtime.res1=dec_to_bcd(0); //BCD转换systimerstruct->uniontime_t.structtime.hour=dec_to_bcd(hour); //BCD转换,获得小时systimerstruct->uniontime_t.structtime.minute=dec_to_bcd(minute); //BCD转换,获得分systimerstruct->uniontime_t.structtime.second=dec_to_bcd(second); //BCD转换,获得秒}/******************************************************************************
*FUNCATION NAME : void set_systimer(systimer_t *systimerstruct)
*CREATE DATE : 2023-05-31
*CREATE BY : LSL
*FUNCTION : 向系统写入时间函数(含年月日时分秒)
*MODIFY DATE :
*INPUT :
*OUTPUT :
*RETURN :
*OTHERS :
******************************************************************************/
void set_Systimer(systimer_t *systimerstruct)
{int ret = 0;unsigned char date; //日unsigned char month; //月unsigned int year; //年unsigned char second; //秒unsigned char minute; //分unsigned char hour; //时time_t current_time;struct tm now_time;struct timeval time_tv;year=bcd_to_dec(systimerstruct->uniondate_t.structdate.res1)*100;year+=bcd_to_dec(systimerstruct->uniondate_t.structdate.year); //年month=bcd_to_dec(systimerstruct->uniondate_t.structdate.month); //月date=bcd_to_dec(systimerstruct->uniondate_t.structdate.date); //日hour=bcd_to_dec(systimerstruct->uniontime_t.structtime.hour); //时minute=bcd_to_dec(systimerstruct->uniontime_t.structtime.minute); //分second=bcd_to_dec(systimerstruct->uniontime_t.structtime.second); //秒now_time.tm_year = (year - 1900); //年now_time.tm_mon = (month - 1); //月now_time.tm_mday = (date); //天now_time.tm_hour = hour; //时now_time.tm_min = minute; //分now_time.tm_sec = second; //秒//now_time.tm_isdst = 0; //dst时区current_time = mktime(&now_time); //完成时间转换time_tv.tv_sec = current_time;time_tv.tv_usec = 0;ret = settimeofday(&time_tv, NULL); //将时间写给系统if(ret != 0){printf("settimeofday failed\n"); }
}具体头文件systime.h如下所示:
#ifndef SRC_SYSTIME_H_
#define SRC_SYSTIME_H_#pragma pack(1)
typedef struct	systimer
{union{struct{unsigned char	date;		//日unsigned char	month;		//月unsigned char	year;		//年unsigned char	res1;		//年的高16位}structdate;unsigned	int		day;	//日期}uniondate_t;union{struct{unsigned char	second;		//秒unsigned char	minute;		//分unsigned char	hour;		//时unsigned char	res1;		//预留}structtime;unsigned	int		time;	//时间}uniontime_t;
}systimer_t;
#pragma pack(push)void get_Systimer(systimer_t *systimerstruct);//获得系统时间
void set_Systimer(systimer_t *systimerstruct);//设置系统时间#endif
2.其中源文件systime.c实现获取、设置系统时间,并转换systime.h定义的系统时间格式。
(二)动态库打包
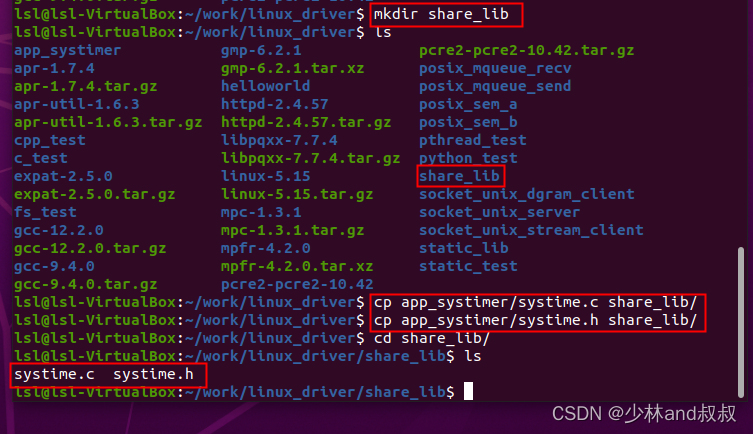
1.新建share_lib的文件夹,并将上述systime.c和systime.h两个文件拷贝到share_lib目录,如下所示:
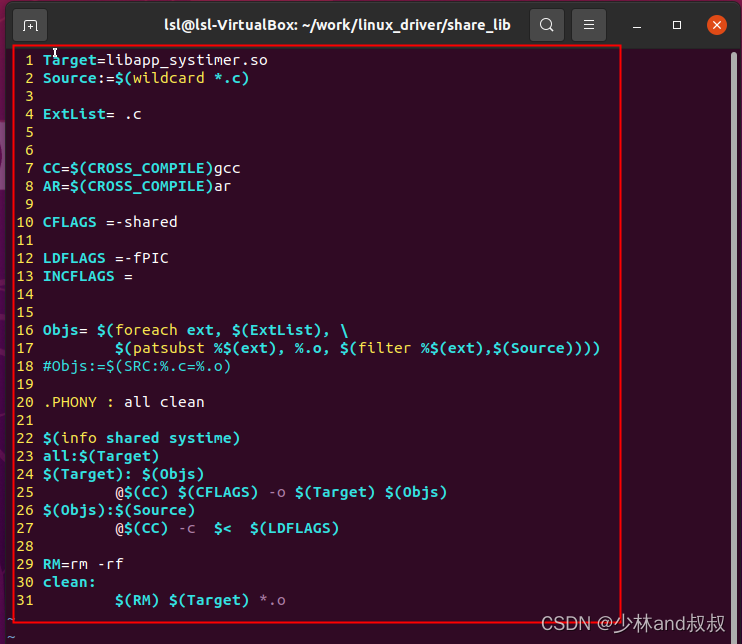
2.为了提高编译打包方法的移植性,在动态库目录中新建Makefile文件,内容如下所示:
3.运行make指令,生成libapp_systimer.so的动态库文件,如下图所示。

4.以上生成的libapp_systimer.so文件和systim.h文件,供后续动态库调用。
(三)动态库调用
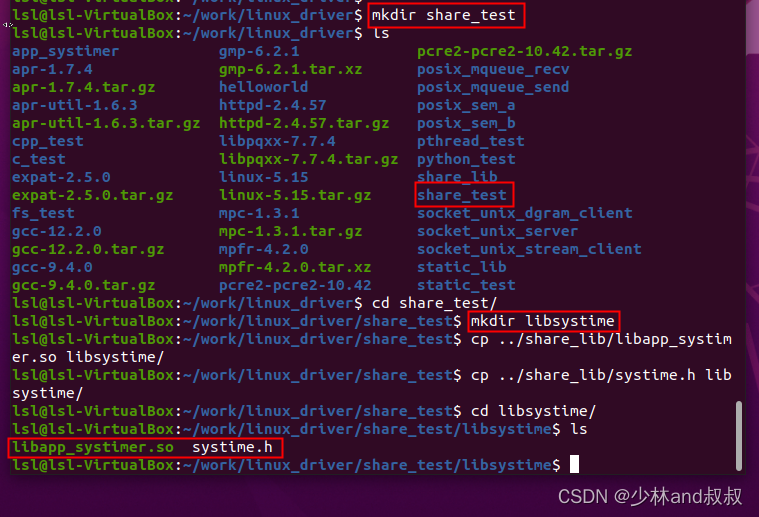
1.新建测试目录share_test,并在share_test目录下新建libsystime的子文件夹,并拷贝上节生成的静态库文件libapp_systimer.so和头文件systime.h到动态库测试目录的系统时间库子目录share_test/libsystime。具体流程如下所示:
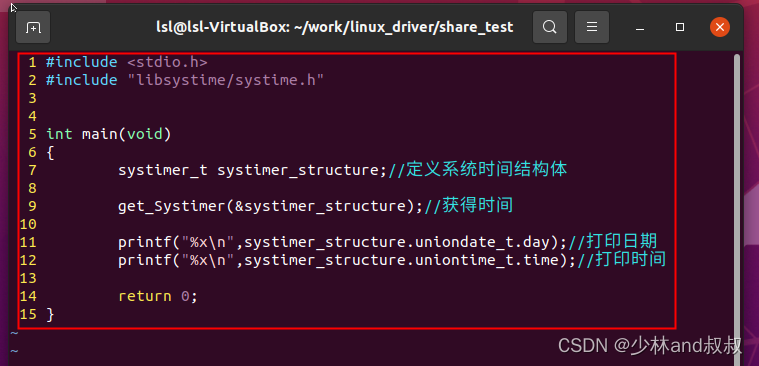
2.在测试目录share_test中,新建测试程序main.c,获取系统时间,并打印输出:
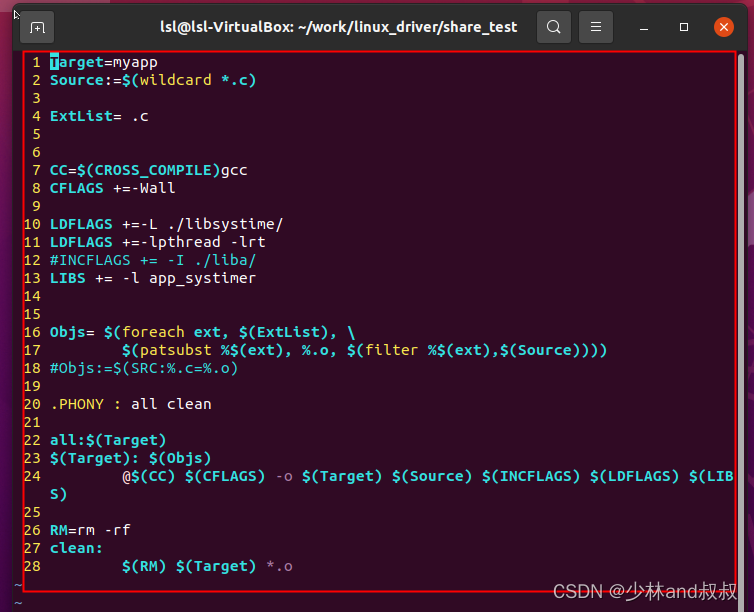
3.新建Makefile文件,注意:包含头文件和lib库的路径,如下图所示:
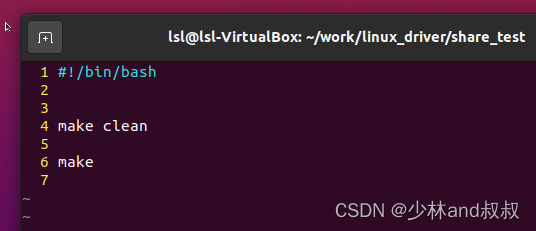
4.新建编译脚本build.sh,编译脚本内容如下所示:
5.给编译脚本添加可执行权限,并运行编译脚本,编译生成测试软件的可执行程序myapp,如下图所示:

6.export动态库的目录,保证运行可执行程序能够找到动态库,获得当前时间,如下图所示,说明动态库的调用成功。

