文章目录
- 一. 链表的定义
- 二. 删除元素
- 203. 移除链表元素
- 二. 反/翻转链表
- T206.反转链表
- 25. K 个一组翻转链表 ****
- 四. 链表中的环
- T142.环形链表Ⅱ
- 02.07/T160 链表相交
- 五. 合并链表
- T23. 合并K个升序链表
- 六. 交换链表
- T24.两两交换链表的节点
- T143. 重排链表
- 七. 设计链表
- T707.设计链表
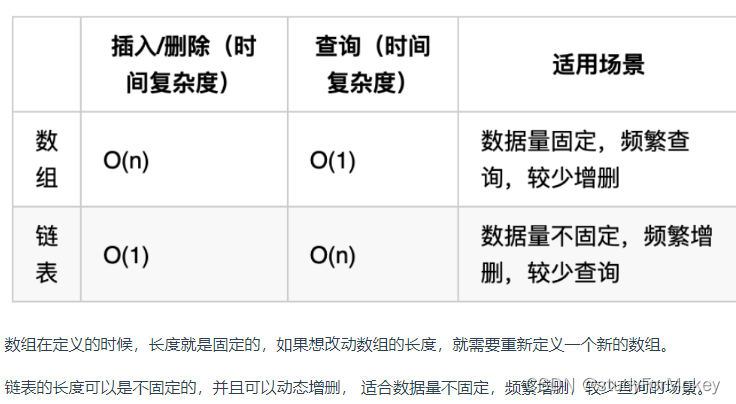
一. 链表的定义
public class ListNode {// 结点的值int val;// 下一个结点ListNode next;// 节点的构造函数(无参)public ListNode() {}// 节点的构造函数(有一个参数)public ListNode(int val) {this.val = val;}// 节点的构造函数(有两个参数)public ListNode(int val, ListNode next) {this.val = val;this.next = next;}
}
二. 删除元素
203. 移除链表元素
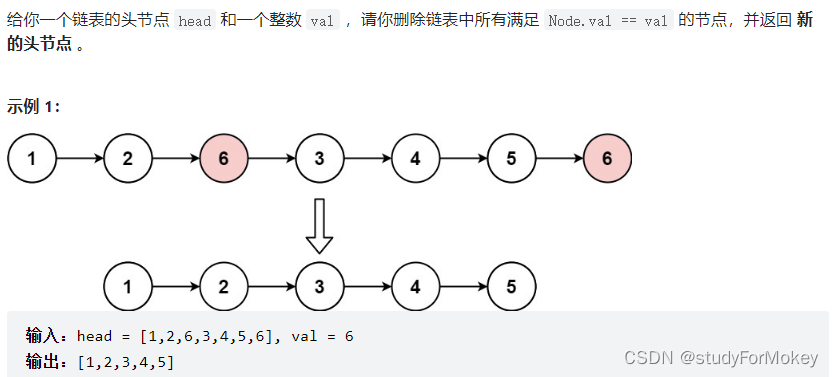
- 虚拟结点 指向头节点
- 双指针
class Solution {public ListNode removeElements(ListNode head, int val) {if (head == null){return null;}ListNode dummyHead = new ListNode(-1,head);ListNode fast = head; //每个元素都遍历ListNode slow = dummyHead;while(fast != null){if (fast.val == val){slow.next = fast.next;}else{slow = fast;}fast = fast.next;}return dummyHead.next;}
}
二. 反/翻转链表
T206.反转链表
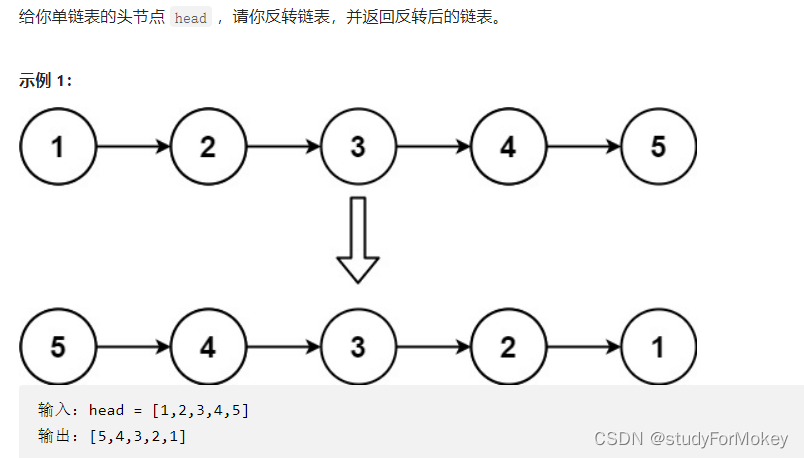
双指针
class Solution {public ListNode reverseList(ListNode head) {ListNode pre = null;ListNode cur = head;ListNode temp = null;while (cur != null){temp = cur.next;cur.next = pre;pre = cur;cur = temp;}return pre;}
}
25. K 个一组翻转链表 ****
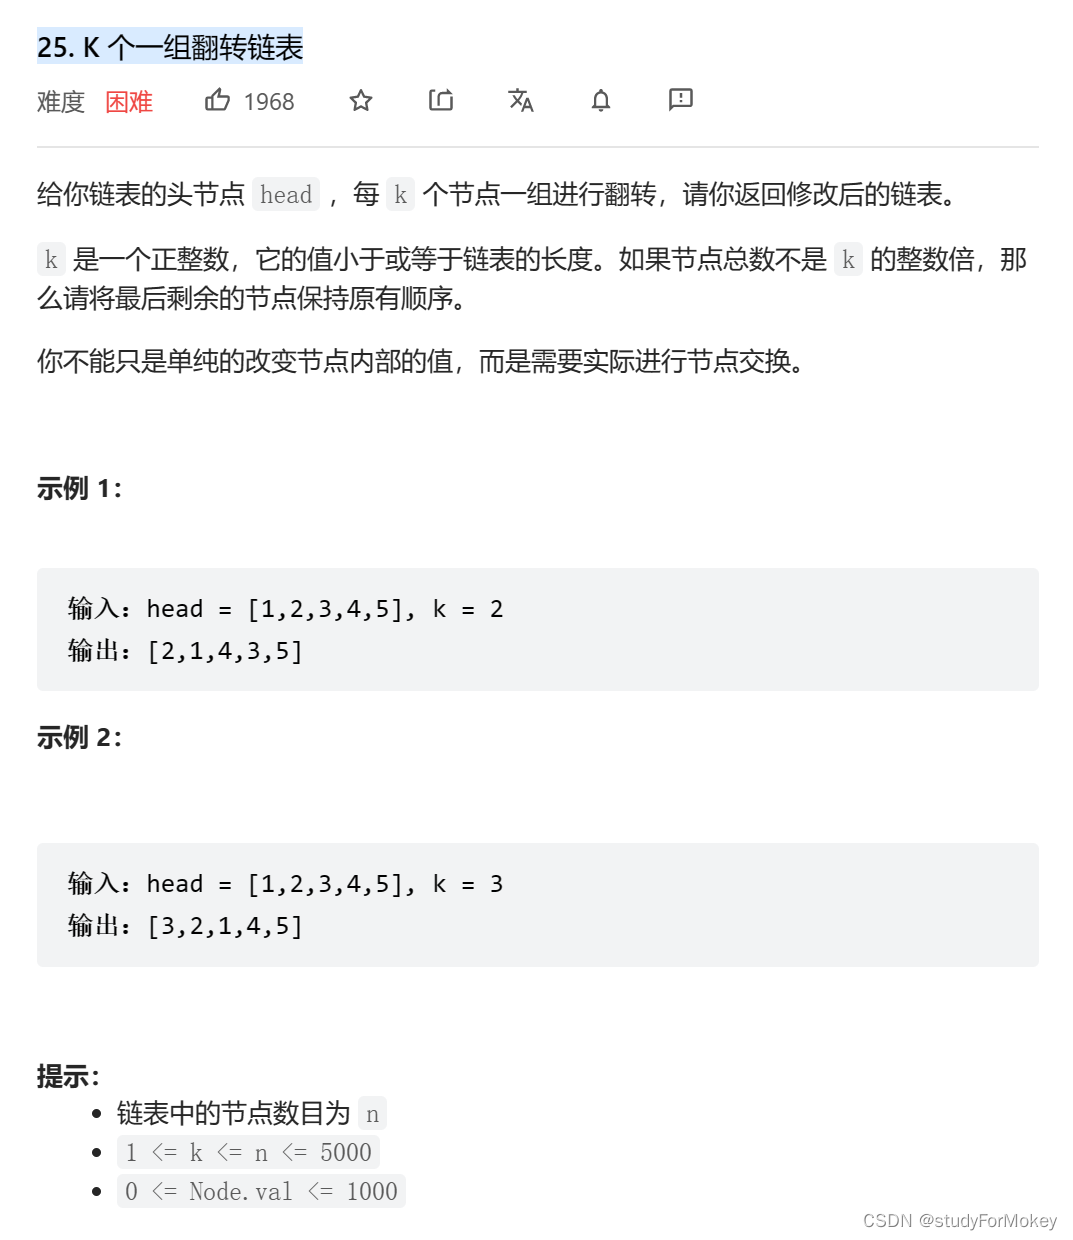
- 思路分析
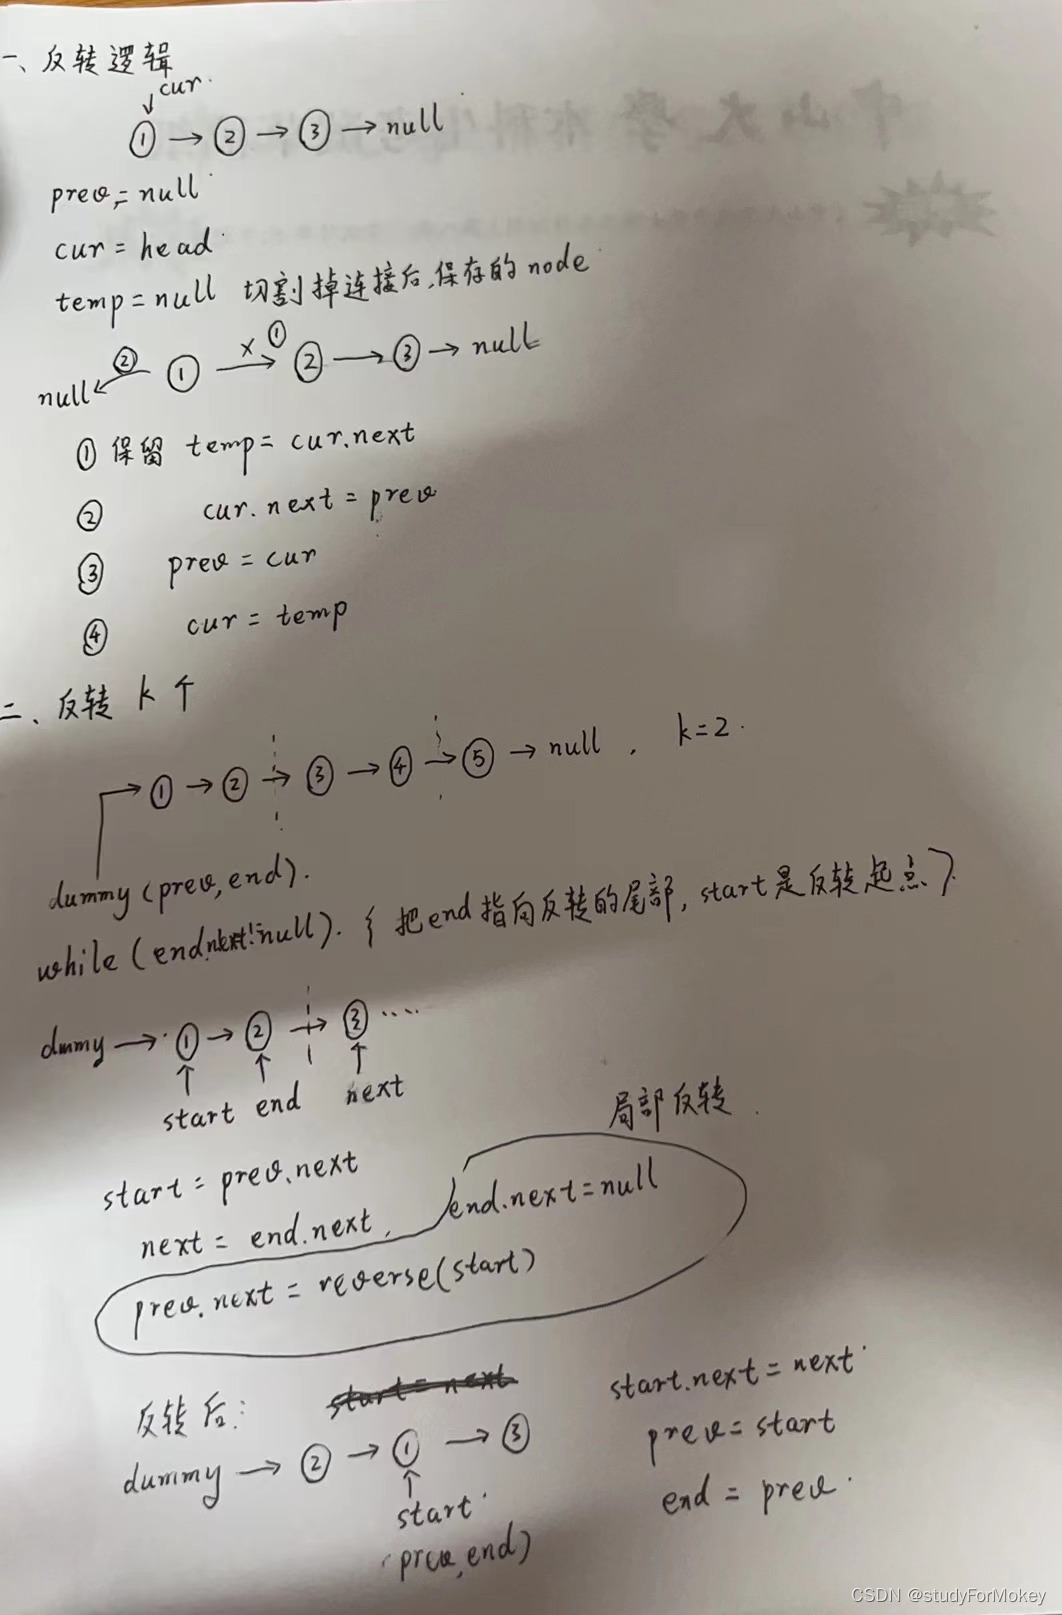
- 代码实现
/*** Definition for singly-linked list.* public class ListNode {*     int val;*     ListNode next;*     ListNode() {}*     ListNode(int val) { this.val = val; }*     ListNode(int val, ListNode next) { this.val = val; this.next = next; }* }*/
class Solution {public ListNode reverseKGroup(ListNode head, int k) {ListNode dummyNode = new ListNode(-1);dummyNode.next = head;ListNode prev = dummyNode;//指向start的前一个ListNode end = dummyNode;//指向反转的最后一个while(end.next!=null){for(int i=0;i<k&&end!=null;i++){end = end.next;}if(end==null) break;//终止条件ListNode start = prev.next;//反转的第一个元素ListNode next = end.next;//指向末尾的下一个元素,用于反转后的拼接//反转end.next = null;//先把该部分断开prev.next = reverse(start);//反转后的拼接处理start.next = next;prev = start;end = prev;}return dummyNode.next;}public ListNode reverse(ListNode head){ListNode prev = null;ListNode cur = head;ListNode temp = null;//保留下一个指向的元素while(cur!=null){temp = cur.next;cur.next = prev;prev = cur;cur = temp;}return prev;}
}
四. 链表中的环
T142.环形链表Ⅱ
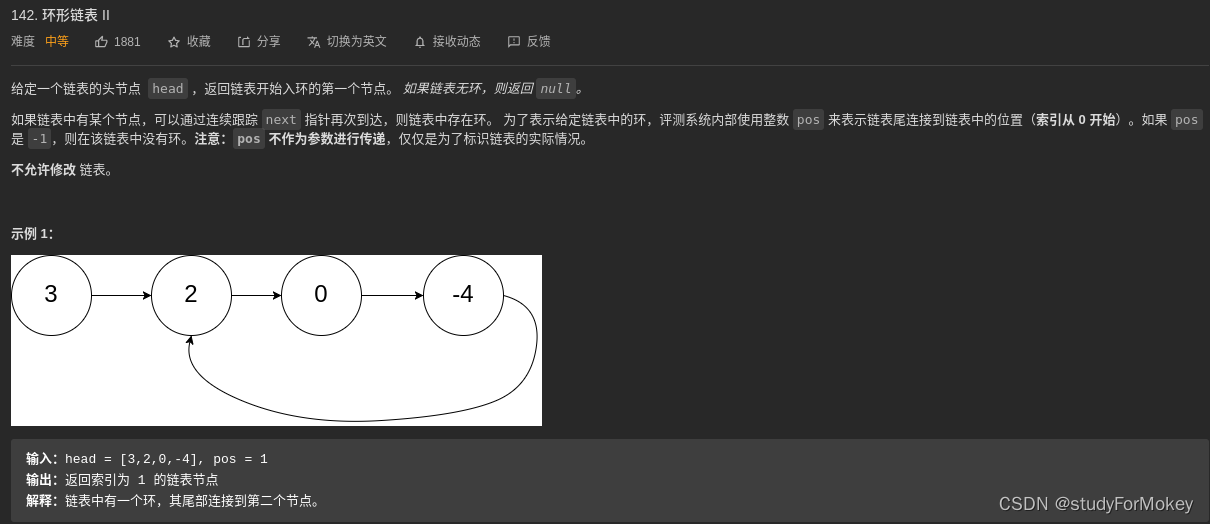
- 判断是否有环:双指针,快指针一步走两个节点,慢指针一步走一个节点,若相等必然有环:
- 如何找环:从头结点出发一个指针,从相遇节点 也出发一个指针,这两个指针每次只走一个节点, 那么当这两个指针相遇的时候就是 环形入口的节点。
public class Solution {public ListNode detectCycle(ListNode head) {ListNode slow = head;ListNode fast = head;while (fast != null && fast.next != null){slow = slow.next;fast = fast.next.next;//若有环必然相遇if (slow == fast) {//相遇,找入口 让一个节点从相遇处出发 一个从头节点出发ListNode cur = fast;ListNode prev = head;while(cur != prev){cur = cur.next;prev = prev.next;}return cur;}}return null;}
}
02.07/T160 链表相交
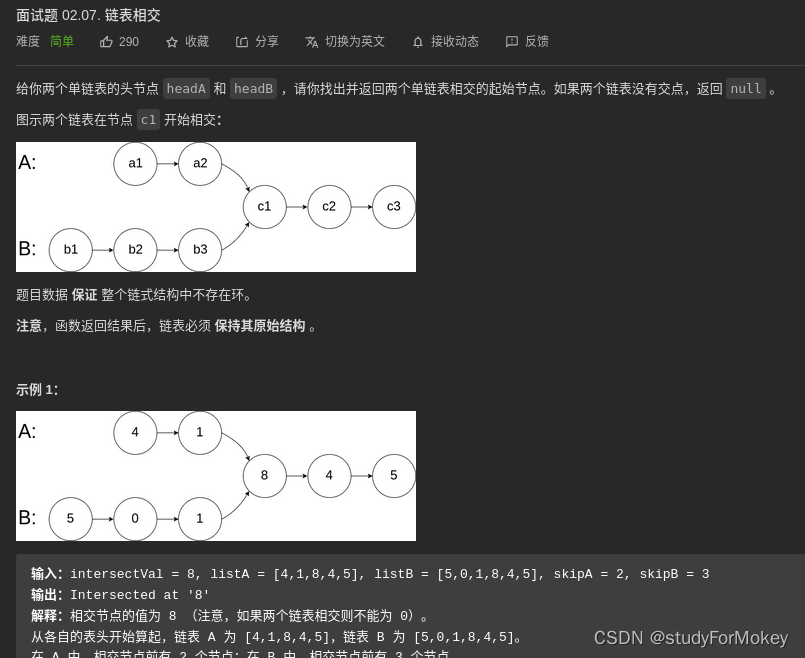
- 方法一:利用AB两个链表的长度差
public class Solution {public ListNode getIntersectionNode(ListNode headA, ListNode headB) {ListNode curA = headA;ListNode curB = headB;int lengthA = 0;int lengthB = 0;while (curA != null){lengthA ++ ;curA = curA.next;}while (curB != null){lengthB++;curB = curB.next;}curA = headA;curB = headB;if (lengthB > lengthA){int  temp = lengthA;lengthA = lengthB;lengthB = temp;ListNode tempNode = curA;curA = curB;curB = tempNode;}        //交换使A长度始终最长int gap = lengthA - lengthB;while (gap>0){curA = curA.next;gap--;}//让A指针先走while(curA != null){if (curA == curB){return curA;}curA = curA.next;curB = curB.next;}return null;}
}
- 方法二:利用双指针,较巧妙
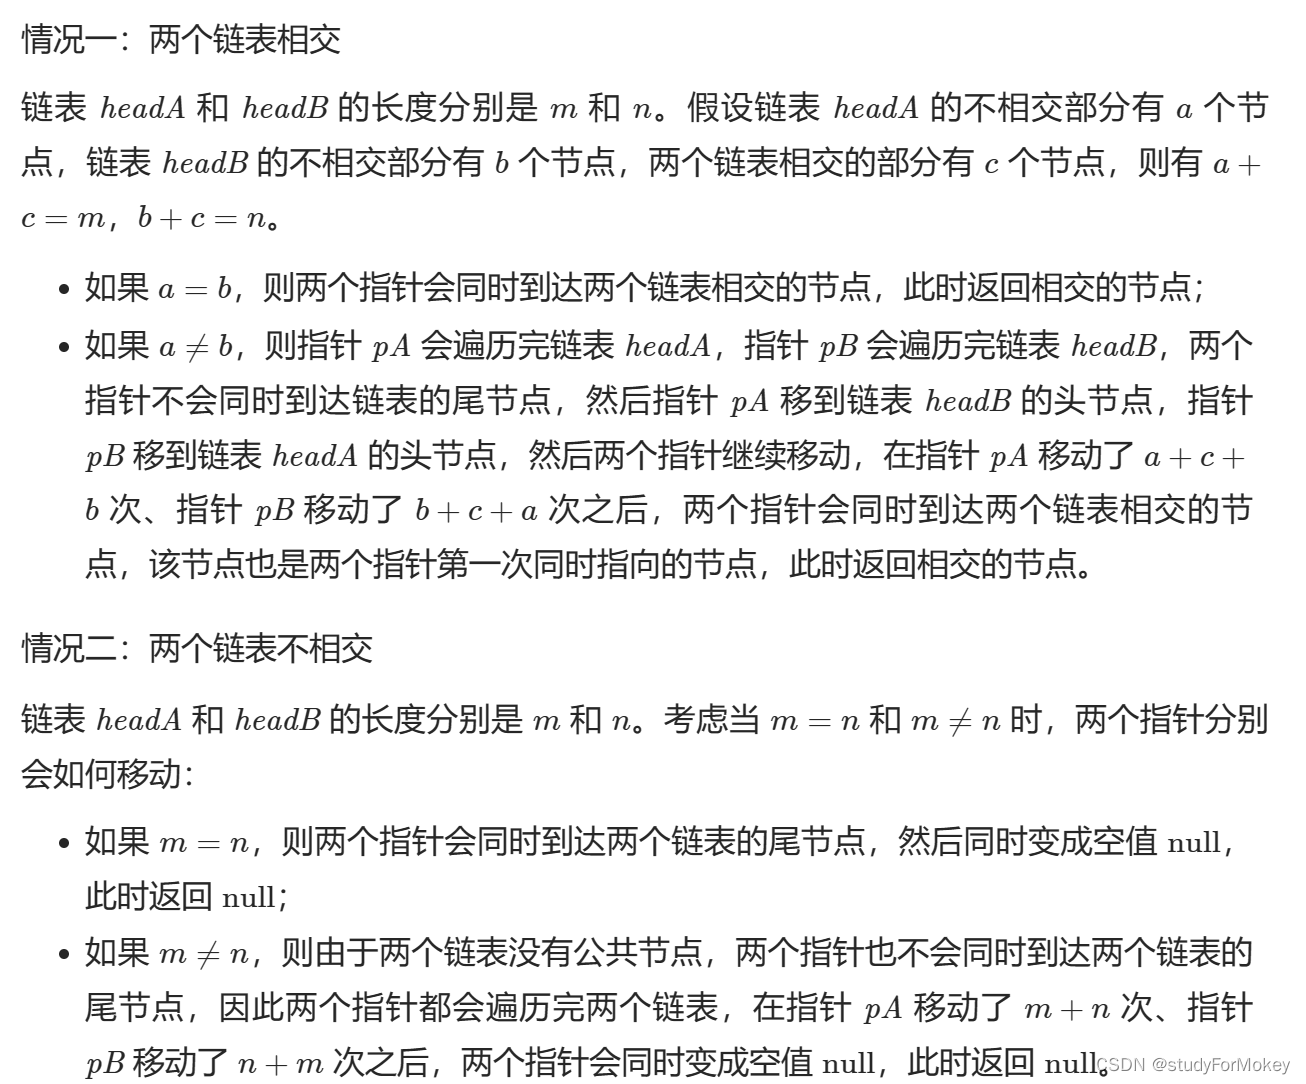
public class Solution {public ListNode getIntersectionNode(ListNode headA, ListNode headB) {if(headA == null || headB == null){return null;}ListNode curA = headA;ListNode curB = headB;while(curA!=curB){curA =  curA!=null ? curA.next : headB;curB =  curB!=null ? curB.next : headA;}return curA;}
}
五. 合并链表
T23. 合并K个升序链表
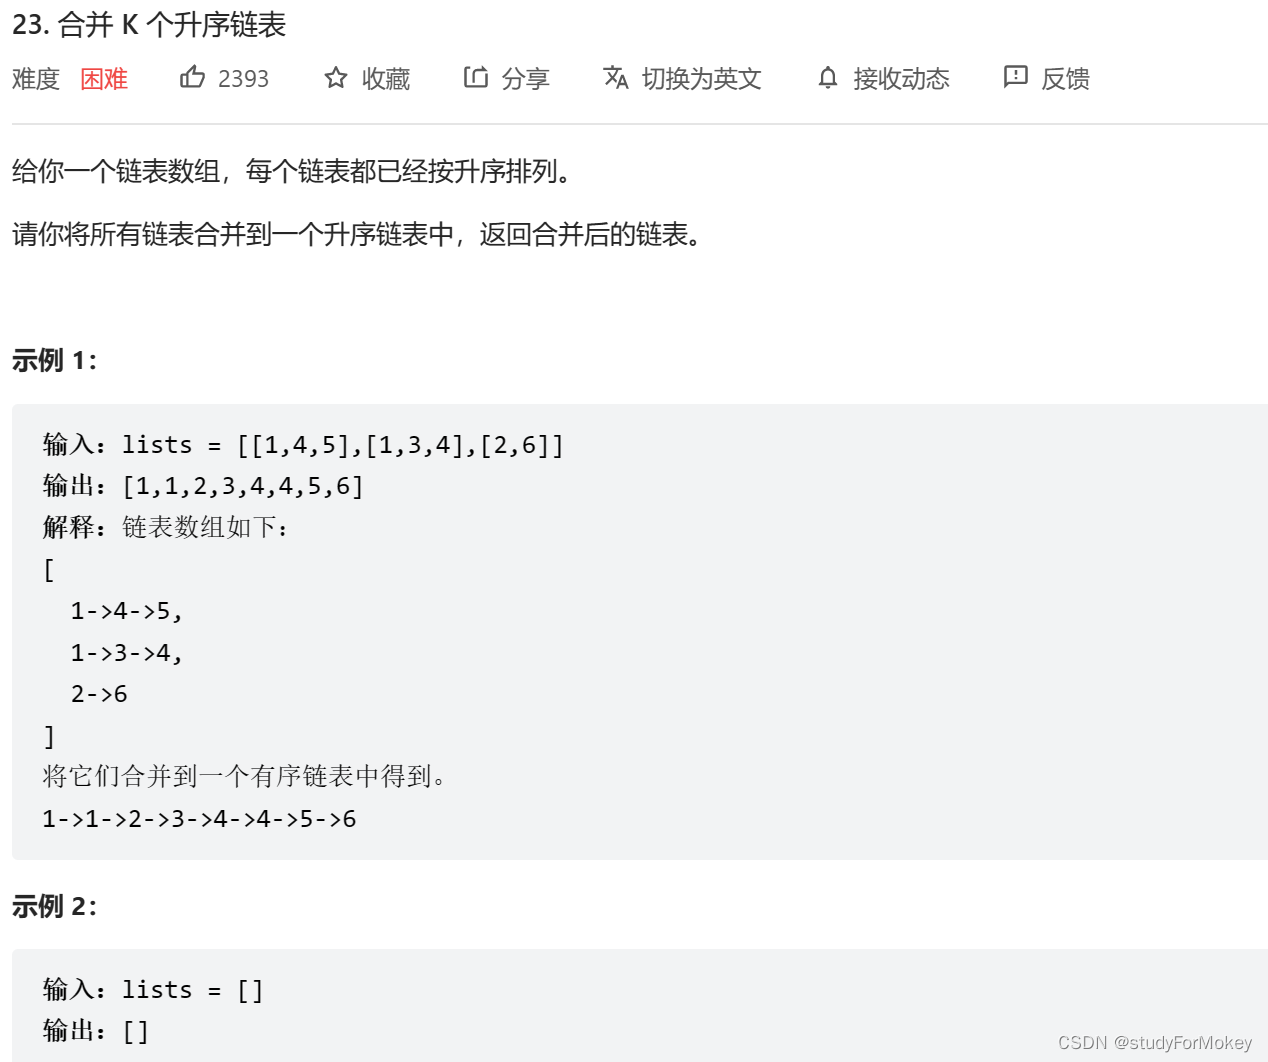
/*** Definition for singly-linked list.* public class ListNode {*     int val;*     ListNode next;*     ListNode() {}*     ListNode(int val) { this.val = val; }*     ListNode(int val, ListNode next) { this.val = val; this.next = next; }* }*/
class Solution {
//合并两个public ListNode mergeKLists(ListNode[] lists) {ListNode res = null;for(int i = 0;i<lists.length;i++){res = mergeTwoList(res,lists[i]);}return res;}   public ListNode mergeTwoList(ListNode a,ListNode b){if(a==null||b==null){return a!=null ? a:b;//出现空的 就返回非空}ListNode dummy = new ListNode(-1);ListNode cur = dummy;ListNode pointA = a;ListNode pointB = b;while(pointA!=null&&pointB!=null){if(pointA.val>pointB.val){cur.next = pointB;pointB = pointB.next;}else{cur.next = pointA;pointA = pointA.next;}cur = cur.next;}//可能还有剩下的cur.next = pointA != null?pointA:pointB;return dummy.next;}
}
六. 交换链表
T24.两两交换链表的节点
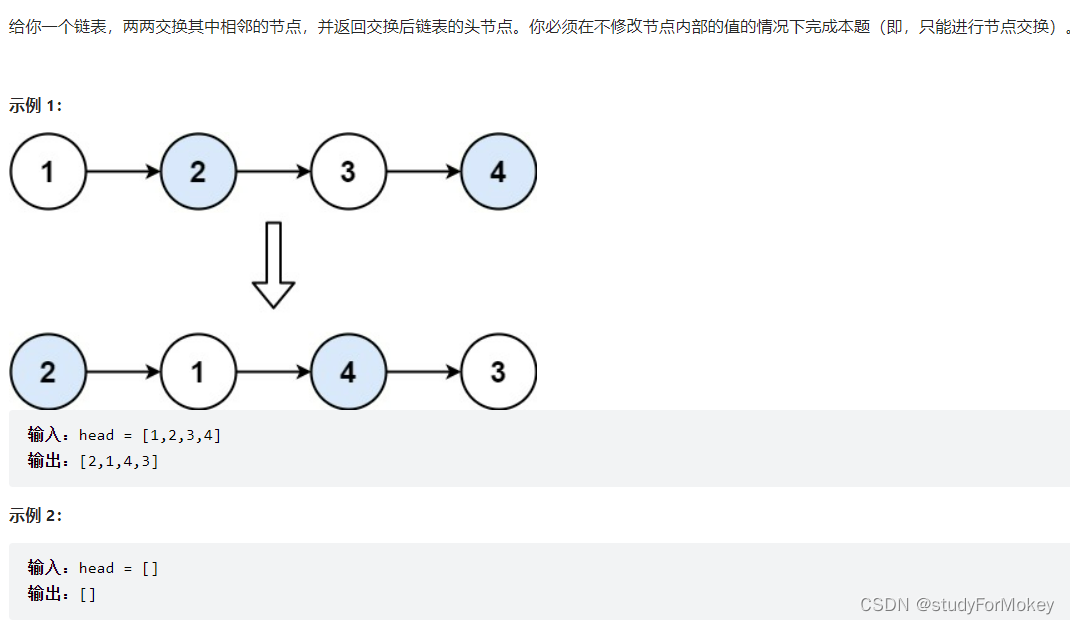
画图分析:记住pre为虚拟节点 1号为head 2号为head.next,按三部走即可
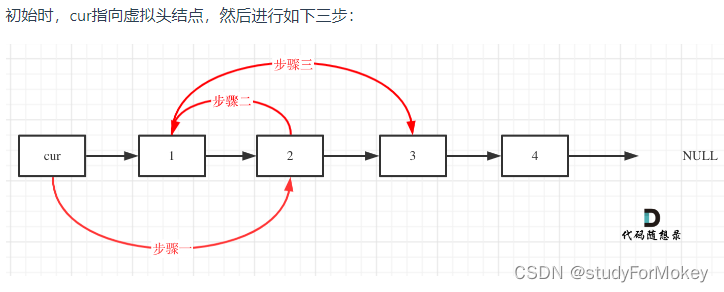
class Solution {public ListNode swapPairs(ListNode head) {ListNode dummyNode = new ListNode(-1);dummyNode.next = head;ListNode prev = dummyNode;while (prev.next != null && prev.next.next != null){//head为1号节点ListNode temp = head.next.next;   prev.next = head.next; head.next.next = head; head.next = temp;prev = prev.next.next;head = temp;}return dummyNode.next;}
}
T143. 重排链表
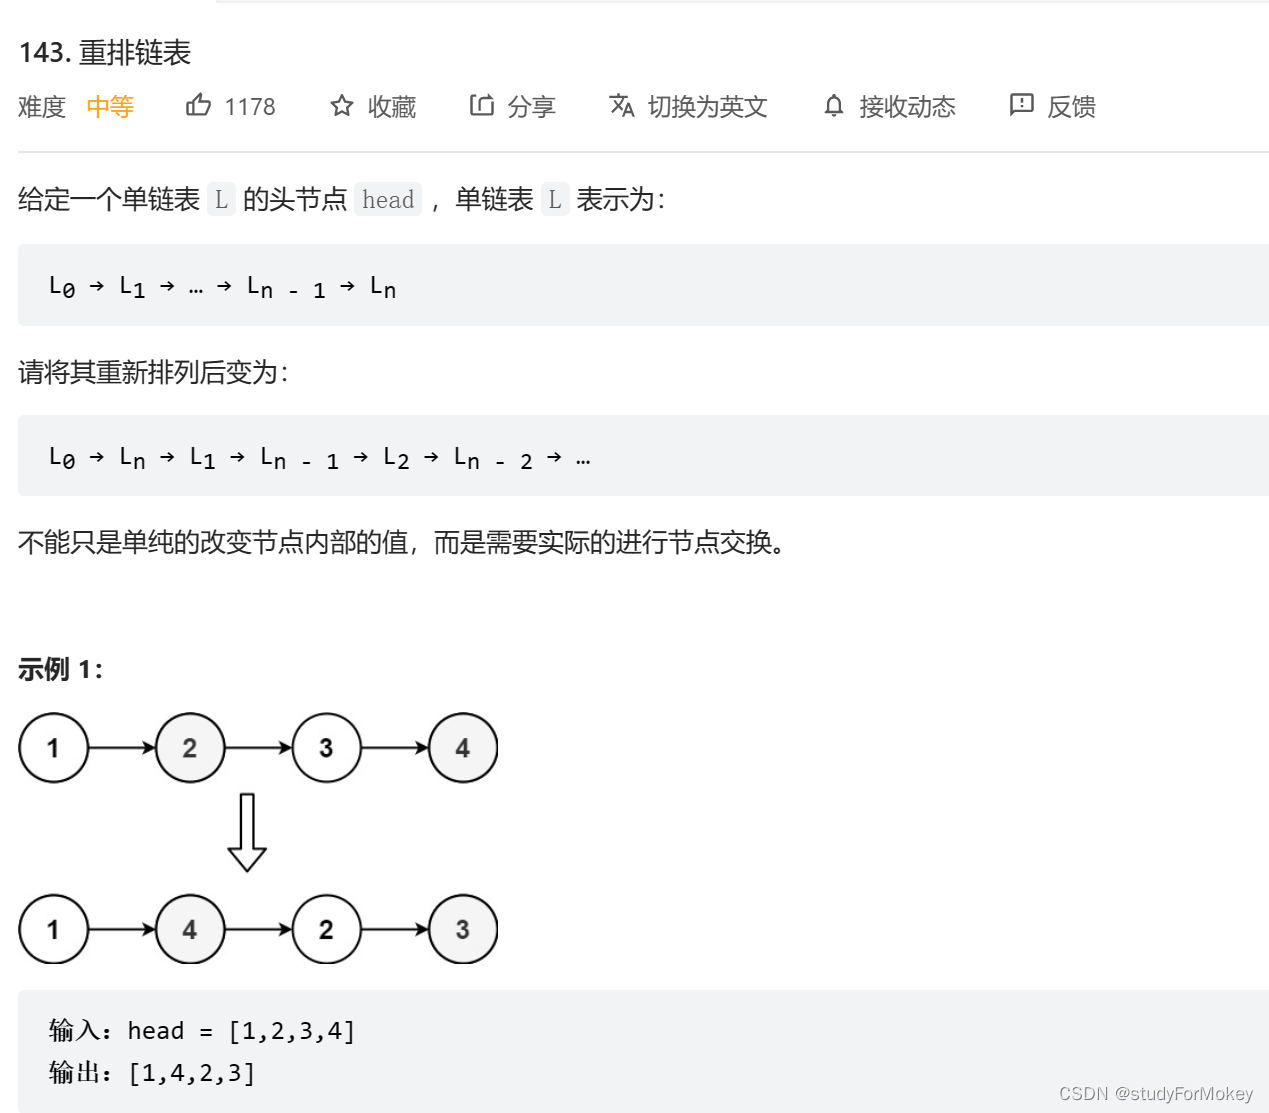
class Solution {public void reorderList(ListNode head) {int len=0;ListNode cur = head;//将所有节点入栈,并记录长度Deque<ListNode> stack = new LinkedList<>();while(cur!=null){stack.push(cur);cur = cur.next;len++;}int count = len/2;ListNode front = head;//第一个指针从前往后遍历,按照题目的意思只需要len/2次操作//第二个指针不断从栈中弹出元素while(count>0){ListNode node = stack.pop();ListNode temp = front.next;front.next = node;node.next = temp;front = temp;count--;}//最后的元素必须指向空,否则会出现环front.next = null;}
}
七. 设计链表
T707.设计链表
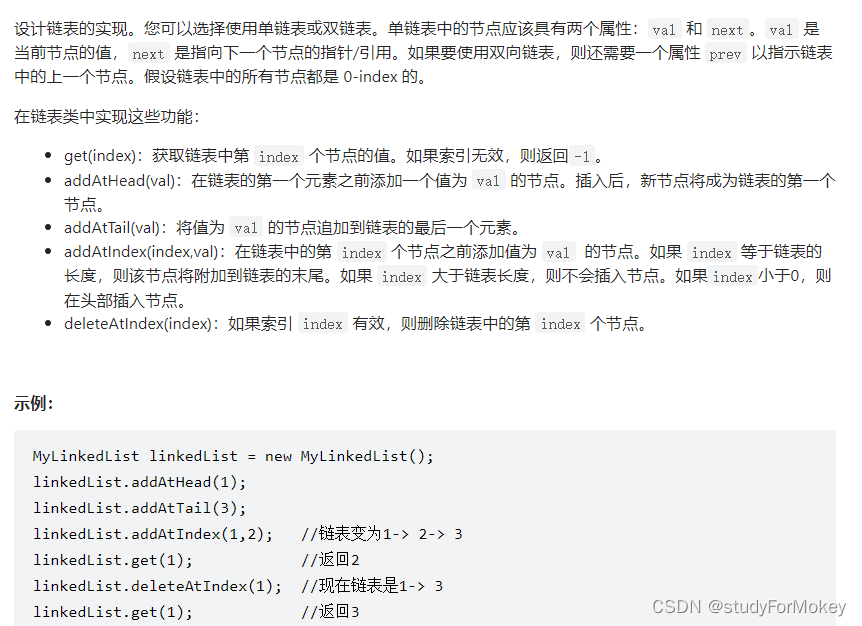
- 查:for循环遍历
- 增:头、尾、任意位置,头尾在任意位置的基础上修改 (本质就是查询,然后插入)
- 删: 查询后删除 无论是删除还是插入,引入一个tempNode记录节点
class ListNode{ //定义类 两个属性 一个构造方法int val;ListNode next;// ListNode (){}ListNode(int val){this.val = val;}
}//获取第index个节点的数值,注意index是从0开始的,第0个节点就是头结点
//其实就是在遍历的基础上做点操作
class MyLinkedList {int size;ListNode head;//初始化public MyLinkedList() {size = 0;head = new ListNode(0);}//查询 public int get(int index) {if (index < 0 || index >= size){return -1;}ListNode cur = head;for (int i = 0;i<=index;i++){ //注意等号cur = cur.next;}return cur.val;}//添加头节点public void addAtHead(int val) {addAtIndex(0,val);}public void addAtTail(int val) {addAtIndex(size,val);}//增加元素public void addAtIndex(int index, int val) {if (index > size){return;}if (index < 0){index=0;}ListNode newNode = new ListNode(val);size++;//调整size//找到第index-1个节点,用temp变量记录ListNode temp = head;for (int i = 0;i<index;i++){temp = temp.next;}// 改动 newNode.next = temp.next;temp.next = newNode;}//删除public void deleteAtIndex(int index) {if (index >= size || size < 0){return;}size--;if (index == 0){head = head.next;return;}ListNode temp = head;for (int i = 0; i<index;i++){temp = temp.next;}temp.next = temp.next.next;}
}


