Java 队列
Java集合教程 - Java队列
队列是只能在其上执行操作的对象的集合两端的队列。
队列有两个末端,称为头和尾。
在简单队列中,对象被添加到尾部并从头部删除并首先删除首先添加的对象。
Java Collections Framework支持以下类型的队列。
- 简单的队列允许在尾部插入和从头部移除。
- 优先级队列为每个元素分配优先级,并允许从队列中删除具有最高优先级的元素。
- 延迟队列向每个元素添加延迟,并仅在其延迟已过去时删除该元素。
- 双端队列允许其元件从头部和尾部插入和移除。
- 阻塞队列阻塞线程,当线程已满时向其添加元素,当线程为空时,它阻止线程从中删除元素。
- 传输队列是阻塞队列,其中对象的切换发生在生产者线程和消费者线程之间。
- 阻塞双端队列是双端队列和阻塞队列的组合。
简单队列
简单队列由 Queue 接口的实例表示。
队列允许您执行三个基本操作:
- 从尾部添加元素
- 从其头部移除元素
- 在元素顶部审查
Queue接口为三个操作中的每一个定义了两个方法。如果操作不可能,一个方法抛出异常,另一个方法方法返回false或null以指示失败。
| 方法 | 描述 |
|---|---|
| boolean add(E e) | 如果可能,向队列中添加一个元素。否则,它抛出异常。 |
| boolean offer(E e) | 如果不能添加元素,则将元素添加到队列中,而不抛出异常。 它在失败时返回false,在成功时返回true。 |
| E remove() | 删除队列的头。如果队列为空,它会抛出异常。此方法返回已移除的项目。 |
| E poll() | 从队列中删除元素。如果队列为空而不是抛出异常,则返回null。 |
| Eelement() | 偷看队列的头,而不从队列中删除它。 如果队列为空,它会抛出异常。 |
| E peek() | 查看队列,如果队列为空而不是抛出异常,则返回null。 |
LinkedList和PriorityQueue是Queue接口的两个实现类。LinkedList还实现了List接口。
Queue APIs
LinkedList APIs
Stack APIs
例子
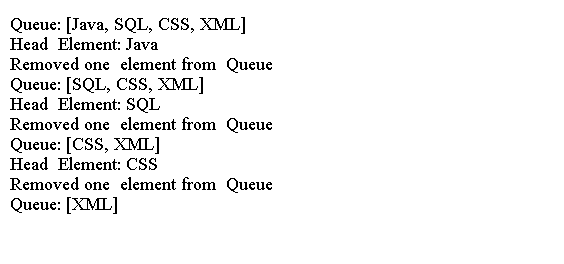
以下代码显示如何将链表用作FIFO队列。
import java.util.LinkedList;
import java.util.NoSuchElementException;
import java.util.Queue;public class Main {public static void main(String[] args) {Queue<String> queue = new LinkedList<>();queue.add("Java");// offer() will work the same as add()queue.offer("SQL");queue.offer("CSS");queue.offer("XML");System.out.println("Queue: " + queue);// Let"s remove elements until the queue is emptywhile (queue.peek() != null) {System.out.println("Head  Element: " + queue.peek());queue.remove();System.out.println("Removed one  element from  Queue");System.out.println("Queue: " + queue);}System.out.println("queue.isEmpty(): " + queue.isEmpty());System.out.println("queue.peek(): " + queue.peek());System.out.println("queue.poll(): " + queue.poll());try {String str = queue.element();System.out.println("queue.element(): " + str);str = queue.remove();System.out.println("queue.remove(): " + str);} catch (NoSuchElementException e) {System.out.println("queue.remove(): Queue is  empty.");}}
}
上面的代码生成以下结果。
Java 优先级队列
Java集合教程 - Java优先级队列
优先级队列是其中每个元素具有相关联的优先级的队列。具有最高优先级的元素将从队列中删除。
PriorityQueue 是一个实现类对于Java Collection Framework中的无界优先级队列。
我们可以使用在每个元素中实现的 Comparable 接口作为其优先事项。
或者我们可以提供一个 Comparator 对象,这将确定元素的优先级顺序。
当向优先级队列添加新元素时,它将根据其优先级位于队列中。
例子
import java.util.PriorityQueue;
import java.util.Queue;class ComparablePerson implements Comparable<ComparablePerson> {private int id;private String name;public ComparablePerson(int id, String name) {this.id = id;this.name = name;}public int getId() {return id;}public void setId(int id) {this.id = id;}public String getName() {return name;}public void setName(String name) {this.name = name;}@Overridepublic boolean equals(Object o) {if (!(o instanceof ComparablePerson)) {return false;}ComparablePerson p = (ComparablePerson) o;if (this.id == p.getId()) {return true;}return false;}@Overridepublic int hashCode() {return this.id;}@Overridepublic String toString() {return "(" + id + ", " + name + ")";}@Overridepublic int compareTo(ComparablePerson cp) {int cpId = cp.getId();String cpName = cp.getName();if (this.getId() < cpId) {return -1;}if (this.getId() > cpId) {return 1;}if (this.getId() == cpId) {return this.getName().compareTo(cpName);}// Should not reach here return 0;}
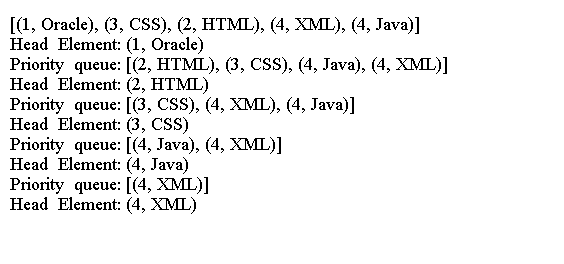
}public class Main {public static void main(String[] args) {Queue<ComparablePerson> pq = new PriorityQueue<>();pq.add(new ComparablePerson(1, "Oracle"));pq.add(new ComparablePerson(4, "XML"));pq.add(new ComparablePerson(2, "HTML"));pq.add(new ComparablePerson(3, "CSS"));pq.add(new ComparablePerson(4, "Java"));System.out.println(pq);while (pq.peek() != null) {System.out.println("Head  Element: " + pq.peek());pq.remove();System.out.println("Priority  queue: " + pq);}}
}
上面的代码生成以下结果。
注意
当您使用迭代器时, PriorityQueue 类不保证元素的任何顺序。
它的toString()方法使用它的迭代器给你的元素的字符串表示。
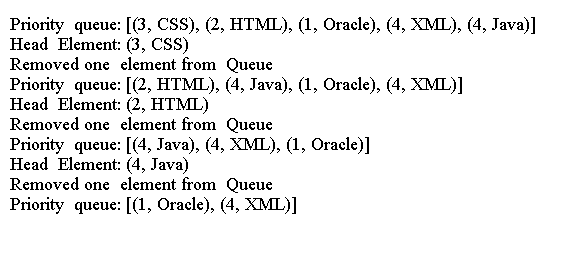
以下代码显示如何使用 Comparator 对象为ComparablePerson列表创建优先级队列。
import java.util.Comparator;
import java.util.PriorityQueue;
import java.util.Queue;class ComparablePerson implements Comparable<ComparablePerson> {private int id;private String name;public ComparablePerson(int id, String name) {this.id = id;this.name = name;}public int getId() {return id;}public void setId(int id) {this.id = id;}public String getName() {return name;}public void setName(String name) {this.name = name;}@Overridepublic boolean equals(Object o) {if (!(o instanceof ComparablePerson)) {return false;}ComparablePerson p = (ComparablePerson) o;if (this.id == p.getId()) {return true;}return false;}@Overridepublic int hashCode() {return this.id;}@Overridepublic String toString() {return "(" + id + ", " + name + ")";}@Overridepublic int compareTo(ComparablePerson cp) {int cpId = cp.getId();String cpName = cp.getName();if (this.getId() < cpId) {return -1;}if (this.getId() > cpId) {return 1;}if (this.getId() == cpId) {return this.getName().compareTo(cpName);}// Should not reach herereturn 0;}
}public class Main {public static void main(String[] args) {int initialCapacity = 5;Comparator<ComparablePerson> nameComparator = Comparator.comparing(ComparablePerson::getName);Queue<ComparablePerson> pq = new PriorityQueue<>(initialCapacity,nameComparator);pq.add(new ComparablePerson(1, "Oracle"));pq.add(new ComparablePerson(4, "XML"));pq.add(new ComparablePerson(2, "HTML"));pq.add(new ComparablePerson(3, "CSS"));pq.add(new ComparablePerson(4, "Java"));System.out.println("Priority  queue: " + pq);while (pq.peek() != null) {System.out.println("Head  Element: " + pq.peek());pq.remove();System.out.println("Removed one  element from  Queue");System.out.println("Priority  queue: " + pq);}}
}
上面的代码生成以下结果。
Java 双端队列
Java集合教程 - Java双端队列
双端队列或deque扩展队列以允许元件从两端插入和移除。
Deque 类的实例表示双端队列。 Deque 接口扩展了 Queue 接口。
它声明了方便所有操作的其他方法对于头部以及尾部的队列。它可以用作FIFO队列或LIFO队列。
ArrayDeque和LinkedList类是Deque接口的两个实现类。
ArrayDeque 类由数组支持,而 LinkedList 类由链表支持。
如果您使用Deque作为堆栈,则应该使用 ArrayDeque 作为 Deque 实现。
如果使用 Deque 作为FIFO队列, LinkedList
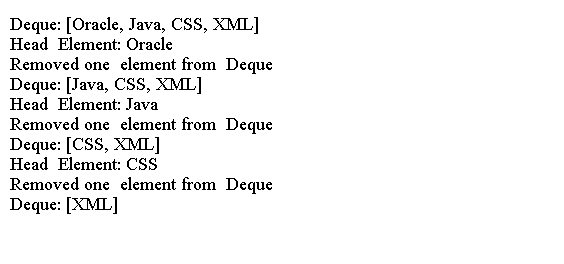
以下代码显示如何使用 Deque 作为FIFO队列。
import java.util.Deque;
import java.util.LinkedList;public class Main {public static void main(String[] args) {Deque<String> deque = new LinkedList<>();deque.addLast("Oracle");deque.offerLast("Java");deque.offerLast("CSS");deque.offerLast("XML");System.out.println("Deque: " + deque);// remove elements from the Deque until it is emptywhile (deque.peekFirst() != null) {System.out.println("Head  Element: " + deque.peekFirst());deque.removeFirst();System.out.println("Removed one  element from  Deque");System.out.println("Deque: " + deque);}// the Deque is empty. Try to call its peekFirst(),// getFirst(), pollFirst() and removeFirst() methodsSystem.out.println("deque.isEmpty(): " + deque.isEmpty());System.out.println("deque.peekFirst(): " + deque.peekFirst());System.out.println("deque.pollFirst(): " + deque.pollFirst());String str = deque.getFirst();System.out.println("deque.getFirst(): " + str);str = deque.removeFirst();System.out.println("deque.removeFirst(): " + str);}
}
上面的代码生成以下结果。
例子
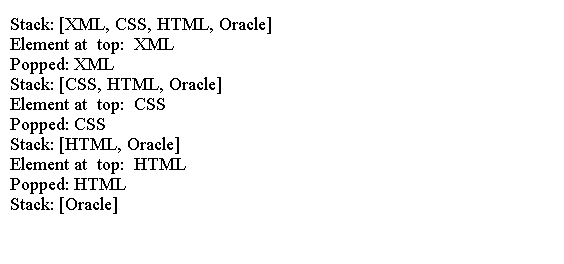
以下代码显示如何使用Deque作为堆栈(或LIFO队列)。
import java.util.ArrayDeque;
import java.util.Deque;public class Main {public static void main(String[] args) {// Create a Deque and use it as stackDeque<String> deque = new ArrayDeque<>();deque.push("Oracle");deque.push("HTML");deque.push("CSS");deque.push("XML");System.out.println("Stack: " + deque);// remove all elements from the Dequewhile (deque.peek() != null) {System.out.println("Element at  top:  " + deque.peek());System.out.println("Popped: " + deque.pop());System.out.println("Stack: " + deque);}System.out.println("Stack is  empty:  " + deque.isEmpty());}
}
上面的代码生成以下结果。
Java 特殊队列
Java集合教程 - Java特殊队列
阻塞队列
阻塞队列通过添加两组方法来扩展队列:
- 一组方法无限期地阻塞
- 另一组方法允许您指定要阻止的时间段。
BlockingQueue 接口的实例表示阻塞队列。 BlockingQueue 接口继承自 Queue 接口。
put()和 offer()方法在阻塞队列的尾部添加一个元素。如果阻塞队列已满,则put()方法将无限期阻塞,直到队列中的空间可用。offer()方法允许您指定等待空间可用的时间段。 如果指定的元素添加成功,则返回true; 否则为假。
take()和poll()方法检索和删除阻塞队列的头。如果阻塞队列为空,take()方法将无限期阻塞。poll()方法允许您指定在阻塞队列为空时要等待的时间段; 如果在元素可用之前过去了指定的时间,则返回null。
来自 BlockingQueue 中 Queue 接口的方法就像使用 Queue 。
BlockingQueue 被设计为线程安全的并且可以使用在生产者/消费者的情况下。
阻塞队列不允许空元素和可以是有界的或无界的。
BlockingQueue 中的 remainingCapacity()返回可以添加到阻止队列中而不阻塞的元素数。
BlockingQueue 可以控制多个线程被阻塞时的公平性。 如果阻塞队列是公平的,它可以选择最长的等待线程来执行操作。如果阻塞队列不公平,则不指定选择的顺序。
BlockingQueue 接口及其所有实现类都在 java.util.concurrent 包中。 以下是 BlockingQueue 接口的实现类:
由数组支持的 ArrayBlockingQueue 是 BlockingQueue 的有界实现类。 我们可以在其构造函数中指定阻塞队列的公平性。 默认情况下,它不公平。
LinkedBlockingQueue 可以用作有界或无界阻塞队列。 它不允许为阻塞队列指定公平规则。
PriorityBlockingQueue 是 BlockingQueue 的无界实现类。 它的工作方式与 PriortyQueue 相同,用于排序阻塞队列中的元素,并将阻塞特性添加到 PriorityQueue 中。
SynchronousQueue 实现 BlockingQueue ,没有任何容量。 put操作等待take操作以获取元素。 它可以在两个线程之间进行握手,并在两个线程之间交换对象。 它的isEmpty()方法总是返回true。
DelayQueue是BlockingQueue的无界实现类。它保持一个元素,直到该元素经过指定的延迟。 如果有超过一个元素的延迟已经过去,那么其延迟最早传递的元素将被放置在队列的头部。
例子
以下代码显示了如何在生产者/消费者应用程序中使用阻塞队列。
import java.util.UUID;
import java.util.concurrent.ArrayBlockingQueue;
import java.util.concurrent.BlockingQueue;class BQProducer extends Thread {private final BlockingQueue<String> queue;private final String name;public BQProducer(BlockingQueue<String> queue, String name) {this.queue = queue;this.name = name;}@Overridepublic void run() {while (true) {try {this.queue.put(UUID.randomUUID().toString());Thread.sleep(4000);}catch (InterruptedException e) {e.printStackTrace();break;}}}
}
class BQConsumer extends Thread {private final BlockingQueue<String> queue;private final String name;public BQConsumer(BlockingQueue<String> queue, String name) {this.queue = queue;this.name = name;}@Overridepublic void run() {while (true) {try {String str = this.queue.take();System.out.println(name + "  took: " + str);Thread.sleep(3000);} catch (InterruptedException e) {e.printStackTrace();break;}}}
}public class Main {public static void main(String[] args) {int capacity = 5;boolean fair = true;BlockingQueue<String> queue = new ArrayBlockingQueue<>(capacity, fair);new BQProducer(queue, "Producer1").start();new BQProducer(queue, "Producer2").start();new BQProducer(queue, "Producer3").start();new BQConsumer(queue, "Consumer1").start();new BQConsumer(queue, "Consumer2").start();}
}
上面的代码生成以下结果。

延迟队列
DelayQueue 实现 BlockingQueue 接口。 DelayQueue 中的元素必须保留一定的时间。
DelayQueue 使用一个名为 Delayed 的接口来获取延迟时间。
该接口在java.util.concurrent包中。 其声明如下:
public interface  Delayed  extends Comparable<Delayed>  {long  getDelay(TimeUnit timeUnit);
}
它扩展了 Comparable 接口,它的 compareTo()方法接受一个Delayed对象。
DelayQueue 调用每个元素的 getDelay()方法来获取元素必须保留多长时间。 DelayQueue 将传递 TimeUnit 到此方法。
当 getDelay()方法返回一个零或一个负数时,是元素离开队列的时间。
队列通过调用元素的 compareTo()方法确定要弹出的那个。 此方法确定要从队列中删除的过期元素的优先级。
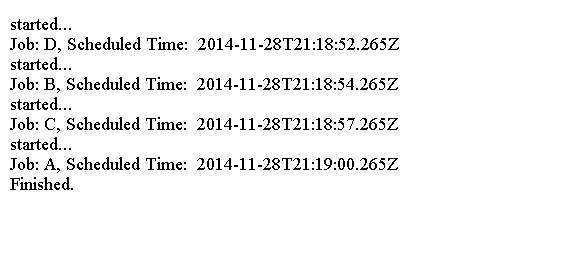
以下代码显示了如何使用DelayQueue。
import static java.time.temporal.ChronoUnit.MILLIS;
import static java.util.concurrent.TimeUnit.MILLISECONDS;import java.time.Instant;
import java.util.concurrent.BlockingQueue;
import java.util.concurrent.DelayQueue;
import java.util.concurrent.Delayed;
import java.util.concurrent.TimeUnit;class DelayedJob implements Delayed {private Instant scheduledTime;String jobName;public DelayedJob(String jobName, Instant scheduledTime) {this.scheduledTime = scheduledTime;this.jobName = jobName;}@Overridepublic long getDelay(TimeUnit unit) {long delay = MILLIS.between(Instant.now(), scheduledTime);long returnValue = unit.convert(delay, MILLISECONDS);return returnValue;}@Overridepublic int compareTo(Delayed job) {long currentJobDelay = this.getDelay(MILLISECONDS);long jobDelay = job.getDelay(MILLISECONDS);int diff = 0;if (currentJobDelay > jobDelay) {diff = 1;} else if (currentJobDelay < jobDelay) {diff = -1;}return diff;}@Overridepublic String toString() {String str = this.jobName + ", " + "Scheduled Time:  "+ this.scheduledTime;return str;}
}
public class Main {public static void main(String[] args) throws InterruptedException {BlockingQueue<DelayedJob> queue = new DelayQueue<>();Instant now = Instant.now();queue.put(new DelayedJob("A", now.plusSeconds(9)));queue.put(new DelayedJob("B", now.plusSeconds(3)));queue.put(new DelayedJob("C", now.plusSeconds(6)));queue.put(new DelayedJob("D", now.plusSeconds(1)));while (queue.size() > 0) {System.out.println("started...");DelayedJob job = queue.take();System.out.println("Job: " + job);}System.out.println("Finished.");}
}
上面的代码生成以下结果。
传输队列
传输队列扩展阻塞队列。
生产者使用 TransferQueue 的 transfer(E element)方法将元素传递给消费者。
当生产者调用传递(E元素)方法时,它等待直到消费者获取其元素。 tryTransfer()方法提供了该方法的非阻塞和超时版本。
getWaitingConsumerCount()方法返回等待消费者的数量。
如果有一个等待消费者, hasWaitingConsumer()方法返回true; 否则,返回false。 LinkedTransferQueue 是 TransferQueue 接口的实现类。 它提供了一个无界的 TransferQueue 。
以下代码显示如何使用 TransferQueue 。
import java.util.concurrent.LinkedTransferQueue;
import java.util.concurrent.TransferQueue;
import java.util.concurrent.atomic.AtomicInteger;class TQProducer extends Thread {private String name;private TransferQueue<Integer> tQueue;private AtomicInteger sequence;public TQProducer(String name, TransferQueue<Integer> tQueue,AtomicInteger sequence) {this.name = name;this.tQueue = tQueue;this.sequence = sequence;}@Overridepublic void run() {while (true) {try {Thread.sleep(4000);int nextNum = this.sequence.incrementAndGet();if (nextNum % 2 == 0) {System.out.format("%s:  Enqueuing: %d%n", name, nextNum);tQueue.put(nextNum); // Enqueue} else {System.out.format("%s: Handing  off: %d%n", name, nextNum);System.out.format("%s: has  a  waiting  consumer: %b%n", name,tQueue.hasWaitingConsumer());tQueue.transfer(nextNum); // A hand off}} catch (InterruptedException e) {e.printStackTrace();}}}
}class TQConsumer extends Thread {private final String name;private final TransferQueue<Integer> tQueue;public TQConsumer(String name, TransferQueue<Integer> tQueue) {this.name = name;this.tQueue = tQueue;}@Overridepublic void run() {while (true) {try {Thread.sleep(3000);int item = tQueue.take();System.out.format("%s removed:  %d%n", name, item);}catch (InterruptedException e) {e.printStackTrace();}}}
}public class Main {public static void main(String[] args) {final TransferQueue<Integer> tQueue = new LinkedTransferQueue<>();final AtomicInteger sequence = new AtomicInteger();for (int i = 0; i < 5; i++) {try {tQueue.put(sequence.incrementAndGet());System.out.println("Initial queue: " + tQueue);new TQProducer("Producer-1", tQueue, sequence).start();new TQConsumer("Consumer-1", tQueue).start();} catch (InterruptedException e) {e.printStackTrace();}}}
}
上面的代码生成以下结果。


