版权声明:本文为博主原创文章,转载请在显著位置标明本文出处以及作者网名,未经作者允许不得用于商业目的。
EmguCV学习笔记目录 Vb.net
EmguCV学习笔记目录 C#
笔者的博客网址:VB.Net-CSDN博客
教程相关说明以及如何获得pdf教程和代码(博客上的教程内容会和pdf教程一致,教程中也会包含所有代码),请移步:EmguCV学习笔记
2.4 Image类
Image类在EmguCV中实际是Image(Of TColor,Tdepth)类,本教程中简称Image类。其中:
- Tcolor:图像像素使用的颜色空间,可以使用Bgr、Hsv等。(关于颜色空间的介绍请参看2.1.1节《颜色空间》)
- Tdepth:图像深度,即像素的位数。例如:Byte、Int16、Int32等,大多数情况都是使用的Byte。
Image类是EmguCV中最基本的图像类,提供了各种图像处理方法,如图像裁剪、缩放、旋转等。
常用属性:
- Mat:对应的Mat矩阵。
- ROI:即region of interest(感兴趣的区域),后面会讲用法,如果需要清空ROI, 那么将它设置为Rectangle.Empty。
- IsROISet:返回是否设置了ROI。
- NumberOfChannels:图像包含的通道数。
2.4.1 构造函数
Image类常用构造函数:
Public Sub New (fileName As String)
实际使用时候的声明如:
Dim img As New Image(Of Bgr, Byte)("C:\learnEmgucv\lena.jpg")
参数:
- fileName: 文件路径。
注意:由于使用的是Bgr,表示三个通道数据,每个通道的大小是1个Byte,也就是保存数据从0-255。如果是Image (Of Gray, Byte),那么就只有一个通道。
【代码位置:frmChapter2_3】Button1_Click
以下代码演示了使用不同的颜色空间,显示出来的图像:
'构造函数
Private Sub Button1_Click(sender As Object, e As EventArgs) Handles Button1.Click
'使用Bgr颜色空间
Dim img1 As New Image(Of Bgr, Byte)("C:\learnEmgucv\lena.jpg")
ImageBox1.Image = img1
'使用Hsv颜色空间
Dim img2 As New Image(Of Hsv, Byte)("C:\learnEmgucv\lena.jpg")
ImageBox2.Image = img2
End Sub
运行后如下图所示:

图2-55 不同颜色空间显示出的图片
在下面的代码中用到这两个构造函数:
Public Sub New(size As System.Drawing.Size)
Public Sub New(width As Integer, height As Integer, value As TColor)
【代码位置:frmChapter2_3】Button2_Click
'构造函数
Private Sub Button2_Click(sender As Object, e As EventArgs) Handles Button2.Click
Dim img1 As New Image(Of Bgr, Byte)(New Size(200, 200))
ImageBox1.Image = img1
Dim img2 As New Image(Of Bgr, Byte)(img1.Size.Width, img1.Size.Height, New Bgr(255, 0, 0))
ImageBox2.Image = img2
End Sub
上述代码中,img1设置为了200*200大小,由于没有值,那么默认是0,也就显示为黑色。而img2同img1的宽度和高度,并直接设置颜色为蓝色。
运行后如下图所示:

图2-56 显示黑色和蓝色图像
2.4.2 设置图像颜色
通过SetZero和SetValue可以设置图像整体颜色。其中SetZero将图像所有像素设置为0,即黑色;SetValue可以设置指定的颜色。
【代码位置:frmChapter2_3】Button3_Click
'SetZero和SetValue
Private Sub Button3_Click(sender As Object, e As EventArgs) Handles Button3.Click
Dim img1 As New Image(Of Bgr, Byte)(New Size(200, 200))
'所有像素设置为0
img1.SetZero()
ImageBox1.Image = img1
Dim img2 As New Image(Of Bgr, Byte)(New Size(200, 200))
'所有像素设置为红色
img2.SetValue(New Bgr(0, 0, 255))
ImageBox2.Image = img2
End Sub
运行后如下图所示:

图2-57 显示黑色和红色图像
另外还可以通过像素点在行、列方向索引的方式,设置具体某个像素点颜色。需要注意的是,这个方法使用的颜色,和Image的Tcolor要一致。
【代码位置:frmChapter2_3】Button4_Click
'设置像素点颜色
Private Sub Button4_Click(sender As Object, e As EventArgs) Handles Button4.Click
'使用Bgr颜色空间
Dim img As New Image(Of Bgr, Byte)("C:\learnEmgucv\lena.jpg")
ImageBox1.Image = img
For i As Integer = 100 To 200
For j As Integer = 200 To 300
'img(行,列)=Bgr
img(j, i) = New Bgr(122, 122, 122)
Next
Next
ImageBox2.Image = img
End Sub
运行后如下图所示:

图2-58 在图像上生成一个灰色的方框
与设置像素点颜色相反,读取图片某个位置像素的颜色可以使用以下代码:
Bgr=img(行,列)
【代码位置:frmChapter2_3】Button5_Click
'读取像素颜色
Private Sub Button5_Click(sender As Object, e As EventArgs) Handles Button5.Click
Dim img As New Image(Of Bgr, Byte)("C:\learnEmgucv\lena.jpg")
ImageBox1.Image = img
Dim imgDst As New Image(Of Bgr, Byte)(New Size(120, 120))
Dim c As Bgr
'读取源图像坐标(0,0)像素的颜色
c = img(0, 0)
'设置图像颜色
imgDst.SetValue(c)
ImageBox2.Image = imgDst
End Sub
运行后如下图所示:

图2-59 获取源图像某个像素的颜色
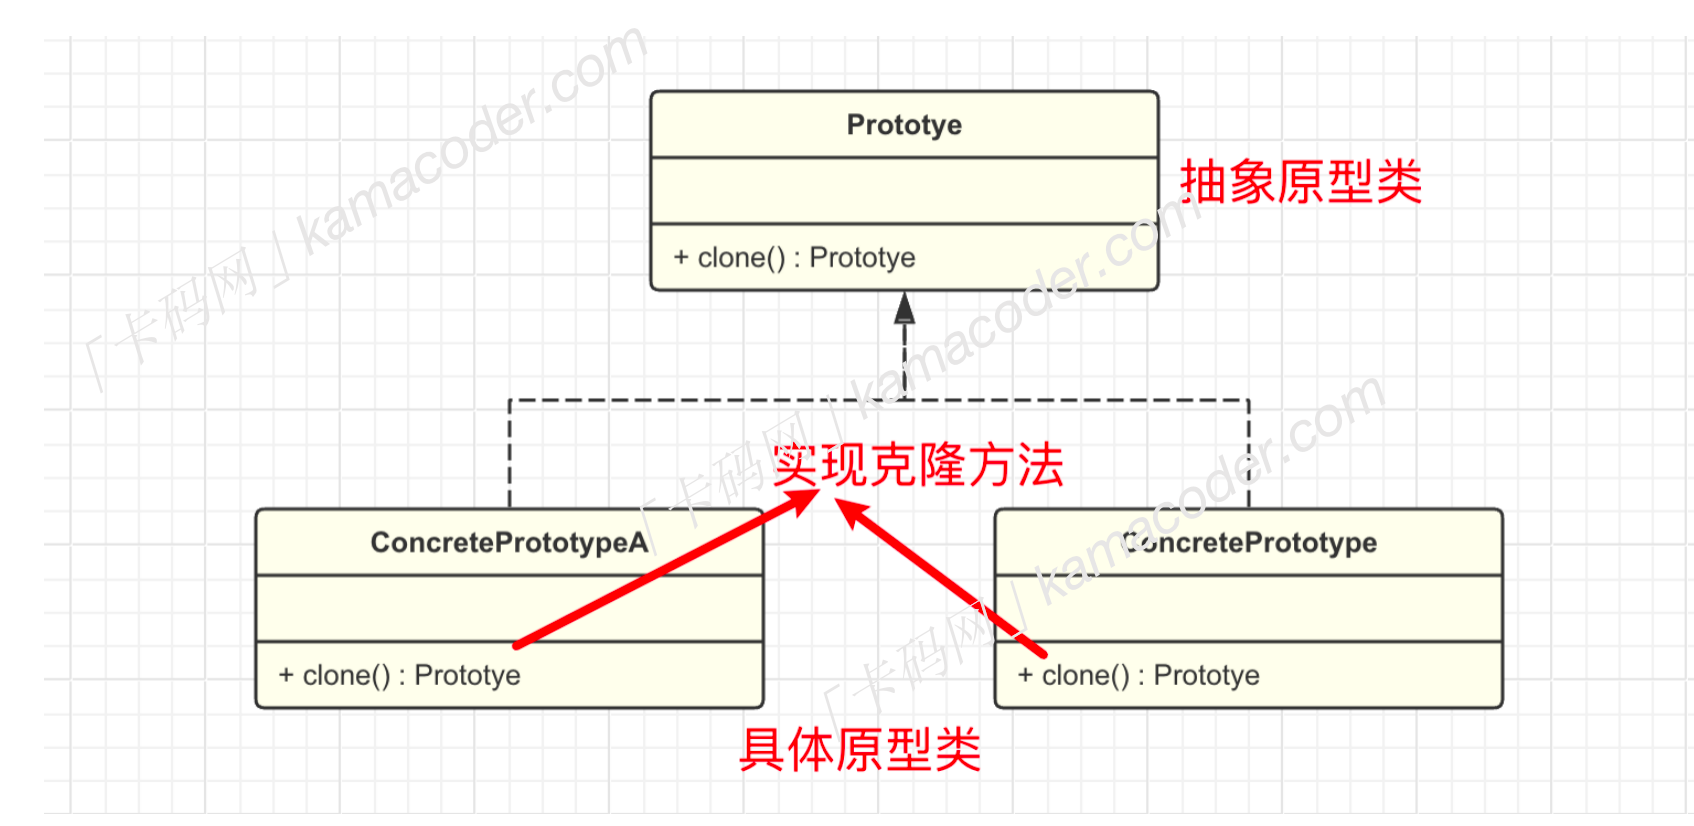
2.4.3 图像的副本
Image 类中的 Copy 和 Clone 方法都可以用于创建图像的副本,但它们之间存在一些区别:如果源图像设置了ROI区域,Clone 方法会将源图像完全复制,包括ROI区域;而Copy方法仅复制源图像的ROI区域。
【代码位置:frmChapter2_3】Button6_Click
'Copy与Clone:未设置ROI
Private Sub Button5_Click(sender As Object, e As EventArgs) Handles Button5.Click
Dim img As New Image(Of Bgr, Byte)("C:\learnEmgucv\lena.jpg")
Dim imgClone As Image(Of Bgr, Byte)
imgClone = img.Clone
ImageBox1.Image = imgClone
Dim imgCopy As Image(Of Bgr, Byte)
imgCopy = img.Copy
ImageBox2.Image = imgCopy
End Sub
运行后如下图所示:

图2-60 未设置ROI时,Clone和Copy显示相同
【代码位置:frmChapter2_3】Button7_Click
'Copy与Clone:设置ROI
Private Sub Button6_Click(sender As Object, e As EventArgs) Handles Button6.Click
Dim img As New Image(Of Bgr, Byte)("C:\learnEmgucv\lena.jpg")
img.ROI = New Rectangle(100, 100, 200, 200)
Dim imgClone As Image(Of Bgr, Byte)
imgClone = img.Clone
'取消ROI区域
imgClone.ROI = Rectangle.Empty
'实际显示了源图像的全部区域
ImageBox1.Image = imgClone
Dim imgCopy As Image(Of Bgr, Byte)
imgCopy = img.Copy
'取消ROI区域,不影响已经拷贝的副本
img.ROI = Rectangle.Empty
'实际只显示了源图像的(100, 100, 200, 200)区域
ImageBox2.Image = imgCopy
End Sub
运行后如下图所示:

图2-61 设置ROI后,Clone显示同源图,Copy只显示源图的ROI部分
2.4.4 图像的运算
2.4.4.1 加法
Image类提供了Add和AddWeighted方法,用于对两个图像进行加法运算。这两个方法的作用类似,都是将两个图像的像素值相加,并将结果存储到一个新的图像中。不同之处在于,AddWeighted方法还可以对两个图像进行加权求和,并可以指定权重系数。
需要注意的是,要使用Add和AddWeighted方法对两个图像进行加法运算,两个输入图像的大小、颜色空间和深度类型必须相同。
【代码位置:frmChapter2_3】Button8_Click
'加法:Add
Private Sub Button8_Click(sender As Object, e As EventArgs) Handles Button8.Click
Dim imgsrc As New Image(Of Bgr, Byte)("C:\learnEmgucv\lena.jpg")
'直接加上某个颜色
Dim img1 As New Image(Of Bgr, Byte)(imgsrc.Size)
img1 = imgsrc.Add(New Bgr(40, 40, 40))
ImageBox1.Image = img1
Dim img2 As New Image(Of Bgr, Byte)(imgsrc.Size)
img2.SetValue(New Bgr(255, 0, 0))
For i As Integer = 100 To 200
For j As Integer = 200 To 300
img2(j, i) = New Bgr(122, 122, 122)
Next
Next
Dim img3 As New Image(Of Bgr, Byte)(imgsrc.Size)
'Add
img3 = imgsrc.Add(img2)
ImageBox2.Image = img3
End Sub
运行后如下图所示:

图2-62 Add方法
AddWeighted方法的语法如下:
Public Function AddWeighted(img2 As Emgu.CV.Image(Of TColor, TDepth), alpha As Double, beta As Double, gamma As Double) As Emgu.CV.Image(Of TColor, TDepth)
其中:
使用AddWeighted方法后:
输出图像像素颜色=第一个输入图像像素颜色* alpha +第二个输入图像像素颜色* beta + gamma
【代码位置:frmChapter2_3】Button9_Click
'AddWeighted
Private Sub Button9_Click(sender As Object, e As EventArgs) Handles Button9.Click
Dim img1 As New Image(Of Bgr, Byte)("C:\learnEmgucv\lena.jpg")
ImageBox1.Image = img1
'叠加的图片必须同一个尺寸和同一类型
Dim img2 As New Image(Of Bgr, Byte)("C:\learnEmgucv\lena_fillwhite.jpg")
'img1的权重
Dim alpha As Double = 0.3
'img2的权重
Dim beta As Double = 0.5
'偏移量
Dim gamma As Double = -40
Dim img3 As New Image(Of Bgr, Byte)(img1.Size)
'AddWeighted
img3 = img1.AddWeighted(img2, alpha, beta, gamma)
ImageBox2.Image = img3
End Sub
运行后如下图所示:

图2-63 AddWeighted方法
2.4.4.2 减法
【代码位置:frmChapter2_3】Button10_Click
'减法:AbsDiff 1
Private Sub Button10_Click(sender As Object, e As EventArgs) Handles Button10.Click
Dim imgsrc As New Image(Of Bgr, Byte)("C:\learnEmgucv\lena.jpg")
'====以下代码减去某个颜色值
Dim img1 As Image(Of Bgr, Byte)
img1 = imgsrc.AbsDiff(New Bgr(50, 50, 50))
ImageBox1.Image = img1
'====逆反(底片)效果
Dim img2 As New Image(Of Bgr, Byte)(imgsrc.Size)
img2.SetValue(New Bgr(255, 255, 255))
Dim img3 As Image(Of Bgr, Byte)
img3 = imgsrc.AbsDiff(img2)
ImageBox2.Image = img3
End Sub
运行后如下图所示:

图2-64 AbsDiff方法
【代码位置:frmChapter2_3】Button11_Click
'减法:AbsDiff 2 扣出人像
Private Sub Button11_Click(sender As Object, e As EventArgs) Handles Button11.Click
Dim imgsrc As New Image(Of Bgr, Byte)("C:\learnEmgucv\lena.jpg")
ImageBox1.Image = imgsrc
'载入的图片已经将人像部分涂黑
Dim img1 As New Image(Of Bgr, Byte)("C:\learnEmgucv\lena_fillblack.jpg")
Dim img2 As Image(Of Bgr, Byte)
img2 = imgsrc.AbsDiff(img1)
'更换图片顺序做减法也一样:
'img2 = img1.AbsDiff(imgsrc)
ImageBox2.Image = img2
End Sub
运行后如下图所示:

图2-65 使用AbsDiff进行抠图
2.4.4.3 乘法
【代码位置:frmChapter2_3】Button12_Click
'乘法:Mul
Private Sub Button12_Click(sender As Object, e As EventArgs) Handles Button12.Click
Dim img As New Image(Of Bgr, Byte)("C:\learnEmgucv\lena.jpg")
ImageBox1.Image = img
Dim img2 As New Image(Of Bgr, Byte)(img.Size)
img2 = img.Mul(2)
ImageBox2.Image = img2
End Sub
运行后如下图所示:

图2-66 乘法
2.4.4.4 Xor和And运算
【代码位置:frmChapter2_3】Button13_Click
'Xor和And运算1:使用彩色图片
Private Sub Button13_Click(sender As Object, e As EventArgs) Handles Button13.Click
Dim imgsrc1 As New Image(Of Bgr, Byte)("C:\learnEmgucv\lena.jpg")
Dim imgsrc2 As New Image(Of Bgr, Byte)("C:\learnEmgucv\lena_fillblack.jpg")
Dim imgout1 As New Image(Of Bgr, Byte)(imgsrc1.Size)
'Xor运算
imgout1 = imgsrc1.Xor(imgsrc2)
ImageBox1.Image = imgout1
Dim imgout2 As New Image(Of Bgr, Byte)(imgsrc1.Size)
'And运算
imgout2 = imgsrc1.And(imgsrc2)
ImageBox2.Image = imgout2
End Sub
运行后如下图所示:

图2-67 彩色图片的Xor和And运算
【代码位置:frmChapter2_3】Button14_Click
'Xor和And运算2:使用灰度图片
Private Sub Button14_Click(sender As Object, e As EventArgs) Handles Button14.Click
Dim imgsrc1 As New Image(Of Gray, Byte)("C:\learnEmgucv\lena.jpg")
Dim imgsrc2 As New Image(Of Gray, Byte)("C:\learnEmgucv\lena_fillblack.jpg")
Dim imgout1 As New Image(Of Gray, Byte)(imgsrc1.Size)
imgout1 = imgsrc1.Xor(imgsrc2)
ImageBox1.Image = imgout1
Dim imgout2 As New Image(Of Gray, Byte)(imgsrc1.Size)
imgout2 = imgsrc1.And(imgsrc2)
ImageBox2.Image = imgout2
End Sub
运行后如下图所示:

图2-68 灰度图片的Xor和And运算
2.4.5 常用方法
Image类提供的图像处理方法和Mat类的方法类似,请参看5.3节【Mat类】部分;此外,还有一些方法和后面第5章【图像处理】所讲述的方法类似,请参考第5章的讲解。
2.4.5.1 Convert
Convert方法将一个图像转换为其他颜色空间的图像,例如将BGR图像转换为灰度图像、将灰度图像转换为彩色图像等。
【代码位置:frmChapter2_3】Button15_Click
'颜色空间转换
Private Sub Button15_Click(sender As Object, e As EventArgs) Handles Button15.Click
Dim img As New Image(Of Bgr, Byte)("C:\learnEmgucv\lena.jpg")
Dim img1 As Image(Of Rgb, Byte)
'Bgr转Rgb
img1 = img.Convert(Of Rgb, Byte)
ImageBox1.Image = img1
Dim img2 As Image(Of Gray, Byte)
'Bgr转Gray
img2 = img.Convert(Of Gray, Byte)
ImageBox2.Image = img2
End Sub
运行后如下图所示:

图2-69 图像颜色空间转换
2.4.5.2 ThresholdBinary
Thresholdbinary方法,用于对图像进行二值化处理。二值化是一种常用的图像处理技术,可以将图像中的像素点转换为只有两种值(一般是黑和白,对应像素值为0和255)的形式,以便于后续处理。
thresholdbinary方法的语法如下:
Public Function ThresholdBinary(threshold As TColor, maxValue As TColor) As Emgu.CV.Image(Of TColor, TDepth)
参数说明:
threshold:表示阈值,此参数决定了二值化的结果,如果像素点的灰度值大于等于阈值,则将其设为最大值,否则将其设为0。如果是处理多通道图像,那么图像的每个通道将分别与阈值做对比。
maxVal:表示最大值,默认为255。
【代码位置:frmChapter2_3】Button16_Click
'二值化1:ThresholdBinary
Private Sub Button16_Click(sender As Object, e As EventArgs) Handles Button16.Click
Dim img As New Image(Of Bgr, Byte)("C:\learnEmgucv\lena.jpg")
ImageBox1.Image = img
Dim img2 As New Image(Of Bgr, Byte)(img.Size)
img2 = img.ThresholdBinary(New Bgr(120, 120, 120), New Bgr(255, 255, 255))
ImageBox2.Image = img2
End Sub
运行后如下图所示:

图2-70 彩色图像二值化
2.4.5.2 ThresholdBinaryInv
ThresholdBinaryInv与Thresholdbinary相反,如果像素点的灰度值小于阈值,则将其设为最大值,否则将其设为0。如果是处理多通道图像,那么图像的每个通道将分别与阈值做对比。
【代码位置:frmChapter2_3】Button17_Click
'二值化2:ThresholdBinaryInv
Private Sub Button17_Click(sender As Object, e As EventArgs) Handles Button17.Click
Dim imgsrc As New Image(Of Gray, Byte)("C:\learnEmgucv\lena.jpg")
Dim img1 As New Image(Of Gray, Byte)(imgsrc.Size)
img1 = imgsrc.ThresholdBinary(New Gray(120), New Gray(255))
ImageBox1.Image = img1
Dim img2 As New Image(Of Gray, Byte)(imgsrc.Size)
img2 = imgsrc.ThresholdBinaryInv(New Gray(120), New Gray(255))
ImageBox2.Image = img2
End Sub
运行后如下图所示,可以看到两个图像黑白是相反的:

图2-71 ThresholdBinaryInv与Thresholdbinary的对比
Image类下面还有几个Threshold~方法,这里不再累述,后面第5章,还要讲到。
2.4.5.3 Canny
Canny方法用于进行Canny边缘检测。Canny边缘检测是一种非常常用的图像处理算法,它可以检测出图像中的边缘,并将它们以二值图像的形式输出。
Canny方法原型如下:
Public Function Canny(thresh As Double, threshLinking As Double) As Emgu.CV.Image(Of Emgu.CV.Structure.Gray, Byte)
- thresh:一个Double类型的值,表示高阈值。
- threshLinking:一个Double类型的值,表示低阈值。
【代码位置:frmChapter2_3】Button18_Click
'边缘检测:canny
Private Sub Button18_Click(sender As Object, e As EventArgs) Handles Button18.Click
'载入彩色图像再进行Canny
Dim imgsrc1 As New Image(Of Bgr, Byte)("C:\learnEmgucv\lena.jpg")
Dim img1 As New Image(Of Gray, Byte)(imgsrc1.Size)
img1 = imgsrc1.Canny(120, 0)
ImageBox1.Image = img1
'载入灰度图像再进行Canny
Dim imgsrc2 As New Image(Of Gray, Byte)("C:\learnEmgucv\lena.jpg")
Dim img2 As New Image(Of Gray, Byte)(imgsrc2.Size)
img2 = imgsrc2.Canny(120, 0)
ImageBox2.Image = img2
End Sub
运行后如下图所示,可以看到两种方式进行边缘检测结果不同:

2.4.5.4 SmoothBlur
SmoothBlur方法用于对图像进行模糊(也称为滤波)处理,以达到平滑图像的效果。模糊处理是一种常见的图像预处理方法,可以减少图像中的噪声,平滑图像的边缘和细节,同时也可以用于去除图像中的某些细节信息,以达到特定的目的。
SmoothBlur方法的原型为:
Public Function SmoothBlur(width As Integer, height As Integer) As Emgu.CV.Image(Of TColor, TDepth)
SmoothBlur方法将按照像素对width*height的区域进行求和,随后乘上1/(width*height)获得处理后的像素值。
【代码位置:frmChapter2_3】Button19_Click
'模糊:SmoothBlur
Private Sub Button19_Click(sender As Object, e As EventArgs) Handles Button19.Click
Dim img As New Image(Of Bgr, Byte)("C:\learnEmgucv\lena.jpg")
ImageBox1.Image = img
Dim img2 As New Image(Of Bgr, Byte)(img.Size)
img2 = img.SmoothBlur(3, 10)
ImageBox2.Image = img2
End Sub
运行后如下图所示:

图2-73 模糊
2.4.5.5 SmoothGaussian
Smoothgaussian方法用于对图像进行高斯模糊(滤波),可以用于去噪或者平滑图像。高斯滤波是一种线性平滑滤波器,它可以对图像进行平滑处理,同时保持图像的边缘信息不变。
Smoothgaussian方法的原型为:
Public Function SmoothGaussian(kernelWidth As Integer, kernelHeight As Integer, sigma1 As Double, sigma2 As Double) As Emgu.CV.Image(Of TColor, TDepth)
- kernelWidth和kernelHeight表示模糊核的宽度和高度,也称为模板的大小。
- sigmaX和sigmaY分别表示模糊核在X和Y方向上的标准差,决定了模糊程度。
【代码位置:frmChapter2_3】Button20_Click
'模糊:SmoothGaussian
Private Sub Button20_Click(sender As Object, e As EventArgs) Handles Button20.Click
Dim img As New Image(Of Bgr, Byte)("C:\learnEmgucv\lena.jpg")
ImageBox1.Image = img
Dim img2 As New Image(Of Bgr, Byte)(img.Size)
img2 = img.SmoothGaussian(5, 5, 15, 1.5)
ImageBox2.Image = img2
End Sub
运行后如下图所示:

图2-74 高斯模糊


![[数据集][目标检测]集装箱缺陷检测数据集VOC+YOLO格式4127张3类别](https://i-blog.csdnimg.cn/direct/88ef9ef0679a4468914c2a2ad44956d6.png)