采用k8s,而非minikube, 在3个centos系统的节点上安装fate集群。
集群配置信息
3节点配置信息如下图:

当时kubefate最新版是1.9.0,依赖的k8s和ingress-ngnix版本如下:
Recommended version of dependent software:
Kubernetes: v1.23.5
Ingress-nginx: v1.1.3
升级K8S到1.23.5
如果你的集群k8s版本高于1.19.0,可以直接跳过本步骤。k8s可升级,也可重新安装到该版本
卸载旧版Fate
如果你的集群未安装过Fate,跳过本步骤,我之前安装的版本步骤记录在:
https://blog.csdn.net/Acecai01/article/details/127979608
查看之前已安装的旧版fate,将其删除:
[root@harbor kubefate]# kubectl get ns
NAME                              STATUS        AGE
default                           Active        504d
fate-10000                        Active        459d
fate-9999                         Active        459d
fate-9998                         Active        459d
ingress-nginx                     Active        465d
.... 先切换到原版安装文件的目录(如/home/FATE_V180/kubefate),删除3个节点的Fate,先找到cluster id, 根据cluster id,用kubfate cluster delete删除:
[root@harbor kubefate]# kubefate cluster ls
UUID                                    NAME            NAMESPACE       REVISION        STATUS  CHART   ChartVERSION    AGE
5d57a5e4-abdc-4dbd-94be-3966940f36dd    fate-10000      fate-10000      1               Running fate    v1.8.0          7d22h
1c83526e-9c1e-4a7d-b364-40775544abcc    fate-9999       fate-9999       1               Running fate    v1.8.0          7d22h
2dc9eede-2c9b-4a27-a58a-96fd84edd31a    fate-9998       fate-9998       1               Running fate    v1.8.0          7d22h
[root@harbor kubefate]# kubefate cluster delete 5d57a5e4-abdc-4dbd-94be-3966940f36dd
create job Success, job id=bc3276bf-5a2a-425e-a4e5-4a831785736e
[root@harbor kubefate]# kubefate cluster delete 1c83526e-9c1e-4a7d-b364-40775544abcc
create job Success, job id=b36feca8-e575-4f03-998f-3264fdb541e6
[root@harbor kubefate]# kubefate cluster delete 2dc9eede-2c9b-4a27-a58a-96fd84edd31a
create job Success, job id=c50fcb1f-2632-487d-94dd-88beb7018eba然后用当时安装该命名空间fate-10000、fate-9999、fate-9998的yaml文件一一删除即可:
[root@harbor kubefate]# kubectl delete -f ./cluster.yaml
....
再删除:
[root@harbor kubefate]# kubectl delete -f ./rbac-config.yaml
.... 最后删除ingress-nginx:
[root@harbor kubefate]# kubectl apply -f ./deploy.yaml   # 这个文件是当时自己下载的,下载源参照我安装旧版的博客
....
v1.7.2 kate下载
链接: link
软件包:kubefate-k8s-v1.7.2.tar.gz
以下操作在Master节点上完成。
部署ingress-nginx
参考:https://blog.csdn.net/qq_41296573/article/details/125809696
以下deploy.yaml为部署ingress-nginx(1.1.3版本,当时最新1.5.0)的文件,可能需要翻墙才能下载:
https://raw.githubusercontent.com/kubernetes/ingress-nginx/controller-v1.1.3/deploy/static/provider/cloud/deploy.yaml
以上文件中有2个翻墙才能下载的镜像,将镜像改成国内的镜像(3处地方):
k8s.gcr.io/ingress-nginx/controller:v1.1.3@sha256:31f47c1e202b39fadecf822a9b76370bd4baed199a005b3e7d4d1455f4fd3fe2
改为:
registry.cn-hangzhou.aliyuncs.com/google_containers/nginx-ingress-controller:v1.1.3k8s.gcr.io/ingress-nginx/kube-webhook-certgen:v1.1.1@sha256:64d8c73dca984af206adf9d6d7e46aa550362b1d7a01f3a0a91b20cc67868660
改为:
registry.cn-hangzhou.aliyuncs.com/google_containers/kube-webhook-certgen:v1.1.1
deploy.yaml文件中的pod需要指定一个服务器进行部署,首先给服务器打上label(这个步骤是我后来补上的,打label的步骤被先前写到后面了,参照后面的“使用KubeFATE安装FATE–>为集群各节点添加label“的步骤进行),然后修改deploy.yaml文件中的内容,查询到三处包含 nodeSelector的属性,每处都加入如下内容:
...nodeSelector:type: node2 # 指定在被打上node2的服务器安装pod
然后部署ingress-nginx:
kubectl apply -f ./deploy.yaml
查看ingress-nginx是否成功:
[root@harbor kubefate]#  kubectl get  pods -n ingress-nginx -o wide
NAME                                        READY   STATUS      RESTARTS   AGE     IP            NODE         NOMINATED NODE   READINESS GATES
ingress-nginx-admission-create-zh96h        0/1     Completed   0          2d23h   10.244.1.26   gpu-51       <none>           <none>
ingress-nginx-admission-patch-hmgr5         0/1     Completed   1          2d23h   10.244.1.27   gpu-51       <none>           <none>
ingress-nginx-controller-6995ffb95b-m87gh   1/1     Running     0          2d18h   172.17.0.8    k8s-node02   <none>           <none>
可见ingress-nginx被安装到了k8s-node02节点,而不是master节点,这个是正常的(即便是在master操作,也会安装到别处)
输入如下命令,检查配置是否生效:
kubectl -n ingress-nginx get svc
NAME                                 TYPE           CLUSTER-IP    EXTERNAL-IP   PORT(S)                      AGE
ingress-nginx-controller             LoadBalancer   10.1.196.14   <pending>     80:30428/TCP,443:30338/TCP   16m
ingress-nginx-controller-admission   ClusterIP      10.1.32.33    <none>        443/TCP                      16m
可以看到ingress-nginx-controller的EXTERNAL-IP为pending状态,经查阅资料,借鉴如下博客:
链接: link
修改 service中ingress-nginx-controller的EXTERNAL-IP为k8s-node02节点的IP:
kubectl edit -n ingress-nginx service/ingress-nginx-controller
在大概如下位置添加externalIPs:
spec:allocateLoadBalancerNodePorts: trueclusterIP: 10.1.86.240clusterIPs:- 10.1.86.240externalIPs:- 10.6.17.106
再次查看,EXTERNAL-IP已经有了:
[root@harbor kubefate]# kubectl -n ingress-nginx get svc
NAME                                 TYPE           CLUSTER-IP    EXTERNAL-IP   PORT(S)                      AGE
ingress-nginx-controller             LoadBalancer   10.1.86.240   10.6.17.106   80:31872/TCP,443:32412/TCP   2d23h
ingress-nginx-controller-admission   ClusterIP      10.1.41.173   <none>        443/TCP                      2d23h
安装kubefate服务
创建目录
mkdir /home/FATE_V172
将kubefate-k8s-v1.7.2.tar.gz拷贝到新目录中解压
tar -zxvf kubefate-k8s-v1.7.2.tar.gz
解压后的目录,可见可执行文件KubeFATE,可以直接移动到path目录方便使用:
[root@harbor kubefate]# chmod +x ./kubefate && sudo mv ./kubefate /usr/bin
测试下kubefate命令是否可用:
[root@harbor kubefate]# kubefate version
* kubefate commandLine version=v1.4.4
* kubefate service connection error, resp.StatusCode=404, error: <?xml version="1.0" encoding="iso-8859-1"?>
<!DOCTYPE html PUBLIC "-//W3C//DTD XHTML 1.0 Transitional//EN""http://www.w3.org/TR/xhtml1/DTD/xhtml1-transitional.dtd">
<html xmlns="http://www.w3.org/1999/xhtml" xml:lang="en" lang="en"><head><title>404 - Not Found</title></head><body><h1>404 - Not Found</h1><script type="text/javascript" src="//wpc.75674.betacdn.net/0075674/www/ec_tpm_bcon.js"></script></body>
</html>
以上提示的问题算正常,后面会解决。
执行rbac-config.yaml–为 KubeFATE服务创建命名空间
[root@harbor kubefate]# kubectl apply -f ./rbac-config.yaml
因为近期Dockerhub调整了下载限制服务条例 Dockerhub latest limitation, 我建议使用国内网易云的镜像仓库代替官方Dockerhub
1、将kubefate.yaml内镜像federatedai/kubefate:v1.4.4改成hub.c.163.com/federatedai/kubefate:v1.4.3
2、sed 's/mariadb:10/hub.c.163.com\/federatedai\/mariadb:10/g' kubefate.yaml > kubefate_163.yaml
在kube-fate命名空间里部署KubeFATE服务,相关的yaml文件也已经准备在工作目录,直接使用kubectl apply:
[root@harbor kubefate]# kubectl apply -f ./kubefate_163.yaml
【注】如果你是删除了kubefate和ingress-ngnix重新执行到这一步,可能会发生一个错误,解决办法参考:https://blog.csdn.net/qq_39218530/article/details/115372879
稍等一会,大概10几秒后查看下KubeFATE服务是否部署好,如果看到kubefate工具的两pod中kubefate没起来:

如上图,原因很可能是因为kubefate和mariadb被部署到了两个不同的节点,导致kubefate无法连上mariadb,可以将前面步骤的rbac-config和kubefate_163安装全部删除重来,运气好的话,这两pod会被部署在同一节点,这样kubefate就不会有问题,如下图所示:

当然靠运气安装会比较耗时,可以参考如下博客将pod安装到指定节点:
http://t.zoukankan.com/wucaiyun1-p-11698320.html
如果返回类似下面的信息(特别是pod的STATUS显示的是Running状态),则KubeFATE的服务就已经部署好并正常运行:
[root@harbor kubefate]# kubectl get all,ingress -n kube-fate
NAME                            READY   STATUS                   RESTARTS   AGE
pod/kubefate-5bf485957b-tznw6   1/1     Running                  0          2d20h
pod/mariadb-574d4679f8-f5wc2    1/1     Running                  0          2d20hNAME               TYPE        CLUSTER-IP     EXTERNAL-IP   PORT(S)          AGE
service/kubefate   NodePort    10.1.151.34    <none>        8080:30053/TCP   3d1h
service/mariadb    ClusterIP   10.1.150.151   <none>        3306/TCP         3d1hNAME                       READY   UP-TO-DATE   AVAILABLE   AGE
deployment.apps/kubefate   1/1     1            1           3d1h
deployment.apps/mariadb    1/1     1            1           3d1hNAME                                  DESIRED   CURRENT   READY   AGE
replicaset.apps/kubefate-5bf485957b   1         1         1       3d1h
replicaset.apps/mariadb-574d4679f8    1         1         1       3d1hNAME                                 CLASS   HOSTS         ADDRESS       PORTS   AGE
ingress.networking.k8s.io/kubefate   nginx   example.com   10.6.17.106   80      3d1h
.添加example.com到hosts文件
因为我们要用 example.com 域名来访问KubeFATE服务(该域名在ingress中定义,有需要可自行修改),需要在运行kubefate命令行所在的机器配置hosts文件(注意不是Kubernetes所在的机器,而是ingress-ngnix所在的机器,前面安装ingress-ngnix部分有讲)。 另外下文中部署的FATE集群默认也是使用example.com作为默认域名, 如果网络环境有域名解析服务,可配置example.com域名指向master机器的IP地址,这样就不用配置hosts文件。(IP地址一定要换成你自己的)
sudo -- sh -c "echo \"10.6.17.106 example.com\" >> /etc/hosts"
[root@harbor kubefate]# ping example.com
PING example.com (10.6.17.106) 56(84) bytes of data.
64 bytes from k8s-master (10.6.17.106): icmp_seq=1 ttl=64 time=0.041 ms
64 bytes from k8s-master (10.6.17.106): icmp_seq=2 ttl=64 time=0.054 ms
64 bytes from k8s-master (10.6.17.106): icmp_seq=3 ttl=64 time=0.050 ms
^C
--- example.com ping statistics ---
3 packets transmitted, 3 received, 0% packet loss, time 2000ms
rtt min/avg/max/mdev = 0.041/0.048/0.054/0.007 ms
使用vi修改config.yaml的内容。只需要修改serviceurl: example.com:32303加上映射的端口,如果忘记了重新查看一下80端口对应的映射端口:
[root@harbor kubefate]#  kubectl -n ingress-nginx get svc
NAME                                 TYPE           CLUSTER-IP     EXTERNAL-IP   PORT(S)                      AGE
ingress-nginx-controller             LoadBalancer   10.1.209.99    10.6.17.106   80:32303/TCP,443:31648/TCP   43h
ingress-nginx-controller-admission   ClusterIP      10.1.241.232   <none>        443/TCP                      43h
修改完成查看一下,显示如下:
[root@harbor kubefate]# kubefate version
* kubefate commandLine version=v1.4.3
* kubefate service version=v1.4.3
使用KubeFATE安装FATE
为集群各节点添加label
声明部分(无需执行)
当同命名空间的pod被分配安装到不同节点时,pod之间无法互通,pod部署会失败,比如如下图所示,python和mysql被部署到不同的节点了,python一直无法连上mysql,所以python一直无法成功部署:
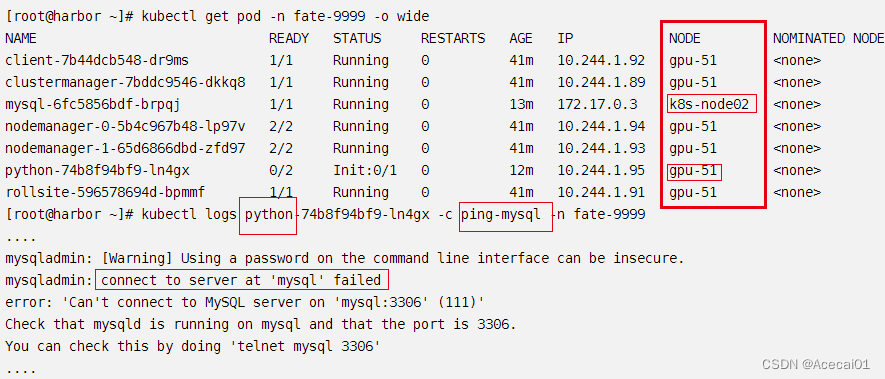
根据以上图片可以看出同个命名空间的pod没有被部署到相同节点之外,也可知道pod的部署是没有受到控制的,master调度部署pod的情况可能不会如你所愿(本人是希望3个命名空间的pod被分别部署到3个不同的节点),所以本人推测pod的部署可以指定节点,后面阅读官方的配置参数,确有选定节点配置pod的方法。
执行部分
为了将不同命名空间的pod部署到指定的节点,需要先将集群的各个节点打上label
[root@harbor kubefate]# kubectl get node   # 先查看集群节点的名字
NAME              STATUS   ROLES                  AGE   VERSION
gpu-51            Ready    <none>                 15d   v1.23.5
harbor.clife.io   Ready    control-plane,master   15d   v1.23.5
k8s-node02        Ready    <none>                 15d   v1.20.2
[root@harbor ~]# kubectl label node harbor.clife.io type=master
node/harbor.clife.io labeled
[root@harbor ~]# kubectl label node k8s-node02 type=node2
node/k8s-node02 labeled
[root@harbor ~]# kubectl label node gpu-51 type=node1
node/gpu-51 labeled
[root@harbor ~]# kubectl get nodes --show-labels
NAME              STATUS   ROLES                  AGE   VERSION   LABELS
gpu-51            Ready    <none>                 14d   v1.23.5   beta.kubernetes.io/arch=amd64,beta.kubernetes.io/os=linux,kubernetes.io/arch=amd64,kubernetes.io/hostname=gpu-51,kubernetes.io/os=linux,type=node1
harbor.clife.io   Ready    control-plane,master   14d   v1.23.5   beta.kubernetes.io/arch=amd64,beta.kubernetes.io/os=linux,kubernetes.io/arch=amd64,kubernetes.io/hostname=harbor.clife.io,kubernetes.io/os=linux,node-role.kubernetes.io/control-plane=,node-role.kubernetes.io/master=,node.kubernetes.io/exclude-from-external-load-balancers=,type=master
k8s-node02        Ready    <none>                 14d   v1.20.2
。beta.kubernetes.io/arch=amd64,beta.kubernetes.io/os=linux,kubernetes.io/arch=amd64,kubernetes.io/hostname=k8s-node02,kubernetes.io/os=linux, type=node2
配置部署参数
按照前面的计划,我们需要安装3联盟方,ID分别9998、9999与10000。现实情况,这3方应该是完全独立、隔绝的组织,为了模拟现实情况,所以我们需要先为他们在Kubernetes上创建各自独立的命名空间(namespace)。 我们创建命名空间fate-9998用来部署9998,fate-9999用来部署9999,fate-10000部署10000
kubectl create namespace fate-9998
kubectl create namespace fate-9999
kubectl create namespace fate-10000
在exmaple目录下,预先设置了3个例子(9998由自己复制):/kubefate/examples/party-9998/和/kubefate/examples/party-9999/ 和 /kubefate/examples/party-10000,这里先说配置,后面说配置的关注点:
对于/kubefate/examples/party-9998/cluster.yaml,修改如下:
name: fate-9998
namespace: fate-9998
chartName: fate
chartVersion: v1.7.2
partyId: 9998
registry: "hub.c.163.com/federatedai"    # 修改未国内镜像库
imageTag: "1.7.2-release"
pullPolicy:
imagePullSecrets:
- name: myregistrykey
persistence: false
istio:enabled: false
podSecurityPolicy:enabled: false
modules:- rollsite- clustermanager- nodemanager- mysql- python- fateboard- clientbackend: eggrollrollsite: type: NodePortnodePort: 30081partyList:       # 填写另外两个party的信息- partyId: 10000           partyIp: 10.6.17.104partyPort: 30101- partyId: 9999partyIp: 10.6.17.106partyPort: 30091nodeSelector:  # 设置pod的部署节点type: node1clustermanager:nodeSelector:   # 该配置在官网说明中没有,自己强加的nodeSelector,强行将其部署在目标节点上type: node1 nodemanager:count: 3sessionProcessorsPerNode: 4storageClass: "nodemanagers"accessMode: ReadWriteOncesize: 2GinodeSelector:   # 设置pod的部署节点,这里官网也没有,自己加的type: node1  list:- name: nodemanagernodeSelector:  # 设置pod的部署节点type: node1      sessionProcessorsPerNode: 4subPath: "nodemanager"existingClaim: ""storageClass: "nodemanager"accessMode: ReadWriteOncesize: 1Gimysql: nodeSelector:   # 设置pod的部署节点type: node1      ip: mysqlport: 3306database: eggroll_metauser: fatepassword: fate_devsubPath: ""existingClaim: ""storageClass: "mysql"accessMode: ReadWriteOncesize: 1Giingress:fateboard: annotations:kubernetes.io/ingress.class: "nginx"hosts:- name: party9998.fateboard.example.comclient:  annotations:kubernetes.io/ingress.class: "nginx"hosts:- name: party9998.notebook.example.compython:type: NodePorthttpNodePort: 30087grpcNodePort: 30082logLevel: INFO  # 这个一定要设置,否则在fateboard看不到日志nodeSelector:   # 设置pod的部署节点type: node1fateboard: # 该服务是由在上面的python提供的,所以不用设置nodeSelectortype: ClusterIPusername: adminpassword: adminclient:nodeSelector:   # 设置pod的部署节点type: node1    subPath: ""existingClaim: ""storageClass: "client"accessMode: ReadWriteOncesize: 1GiservingIp: 10.6.14.13
servingPort: 30085
对于/kubefate/examples/party-9999/cluster.yaml,修改如下:
name: fate-9999
namespace: fate-9999
chartName: fate
chartVersion: v1.7.2
partyId: 9999
registry: "hub.c.163.com/federatedai"   # 修改未国内镜像库
imageTag: "1.7.2-release"
pullPolicy:
imagePullSecrets:
- name: myregistrykey
persistence: false
istio:enabled: false
podSecurityPolicy:enabled: false
modules:- rollsite- clustermanager- nodemanager- mysql- python- fateboard- clientbackend: eggrollrollsite: type: NodePortnodePort: 30091 partyList:     # 填写另外两个party的信息- partyId: 10000partyIp: 10.6.17.104partyPort: 30101- partyId: 9998partyIp: 10.6.14.13partyPort: 30081nodeSelector:  # 设置pod的部署节点type: node2clustermanager:nodeSelector:   # 该配置在官网说明中没有,自己强加的nodeSelector,强行将其部署在目标节点上type: node2 nodemanager:count: 3sessionProcessorsPerNode: 4storageClass: "nodemanagers"accessMode: ReadWriteOncesize: 2GinodeSelector:   # 设置pod的部署节点,这里官网也没有,自己加的type: node2  list:- name: nodemanagernodeSelector:  # 设置pod的部署节点type: node2      sessionProcessorsPerNode: 4subPath: "nodemanager"existingClaim: ""storageClass: "nodemanager"accessMode: ReadWriteOncesize: 1Gimysql: nodeSelector:   # 设置pod的部署节点type: node2      ip: mysqlport: 3306database: eggroll_metauser: fatepassword: fate_devsubPath: ""existingClaim: ""storageClass: "mysql"accessMode: ReadWriteOncesize: 1Giingress:fateboard: annotations:kubernetes.io/ingress.class: "nginx"hosts:- name: party9999.fateboard.example.comclient:annotations:kubernetes.io/ingress.class: "nginx"hosts:- name: party9999.notebook.example.compython:type: NodePorthttpNodePort: 30097grpcNodePort: 30092logLevel: INFO  # 这个一定要设置,否则在fateboard看不到日志nodeSelector:   # 设置pod的部署节点type: node2fateboard: # 该服务是由在上面的python提供的,所以不用设置nodeSelectortype: ClusterIPusername: adminpassword: adminclient:nodeSelector:   # 设置pod的部署节点type: node2    subPath: ""existingClaim: ""storageClass: "client"accessMode: ReadWriteOncesize: 1GiservingIp: 10.6.17.106
servingPort: 30095
对于/kubefate/examples/party-10000/cluster.yaml,修改如下:
name: fate-10000
namespace: fate-10000
chartName: fate
chartVersion: v1.7.2
partyId: 10000
registry: "hub.c.163.com/federatedai"     # 修改未国内镜像库
imageTag: "1.7.2-release"
pullPolicy:
imagePullSecrets:
- name: myregistrykey
persistence: false
istio:enabled: false
podSecurityPolicy:enabled: false
modules:- rollsite- clustermanager- nodemanager- mysql- python- fateboard- clientbackend: eggrollrollsite: type: NodePortnodePort: 30101partyList:        # 填写另外两个party的信息- partyId: 9999partyIp: 10.6.17.106partyPort: 30091- partyId: 9998partyIp: 10.6.14.13partyPort: 30081nodeSelector:     # 设置pod的部署节点type: masterclustermanager:nodeSelector:   # 该配置在官网说明中没有,自己强加的nodeSelector,强行将其部署在目标节点上type: master nodemanager:count: 3sessionProcessorsPerNode: 4storageClass: "nodemanagers"accessMode: ReadWriteOncesize: 2GinodeSelector:   # 设置pod的部署节点,这里官网也没有,自己加的type: master  list:- name: nodemanagernodeSelector:   # 设置pod的部署节点type: master      sessionProcessorsPerNode: 4subPath: "nodemanager"existingClaim: ""storageClass: "nodemanager"accessMode: ReadWriteOncesize: 1Gimysql: nodeSelector:   # 设置pod的部署节点type: master     ip: mysqlport: 3306database: eggroll_metauser: fatepassword: fate_devsubPath: ""existingClaim: ""storageClass: "mysql"accessMode: ReadWriteOncesize: 1Giingress:fateboard: annotations:kubernetes.io/ingress.class: "nginx"hosts:- name: party10000.fateboard.example.comclient:  annotations:kubernetes.io/ingress.class: "nginx"hosts:- name: party10000.notebook.example.compython:type: NodePorthttpNodePort: 30107grpcNodePort: 30102logLevel: INFO   # 这个一定要设置,否则在fateboard看不到日志nodeSelector:   # 设置pod的部署节点type: masterfateboard: # 该服务是由在上面的python提供的,所以不用设置nodeSelectortype: ClusterIPusername: adminpassword: adminclient:nodeSelector:   # 设置pod的部署节点type: master    subPath: ""existingClaim: ""storageClass: "client"accessMode: ReadWriteOncesize: 1GiservingIp: 10.6.17.104
servingPort: 30105
以上配置主要关注点是:
1、修改命名空间的名字;
2、修改镜像库来源;
3、修改每个party的服务IP和端口,以及每个party之外的party ip和端口;
4、配置每个pod的nodeSelector,指定该pod安装到集群的哪个节点上,这步非常重要,官方的配置是没写这个的,没配置的话后面会出问题;nodeSelector是通过节点的label来选定的,所以上一小节的步骤对该配置是必要的。
部署FATE集群
如果一切没有问题,那就可以使用kubefate cluster install来部署两个fate集群了,(没遇到坑的步骤按照官方的执行就可以)
kubefate cluster install -f ./examples/party-10000/cluster10000.yaml
kubefate cluster install -f ./examples/party-9999/cluster9999.yaml
kubefate cluster install -f ./examples/party-9998/cluster9998.yaml
这时候,KubeFATE会创建3个任务去分别部署两个FATE集群。我们可以通过kubefate job ls来查看任务,或者直接watch KubeFATE中集群的状态,直至变成Running
[root@harbor kubefate]# watch kubefate cluster ls
UUID                                    NAME            NAMESPACE       REVISION        STATUS          CHART   ChartVERSION    AGE
7bca70c1-236c-4931-81f8-1350cce579d4    fate-9998       fate-9998       1               Running         fate    v1.8.0          18m
143378db-b84d-4045-8615-11d36335d5b2    fate-9999       fate-9999       0               Creating        fate    v1.8.0          17m
d3e27a39-c8de-4615-96f2-29012f3edc68    fate-10000      fate-10000      0               Creating        fate    v1.8.0          17m
因为这个步骤需要到网易云镜像仓库去下载约10G的镜像,所以第一次执行视乎你的网络情况需要一定时间(耐心等待上述下载过程,直至状态变成Running)。 检查下载的进度可以用
kubectl get po -n fate-9998
kubectl get po -n fate-9999
kubectl get po -n fate-10000
全部的镜像下载完成后,结果会呈现如下样子:
[root@harbor kubefate]# kubectl get po -n fate-9998 -o wide
NAME                              READY   STATUS    RESTARTS   AGE   IP             NODE     NOMINATED NODE   READINESS GATES
client-6f64dfc96d-45dzd           1/1     Running   0          21h   10.244.1.152   gpu-51   <none>           <none>
clustermanager-578ddd9665-whwxq   1/1     Running   0          21h   10.244.1.153   gpu-51   <none>           <none>
mysql-5d5b7bd654-78wp7            1/1     Running   0          21h   10.244.1.150   gpu-51   <none>           <none>
nodemanager-0-5c4868fb85-mrd6h    2/2     Running   0          21h   10.244.1.151   gpu-51   <none>           <none>
nodemanager-1-787588cd7c-2ds68    2/2     Running   0          21h   10.244.1.154   gpu-51   <none>           <none>
nodemanager-2-d7f986fb5-wclkr     2/2     Running   0          21h   10.244.1.148   gpu-51   <none>           <none>
python-f6c4f885c-mh8ws            2/2     Running   0          21h   10.244.1.149   gpu-51   <none>           <none>
rollsite-c946d6989-znm7b          1/1     Running   0          21h   10.244.1.147   gpu-51   <none>           <none>
fate-9998和fate-9999是正常的,而fate-10000不正常,因为它的pod被指定部署在master节点了,当将pod指定部署到master节点时,pod都呈现pending状态,查看pending的pod日志看到:
Events:Type Reason Age From Message---- ------ ---- ---- -------Warning FailedScheduling 3s (x5 over 4m19s) default-scheduler 0/3 nodes are available: 1 node(s) had taint {node-role.kubernetes.io/master: }, that the pod didn't tolerate, 2 node(s) didn't match Pod's node affinity/selector.
出现错误的原因是master 节点是默认不允许调度 pod的,参考博客解决问题:
https://blog.csdn.net/weixin_43114954/article/details/119153903
[root@harbor ~]# kubectl taint nodes --all node-role.kubernetes.io/master-
node/harbor.clife.io untainted
taint "node-role.kubernetes.io/master" not found
taint "node-role.kubernetes.io/master" not found
上面的not found可以不管,现在master节点已经可以部署pod了,过一会儿fate-10000下的pod都部署成功。
mysql pod频繁重启问题
在使用fateboard时,发现fate-9999的mysql pod老是重启,导致fateboard访问不了,查看其日志没发现什么问题:
[root@harbor kubefate]# kubectl logs mysql-846476f9bf-j96nz -n fate-9999
2022-12-09 02:37:22+00:00 [Note] [Entrypoint]: Entrypoint script for MySQL Server 8.0.28-1debian10 started.
2022-12-09 02:37:22+00:00 [Note] [Entrypoint]: Switching to dedicated user 'mysql'
2022-12-09 02:37:22+00:00 [Note] [Entrypoint]: Entrypoint script for MySQL Server 8.0.28-1debian10 started.
2022-12-09T02:37:22.874490Z 0 [System] [MY-010116] [Server] /usr/sbin/mysqld (mysqld 8.0.28) starting as process 1
2022-12-09T02:37:23.027833Z 1 [System] [MY-013576] [InnoDB] InnoDB initialization has started.
2022-12-09T02:37:23.630021Z 1 [System] [MY-013577] [InnoDB] InnoDB initialization has ended.
2022-12-09T02:37:23.861099Z 0 [System] [MY-010229] [Server] Starting XA crash recovery...
2022-12-09T02:37:23.878257Z 0 [System] [MY-010232] [Server] XA crash recovery finished.
2022-12-09T02:37:23.982436Z 0 [Warning] [MY-010068] [Server] CA certificate ca.pem is self signed.
2022-12-09T02:37:23.982493Z 0 [System] [MY-013602] [Server] Channel mysql_main configured to support TLS. Encrypted connections are now supported for this channel.
2022-12-09T02:37:23.984665Z 0 [Warning] [MY-011810] [Server] Insecure configuration for --pid-file: Location '/var/run/mysqld' in the path is accessible to all OS users. Consider choosing a different directory.
2022-12-09T02:37:24.108885Z 0 [System] [MY-011323] [Server] X Plugin ready for connections. Bind-address: '::' port: 33060, socket: /var/run/mysqld/mysqlx.sock
2022-12-09T02:37:24.108958Z 0 [System] [MY-010931] [Server] /usr/sbin/mysqld: ready for connections. Version: '8.0.28'  socket: '/var/run/mysqld/mysqld.sock'  port: 3306  MySQL Community Server - GPL.
有网友这是服务器的内存不够用了,于是给fate-9999对应的服务器k8s-node02创建了16G的swap分区
[root@k8s-node02 ~]# dd if=/dev/zero of=/home/swapfile bs=1024 count=16777216
16777216+0 records in
16777216+0 records out
17179869184 bytes (17 GB) copied, 62.5734 s, 275 MB/s
[root@k8s-node02 ~]# mkswap /home/swapfile
Setting up swapspace version 1, size = 16777212 KiB
no label, UUID=d0a7f218-10a6-406a-9bea-be90b8493828
[root@k8s-node02 ~]# swapon /home/swapfile
swapon: /home/swapfile: insecure permissions 0644, 0600 suggested.
[root@k8s-node02 ~]# vim /etc/fstab    # 编辑/etc/fstab文件,使在每次开机时自动加载swap文件,最后添加如下行即可:
...
/home/swapfile swap swap defaults 0 0
...
[root@k8s-node02 ~]# free -mtotal        used        free      shared  buff/cache   available
Mem:          15847       14440         242         760        1164         315
Swap:         16383           5       16378
之后fate-9999的mysql pod就正常了,不再反复重启。
验证FATE的部署
通过以上的 kubefate cluster ls 命令, 我们得到 fate-9998 的集群ID是 7bca70c1-236c-4931-81f8-1350cce579d4, fate-9999 的集群ID是 143378db-b84d-4045-8615-11d36335d5b2, 而 fate-10000 的集群ID是 d3e27a39-c8de-4615-96f2-29012f3edc68. 我们可以通过kubefate cluster describe查询集群的具体访问信息:
[root@harbor kubefate]# kubefate cluster describe 7bca70c1-236c-4931-81f8-1350cce579d4
....          Info            dashboard:                                 - party9998.notebook.example.com           - party9998.fateboard.example.com          ip: 10.6.17.106                            port: 30081                                status:                                    containers:                              client: Running                        clustermanager: Running                fateboard: Running                     mysql: Running                         nodemanager-0: Running                 nodemanager-0-eggrollpair: Running     nodemanager-1: Running                 nodemanager-1-eggrollpair: Running     python: Running                        rollsite: Running                      deployments:                             client: Available                      clustermanager: Available              mysql: Available                       nodemanager-0: Available               nodemanager-1: Available               python: Available                      rollsite: Available
从返回的内容中,我们看到Info->dashboard里包含了:
- Jupyter Notebook的访问地址: party9998.notebook.example.com。这个是我们准备让数据科学家进行建模分析的平台。已经集成了FATE-Clients;
- FATEBoard的访问地址: party9998.fateboard.example.com。我们可以通过FATEBoard来查询当前训练的状态。
同样的查看 fate-10000的信息,可以看到 dashboard的网址虽然不同,但是ip都是10.6.17.106,也就是ingress-ngnix的地址,所以即使是访问party10000.fateboard.example.com,也是先访问10.6.17.106,而不是fate-10000所在的主机10.6.17.104。
在浏览器访问FATE集群的机器上配置相关的Host信息
如果是Windows机器,我们需要把相关域名解析配置到C:\WINDOWS\system32\drivers\etc\hosts:
10.6.17.106 party9998.notebook.example.com
10.6.17.106 party9998.fateboard.example.com
10.6.17.106 party9999.notebook.example.com
10.6.17.106 party9999.fateboard.example.com
10.6.17.106 party10000.notebook.example.com
10.6.17.106 party10000.fateboard.example.com
注意以上网址都是设置IP为10.6.17.106
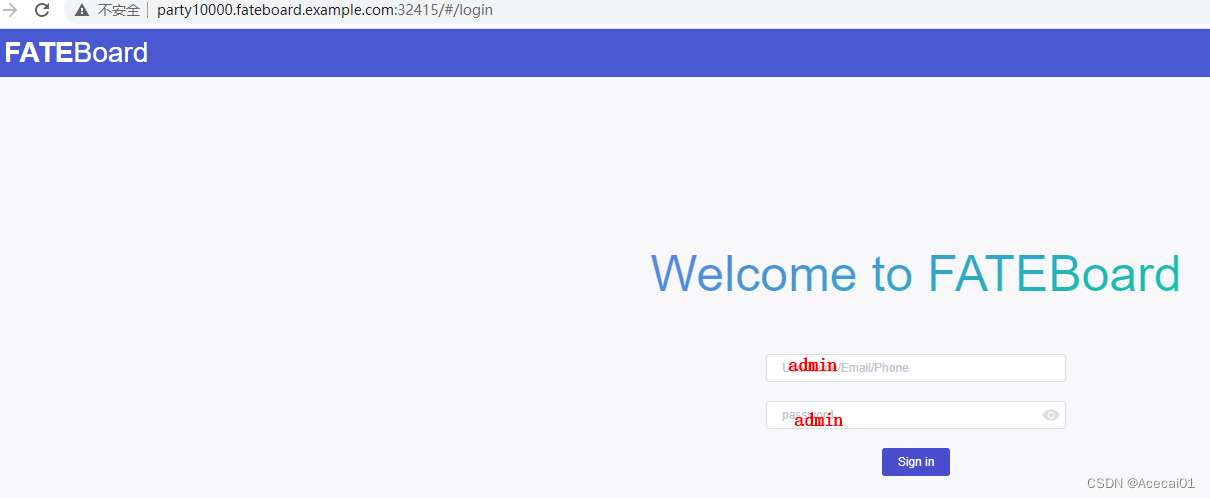
用网址party10000.fateboard.example.com:32303,登陆party10000的fateboard,用户名和密码如下图:
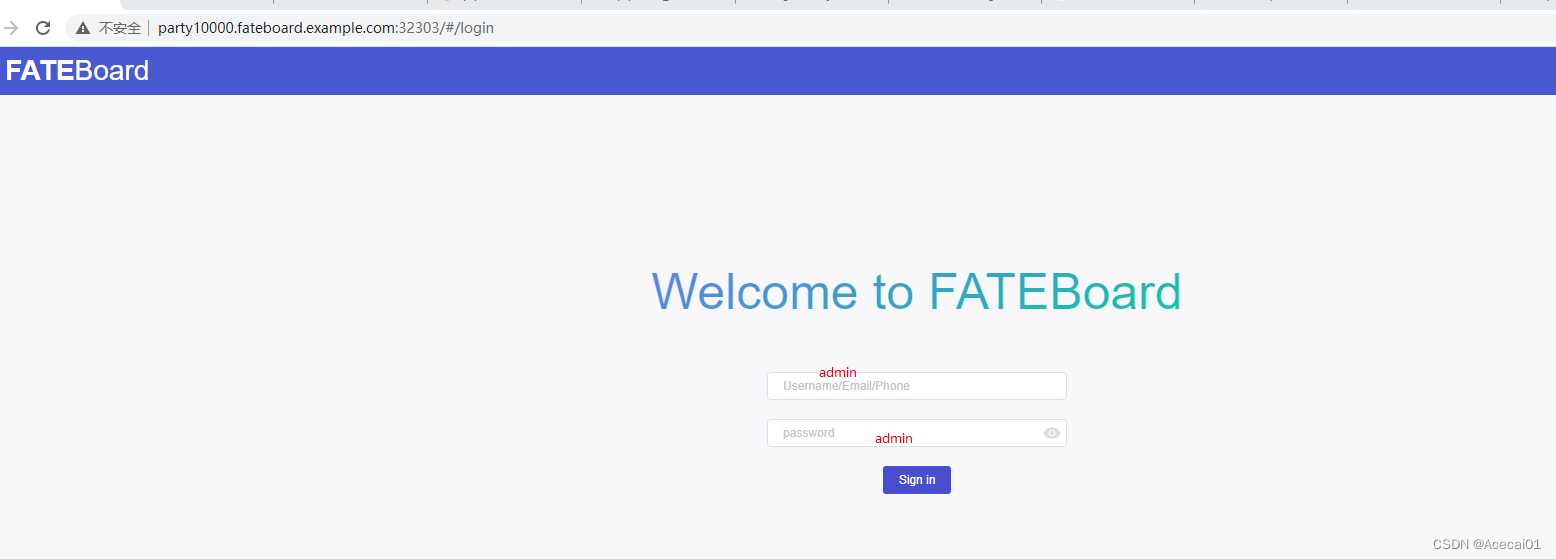
注意上面网址的端口就是ingress服务的端口,由以下命令查看:
[root@harbor kubefate]# kubectl -n ingress-nginx get svc
NAME                                 TYPE           CLUSTER-IP     EXTERNAL-IP   PORT(S)                      AGE
ingress-nginx-controller             LoadBalancer   10.1.209.99    10.6.17.106   80:32303/TCP,443:31648/TCP   120d
ingress-nginx-controller-admission   ClusterIP      10.1.241.232   <none>        443/TCP                      120d
问题:
1、fateboard界面访问不了
过了1天,发现命名空间fate-9998和fate-10000对应的fateboard界面访问不了了,只有fate-9999的可以访问,经检查:
root@harbor kubefate]# kubectl get pods -n fate-9998
NAME                             READY   STATUS             RESTARTS         AGE
client-7ccbc89559-njr2m          1/1     Running            0                3d21h
clustermanager-fcb86747f-8zzh7   1/1     Running            0                3d21h
mysql-6d546bd578-9mfvn           1/1     Running        37 (117m ago)    3d21h
nodemanager-0-66dfd58cdc-76wqc   2/2     Running            0                3d21h
nodemanager-1-7b7c65c685-jb2gs   2/2     Running            0                3d21h
python-594cd5c47b-vl4mb          1/2     CrashLoopBackOff   473 (117s ago)   3d21h
rollsite-6b77d9f5f7-lk6dm        1/1     Running            0                3d21h
查看到python这个podCrashLoopBackOff,其内部由两容器fateboard和ping-mysql,查看其ping-mysql容器:
root@harbor kubefate]# kubectl logs -f python-594cd5c47b-vl4mb -n fate-9998 -c ping-mysql
得知mysql有问题,于是直接重新部署fate-9998的mysql:
kubectl rollout restart deployment mysql -n fate-9998
再重新部署fate-9998的python:
kubectl rollout restart deployment python -n fate-9998
问题解决。
重启之后可能会有个新问题,以fate-9998为例:
(app-root) bash-4.2# flow
bash: flow: command not found
就是flow命令不能用了,需要手动安装:
进入fate-9998的python容器内安装fate-client:
[root@harbor kubefate]# kubectl exec -it svc/fateflow -c python -n fate-9998 -- bash
(app-root) bash-4.2# pip install fate-client -i https://pypi.tuna.tsinghua.edu.cn/simple
在主节点查看fateflow的服务ip:
[root@harbor kubefate]# kubectl describe svc fateflow -n fate-9998
Name:              fateflow
Namespace:         fate-9998
Labels:            app.kubernetes.io/managed-by=Helmchart=fatecluster=fatefateMoudle=fateflowheritage=Helmname=fate-9998owner=kubefatepartyId=9998release=fate-9998
Annotations:       meta.helm.sh/release-name: fate-9998meta.helm.sh/release-namespace: fate-9998
Selector:          fateMoudle=python,name=fate-9998,partyId=9998
Type:              ClusterIP
IP Family Policy:  SingleStack
IP Families:       IPv4
IP:                None
IPs:               None
Port:              tcp-grpc  9360/TCP
TargetPort:        9360/TCP
Endpoints:         10.244.1.195:9360
Port:              tcp-http  9380/TCP
TargetPort:        9380/TCP
Endpoints:         10.244.1.195:9380
Session Affinity:  None
Events:            <none>
根据上面的Endpoints设置flow的服务ip,进入fate-9998的python容器:
(app-root) bash-4.2# flow init --ip 10.244.1.195 --port 9380   # 初始化flow
{"retcode": 0,"retmsg": "Fate Flow CLI has been initialized successfully."
}
(app-root) bash-4.2# pipeline init --ip 10.244.1.195 --port 9380          # 初始化pipeline
Pipeline configuration succeeded.
(app-root) bash-4.2# pipeline config check
Flow server status normal, Flow version: 1.7.2
2、发现fate-10000很多Evicted的pod
因为fate-10000节点资源问题,导致python这个pod生成了多次,但都是Evicted状态,一大条失败pod很影响查看pod状态,于是删除这些失败pod记录:
[root@harbor kubefate]# kubectl get pods -n fate-10000 -A | awk '/Evicted/{print $1,$2}' | xargs -r -n2 kubectl delete pod -n
还有ContainerStatusUnknown状态的pod也删除掉:
[root@harbor kubefate]# kubectl get pods -n fate-10000 -A | awk '/ContainerStatusUnknown/{print $1,$2}' | xargs -r -n2 kubectl delete pod -n


