1. build.gradle, AndroidManifast.xml, 配置文件添加引用
1.1 dependencies 中添加引用库
dependencies {//http 请求implementation 'com.android.volley:volley:1.2.1'//上拉刷新implementation 'androidx.swiperefreshlayout:swiperefreshlayout:1.1.0'//加载网络地址图片implementation 'com.github.bumptech.glide:glide:4.13.2'annotationProcessor 'com.github.bumptech.glide:compiler:4.13.2'def nav_version = "2.5.2"//Kotlin navigation 导航implementation "androidx.navigation:navigation-fragment-ktx:$nav_version"implementation "androidx.navigation:navigation-ui-ktx:$nav_version"//gson 序列化implementation 'com.google.code.gson:gson:2.9.1'//加载图片时动画效果implementation 'io.supercharge:shimmerlayout:2.1.0'//图片缩放操作implementation 'com.github.chrisbanes:PhotoView:2.3.0'
}
1.2 添加 com.github.chrisbanes:PhotoView:2.3.0 库,settings.gradle 需要添加引用
dependencyResolutionManagement {repositoriesMode.set(RepositoriesMode.FAIL_ON_PROJECT_REPOS)repositories {google()mavenCentral()//添加引用maven { url "https://www.jitpack.io" }}
}
1.3 视图与类绑定
android {buildFeatures {viewBinding = true}
}
1.4 添加 @Parcelize 注解, 不用实现 Parcelable 里的方法
plugins {id 'kotlin-parcelize'
}
1.5 AndroidManifest.xml 添加网络权限
<uses-permission android:name="android.permission.INTERNET" /><application android:usesCleartextTraffic="true">1.6 占位图 ic_baseline_photo_24.xml
<vector xmlns:android="http://schemas.android.com/apk/res/android"android:width="24dp"android:height="24dp"android:tint="#D8D9D9"android:viewportWidth="24"android:viewportHeight="24"><pathandroid:fillColor="@android:color/white"android:pathData="M21,19V5c0,-1.1 -0.9,-2 -2,-2H5c-1.1,0 -2,0.9 -2,2v14c0,1.1 0.9,2 2,2h14c1.1,0 2,-0.9 2,-2zM8.5,13.5l2.5,3.01L14.5,12l4.5,6H5l3.5,-4.5z" />
</vector>
1.7 占位图 ic_photo_place_holder.xml
<?xml version="1.0" encoding="utf-8"?>
<selector xmlns:android="http://schemas.android.com/apk/res/android"><item><shape><solid android:color="#99999999" /><size android:width="40dp" android:height="30dp" /></shape></item>
</selector>
1.8 占位图喜欢 ic_baseline_thumb_up.xml
<vector xmlns:android="http://schemas.android.com/apk/res/android"android:width="12dp"android:height="12dp"android:tint="#F50606"android:viewportWidth="24"android:viewportHeight="24"><pathandroid:fillColor="@android:color/white"android:pathData="M1,21h4L5,9L1,9v12zM23,10c0,-1.1 -0.9,-2 -2,-2h-6.31l0.95,-4.57 0.03,-0.32c0,-0.41 -0.17,-0.79 -0.44,-1.06L14.17,1 7.59,7.59C7.22,7.95 7,8.45 7,9v10c0,1.1 0.9,2 2,2h9c0.83,0 1.54,-0.5 1.84,-1.22l3.02,-7.05c0.09,-0.23 0.14,-0.47 0.14,-0.73v-2z" />
</vector>
1.9 占位图收藏 ic_baseline_favorite.xml
<vector xmlns:android="http://schemas.android.com/apk/res/android"android:width="12dp"android:height="12dp"android:tint="#F50606"android:viewportWidth="24"android:viewportHeight="24"><pathandroid:fillColor="@android:color/white"android:pathData="M12,21.35l-1.45,-1.32C5.4,15.36 2,12.28 2,8.5 2,5.42 4.42,3 7.5,3c1.74,0 3.41,0.81 4.5,2.09C13.09,3.81 14.76,3 16.5,3 19.58,3 22,5.42 22,8.5c0,3.78 -3.4,6.86 -8.55,11.54L12,21.35z" />
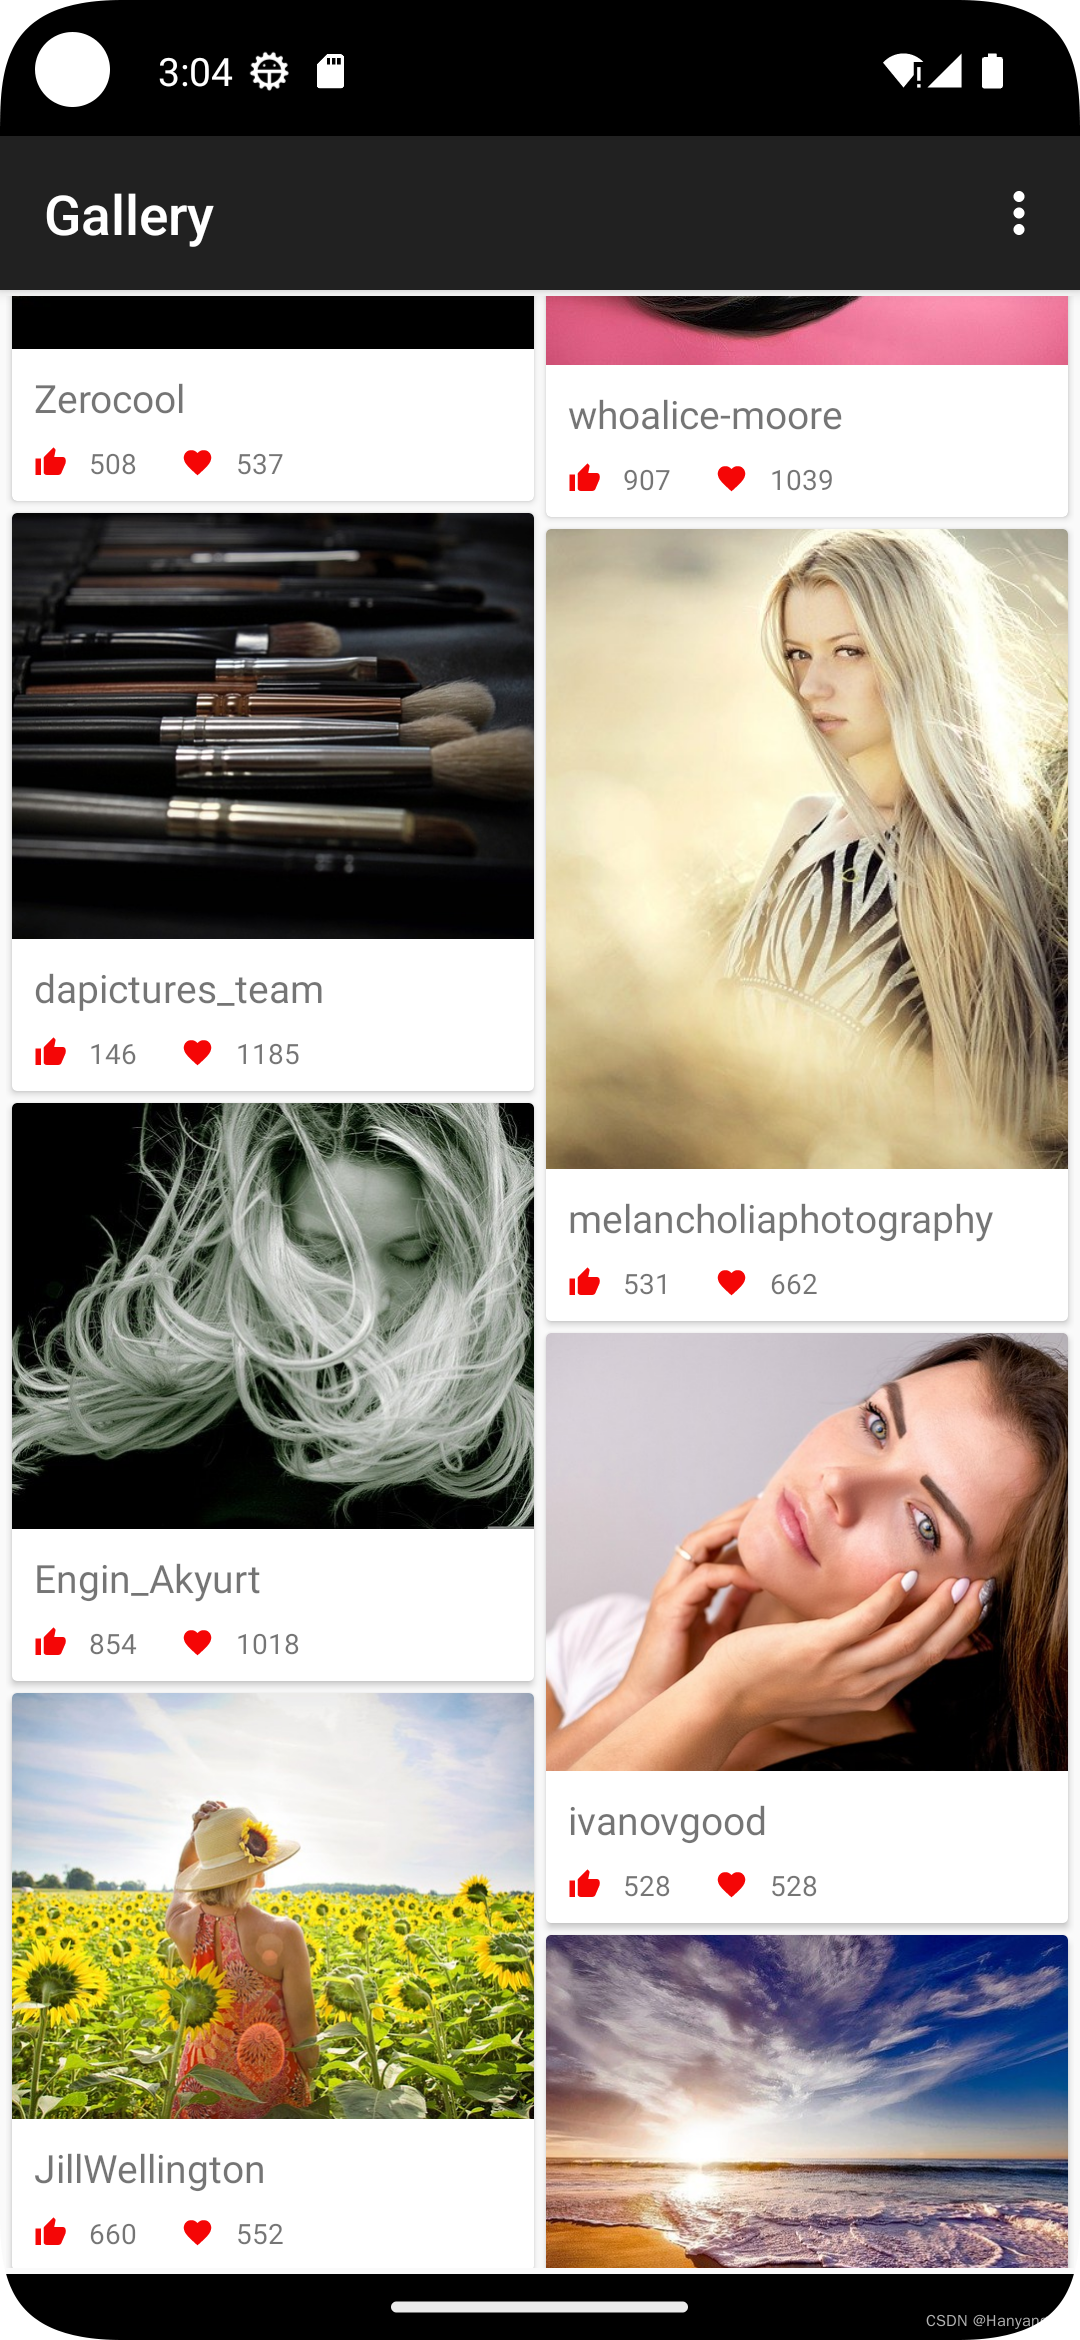
</vector>2. 创建 Gallery 主页
2.1 布局文件 fragment_gallery.xml
<?xml version="1.0" encoding="utf-8"?>
<androidx.swiperefreshlayout.widget.SwipeRefreshLayout xmlns:android="http://schemas.android.com/apk/res/android"xmlns:tools="http://schemas.android.com/tools"android:id="@+id/swipeLayoutGallery"android:layout_width="match_parent"android:layout_height="match_parent"android:layout_margin="2dp"tools:context=".GalleryFragment"><androidx.recyclerview.widget.RecyclerViewandroid:id="@+id/recyclerView"android:layout_width="match_parent"android:layout_height="match_parent" />
</androidx.swiperefreshlayout.widget.SwipeRefreshLayout>
2.2 创建实体类,存放字段 Pixabay.kt
data class Pixabay(val total: Int,val totalHits: Int,val hits: Array<PhotoItem>
) {override fun equals(other: Any?): Boolean {if (this === other) return trueif (javaClass != other?.javaClass) return falseother as Pixabayif (total != other.total) return falseif (totalHits != other.totalHits) return falseif (!hits.contentEquals(other.hits)) return falsereturn true}override fun hashCode(): Int {var result = totalresult = 31 * result + totalHitsresult = 31 * result + hits.contentHashCode()return result}
}//@Parcelize:注解 不用实现 Parcelable 里的方法
@Parcelize data class PhotoItem(@SerializedName("id") val photoId: Int,@SerializedName("webformatURL") val previewUrl: String,@SerializedName("largeImageURL") val fullUrl: String,@SerializedName("webformatHeight") val photoHeight: Int,@SerializedName("user") val photoUser:String,@SerializedName("likes") val photoLikes: Int,@SerializedName("collections") val photoFavorites: Int
):Parcelable
2.3 创建 RecyclerView 子 View,gallery_cell.xml
<?xml version="1.0" encoding="utf-8"?>
<androidx.cardview.widget.CardView xmlns:android="http://schemas.android.com/apk/res/android"xmlns:app="http://schemas.android.com/apk/res-auto"xmlns:tools="http://schemas.android.com/tools"android:layout_width="match_parent"android:layout_height="wrap_content"android:layout_margin="2dp"app:cardCornerRadius="2dp"><androidx.constraintlayout.widget.ConstraintLayoutandroid:layout_width="match_parent"android:layout_height="match_parent"><TextViewandroid:id="@+id/tv_user"android:layout_width="wrap_content"android:layout_height="wrap_content"android:layout_marginStart="8dp"android:layout_marginTop="8dp"android:text="TextView"android:textSize="14sp"app:layout_constraintStart_toStartOf="parent"app:layout_constraintTop_toBottomOf="@+id/shimmerLayoutCell" /><ImageViewandroid:id="@+id/imageView2"android:layout_width="wrap_content"android:layout_height="wrap_content"android:layout_marginStart="8dp"android:layout_marginTop="8dp"android:layout_marginBottom="8dp"app:layout_constraintBottom_toBottomOf="parent"app:layout_constraintStart_toStartOf="parent"app:layout_constraintTop_toBottomOf="@+id/tv_user"app:srcCompat="@drawable/ic_baseline_thumb_up" /><TextViewandroid:id="@+id/tv_likes"android:layout_width="wrap_content"android:layout_height="wrap_content"android:layout_marginStart="8dp"android:text="TextView"android:textSize="10sp"app:layout_constraintBottom_toBottomOf="@+id/imageView2"app:layout_constraintStart_toEndOf="@+id/imageView2"app:layout_constraintTop_toTopOf="@+id/imageView2" /><ImageViewandroid:id="@+id/imageView3"android:layout_width="wrap_content"android:layout_height="wrap_content"android:layout_marginStart="16dp"app:layout_constraintBottom_toBottomOf="@+id/tv_likes"app:layout_constraintStart_toEndOf="@+id/tv_likes"app:layout_constraintTop_toTopOf="@+id/tv_likes"app:srcCompat="@drawable/ic_baseline_favorite" /><TextViewandroid:id="@+id/tv_favorites"android:layout_width="wrap_content"android:layout_height="wrap_content"android:layout_marginStart="8dp"android:text="TextView"android:textSize="10sp"app:layout_constraintBottom_toBottomOf="@+id/imageView3"app:layout_constraintStart_toEndOf="@+id/imageView3"app:layout_constraintTop_toTopOf="@+id/imageView3" /><io.supercharge.shimmerlayout.ShimmerLayoutandroid:id="@+id/shimmerLayoutCell"android:layout_width="match_parent"android:layout_height="wrap_content"app:layout_constraintEnd_toEndOf="parent"app:layout_constraintStart_toStartOf="parent"app:layout_constraintTop_toTopOf="parent"><ImageViewandroid:id="@+id/imageView"android:layout_width="match_parent"android:layout_height="wrap_content"android:adjustViewBounds="true"android:scaleType="centerCrop"tools:srcCompat="@tools:sample/avatars" /></io.supercharge.shimmerlayout.ShimmerLayout></androidx.constraintlayout.widget.ConstraintLayout></androidx.cardview.widget.CardView>
2.4 创建 RecyclerView 适配器, GalleryAdapter.kt
class GalleryAdapter: ListAdapter<PhotoItem, MyViewHolder>(DIFFCALLBACK) {override fun onCreateViewHolder(parent: ViewGroup, viewType: Int): MyViewHolder {val holder = MyViewHolder(GalleryCellBinding.inflate(LayoutInflater.from(parent.context), parent, false))holder.itemView.setOnClickListener {Bundle().apply {//putParcelable("PHOTO", getItem(holder.adapterPosition))//holder.itemView.findNavController().navigate(R.id.action_galleryFragment_to_photoFragment,this)//val list = ArrayList(snapshot())putParcelableArrayList("PHOTO_LIST", ArrayList(currentList))//putParcelableArrayList("PHOTO_LIST", ArrayList(snapshot()))putInt("PHOTO_POSITION", holder.adapterPosition)holder.itemView.findNavController().navigate(R.id.action_galleryFragment_to_pagerPhotoFragment, this)}}return holder}override fun onBindViewHolder(holder: MyViewHolder, position: Int) {val photoItem = getItem(position)?: returnval cellBinding = holder.binding as GalleryCellBindingwith(cellBinding){shimmerLayoutCell.apply {setShimmerColor(0x55FFFFFF)setShimmerAngle(0)startShimmerAnimation()}tvUser.text = photoItem.photoUsertvLikes.text = photoItem.photoLikes.toString()tvFavorites.text = photoItem.photoFavorites.toString()imageView.layoutParams.height = photoItem.photoHeight}Glide.with(holder.itemView).load(getItem(position)?.previewUrl).placeholder(R.drawable.ic_photo_place_holder).listener(object : RequestListener<Drawable> {override fun onLoadFailed(e: GlideException?,model: Any?,target: Target<Drawable>?,isFirstResource: Boolean): Boolean {return false}override fun onResourceReady(resource: Drawable?,model: Any?,target: Target<Drawable>?,dataSource: DataSource?,isFirstResource: Boolean): Boolean {return false.also { cellBinding.shimmerLayoutCell.stopShimmerAnimation() }}}).into(cellBinding.imageView)}object DIFFCALLBACK : DiffUtil.ItemCallback<PhotoItem>() {override fun areItemsTheSame(oldItem: PhotoItem, newItem: PhotoItem): Boolean {return oldItem == newItem}override fun areContentsTheSame(oldItem: PhotoItem, newItem: PhotoItem): Boolean {return oldItem.photoId == newItem.photoId}}
}class MyViewHolder(binding: ViewBinding) : ViewHolder(binding.root) {val binding = binding
}
2.5 封装网络请求类,VolleySingleton.kt
//单例模式
class VolleySingleton private constructor(context: Context) {companion object {private var INSTANCE: VolleySingleton? = nullfun getInstance(context: Context) =INSTANCE ?: synchronized(this) {VolleySingleton(context).also { INSTANCE = it }}}val requestQueue: RequestQueue by lazy {Volley.newRequestQueue(context.applicationContext)}
}
2.6 创建菜单栏布局,刷新图片内容 menu.xml
<?xml version="1.0" encoding="utf-8"?>
<menu xmlns:android="http://schemas.android.com/apk/res/android"><itemandroid:id="@+id/swipeIndicator"android:title="swipe to refresh" />
</menu>
2.7 创建 ViewModel 监听数据,GalleryViewModel.kt
class GalleryViewModel(application: Application) : AndroidViewModel(application) {private val TAG = GalleryViewModel::class.java.simpleNameprivate var _photoListLive = MutableLiveData<List<PhotoItem>>()val photoListLive: LiveData<List<PhotoItem>>get() = _photoListLivefun fetchData() {val stringRequest = StringRequest(Request.Method.GET,getUrl(),{_photoListLive.value = Gson().fromJson(it, Pixabay::class.java).hits.toList();},{Log.e(TAG, "onErrorResponse", it)})VolleySingleton.getInstance(getApplication()).requestQueue.add(stringRequest)}private fun getUrl(): String {//&per_page=100return "https://pixabay.com/api/?key=30070990-cfc31c9f778ceeef4009d910d&q=${keyWords.random()}"}private val keyWords =arrayOf("cat", "dog", "car", "beauty", "phone", "computer", "flower", "animal")
}
2.8 主页调用 GalleryFragment.kt
class GalleryFragment : Fragment() {private lateinit var binding: FragmentGalleryBindingprivate lateinit var galleryViewModel: GalleryViewModeloverride fun onCreateView(inflater: LayoutInflater, container: ViewGroup?, savedInstanceState: Bundle?): View? {binding = FragmentGalleryBinding.inflate(inflater, container, false)return binding.root}override fun onOptionsItemSelected(item: MenuItem): Boolean {when (item.itemId) {R.id.swipeIndicator -> {binding.swipeLayoutGallery.isRefreshing = trueHandler().postDelayed(Runnable { galleryViewModel.fetchData() }, 700)}}return super.onOptionsItemSelected(item)}//加载菜单栏override fun onCreateOptionsMenu(menu: Menu, inflater: MenuInflater) {super.onCreateOptionsMenu(menu, inflater)inflater.inflate(R.menu.menu, menu)}override fun onViewCreated(view: View, savedInstanceState: Bundle?) {super.onViewCreated(view, savedInstanceState)setHasOptionsMenu(true)val galleryAdapter = GalleryAdapter()binding.recyclerView?.apply {adapter = galleryAdapter//GridLayouStaager(requireContext(), 2) 对齐 / StaggeredGridLayoutManager 交错感layoutManager = StaggeredGridLayoutManager(2, StaggeredGridLayoutManager.VERTICAL)}//,ViewModelProvider.AndroidViewModelFactory(requireActivity().application)galleryViewModel = ViewModelProvider(this)[GalleryViewModel::class.java]galleryViewModel.photoListLive.observe(viewLifecycleOwner, Observer {galleryAdapter.submitList(it)binding.swipeLayoutGallery.isRefreshing = false})galleryViewModel.photoListLive.value ?: galleryViewModel.fetchData()binding.swipeLayoutGallery?.setOnRefreshListener {galleryViewModel.fetchData()}}
}
3. Photo 详情页
3.1 布局文件 fragment_photo.xml
<?xml version="1.0" encoding="utf-8"?>
<io.supercharge.shimmerlayout.ShimmerLayout xmlns:android="http://schemas.android.com/apk/res/android"xmlns:tools="http://schemas.android.com/tools"android:id="@+id/shimmerLayoutPhoto"android:layout_width="match_parent"android:layout_height="match_parent"tools:context=".PhotoFragment" ><com.github.chrisbanes.photoview.PhotoViewandroid:id="@+id/photoView"android:layout_width="match_parent"android:layout_height="match_parent"android:adjustViewBounds="true"tools:src="@tools:sample/avatars" />
</io.supercharge.shimmerlayout.ShimmerLayout>
3.2 调用类,PhotoFragment.kt
class PhotoFragment : Fragment() {private lateinit var binding: FragmentPhotoBindingoverride fun onCreateView(inflater: LayoutInflater, container: ViewGroup?, savedInstanceState: Bundle?): View? {binding = FragmentPhotoBinding.inflate(inflater, container, false);return binding.root}override fun onViewCreated(view: View, savedInstanceState: Bundle?) {super.onViewCreated(view, savedInstanceState)binding.shimmerLayoutPhoto.apply {setShimmerColor(0x55FFFFFF)setShimmerAngle(0)startShimmerAnimation()}val item = arguments?.getParcelable<PhotoItem>("PHOTO")Glide.with(requireContext()).load(item?.fullUrl).placeholder(R.drawable.ic_baseline_photo_24).listener(object : RequestListener<Drawable> {override fun onLoadFailed(e: GlideException?,model: Any?,target: Target<Drawable>?,isFirstResource: Boolean): Boolean {return false}override fun onResourceReady(resource: Drawable?,model: Any?,target: Target<Drawable>?,dataSource: DataSource?,isFirstResource: Boolean): Boolean {return false.also { binding.shimmerLayoutPhoto.stopShimmerAnimation() }}}).into(binding.photoView)}
}
4. Activity 调用
4.1 Fragment 导航布局, navigation.xml
<?xml version="1.0" encoding="utf-8"?>
<navigation xmlns:android="http://schemas.android.com/apk/res/android"xmlns:app="http://schemas.android.com/apk/res-auto"xmlns:tools="http://schemas.android.com/tools"android:id="@+id/navigation"app:startDestination="@id/galleryFragment"><fragmentandroid:id="@+id/galleryFragment"android:name="com.example.gallery.GalleryFragment"android:label="Gallery"tools:layout="@layout/fragment_gallery"><actionandroid:id="@+id/action_galleryFragment_to_photoFragment"app:destination="@id/photoFragment" /></fragment><fragmentandroid:id="@+id/photoFragment"android:name="com.example.gallery.PhotoFragment"android:label="Photo"tools:layout="@layout/fragment_photo" />
</navigation>
4.2 布局文件 activity_main.xml
<?xml version="1.0" encoding="utf-8"?>
<androidx.constraintlayout.widget.ConstraintLayout xmlns:android="http://schemas.android.com/apk/res/android"xmlns:app="http://schemas.android.com/apk/res-auto"xmlns:tools="http://schemas.android.com/tools"android:layout_width="match_parent"android:layout_height="match_parent"tools:context=".MainActivity"><androidx.fragment.app.FragmentContainerViewandroid:id="@+id/fragmentContainerView"android:name="androidx.navigation.fragment.NavHostFragment"android:layout_width="match_parent"android:layout_height="match_parent"app:defaultNavHost="true"app:layout_constraintBottom_toBottomOf="parent"app:layout_constraintEnd_toEndOf="parent"app:layout_constraintStart_toStartOf="parent"app:layout_constraintTop_toTopOf="parent"app:navGraph="@navigation/navigation" />
</androidx.constraintlayout.widget.ConstraintLayout>
4.3 调用页 MainActivity.kt
class MainActivity : AppCompatActivity() {private lateinit var controller:NavHostFragmentoverride fun onCreate(savedInstanceState: Bundle?) {super.onCreate(savedInstanceState)setContentView(R.layout.activity_main)//添加返回按键controller = supportFragmentManager.findFragmentById(R.id.fragmentContainerView) as NavHostFragmentNavigationUI.setupActionBarWithNavController(this,controller.navController)}//返回按键监听override fun onSupportNavigateUp(): Boolean {return super.onSupportNavigateUp()||controller.navController.navigateUp()}
}
5. 效果图