一、线程(Thread)
1、概念: 是一个程序内部的一条执行路径
2、分类
- 单线程: 程序中只有一条执行路径
- 多线程: 程序中有多条执行路径
二、多线程的创建
1、Thread的概念: Java通过java.lang.Thread类代表线程,按照面向对象原则,Thread类提供多线程的实现方法。
2、方法一:继承Thread类
(1)实现流程
- 定义一个线程子类继承Thread类,重写run()方法
- 创建线程实现类对象
- 调用线程对象start()方法启动线程(启动后依旧执行run()方法)
(2)使用示例
public class ThreadDemo {public static void main(String[] args) {MyThread thread = new MyThread("线程1运行中...");MyThread thread2 = new MyThread("线程2运行中...");thread.start();thread2.start();}
}class MyThread extends Thread{private String message;public MyThread(){}public MyThread(String message){this.message = message;}@Overridepublic void run() {for (int i = 0; i < 10; i++) {System.out.println(message);}}
}/*打印输出*/
线程2运行中...
线程2运行中...
线程2运行中...
线程2运行中...
线程2运行中...
线程1运行中...
线程1运行中...
线程1运行中...
线程1运行中...
线程1运行中...
线程1运行中...
线程1运行中...
线程1运行中...
线程1运行中...
线程1运行中...
线程2运行中...
线程2运行中...
线程2运行中...
线程2运行中...
线程2运行中...
(3)优缺点
- 优点: 编码简单
- 缺点: 线程类继承了Thread类,无法继承其它类,不利于扩展
(4)相关问题
问:能不能将主线程任务放置到子线程之前?
答: 若想实现多线程,那么主线程的任务必须放在子线程启动之后,否则CPU先执行完主线程任务,再执行子线程。
问:为什么不直接调用run(),而是调用start()?
答: 如果调用run(),则会当做普通方法执行,实际上还是单线程,在start()开启后才算是多线程执行。
3、方法二:实现Runnable接口
(1)实现方式
- 定义一个线程任务类实现Runnable接口,重写run()方法
- 创建线程任务类对象
- 将线程任务类对象交付Thread处理
- 调用start()启动线程
(2)使用示例
public class ThreadDemo {public static void main(String[] args) {RunnableThread run = new RunnableThread("线程1运行中...");RunnableThread run1 = new RunnableThread("线程2运行中...");Thread t = new Thread(run);Thread t1 = new Thread(run1);t.start();t1.start();}
}class RunnableThread implements Runnable{private String message;public RunnableThread(){}public RunnableThread(String message){this.message = message;}@Overridepublic void run() {System.out.println(message);}
}/*打印输出*/
线程2运行中...
线程2运行中...
线程2运行中...
线程2运行中...
线程2运行中...
线程1运行中...
线程1运行中...
线程1运行中...
线程1运行中...
线程1运行中...
线程1运行中...
线程1运行中...
线程1运行中...
线程1运行中...
线程1运行中...
线程2运行中...
线程2运行中...
线程2运行中...
线程2运行中...
线程2运行中...
(3)优缺点
- 优点: 线程任务类只是实现接口,可以继承其它类和实现其它接口,扩展性强
- 缺点: 编程多一层对象包装,如果线程有执行结果是不可以直接返回的。
(4)匿名内部类实现方案
public class ThreadDemo {public static void main(String[] args) {Thread t1 = new Thread(()->{for (int i = 0; i < 10; i++) {System.out.println("子线程1运行中");}});Thread t2 = new Thread(()->{for (int i = 0; i < 10; i++) {System.out.println("子线程2运行中");}});t1.start();t2.start();}
}
4、方法三:实现Callable接口
(1)使用场景: 当需要线程直接返回结果的场景。
(2)实现方式
- 得到任务对象
- 定义类实现Callable接口,重写call方法,封装任务
- 用FutureTask把Callable对象封装成线程任务对象
- 将线程任务对象交付Thread处理
- 调用start(),执行任务
- 通过调用
(3)实现示例
public class CallableDemo {public static void main(String[] args) {/*获取线程任务类对象*/Callable<String> myCallable = new MyCallable(10);Callable<String> myCallable1 = new MyCallable(20);/*FutureTask 封装现成任务类对象*/FutureTask<String> f1 = new FutureTask<>(myCallable);FutureTask<String> f2 = new FutureTask<>(myCallable1);/*交给Thread执行*/Thread t = new Thread(f1);Thread t1 = new Thread(f2);t.start();t1.start();/*FutureTask 调用get方法获取返回值*/try {System.out.println(f1.get());System.out.println(f2.get());} catch (InterruptedException | ExecutionException e) {throw new RuntimeException(e);}}
}class MyCallable implements Callable<String>{private int num;public MyCallable() {}public MyCallable(int num) {this.num = num;}@Overridepublic String call() throws Exception {int sum = 0;for (int i = 1; i < num; i++) {sum += i;}return "子线程执行结果为 " + sum;}
}/*打印输出*/
子线程执行结果为 45
子线程执行结果为 190
三、Thread常用API
1、问题:当有多个线程同时执行时,如何区分线程?
| 方法 | 说明 |
|---|---|
| String getName() | 获取当前线程的名称 |
| String setName() | 重命名当前线程的名称 |
| Thread currentThread() | 获取当前线程对象 |
2、实现示例
  public class MultiThreadDemo {public static void main(String[] args) {/*创建线程*/Thread t1 = new Thread(()->{for (int i = 0; i < 10; i++) {System.out.println(Thread.currentThread().getName()+"输出:"+i);}});Thread t2 = new Thread(()->{for (int i = 0; i < 10; i++) {System.out.println(Thread.currentThread().getName()+"输出:"+i);}});/*重命名线程*/t1.setName("子线程1");t2.setName("子线程2");/*启动线程*/t1.start();t2.start();}
}/*打印输出*/
子线程1输出:0
子线程2输出:0
子线程1输出:1
子线程2输出:1
子线程1输出:2
子线程2输出:2
子线程1输出:3
子线程2输出:3
子线程1输出:4
子线程2输出:4
子线程1输出:5
子线程2输出:5
子线程1输出:6
子线程2输出:6
子线程1输出:7
子线程2输出:7
子线程1输出:8
子线程2输出:8
子线程1输出:9
子线程2输出:9
3、修改线程名称的方案——父类构造器
public class MultiThreadDemo {public static void main(String[] args) {OThread o1 = new OThread("子线程1");OThread o2 = new OThread("子线程2");o1.start();o2.start();}
}class OThread extends Thread{public OThread(){}public OThread(String name){super(name);}@Overridepublic void run() {for (int i = 0; i < 10; i++) {System.out.println(Thread.currentThread().getName()+"执行输出:" + i);}}
}/*打印输出*/
子线程1执行输出:0
子线程2执行输出:0
子线程1执行输出:1
子线程2执行输出:1
子线程1执行输出:2
子线程2执行输出:2
子线程1执行输出:3
子线程2执行输出:3
子线程1执行输出:4
子线程2执行输出:4
子线程1执行输出:5
子线程2执行输出:5
子线程1执行输出:6
子线程2执行输出:6
子线程1执行输出:7
子线程2执行输出:7
子线程1执行输出:8
子线程2执行输出:8
子线程1执行输出:9
子线程2执行输出:9
4、Thread类的线程休眠
| 方法 | 说明 |
|---|---|
| static void sleep(long time) | 让当前线程休眠指定时间后再继续执行,单位为毫秒 |
5、Thread构造器
| 构造器 | 说明 |
|---|---|
| Thread(String name) | 为当前线程指定名称 |
| Thread(Runnable target) | 把Runnable对象交给线程对象 |
| Thread(Runnable target , String name) | 把Runnable对象交给线程对象,为当前线程指定名称 |
四、线程安全
1、相关问题
问题1:线程安全问题是什么?
答:多线程同时操作一个共享数据时可能会出现业务安全问题,称为线程安全问题。
问题2:线程安全问题的产生原因?
答:在多线程并发下,多个线程同时访问并修改一个共享数据,便会导致共享数据多次修改的结果。
示例
public class ThreadSafeDemo {/*创建一个共享账号,并存入10W元*/public static Account account = new Account("ZGYH-1311",100000);public static void main(String[] args) {CardThread user1 = new CardThread(account,"小明");CardThread user2 = new CardThread(account,"小红");user1.start();user2.start();}
}class Account{private String CARD;private double money;public Account() {}public Account(String CARD, double money) {this.CARD = CARD;this.money = money;}public String getCARD() {return CARD;}public void setCARD(String CARD) {this.CARD = CARD;}public double getMoney() {return money;}public void setMoney(double money) {this.money = money;}public void drawnMoney(double money){if (money <= this.money){this.money -= money;System.out.println(Thread.currentThread().getName()+"成功取出"+money+"元");}else {System.out.println("余额不足,无法取出");}}
}class CardThread extends Thread{private Account account;public CardThread(Account account,String name) {super(name);this.account = account;}@Overridepublic void run() {account.drawnMoney(100000);}
}/*打印输出*/
余额不足,无法取出
小明成功取出100000.0元
2、解决方案:线程同步
五、线程同步
1、线程同步的概念: 多线程同步执行相同操作。
2、线程同步的核心思想
- 加锁: 将共享资源上锁,每一次只允许一个线程访问,只有当前线程访问后其它线程才能访问。
3、同步的实现方式
(1)方式一:同步代码块
- 作用: 将可能出现线程安全问题的核心代码上锁。
- 原理: 每次只能一个线程进入,执行完毕后自动解锁,其它线程才可以进来执行。
- 格式
synchronized(同步锁对象){操作共享资源的代码(核心代码)
}
- 锁对象要求:
理论上,锁对象只要对于当前同时执行的线程来说是同一个对象即可,但对于其它无关线程同样会产生影响,所以锁对象有规范。
规范
a. 建议使用共享资源作为锁对象
b. 对于实例方法,建议采用this关键字
c. 对于静态方法,建议采用.class对象作为锁对象
示例
/*以上面的例子,改变为是将核心代码加同步锁*/public void drawnMoney(double money){synchronized (this){if (money <= this.money){this.money -= money;System.out.println(Thread.currentThread().getName()+"成功取出"+money+"元");}else {System.out.println("余额不足,无法取出");}}}/*打印输出*/
小明成功取出100000.0元
余额不足,无法取出/*静态方法*/public static void print(String message){synchronized (Account.class){System.out.println(message);}}
(2)同步方法
使用方法同同步代码块一致。
- 作用: 把出现线程安全问题的方法使用synchronized 关键字加锁。
- 格式
修饰符 synchronized 返回值类型 方法名称(形参列表){操作代码....
}
示例
public synchronized void drawnMoney(double money){if (money <= this.money){this.money -= money;System.out.println(Thread.currentThread().getName()+"成功取出"+money+"元");}else {System.out.println("余额不足,无法取出");}}
- 底层原理
- 同步方法其实底层也是有隐式锁对象的,若锁方法为实例方法则默认使用this作为锁对象,若所方法为静态方法则默认使用.class作为锁对象。
相关问题
问题1:同步代码块与同步方法的比较
答:同步代码块锁范围小,同步方法锁范围大
(3)Lock锁
-
概念: 为了更清晰的表达如何加锁和释放锁,JDK5以后提供一个新的锁对象Lock,Lock实现提供比使用synchronized方法和语句更加广泛的锁定操作。
-
对象类型: 接口
-
创建方式:
| 构造器 | 说明 |
|---|---|
| ReentrantLock() | 获取Lock锁实现类 |
- 常用API
| 方法 | 说明 |
|---|---|
| void lock() | 获取锁 |
| void unlock() | 释放锁 |
使用方法
- 在对象类中声明一个常量Lock
- 在核心代码处使用lock(),unlock()
class Account {private String CARD;private double money;private final Lock lock = new ReentrantLock();public Account() {}public Account(String CARD, double money) {this.CARD = CARD;this.money = money;}public void drawnMoney(double money) {lock.lock();/*为避免因为异常导致死锁,所以要捕捉异常并解锁*/try {if (money <= this.money) {this.money -= money;System.out.println(Thread.currentThread().getName() + "成功取出" + money + "元");} else {System.out.println("余额不足,无法取出");}}catch (Exception e){e.printStackTrace();}finally {lock.unlock();}}public static void print(String message) {synchronized (Account.class) {System.out.println(message);}}
}
六、线程通信
1、概念: 线程之间相互发送数据,通常是通过一个共享数据进行通信。
2、常见通信模型
- 生产者与消费者模型: 生产者线程负责生产数据,消费者线程负责消费数据
实现方式: 生产者线程生产完数据后,唤醒消费者,然后等待自己;消费者消费数据后,唤醒生产者,然后等待自己。
唤醒与等待
| 方法 | 说明 |
|---|---|
| void wait() | 当前线程等待唤醒 |
| void notify() | 当前线程等待唤醒 |
| void notifyAll() | 当前线程等待唤醒 |
实现示例
public class ThreadCommunication {public static Card account = new Card("ZGYH-1311",0);public static void main(String[] args) {/*创建爹对象,生产者*/Saver saver1 = new Saver(account,"亲爹");Saver saver2 = new Saver(account,"干爹");Saver saver3 = new Saver(account,"岳父");/*创建子辈对象,消费者*/Customer customer1 = new Customer(account,"小明");Customer customer2 = new Customer(account,"小红");saver1.start();saver2.start();saver3.start();customer1.start();customer2.start();}
}class Card{private String card;private double money;private final Lock lock = new ReentrantLock();public Card(){}public Card(String card,double money){this.card = card;this.money = money;}public String getCard() {return card;}public double getMoney() {return money;}public void setMoney(double money) {this.money = money;}public synchronized void save(double money){try {if (this.money == 0 ){this.money += money;System.out.println(Thread.currentThread().getName()+"已向"+this.getCard()+"存入金额"+money+"元,剩余金额:"+this.getMoney());}this.notifyAll();this.wait();}catch (Exception e){e.printStackTrace();}}public synchronized void get(double money){this.notify();try {if (this.money != 0){this.money -= money;System.out.println(Thread.currentThread().getName()+"取出金额"+money+",剩余金额:"+this.getMoney());}this.notifyAll();this.wait();}catch (Exception e){e.printStackTrace();}}
}class Saver extends Thread{private Card account;public Saver(){}public Saver(Card account,String name) {super(name);this.account = account;}@Overridepublic void run() {while (true){account.save(100000);try {sleep(1000);} catch (InterruptedException e) {throw new RuntimeException(e);}}}
}class Customer extends Thread{private Card account;public Customer(){}public Customer(Card account,String name) {super(name);this.account = account;}@Overridepublic void run() {while (true){account.get(100000);try {sleep(1000);} catch (InterruptedException e) {throw new RuntimeException(e);}}}
}/*打印输出*/
亲爹已向ZGYH-1311存入金额100000.0元,剩余金额:100000.0
小明取出金额100000.0,剩余金额:0.0
岳父已向ZGYH-1311存入金额100000.0元,剩余金额:100000.0
小红取出金额100000.0,剩余金额:0.0
岳父已向ZGYH-1311存入金额100000.0元,剩余金额:100000.0
小明取出金额100000.0,剩余金额:0.0
岳父已向ZGYH-1311存入金额100000.0元,剩余金额:100000.0
小红取出金额100000.0,剩余金额:0.0
干爹已向ZGYH-1311存入金额100000.0元,剩余金额:100000.0
小明取出金额100000.0,剩余金额:0.0
岳父已向ZGYH-1311存入金额100000.0元,剩余金额:100000.0
小红取出金额100000.0,剩余金额:0.0
亲爹已向ZGYH-1311存入金额100000.0元,剩余金额:100000.0
小明取出金额100000.0,剩余金额:0.0
岳父已向ZGYH-1311存入金额100000.0元,剩余金额:100000.0
小红取出金额100000.0,剩余金额:0.0
七、线程池
1、线程池的概念: 线程池是一个可复用线程的技术。
2、使用线程池的原因: 用户每发起一个请求,后台就创建一个新线程,当下次新任务请求又要创建新县城,而新线程的创建对系统资源的开销是极大的。
3、线程池的工作原理:
(1)线程池由两部分组成:工作线程WorkThread和任务队列WorkQueue
(2)新任务请求会被加入到任务队列中,工作线程由多个线程组成,每一个线程完成任务后,会从任务队列中调取请求进行处理。
4、线程池API
(1)接口: ExecutorService
(2)创建方法:
- 方法1: 使用ExecutorService的实现类ThreadPoolExecutor创建线程池对象
public ThreadPoolExecutor(int corePoolSize, //线程池的线程数量(核心线程)int maximumPoolSize, //线程池支持的最大线程数long keepAliveTime, //临时线程的最大存货时间TimeUnit unit, //存活时间的单位(时、分、秒、天)BlockingQueue<Runnable> workQueue, //指定任务队列ThreadFactory threadFactory, //制定线程工厂RejectedExecutionHandler handler) //指定线程忙,任务满时,新任务请求的处理
新任务拒绝策略
| 策略 | 说明 |
|---|---|
| ThreadPoolExecutor.AbortPolicy | 丢弃并抛出RejectedExecutionException异常(默认) |
| ThreadPoolExecutor.DiscardPolicy | 直接丢弃任务 |
| ThreadPoolExecutor.DiscardOldestPolicy | 丢弃队列中等待最久的任务,任晗把当前任务加入队列中 |
| ThreadPoolExecutor.CallerRunsPolicy | 由主线程负责调用任务的run()方法,从而绕过线程池直接执行 |
问题1:临时线程什么时候创建?
答:新任务提交时发现核心线程都在忙,任务队列满了,并且还可以创建临时线程时,才会创建临时线程。
问题2:什么时候回开始拒绝任务?
答:核心线程和临时线程都在忙,任务队列满了,新任务来的时候开始任务拒绝。
(3)ExecutorService常用方法
| 方法 | 说明 |
|---|---|
| void execute(Runnable command) | 执行任务,没有返回值,一般用来执行Runnable任务 |
| void execute(Callable<T> task) | 执行任务,返回未来任务对象获取线程结果,一般用来执行Callable任务 |
| Future submit(Runnable command) | Runnable任务加入到任务队列中 |
| Future submit(Callable<T> task) | Callable任务加入到任务队列中 |
| void shutdown() | 任务执行完毕关闭线程池 |
| List<Runnable> shutdownNow()() | like关闭,停止正在执行任务,并返回队列中为执行的任务 |
(4)线程池处理Runnable任务
- 创建线程池对象
/*创建含有3个核心线程,5个最大线程数,8秒线程存活时间,6个容量的任务队列,默认线程工厂,丢弃任务并抛出异常的线程池*/ThreadPoolExecutor threadPoolExecutor = new ThreadPoolExecutor(3,5,8, TimeUnit.SECONDS,new ArrayBlockingQueue<>(6), Executors.defaultThreadFactory(),new ThreadPoolExecutor.AbortPolicy());
(5)线程池处理Callable任务
public class ThreadPoolDemo {public static void main(String[] args) {/*创建含有3个核心线程,5个最大线程数,8秒线程存活时间,6个容量的任务队列,默认线程工厂,拒绝任务的线程池*/ExecutorService executorService = new ThreadPoolExecutor(3,5,5, TimeUnit.SECONDS,new ArrayBlockingQueue<>(6), Executors.defaultThreadFactory(),new ThreadPoolExecutor.AbortPolicy());Runnable runnable = new newRunnable();/*模拟10个任务进入线程池*/for (int i = 0; i < 10; i++) {executorService.execute(runnable);}executorService.shutdown();}
}class newRunnable implements Runnable{@Overridepublic void run() {for (int i = 0; i < 5; i++) {System.out.println(Thread.currentThread().getName() + "输出:" + i + "时间:" + new SimpleDateFormat("yyyy-MM-dd HH:mm:ss.SSS").format(System.currentTimeMillis()));}}
}/*打印输出*/
pool-1-thread-3输出:0时间:2023-06-01 12:00:59.783
pool-1-thread-1输出:0时间:2023-06-01 12:00:59.783
pool-1-thread-2输出:0时间:2023-06-01 12:00:59.783
pool-1-thread-4输出:0时间:2023-06-01 12:00:59.783
pool-1-thread-3输出:1时间:2023-06-01 12:00:59.818
pool-1-thread-2输出:1时间:2023-06-01 12:00:59.818
pool-1-thread-1输出:1时间:2023-06-01 12:00:59.818
pool-1-thread-4输出:1时间:2023-06-01 12:00:59.818
pool-1-thread-3输出:2时间:2023-06-01 12:00:59.818
pool-1-thread-2输出:2时间:2023-06-01 12:00:59.818
pool-1-thread-1输出:2时间:2023-06-01 12:00:59.818
pool-1-thread-4输出:2时间:2023-06-01 12:00:59.818
pool-1-thread-3输出:3时间:2023-06-01 12:00:59.818
pool-1-thread-2输出:3时间:2023-06-01 12:00:59.818
pool-1-thread-4输出:3时间:2023-06-01 12:00:59.818
pool-1-thread-1输出:3时间:2023-06-01 12:00:59.818
pool-1-thread-3输出:4时间:2023-06-01 12:00:59.818
pool-1-thread-4输出:4时间:2023-06-01 12:00:59.819
pool-1-thread-1输出:4时间:2023-06-01 12:00:59.819
pool-1-thread-2输出:4时间:2023-06-01 12:00:59.818
pool-1-thread-4输出:0时间:2023-06-01 12:00:59.819
pool-1-thread-1输出:0时间:2023-06-01 12:00:59.819
pool-1-thread-4输出:1时间:2023-06-01 12:00:59.819
pool-1-thread-1输出:1时间:2023-06-01 12:00:59.819
pool-1-thread-2输出:0时间:2023-06-01 12:00:59.819
pool-1-thread-4输出:2时间:2023-06-01 12:00:59.819
pool-1-thread-1输出:2时间:2023-06-01 12:00:59.819
pool-1-thread-3输出:0时间:2023-06-01 12:00:59.819
pool-1-thread-1输出:3时间:2023-06-01 12:00:59.819
pool-1-thread-2输出:1时间:2023-06-01 12:00:59.819
pool-1-thread-4输出:3时间:2023-06-01 12:00:59.819
pool-1-thread-1输出:4时间:2023-06-01 12:00:59.819
pool-1-thread-3输出:1时间:2023-06-01 12:00:59.819
pool-1-thread-1输出:0时间:2023-06-01 12:00:59.820
pool-1-thread-4输出:4时间:2023-06-01 12:00:59.820
pool-1-thread-2输出:2时间:2023-06-01 12:00:59.819
pool-1-thread-3输出:2时间:2023-06-01 12:00:59.820
pool-1-thread-1输出:1时间:2023-06-01 12:00:59.820
pool-1-thread-4输出:0时间:2023-06-01 12:00:59.820
pool-1-thread-2输出:3时间:2023-06-01 12:00:59.820
pool-1-thread-3输出:3时间:2023-06-01 12:00:59.820
pool-1-thread-1输出:2时间:2023-06-01 12:00:59.820
pool-1-thread-2输出:4时间:2023-06-01 12:00:59.820
pool-1-thread-4输出:1时间:2023-06-01 12:00:59.820
pool-1-thread-3输出:4时间:2023-06-01 12:00:59.820
pool-1-thread-1输出:3时间:2023-06-01 12:00:59.820
pool-1-thread-4输出:2时间:2023-06-01 12:00:59.820
pool-1-thread-1输出:4时间:2023-06-01 12:00:59.820
pool-1-thread-4输出:3时间:2023-06-01 12:00:59.820
pool-1-thread-4输出:4时间:2023-06-01 12:00:59.821
- 方法2: 使用Executors(线程池工具类)调用方法返回不同特点的线程池对象
常用API
| 方法 | 说明 |
|---|---|
| static ExecutorService newCachedThreadPool() | 线程数量随任务增加而增加,如果线程任务执行完毕且空闲一段时间则回收线程 |
| static ExecutorService newFixedThreadPool(int nThreads) | 创建固定数量的线程池,如果某个线程执行发生异常而结束,则线程池补充新线程替代 |
| static ExecutorService newSingleThreadExecutor() | 相当于 newFixedThreadPool(1) |
| static ScheduledExecutorService newScheduledThreadPool(int corePoolSite) | 创建线程池,可以实现给定延迟后运行任务或定期完成任务 |
Excutors底层原理: 基于线程池实现类ThreadPoolExecutor创建线程池对象。
使用示例
**任务类 newRunnable **
class newRunnable implements Runnable{@Overridepublic void run() {for (int i = 0; i < 5; i++) {System.out.println(Thread.currentThread().getName() + "输出:" + i + "时间:" + new SimpleDateFormat("yyyy-MM-dd HH:mm:ss.SSS").format(System.currentTimeMillis()));}}
}
newCacheThreadPool()
public class ExecutorsDemo {public static void main(String[] args) {Runnable runnable = new newRunnable();System.out.println("——————————newCacheThreadPool——————————");/*线程数随着任务数量的变化而变化*/ExecutorService e = Executors.newCachedThreadPool();for (int i = 0; i < 5; i++) {e.submit(runnable);}e.shutdown();}
}/*打印输出*/
——————————newCacheThreadPool——————————
pool-1-thread-2输出:0时间:2023-06-01 13:55:43.601
pool-1-thread-5输出:0时间:2023-06-01 13:55:43.601
pool-1-thread-4输出:0时间:2023-06-01 13:55:43.601
pool-1-thread-2输出:1时间:2023-06-01 13:55:43.638
pool-1-thread-3输出:0时间:2023-06-01 13:55:43.601
pool-1-thread-1输出:0时间:2023-06-01 13:55:43.601
pool-1-thread-2输出:2时间:2023-06-01 13:55:43.638
pool-1-thread-4输出:1时间:2023-06-01 13:55:43.638
pool-1-thread-3输出:1时间:2023-06-01 13:55:43.638
pool-1-thread-5输出:1时间:2023-06-01 13:55:43.638
pool-1-thread-2输出:3时间:2023-06-01 13:55:43.638
pool-1-thread-1输出:1时间:2023-06-01 13:55:43.638
pool-1-thread-3输出:2时间:2023-06-01 13:55:43.639
pool-1-thread-4输出:2时间:2023-06-01 13:55:43.639
pool-1-thread-2输出:4时间:2023-06-01 13:55:43.639
pool-1-thread-5输出:2时间:2023-06-01 13:55:43.639
pool-1-thread-1输出:2时间:2023-06-01 13:55:43.639
pool-1-thread-4输出:3时间:2023-06-01 13:55:43.639
pool-1-thread-3输出:3时间:2023-06-01 13:55:43.639
pool-1-thread-5输出:3时间:2023-06-01 13:55:43.639
pool-1-thread-1输出:3时间:2023-06-01 13:55:43.639
pool-1-thread-4输出:4时间:2023-06-01 13:55:43.639
pool-1-thread-3输出:4时间:2023-06-01 13:55:43.639
pool-1-thread-5输出:4时间:2023-06-01 13:55:43.639
pool-1-thread-1输出:4时间:2023-06-01 13:55:43.639
newFixedThreadPool
public class ExecutorsDemo {System.out.println("——————————newFixedThreadPool——————————");ExecutorService e2 = Executors.newFixedThreadPool(2);for (int i = 0; i < 5; i++) {e2.submit(runnable);}e2.shutdown();
}/*打印输出*/
——————————newFixedThreadPool——————————
pool-1-thread-1输出:0时间:2023-06-01 14:17:21.888
pool-1-thread-2输出:0时间:2023-06-01 14:17:21.888
pool-1-thread-1输出:1时间:2023-06-01 14:17:21.919
pool-1-thread-2输出:1时间:2023-06-01 14:17:21.919
pool-1-thread-1输出:2时间:2023-06-01 14:17:21.920
pool-1-thread-2输出:2时间:2023-06-01 14:17:21.920
pool-1-thread-1输出:3时间:2023-06-01 14:17:21.920
pool-1-thread-2输出:3时间:2023-06-01 14:17:21.920
pool-1-thread-1输出:4时间:2023-06-01 14:17:21.920
pool-1-thread-2输出:4时间:2023-06-01 14:17:21.920
pool-1-thread-1输出:0时间:2023-06-01 14:17:21.920
pool-1-thread-1输出:1时间:2023-06-01 14:17:21.920
pool-1-thread-1输出:2时间:2023-06-01 14:17:21.920
pool-1-thread-1输出:3时间:2023-06-01 14:17:21.921
pool-1-thread-2输出:0时间:2023-06-01 14:17:21.921
pool-1-thread-1输出:4时间:2023-06-01 14:17:21.921
pool-1-thread-2输出:1时间:2023-06-01 14:17:21.921
pool-1-thread-1输出:0时间:2023-06-01 14:17:21.921
pool-1-thread-2输出:2时间:2023-06-01 14:17:21.921
pool-1-thread-1输出:1时间:2023-06-01 14:17:21.921
pool-1-thread-2输出:3时间:2023-06-01 14:17:21.921
pool-1-thread-1输出:2时间:2023-06-01 14:17:21.921
pool-1-thread-2输出:4时间:2023-06-01 14:17:21.921
pool-1-thread-1输出:3时间:2023-06-01 14:17:21.921
pool-1-thread-1输出:4时间:2023-06-01 14:17:21.921
newSingleThreadExecutor
public class ExecutorsDemo {System.out.println("——————————newSingleThreadExecutor——————————");ExecutorService e3 = Executors.newSingleThreadExecutor();for (int i = 0; i < 5; i++) {e3.submit(runnable);}e3.shutdown();
}/*打印输出*/
——————————newSingleThreadExecutor——————————
pool-1-thread-1输出:0时间:2023-06-01 14:36:17.093
pool-1-thread-1输出:1时间:2023-06-01 14:36:17.120
pool-1-thread-1输出:2时间:2023-06-01 14:36:17.121
pool-1-thread-1输出:3时间:2023-06-01 14:36:17.121
pool-1-thread-1输出:4时间:2023-06-01 14:36:17.121
pool-1-thread-1输出:0时间:2023-06-01 14:36:17.121
pool-1-thread-1输出:1时间:2023-06-01 14:36:17.121
pool-1-thread-1输出:2时间:2023-06-01 14:36:17.121
pool-1-thread-1输出:3时间:2023-06-01 14:36:17.122
pool-1-thread-1输出:4时间:2023-06-01 14:36:17.122
pool-1-thread-1输出:0时间:2023-06-01 14:36:17.122
pool-1-thread-1输出:1时间:2023-06-01 14:36:17.122
pool-1-thread-1输出:2时间:2023-06-01 14:36:17.122
pool-1-thread-1输出:3时间:2023-06-01 14:36:17.122
pool-1-thread-1输出:4时间:2023-06-01 14:36:17.122
pool-1-thread-1输出:0时间:2023-06-01 14:36:17.122
pool-1-thread-1输出:1时间:2023-06-01 14:36:17.122
pool-1-thread-1输出:2时间:2023-06-01 14:36:17.123
pool-1-thread-1输出:3时间:2023-06-01 14:36:17.123
pool-1-thread-1输出:4时间:2023-06-01 14:36:17.123
pool-1-thread-1输出:0时间:2023-06-01 14:36:17.123
pool-1-thread-1输出:1时间:2023-06-01 14:36:17.123
pool-1-thread-1输出:2时间:2023-06-01 14:36:17.123
pool-1-thread-1输出:3时间:2023-06-01 14:36:17.123
pool-1-thread-1输出:4时间:2023-06-01 14:36:17.123
newScheduledThreadPool
public class ExecutorsDemo {System.out.println("——————————newScheduledThreadPool——————————");ExecutorService e4 = Executors.newScheduledThreadPool(20);for (int i = 0; i < 5; i++) {e4.submit(new Runnable() {@Overridepublic void run() {System.out.println(Thread.currentThread().getName()+"执行了");}});}e4.shutdown();
}/*打印输出*/
——————————newScheduledThreadPool——————————
pool-1-thread-1执行了
pool-1-thread-3执行了
pool-1-thread-2执行了
pool-1-thread-4执行了
pool-1-thread-5执行了
使用Executors工具类可能产生的问题
- 固定线程池与单例线程池产生的问题: 允许请求任务队列长度为Integer.MAX_VALUE,可能出现OOM错误(内存溢出)
- 缓冲线程池与计划线程池产生的问题: 创建的线程数量为Integer.MAX_VALUE,线程数量随任务数量增加,可能会出现OOM错误。
八、定时器
1、概念: 是一种控制任务延时调用或周期调用的技术。
2、作用: 定时执行任务
3、实现方式
(1)Timer
| 构造器 | 说明 |
|---|---|
| Timer() | 创建计时器对象 |
| 方法 | 说明 |
|---|---|
| void schedule(TimerTask task,long delay,long period) | 创建带有任务,延时时间,间隔周期参数的执行方法 |
使用示例
public class TimerDemo {public static void main(String[] args) {Timer timer = new Timer();timer.schedule(new TimerTask() {@Overridepublic void run() {System.out.println(Thread.currentThread().getName()+"执行了,执行时间:"+new SimpleDateFormat("yyyy-MM-dd HH:mm:ss.SSS").format(System.currentTimeMillis()));}},1000,2000); //延时1s开始,以2s为一个执行周期}
}/*打印输出*/
Timer-0执行了,执行时间:2023-06-01 15:49:56.834
Timer-0执行了,执行时间:2023-06-01 15:49:58.812
Timer-0执行了,执行时间:2023-06-01 15:50:00.818
存在的问题
- Timer是单线程,当有多个任务执行时,存在延时和设置定时器的时间有差异。
- 可能因为某个任务异常而终止,影响后续执行。
(2)ScheduleExecutorService
- 优点: 基于线程池,某个任务执行情况不会影响到其它线程。
| 方法 | 说明 |
|---|---|
| static ScheduledExecutorService newScheduledTreadPool(int corePoolSize) | 得到线程池对象 |
| ScheduledFuture<?> scheduleAtFixedRate(Rinnable command,long delay,long period, TimeUnit unit) | 创建周期调度方法 |
使用示例
public class ScheduleDemo {public static void main(String[] args) {ScheduledExecutorService service = Executors.newScheduledThreadPool(3);service.scheduleAtFixedRate(() -> {System.out.println(Thread.currentThread().getName()+"执行了,时间:"+new Date());},0,1, TimeUnit.SECONDS);}
}
九、补充知识
1、并发: 因CPU同时处理的线程有限,CPU会轮询每一个线程服务,由于CPU切换速度极快,因此我们会认为这些线程都是同时执行的,这就叫并发。
2、并行: CPU可多线程执行的能力叫并发。
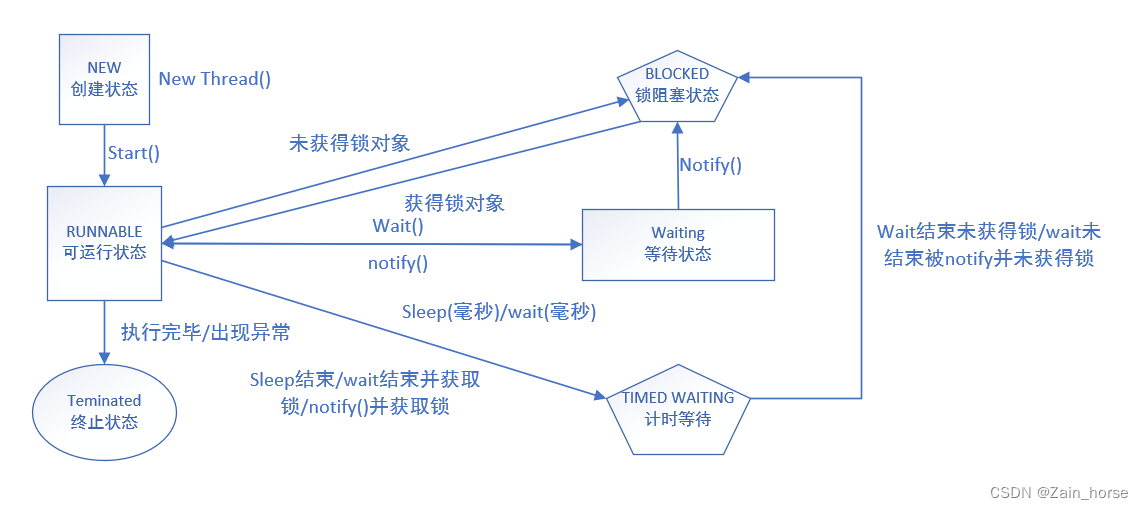
3、生命周期: 是线程从创建到销毁的过程。
(1)六种状态
- NEW——新建状态
- RUNNABLE——运行状态
- BLOCKED——锁阻塞状态
- WATTING——等待状态
- TIMED_WATING——计时等待状态
- TERMINATED——终止死亡状态