前言OpenVINO™ C# API 是一个 OpenVINO™ 的 .Net wrapper,应用最新的 OpenVINO™ 库开发,通过 OpenVINO™ C API 实现 .Net 对 OpenVINO™ Runtime 调用,使用习惯与 OpenVINO™ C++ API 一致。OpenVINO™ C# API 由于是基于 OpenVINO™ 开发,所支持的平台与 OpenVINO™ 完全一致,具体信息可以参考 OpenVINO™。通过使用 OpenVINO™ C# API,可以在 .NET、.NET Framework等框架下使用 C# 语言实现深度学习模型在指定平台推理加速。
OpenVINO™ C# API 项目链接为:
https://github.com/guojin-yan/OpenVINO-CSharp-API.git项目源码链接为:
https://github.com/guojin-yan/OpenVINO-CSharp-API-Samples.git
1. 简介
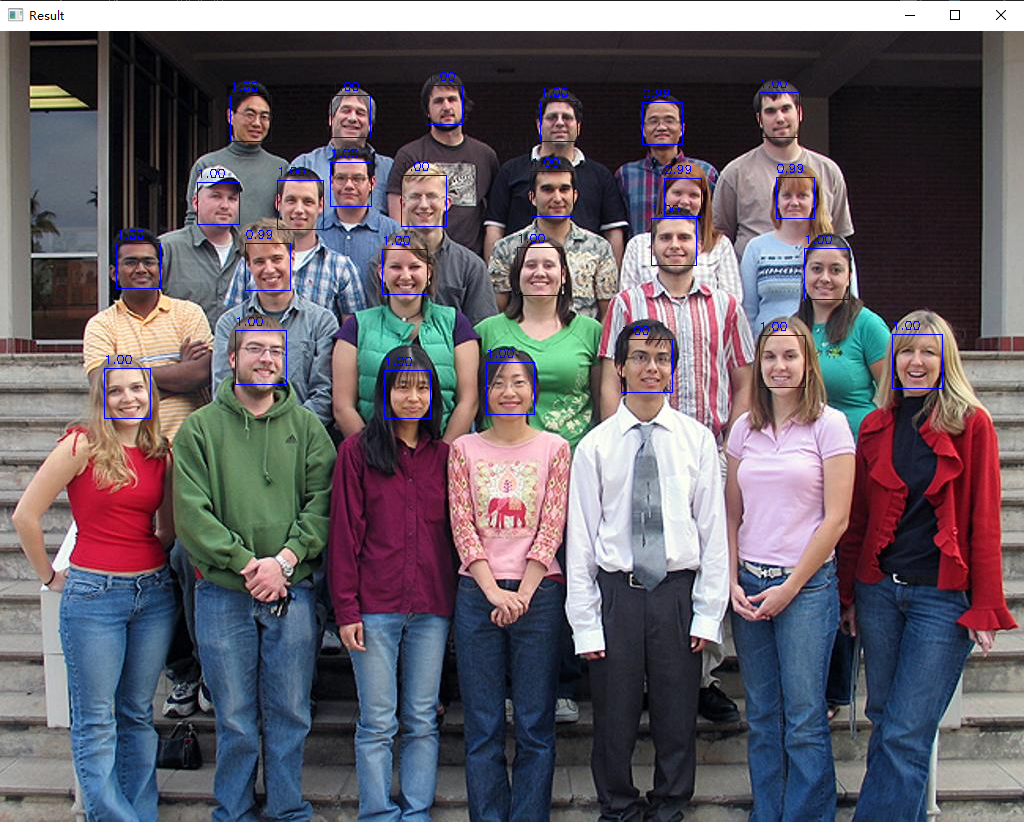
Blazeface模型是Google推出的一款专为移动GPU推理量身定制的轻量级且性能卓越的人脸检测器,BlazeFace 在旗舰移动设备上以200-1000 + FPS的速度运行。 在本文中,我们将使用OpenVINO™ C# API 部署 Blazeface 实现人脸检测。
2. 项目环境与依赖
该项目中所需依赖已经支持通过NuGet Package进行安装,在该项目中,需要安装以下NuGet Package:
- OpenVINO C# API NuGet Package:
OpenVINO.CSharp.API
OpenVINO.runtime.win
OpenVINO.CSharp.API.Extensions
- OpenCvSharp NuGet Package:
OpenCvSharp4
OpenCvSharp4.Extensions
OpenCvSharp4.runtime.win
3. 项目输出
项目使用的是控制台输出,运行后输出如下所示:
<00:00:00> Sending http request to https://github.com/guojin-yan/OpenVINO-CSharp-API-Samples/releases/download/Model/blazeface_1000e.tar.
<00:00:01> Http Response Accquired.
<00:00:01> Total download length is 0.47 Mb.
<00:00:01> Download Started.
<00:00:01> File created.
<00:00:01> Downloading: [■■■■■■■■■■] 100% <00:00:01 0.24 Mb/s> 0.47 Mb/0.47 Mb downloaded.
<00:00:01> File Downloaded, saved in E:\GitSpace\OpenVINO-CSharp-API-Samples\model_samples\face_detection\blazeface_opencvsharp\bin\Release\net6.0\model\blazeface_1000e.tar.
<00:00:00> Sending http request to https://github.com/guojin-yan/OpenVINO-CSharp-API-Samples/releases/download/Image/face1.jpg.
<00:00:01> Http Response Accquired.
<00:00:01> Total download length is 0.14 Mb.
<00:00:01> Download Started.
<00:00:01> File created.
<00:00:01> Downloading: [■■■■■■■■■■] 100% <00:00:01 0.08 Mb/s> 0.14 Mb/0.14 Mb downloaded.
<00:00:01> File Downloaded, saved in E:\GitSpace\OpenVINO-CSharp-API-Samples\model_samples\face_detection\blazeface_opencvsharp\bin\Release\net6.0\model\face1.jpg.
[ INFO ] ---- OpenVINO INFO----
[ INFO ] Description : OpenVINO Runtime
[ INFO ] Build number: 2024.0.0-14509-34caeefd078-releases/2024/0
[ INFO ] Predict model files: ./model/blazeface_1000e.xml
[ INFO ] Predict image  files: ./model/face1.jpg
[ INFO ] Inference device: CPU
[ INFO ] Start RT-DETR model inference.
[ INFO ] 1. Initialize OpenVINO Runtime Core success, time spend: 3.2045ms.
[ INFO ] 2. Read inference model success, time spend: 46.1753ms.
[ INFO ] Inference Model
[ INFO ]   Model name: Model0
[ INFO ]   Input:
[ INFO ]      name: scale_factor
[ INFO ]      type: float
[ INFO ]      shape: Shape : {1,2}
[ INFO ]      name: image
[ INFO ]      type: float
[ INFO ]      shape: Shape : {1,3,640,640}
[ INFO ]      name: im_shape
[ INFO ]      type: float
[ INFO ]      shape: Shape : {1,2}
[ INFO ]   Output:
[ INFO ]      name: multiclass_nms3_0.tmp_0
[ INFO ]      type: float
[ INFO ]      shape: Shape : {750,6}
[ INFO ]      name: multiclass_nms3_0.tmp_2
[ INFO ]      type: int32_t
[ INFO ]      shape: Shape : {1}
[ INFO ] 3. Loading a model to the device success, time spend:213.1551ms.
[ INFO ] 4. Create an infer request success, time spend:0.4506ms.
[ INFO ] 5. Process input images success, time spend:74.6076ms.
[ INFO ] 6. Set up input data success, time spend:1.7392ms.
[ INFO ] 7. Do inference synchronously success, time spend:21.3498ms.
[ INFO ] 8. Get infer result data success, time spend:1.1302ms.
[ INFO ] 9. Process reault  success, time spend:0.4035ms.
[ INFO ] The result save to E:\GitSpace\OpenVINO-CSharp-API-Samples\model_samples\face_detection\blazeface_opencvsharp\bin\Release\net6.0\model\face1_result.jpg
图像预测结果如下图所示:
4. 代码展示
以下为嘛中所使用的命名空间代码:
using OpenCvSharp.Dnn;
using OpenCvSharp;
using OpenVinoSharp;
using OpenVinoSharp.Extensions;
using OpenVinoSharp.Extensions.utility;
using System.Runtime.InteropServices;
using OpenVinoSharp.preprocess;
using OpenVinoSharp.Extensions.result;
using OpenVinoSharp.Extensions.process;
using System;
using System.Reflection.Metadata;namespace blazeface_opencvsharp
{internal class Program{    ....}
}
下面为定义的模型预测代码:
static void face_detection(string model_path, string image_path, string device)
{// -------- Step 1. Initialize OpenVINO Runtime Core --------Core core = new Core();// -------- Step 2. Read inference model --------Model model = core.read_model(model_path);Dictionary<string, PartialShape> pairs = new Dictionary<string, PartialShape>();pairs.Add("scale_factor", new PartialShape(new Shape(1, 2)));pairs.Add("im_shape", new PartialShape(new Shape(1, 2)));pairs.Add("image", new PartialShape(new Shape(1, 3, 640, 640)));model.reshape(pairs);OvExtensions.printf_model_info(model);// -------- Step 3. Loading a model to the device --------CompiledModel compiled_model = core.compile_model(model, device);// -------- Step 4. Create an infer request --------InferRequest infer_request = compiled_model.create_infer_request();// -------- Step 5. Process input images --------Mat image = new Mat(image_path); // Read image by opencvsharpMat mat = new Mat();Cv2.Resize(image, mat, new Size(640, 640));mat = Normalize.run(mat, new float[] { 123f, 117f, 104f }, new float[] { 1 / 127.502231f, 1 / 127.502231f, 1 / 127.502231f },false);float[] input_data = Permute.run(mat);// -------- Step 6. Set up input data --------Tensor input_tensor_data = infer_request.get_tensor("image");//input_tensor_data.set_shape(new Shape(1, 3, image.Cols, image.Rows));input_tensor_data.set_data<float>(input_data);Tensor input_tensor_shape = infer_request.get_tensor("im_shape");input_tensor_shape.set_shape(new Shape(1, 2));input_tensor_shape.set_data<float>(new float[] { 640, 640 });Tensor input_tensor_factor = infer_request.get_tensor("scale_factor");input_tensor_factor.set_shape(new Shape(1, 2));input_tensor_factor.set_data<float>(new float[] { ((float)640.0f / image.Rows), ((float)640.0 / image.Cols) });// -------- Step 7. Do inference synchronously --------infer_request.infer();// -------- Step 8. Get infer result data --------Tensor output_tensor = infer_request.get_output_tensor(0);Shape output_shape = output_tensor.get_shape();int output_length = (int)output_tensor.get_size();float[] result_data = output_tensor.get_data<float>(output_length);Tensor output_tensor1 = infer_request.get_output_tensor(1);int output_length1 = (int)output_tensor1.get_size();int[] result_len = output_tensor1.get_data<int>(output_length1);// -------- Step 9. Process reault  --------List<Rect> position_boxes = new List<Rect>();List<float> confidences = new List<float>();// Preprocessing output resultsfor (int i = 0; i < result_len[0]; i++){double confidence = result_data[6 * i + 1];if (confidence > 0.5){float tlx = result_data[6 * i + 2];float tly = result_data[6 * i + 3];float brx = result_data[6 * i + 4];float bry = result_data[6 * i + 5];Rect box = new Rect((int)tlx, (int)tly, (int)(brx - tlx), (int)(bry - tly));position_boxes.Add(box);confidences.Add((float)confidence);}}for (int i = 0; i < position_boxes.Count; i++){int index = i;Cv2.Rectangle(image, position_boxes[index], new Scalar(255, 0, 0), 1, LineTypes.Link8);Cv2.PutText(image, confidences[index].ToString("0.00"),new OpenCvSharp.Point(position_boxes[index].TopLeft.X, position_boxes[index].TopLeft.Y - 5),HersheyFonts.HersheySimplex, 0.4, new Scalar(255, 0, 0), 1);}string output_path = Path.Combine(Path.GetDirectoryName(Path.GetFullPath(image_path)),Path.GetFileNameWithoutExtension(image_path) + "_result.jpg");Cv2.ImWrite(output_path, image);Slog.INFO("The result save to " + output_path);Cv2.ImShow("Result", image);Cv2.WaitKey(0);
}
下面为程序运行的主函数代码,该代码会下载转换好的预测模型,并调用预测方法进行预测:
static void Main(string[] args)
{string model_path = "";string image_path = "";string device = "CPU";if (args.Length == 0){if (!Directory.Exists("./model")){Directory.CreateDirectory("./model");}if (!File.Exists("./model/blazeface_1000e.xml")&& !File.Exists("./model/blazeface_1000e.bin")){if (!File.Exists("./model/blazeface_1000e.tar")){_ = Download.download_file_async("https://github.com/guojin-yan/OpenVINO-CSharp-API-Samples/releases/download/Model/blazeface_1000e.tar","./model/blazeface_1000e.tar").Result;}Download.unzip("./model/blazeface_1000e.tar", "./model/");}if (!File.Exists("./model/face1.jpg")){_ = Download.download_file_async("https://github.com/guojin-yan/OpenVINO-CSharp-API-Samples/releases/download/Image/face1.jpg","./model/face1.jpg").Result;}model_path = "./model/blazeface_1000e.xml";image_path = "./model/face1.jpg";}else if (args.Length >= 2){model_path = args[0];image_path = args[1];device = args[2];}else{Console.WriteLine("Please enter the correct command parameters, for example:");Console.WriteLine("> 1. dotnet run");Console.WriteLine("> 2. dotnet run <model path> <image path> <device name>");}// -------- Get OpenVINO runtime version --------OpenVinoSharp.Version version = Ov.get_openvino_version();Slog.INFO("---- OpenVINO INFO----");Slog.INFO("Description : " + version.description);Slog.INFO("Build number: " + version.buildNumber);Slog.INFO("Predict model files: " + model_path);Slog.INFO("Predict image  files: " + image_path);Slog.INFO("Inference device: " + device);Slog.INFO("Start RT-DETR model inference.");face_detection(model_path, image_path, device);}
5. 总结
在该项目中,我们结合之前开发的 OpenVINO™ C# API 项目部署 Blazeface 模型,成功实现了人脸检测。
- 项目完整代码链接为:
https://github.com/guojin-yan/OpenVINO-CSharp-API-Samples/blob/master/model_samples/face_detection/blazeface_opencvsharp/Program.cs
- 为了方便EmguCV用户使用需求,同时开发了EmguCV版本,项目链接为:
https://github.com/guojin-yan/OpenVINO-CSharp-API-Samples/blob/master/model_samples/face_detection/blazeface_emgucv/Program.cs
最后如果各位开发者在使用中有任何问题,欢迎大家与我联系。