问题和解决方案
现在要完成一个需求,即镂空中间部分的image,外围image可以定义颜色并可选屏蔽点击,而中间的image需要透明且可以穿透,必须不能屏蔽点击。
由此拆分成了两个问题:
1.定义外围image颜色,内部image不绘制
2.外围image可选raycast target,内围image不受raycast target标志位影响。
由此可继承Graphic和ICanvasRaycastFilter来分别实现这个目标。
OnPopulateMesh
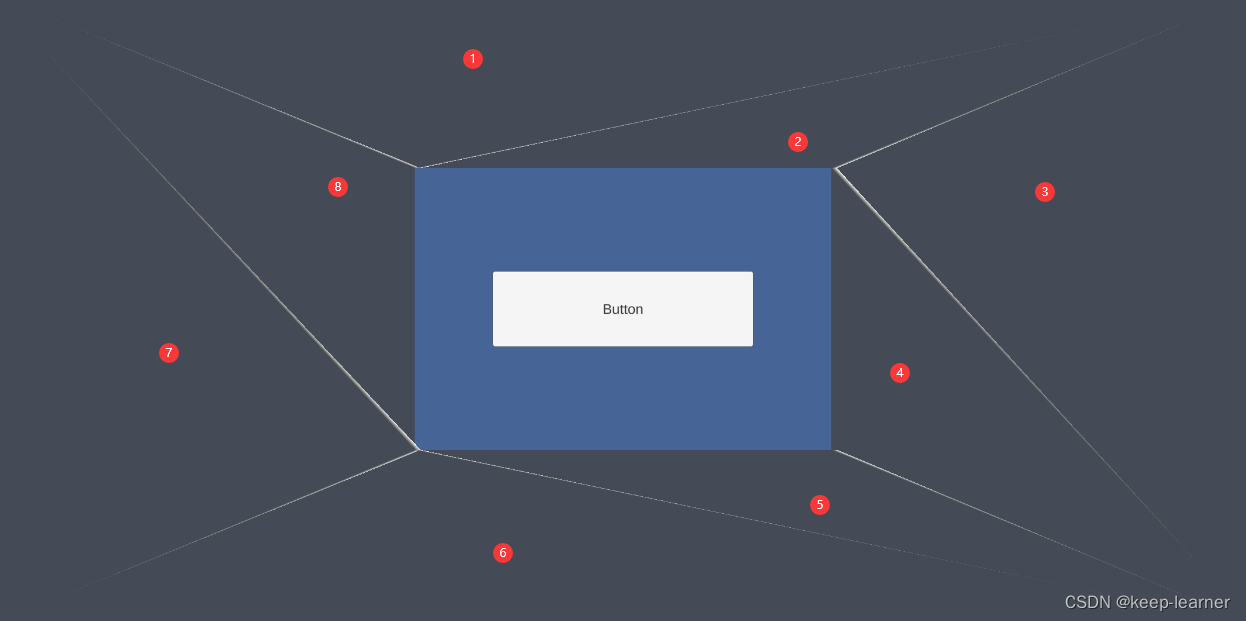
继承graphic脚本后重写Graphic.OnPopulateMesh函数,可以在里面去完成重绘操作。与其说不绘制中间的这部分范围,不如说只绘制外面的范围。用VertexHelper.AddTriangle即可完成简单的三角形绘制工作,由此可以根据外image顶点和内image顶点来完成八个三角形的构建绘制工作,如下示意图所示:
因此代码如下所示:
protected override void OnPopulateMesh(VertexHelper vh)
{if (innerTrans == null){base.OnPopulateMesh(vh);return;}vh.Clear();UIVertex vertex = UIVertex.simpleVert;vertex.color = color;//0 outer左下角vertex.position = new Vector3(outerLeftBottom.x, outerLeftBottom.y);vh.AddVert(vertex);//1 outer左上角vertex.position = new Vector3(outerLeftBottom.x, outerRightTop.y);vh.AddVert(vertex);//2 outer右上角vertex.position = new Vector3(outerRightTop.x, outerRightTop.y);vh.AddVert(vertex);//3 outer右下角vertex.position = new Vector3(outerRightTop.x, outerLeftBottom.y);vh.AddVert(vertex);//4 inner左下角vertex.position = new Vector3(innerLeftBottom.x, innerLeftBottom.y);vh.AddVert(vertex);//5 inner左上角vertex.position = new Vector3(innerLeftBottom.x, innerLeftTop.y);vh.AddVert(vertex);//6 inner右上角vertex.position = new Vector3(innerLeftTop.x, innerLeftTop.y);vh.AddVert(vertex);//7 inner右下角vertex.position = new Vector3(innerLeftTop.x, innerLeftBottom.y);vh.AddVert(vertex);//绘制三角形vh.AddTriangle(0, 1, 4);vh.AddTriangle(1, 4, 5);vh.AddTriangle(1, 5, 2);vh.AddTriangle(2, 5, 6);vh.AddTriangle(2, 6, 3);vh.AddTriangle(6, 3, 7);vh.AddTriangle(4, 7, 3);vh.AddTriangle(0, 4, 3);
}
IsRaycastLocationValid
继承ICanvasRaycastFilter接口,重写内置的IsRaycastLocationValid即可:
return innerTrans == null || !RectTransformUtility.RectangleContainsScreenPoint(innerTrans, sp, eventCamera);整体代码:
public class HollowOutMask : Graphic, ICanvasRaycastFilter
{[Header("镂空区域")]public RectTransform innerTrans;RectTransform outerTrans;//背景区域Vector3 innerLeftTop = Vector3.zero;//镂空区域的右上角坐标Vector3 innerLeftBottom = Vector3.zero;//镂空区域的左下角坐标Vector2 outerRightTop = Vector2.zero;//背景区域的右上角坐标Vector2 outerLeftBottom = Vector2.zero;//背景区域的左下角坐标protected override void Awake(){base.Awake();outerTrans = GetComponent<RectTransform>();}protected override void OnPopulateMesh(VertexHelper vh){if (innerTrans == null){base.OnPopulateMesh(vh);return;}vh.Clear();UIVertex vertex = UIVertex.simpleVert;vertex.color = color;//0 outer左下角vertex.position = new Vector3(outerLeftBottom.x, outerLeftBottom.y);vh.AddVert(vertex);//1 outer左上角vertex.position = new Vector3(outerLeftBottom.x, outerRightTop.y);vh.AddVert(vertex);//2 outer右上角vertex.position = new Vector3(outerRightTop.x, outerRightTop.y);vh.AddVert(vertex);//3 outer右下角vertex.position = new Vector3(outerRightTop.x, outerLeftBottom.y);vh.AddVert(vertex);//4 inner左下角vertex.position = new Vector3(innerLeftBottom.x, innerLeftBottom.y);vh.AddVert(vertex);//5 inner左上角vertex.position = new Vector3(innerLeftBottom.x, innerLeftTop.y);vh.AddVert(vertex);//6 inner右上角vertex.position = new Vector3(innerLeftTop.x, innerLeftTop.y);vh.AddVert(vertex);//7 inner右下角vertex.position = new Vector3(innerLeftTop.x, innerLeftBottom.y);vh.AddVert(vertex);//绘制三角形vh.AddTriangle(0, 1, 4);vh.AddTriangle(1, 4, 5);vh.AddTriangle(1, 5, 2);vh.AddTriangle(2, 5, 6);vh.AddTriangle(2, 6, 3);vh.AddTriangle(6, 3, 7);vh.AddTriangle(4, 7, 3);vh.AddTriangle(0, 4, 3);}/// <summary>/// 过滤掉射线检测/// </summary>public bool IsRaycastLocationValid(Vector2 sp, Camera eventCamera){return innerTrans == null || !RectTransformUtility.RectangleContainsScreenPoint(innerTrans, sp, eventCamera);}private bool NeedUpdateBounds(){if (innerTrans == null){return false;}Bounds bounds = RectTransformUtility.CalculateRelativeRectTransformBounds(outerTrans, innerTrans);if (innerLeftTop == bounds.max&& innerLeftBottom == bounds.min&& outerRightTop == outerTrans.rect.max&& outerLeftBottom == outerTrans.rect.min){return false;}return true;}private void UpdateBounds(){if (innerTrans == null){return;}Bounds bounds = RectTransformUtility.CalculateRelativeRectTransformBounds(outerTrans, innerTrans);innerLeftTop = bounds.max;innerLeftBottom = bounds.min;outerRightTop = outerTrans.rect.max;outerLeftBottom = outerTrans.rect.min;}private void Update(){if(NeedUpdateBounds()){UpdateBounds();SetAllDirty();}}
}
注意我们需要赋值一个innerImage transform给这个graphic脚本,作为内image大小和位置控制;而外image则调整挂载这个graphic脚本本身的transform即可。