目录
01.节点
02.迭代器
迭代器运算符重载
03.list类
(1)构造与析构
(2)迭代器相关
(3)容量相关
(4)访问操作
(5)插入删除
我们在学习数据结构的时候,学过一个非常好用的结构,叫做带头双向循环链表,它不仅遍历非常地灵活方便,而且插入和删除操作的效率很高,弥补了单链表相较于数组的缺点。我们今天要讲的list模版底层就是带头双向循环链表。
01.节点
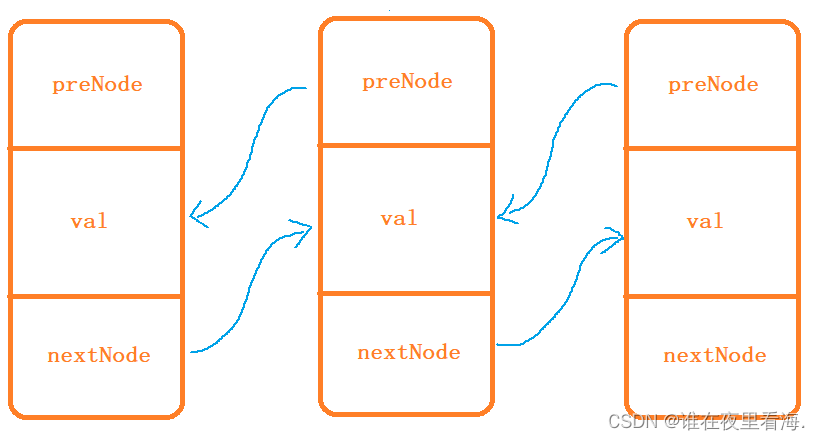
既然是链表,链表是由一个个节点组成的,每一个节点都需要独立开辟空间,节点之间通过指针进行连接,而双向循环链表的节点内部包含两个指针,一个指向下一个节点,一个指向上一个节点。
// List的节点类template<class T>struct ListNode{ListNode(const T& val = T()): _prev(nullptr), _next(bullptr), _val(val){}ListNode<T>* _prev;ListNode<T>* _next;T _val;};这里用struct定义类是因为,struct定义的类内部成员默认为公有,而class定义的类内部成员默认私有,节点的参数需要支持外部访问,所以这里用struct定义。
02.迭代器
在vector中,迭代器通常是一个原生指针,因为vector内部是使用连续的内存块来存储数据的,所以可以直接用指针来表示迭代器。
但是list使用双向链表存储数据,其迭代器就不能只是指针了,而需要存储更多的数据,并且迭代器的加减等运算操作也需要重载。
迭代器运算符重载
1.*解引用:
使用 *iter 访问迭代器时,operator*() 返回的是 _node->_val 的引用,可以直接对返回值进行操作,就好像它是一个对象一样。
2.->成员访问:
使用迭代器的 -> 操作符时,实际上是先调用 operator->() 返回 _node->_val 的地址,然后对返回的地址进行成员访问。
3.迭代器++、--:
分为前置++与后置++:
前置++:
- 调用前置++时,先将
_node指向下一个节点。 - 返回的是递增后的对象的引用。
- 返回的引用允许对递增后的对象进行连续操作。
后置++:
- 调用后置++时,先创建一个当前对象的副本
temp。 - 将
_node指向下一个节点。 - 返回的是之前的对象的副本
temp。 - 返回的副本
temp保留了递增前的状态,允许在返回后继续使用递增前的对象。
--与++同理,只不过--是指向前一个节点,将“ _node = _node->_next”改成“ _node = _node->_prev”即可。
4.==运算符:
判断两个迭代器是否相等就是判断他们的节点是否相等。
//List的迭代器类template<class T, class Ref, class Ptr>class ListIterator{typedef ListNode<T> Node;typedef ListIterator<T, Ref, Ptr> Self;public:ListIterator(Node* node = nullptr): _node(node){}ListIterator(const Self& l): *this(l){}T& operator*(){return _node->_val;}T* operator->(){return &(operator*());}Self& operator++(){_node = _node->_next;return *this;}Self operator++(int){Self temp(*this);_node = _node->_next;return temp;}Self& operator--(){_node = _node->_prev;return *this;}Self& operator--(int){Self temp(*this);_node = _node->_prev;return temp;}bool operator!=(const Self& l){return _node != l._node;}bool operator==(const Self& l){return _node == l._node;}private:Node* _node;};03.list类
(1)构造与析构
在创建一个list实例时,首先需要创建一个头节点,不存储任何有效数据。用于简化链表的操作,以及提供一种统一的操作方式。
private:void CreateHead(){_head = new node;_head->_prev = _head;_head->_next = _head;}Node* _head;};
list的构造分为无参构造、实例化构造、迭代器构造、拷贝构造等等。
无参构造:
只需要创建一个头节点,CreateHead()已经完成了初始化,就不需要默认构造了
list(){CreateHead();}
实例化构造:
实例化n个value元素,在head节点后面插入n个value元素。
list(int n, const T& value = T()){CreateHead();for (int i = 0; i < n; ++i) {push_back(value);}}
迭代器构造:
利用迭代器对拷贝源进行遍历,在head节点后面不断插入数据。
template <class Iterator>list(Iterator first, Iterator last){CreateHead();while (first != last) {push_back(*first);++first;}}
拷贝构造:
复制一个拷贝源副本,然后赋值给目标容器。
list(const list<T>& l){CreateHead();//_head = l->_head;//浅拷贝list temp<T>(l.begin(), l.end());this->swap(temp);}
重载=:
创建赋值源的副本并作为返回值返回。
list<T>& operator=(const list<T> l){list temp<T>(l.begin(), l.end());return *temp;}
析构:
由于list内部数据存储地址是分散的,析构时要对每一个节点单独进行空间释放,这里我们可以用头删的方法,头节点保留,依次删除头节点指向的首元素节点,并改变指向,这样就可以遍历容器达到析构效果。
void clear(){Node cur = _head;while (cur != _head){_head->_next = cur->_next;delete cur;cur = _head->_next;}_head->_next = _head->_prev = _head;}~list(){clear();delete _head;_head = nullptr;}
(2)迭代器相关
我们需要定义定义 begin() 和 end() 函数,用于返回指向链表开头和结尾的迭代器。
begin() 函数返回的迭代器指向链表的第一个有效节点,即头节点 _head 的下一个节点 _head->_next。因为头节点 _head 不存储有效数据,而是作为链表的辅助节点。
end() 函数返回的迭代器指向链表的结尾,即头节点 _head。因为在list中,尾节点指向的下一个节点就是头节点 _head。
// List 迭代器iterator begin(){return iterator(_head->_next);}iterator end(){return iterator(_head);}const_iterator begin() const{return const_iterator(_head->_next);}const_iterator end() const{return const_iterator(_head);}
(3)容量相关
size()函数:
要想知道list容器中的数据个数,就需要遍历全部节点,因为是循环链表,遍历到_head头节点时即表示遍历完毕。
size_t size()const{size_t count = 0;Node* cur = _head->_next;while (cur != _head){++count;cur = cur->_next;}return count;}empty()函数:
容器为空的判定条件是:头结点的两个指针都指向自己,即为初始化状态。
bool empty()const{return _head->_next == _head;}(4)访问操作
front() 和 back() 函数,分别用于获取链表的第一个元素和最后一个元素。这是直接获取元素的值,而 begin() 和 end() 函数是获取地址。
T& front(){return _head->_next->_val;}const T& front()const{return _head->_next->_val;}T& back(){return _head->_prev->_val;}const T& back()const{return _head->_prev->_val;}
注意:想要对const类型进行函数重载,函数后面必须加上const关键字,才能构成重载。
(5)插入删除
插入和删除分为头插、头删;尾插、尾删;在pos位置前插入和删除。
由于前两种可以看做是第三种的特殊情况,所以只需要具体实现第三种即可。
在pos位置前插入:
首先需要创建一个新节点newNode,newNode 的 _prev 指向 rightNode 的 _prev ,newNode 的 _next 指向 leftNode 的 _next
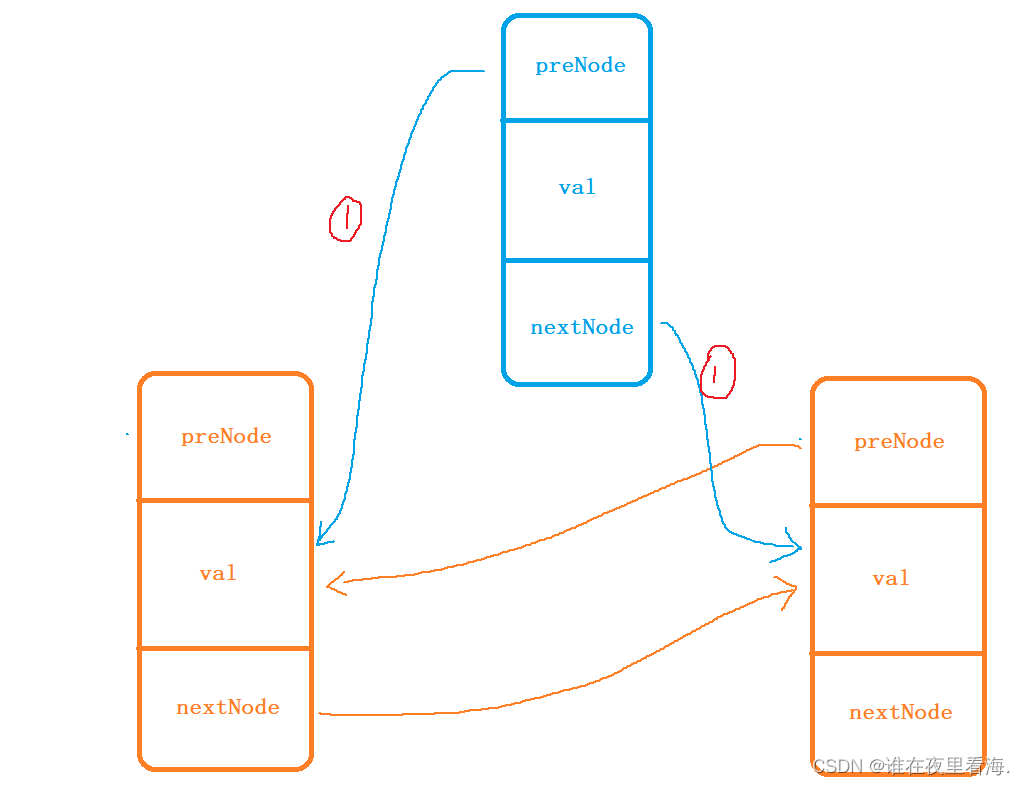
再将 rightNode 的 _prev 、leftNode 的 _next 都指向 newNode ,就完成了插入操作,插入完成后需要返回插入位置的迭代器。
// 在pos位置前插入值为val的节点iterator insert(iterator pos, const T & val){Node* _pnewnode = new Node;Node* cur = pos._node;_pnewnode->_val = val;_pnewnode->_next = cur;_pnewnode->_prev = cur->_prev;cur->_prev = _pnewnode;return iterator(_pnewnode);}
删除pos位置的节点:
首先将leftNode 的 _next 指向 rightNode ,rightNode 的 _prev 指向 leftNode。
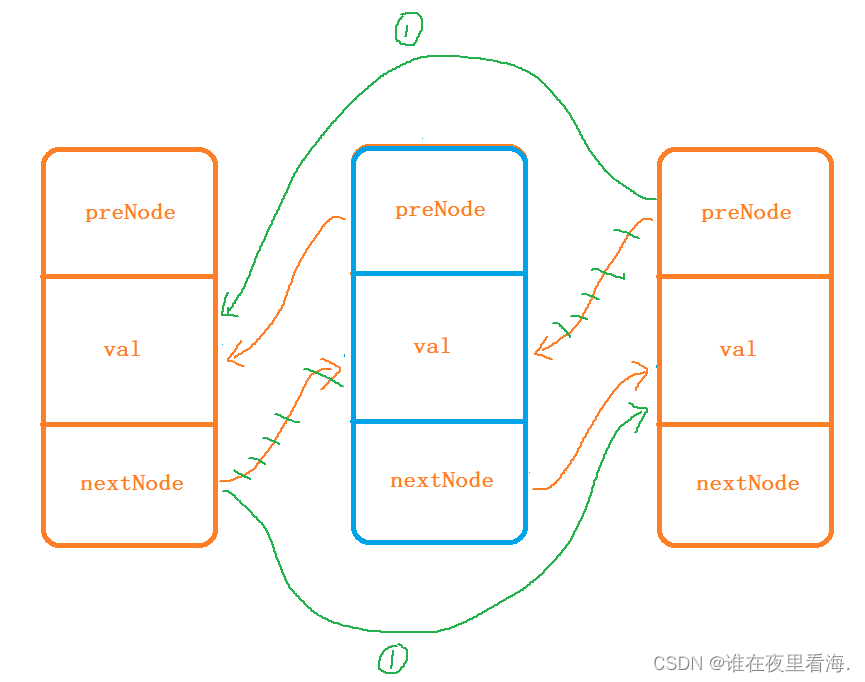
然后对pos位置节点进行空间释放。
// 删除pos位置的节点,返回该节点的下一个位置iterator erase(iterator pos){Node* pDel = pos._node;Node* pRet = pos._node->_next;pDel->_prev->_next = pDel->_next;pRet->_prev = pDel->_prev;delete pDel;return iterator(pRet);}
头插头删就是在首元素节点前插入节点;尾插尾删就是删除头结点_prev指向的节点,是上述插入删除操作的实例:
// List 插入和删除void push_back(const T& val) { insert(end(), val);}void pop_back() { erase(--end());}void push_front(const T& val) {insert(begin(), val);}void pop_front(){erase(begin());}
最后附上完整代码:
#pragma once
#include<iostream>
using namespace std;namespace My
{// List的节点类template<class T>struct ListNode{ListNode(const T& val = T()): _prev(nullptr), _next(bullptr), _val(val){}ListNode<T>* _prev;ListNode<T>* _next;T _val;};//List的迭代器类template<class T, class Ref, class Ptr>class ListIterator{typedef ListNode<T> Node;typedef ListIterator<T, Ref, Ptr> Self;public:ListIterator(Node* node = nullptr): _node(node){}ListIterator(const Self& l): *this(l){}T& operator*(){return _node->_val;}T* operator->(){return &(operator*());}Self& operator++(){_node = _node->_next;return *this;}Self operator++(int){Self temp(*this);_node = _node->_next;return temp;}Self& operator--(){_node = _node->_prev;return *this;}Self& operator--(int){Self temp(*this);_node = _node->_prev;return temp;}bool operator!=(const Self& l){return _node != l._node;}bool operator==(const Self& l){return _node == l._node;}private:Node* _node;};//list类template<class T>class list{typedef ListNode<T> Node;public:typedef ListIterator<T, T&, T*> iterator;typedef ListIterator<T, const T&, const T&> const_iterator;public:///// List的构造list(){CreateHead();}list(int n, const T& value = T()){CreateHead();for (int i = 0; i < n; ++i) {push_back(value);}}template <class Iterator>list(Iterator first, Iterator last){CreateHead();while (first != last) {push_back(*first);++first;}}list(const list<T>& l){CreateHead();//_head = l->_head;//浅拷贝list temp<T>(l.begin(), l.end());this->swap(temp);}list<T>& operator=(const list<T> l){list temp<T>(l.begin(), l.end());return *temp;}~list(){clear();delete _head;_head = nullptr;}///// List 迭代器iterator begin(){return iterator(_head->_next);}iterator end(){return iterator(_head);}const_iterator begin() const{return const_iterator(_head->_next);}const_iterator end() const{return const_iterator(_head);}///// List 容量相关size_t size()const{size_t count = 0;Node* cur = _head->_next;while (cur != _head){++count;cur = cur->_next;}return count;}bool empty()const{return _head->_next == _head;}// List 元素访问操作T& front(){return _head->_next->_val;}const T& front()const{return _head->_next->_val;}T& back(){return _head->_prev->_val;}const T& back()const{return _head->_prev->_val;}// List 插入和删除void push_back(const T& val) { insert(end(), val);}void pop_back() { erase(--end());}void push_front(const T& val) {insert(begin(), val);}void pop_front(){erase(begin());}// 在pos位置前插入值为val的节点iterator insert(iterator pos, const T & val){Node* _pnewnode = new Node;Node* cur = pos._node;_pnewnode->_val = val;_pnewnode->_next = cur;_pnewnode->_prev = cur->_prev;cur->_prev = _pnewnode;return iterator(_pnewnode);}// 删除pos位置的节点,返回该节点的下一个位置iterator erase(iterator pos){Node* pDel = pos._node;Node* pRet = pos._node->_next;pDel->_prev->_next = pDel->_next;pRet->_prev = pDel->_prev;delete pDel;return iterator(pRet);}void clear(){Node cur = _head;while (cur != _head){_head->_next = cur->_next;delete cur;cur = _head->_next;}_head->_next = _head->_prev = _head;}void swap(list<T>& l){std::swap(_head, l._head);}private:void CreateHead(){_head = new node;_head->_prev = _head;_head->_next = _head;}Node* _head;};
};
那么以上就是list的模拟实现了,欢迎在评论区留言,觉得这篇博客对你有帮助的可以点赞关注收藏支持一波喔~😉