看博客AlexNet--CNN经典网络模型详解(pytorch实现)_alex的cnn-CSDN博客,该博客的作者写的很详细,是一个简单的目标分类的代码,可以通过该代码深入了解目标检测的简单框架。在这里不作详细的赘述,如果想更深入的了解,可以看另一个博客实现pytorch实现MobileNet-v2(CNN经典网络模型详解) - 知乎 (zhihu.com)。
在这里,直接写AlexNet--CNN的代码。
1.首先建立一个model.py文件,用来写神经网络,代码如下:
#model.pyimport torch.nn as nn
import torchclass AlexNet(nn.Module):def __init__(self, num_classes=1000, init_weights=False):super(AlexNet, self).__init__()self.features = nn.Sequential(  #打包nn.Conv2d(3, 48, kernel_size=11, stride=4, padding=2),  # input[3, 224, 224]  output[48, 55, 55] 自动舍去小数点后nn.ReLU(inplace=True), #inplace 可以载入更大模型nn.MaxPool2d(kernel_size=3, stride=2),                  # output[48, 27, 27] kernel_num为原论文一半nn.Conv2d(48, 128, kernel_size=5, padding=2),           # output[128, 27, 27]nn.ReLU(inplace=True),nn.MaxPool2d(kernel_size=3, stride=2),                  # output[128, 13, 13]nn.Conv2d(128, 192, kernel_size=3, padding=1),          # output[192, 13, 13]nn.ReLU(inplace=True),nn.Conv2d(192, 192, kernel_size=3, padding=1),          # output[192, 13, 13]nn.ReLU(inplace=True),nn.Conv2d(192, 128, kernel_size=3, padding=1),          # output[128, 13, 13]nn.ReLU(inplace=True),nn.MaxPool2d(kernel_size=3, stride=2),                  # output[128, 6, 6])self.classifier = nn.Sequential(nn.Dropout(p=0.5),#全链接nn.Linear(128 * 6 * 6, 2048),nn.ReLU(inplace=True),nn.Dropout(p=0.5),nn.Linear(2048, 2048),nn.ReLU(inplace=True),nn.Linear(2048, num_classes),)if init_weights:self._initialize_weights()def forward(self, x):x = self.features(x)x = torch.flatten(x, start_dim=1) #展平   或者view()x = self.classifier(x)return xdef _initialize_weights(self):for m in self.modules():if isinstance(m, nn.Conv2d):nn.init.kaiming_normal_(m.weight, mode='fan_out', nonlinearity='relu') #何教授方法if m.bias is not None:nn.init.constant_(m.bias, 0)elif isinstance(m, nn.Linear):nn.init.normal_(m.weight, 0, 0.01)  #正态分布赋值nn.init.constant_(m.bias, 0)
2.下载数据集
DATA_URL = 'http://download.tensorflow.org/example_images/flower_photos.tgz'
3.下载完后写一个spile_data.py文件,将数据集进行分类
#spile_data.pyimport os
from shutil import copy
import randomdef mkfile(file):if not os.path.exists(file):os.makedirs(file)file = 'flower_data/flower_photos'
flower_class = [cla for cla in os.listdir(file) if ".txt" not in cla]
mkfile('flower_data/train')
for cla in flower_class:mkfile('flower_data/train/'+cla)mkfile('flower_data/val')
for cla in flower_class:mkfile('flower_data/val/'+cla)split_rate = 0.1
for cla in flower_class:cla_path = file + '/' + cla + '/'images = os.listdir(cla_path)num = len(images)eval_index = random.sample(images, k=int(num*split_rate))for index, image in enumerate(images):if image in eval_index:image_path = cla_path + imagenew_path = 'flower_data/val/' + clacopy(image_path, new_path)else:image_path = cla_path + imagenew_path = 'flower_data/train/' + clacopy(image_path, new_path)print("\r[{}] processing [{}/{}]".format(cla, index+1, num), end="")  # processing barprint()print("processing done!")
之后应该是这样: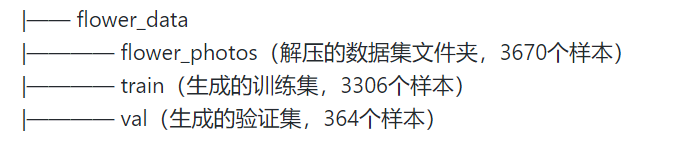
4.再写一个train.py文件,用来训练模型
import torch
import torch.nn as nn
from torchvision import transforms, datasets, utils
import matplotlib.pyplot as plt
import numpy as np
import torch.optim as optim
from model import AlexNet
import os
import json
import time#device : GPU or CPU
device = torch.device("cuda:0" if torch.cuda.is_available() else "cpu")
print(device)#数据转换data_transform = {#具体是对图像进行各种转换操作,并用函数compose将这些转换操作组合起来#以下操作步骤:# 1.图片随机裁剪为224X224# 2.随机水平旋转,默认为概率0.5# 3.将给定图像转为Tensor# 4.归一化处理"train": transforms.Compose([transforms.RandomResizedCrop(224),transforms.RandomHorizontalFlip(),transforms.ToTensor(),transforms.Normalize((0.5, 0.5, 0.5), (0.5, 0.5, 0.5))]),"val": transforms.Compose([transforms.Resize((224, 224)),  # cannot 224, must (224, 224)transforms.ToTensor(),transforms.Normalize((0.5, 0.5, 0.5), (0.5, 0.5, 0.5))])}data_root = os.getcwd()
image_path = data_root + "/flower_data/"  # flower data set path
train_dataset = datasets.ImageFolder(root=image_path + "/train",transform=data_transform["train"])
train_num = len(train_dataset)# print(train_dataset)
# print(train_dataset[1][0].size())
# print(train_dataset.imgs[0][0])# {'daisy':0, 'dandelion':1, 'roses':2, 'sunflower':3, 'tulips':4}
flower_list = train_dataset.class_to_idx
cla_dict = dict((val, key) for key, val in flower_list.items())
# write dict into json file
json_str = json.dumps(cla_dict, indent=4)
with open('class_indices.json', 'w') as json_file:json_file.write(json_str)batch_size = 32
train_loader = torch.utils.data.DataLoader(train_dataset,batch_size=batch_size, shuffle=True,num_workers=0)
i=1
# for step, data in enumerate(train_loader, start=0):
#     images, labels = data
#     print(i,"==>",images.shape,labels.shape)
#     i+=1validate_dataset = datasets.ImageFolder(root=image_path + "/val",transform=data_transform["val"])
val_num = len(validate_dataset)
validate_loader = torch.utils.data.DataLoader(validate_dataset,batch_size=batch_size, shuffle=True,num_workers=0)test_data_iter = iter(validate_loader)
test_image, test_label = test_data_iter.__next__()net = AlexNet(num_classes=5, init_weights=True)net.to(device)
#损失函数:这里用交叉熵
loss_function = nn.CrossEntropyLoss()
#优化器 这里用Adam
optimizer = optim.Adam(net.parameters(), lr=0.0002)
#训练参数保存路径
save_path = './AlexNet.pth'
#训练过程中最高准确率
best_acc = 0.0#开始进行训练和测试,训练一轮,测试一轮
for epoch in range(10):# trainnet.train()    #训练过程中,使用之前定义网络中的dropoutrunning_loss = 0.0t1 = time.perf_counter()for step, data in enumerate(train_loader, start=0):images, labels = data#print("step:     ",images.shape,labels)optimizer.zero_grad()outputs = net(images.to(device))loss = loss_function(outputs, labels.to(device))loss.backward()optimizer.step()# print statisticsrunning_loss += loss.item()# print train processrate = (step + 1) / len(train_loader)a = "*" * int(rate * 50)b = "." * int((1 - rate) * 50)print("\rtrain loss: {:^3.0f}%[{}->{}]{:.3f}".format(int(rate * 100), a, b, loss), end="")print()print(time.perf_counter()-t1)# validatenet.eval()    #测试过程中不需要dropout,使用所有的神经元acc = 0.0  # accumulate accurate number / epochwith torch.no_grad():for val_data in validate_loader:val_images, val_labels = val_dataoutputs = net(val_images.to(device))predict_y = torch.max(outputs, dim=1)[1]acc += (predict_y == val_labels.to(device)).sum().item()val_accurate = acc / val_numif val_accurate > best_acc:best_acc = val_accuratetorch.save(net.state_dict(), save_path)print('[epoch %d] train_loss: %.3f  test_accuracy: %.3f' %(epoch + 1, running_loss / step, val_accurate))print('Finished Training')