总览
输入:环绕Object拍摄的RGB视频
输出:自定义相机路径的渲染视频(包含渐变效果)
实现过程
首先,编译3DGS的C++代码,并跑通convert.py、train.py和render.py。教程如下:
- github网址:https://github.com/graphdeco-inria/gaussian-splatting
- 新手教程:https://www.youtube.com/watch?v=UXtuigy_wYc
- 训练自己的视频数据-教程:https://www.youtube.com/watch?v=wuKhEGCt6ks
在掌握训练自己的视频后,可以生成一组input图像对应的render图像,但点云和参数都是固定的,如:
- 渲染的scaling_modifier参数固定为1.0。
- 渲染时使用的点云 始终是train得到的完整点云。
因此,我们为了得到上面视频中的渐变效果,需要调整这两个地方(scaling_modifier参数和点云采样)。
1 调整scaling_modifier参数
- 修改render.py中的调用的render函数,向里面传入scaling_modifier参数。
# 对每一帧进行渲染
for idx, view in enumerate(tqdm(views, desc="Rendering progress")):rendering = render(view, gaussians, pipeline, background, scaling_modifier=scaling_modifier)["render"]
- 进入该render函数,将scaling_modifier传入GaussianRasterizationSettings方法中。
def render(viewpoint_camera, pc : GaussianModel, pipe, bg_color : torch.Tensor, scaling_modifier = 1.0, override_color = None):# Create zero tensor. We will use it to make pytorch return gradients of the 2D (screen-space) meansscreenspace_points = torch.zeros_like(pc.get_xyz, dtype=pc.get_xyz.dtype, requires_grad=True, device="cuda") + 0try:screenspace_points.retain_grad()except:pass# Set up rasterization configurationtanfovx = math.tan(viewpoint_camera.FoVx * 0.5)tanfovy = math.tan(viewpoint_camera.FoVy * 0.5)raster_settings = GaussianRasterizationSettings(image_height=int(viewpoint_camera.image_height),image_width=int(viewpoint_camera.image_width),tanfovx=tanfovx,tanfovy=tanfovy,bg=bg_color,scale_modifier=scaling_modifier,viewmatrix=viewpoint_camera.world_view_transform,projmatrix=viewpoint_camera.full_proj_transform,sh_degree=pc.active_sh_degree,campos=viewpoint_camera.camera_center,prefiltered=False,debug=pipe.debug)
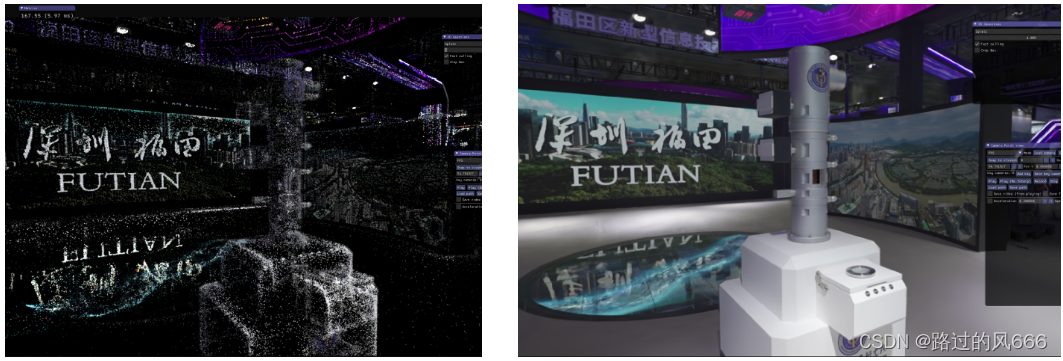
通过上面的方式,即可对每一帧在不同的scaling_modifier下进行渲染,该参数在SIBR Viewer中也可以修改,修改位置如下:

如下左图为scaling_modifier=0.01、右图为scaling_modifier=1.0
2 点云采样
为了实现视频一开始由中心物体向四周扩散的渐变效果,我们需要通过点云采样的方式,实现点云数量渐变式增多
具体步骤如下:
- 计算原始点云中所有点的密度大小。
- 以密度最大的点作为中心点,计算每个点到该点的距离,得到升序排序后的索引。
- 根据该索引生成渐变式的点云。
对应在render.py中添加如下代码:
def get_indices(model_path, iteration):path = os.path.join(model_path, "point_cloud", "iteration_" + str(iteration), "point_cloud.ply")plydata = PlyData.read(path)xyz = np.stack((np.asarray(plydata['vertex']['x']),np.asarray(plydata['vertex']['y']),np.asarray(plydata['vertex']['z'])), axis=1)# 定义邻域半径neighbor_radius = 0.1 # 例如,这里假设邻域半径为0.1# 使用最近邻算法查找每个点的邻域内的点的数量nbrs = NearestNeighbors(radius=neighbor_radius, algorithm='auto').fit(xyz)densities = nbrs.radius_neighbors(xyz, return_distance=False)# 使用最近邻算法查找每个点的邻域内的点的数量nbrs = NearestNeighbors(radius=neighbor_radius, algorithm='auto').fit(xyz)densities = nbrs.radius_neighbors(xyz, return_distance=False)# 计算每个点的密度point_cloud_density = np.array([len(density) for density in densities])# 确定渲染顺序start_idx = np.argmax(point_cloud_density)start_point = xyz[start_idx]# 根据与起始点的距离对点云进行排序distances = np.linalg.norm(xyz - start_point, axis=1)sorted_indices = np.argsort(distances)return sorted_indices在render_set函数中调用get_indices函数:
def render_set(model_path, name, iteration, views, gaussians, pipeline, background, scene):render_path = os.path.join(model_path, name, "ours_{}".format(iteration), "renders")gts_path = os.path.join(model_path, name, "ours_{}".format(iteration), "gt")makedirs(render_path, exist_ok=True)# makedirs(gts_path, exist_ok=True)### 计算点的渲染顺序sorted_indices = get_indices(model_path, iteration)# 对给定的images.bin(相机外参)一帧帧图片进行渲染for idx, view in enumerate(tqdm(views, desc="Rendering progress")):# 修改点云切片if idx<120:indices = sorted_indices[:(len(sorted_indices)//120 * idx)]scene.change_pc_indice(indices=indices)scaling_modifier = 0.01elif scaling_modifier<1:scaling_modifier += 0.01else:scaling_modifier = 1rendering = render(view, gaussians, pipeline, background, scaling_modifier=scaling_modifier)["render"]torchvision.utils.save_image(rendering, os.path.join(render_path, '{0:05d}'.format(idx) + ".png"))
最后,运行render.py即可得到最后的渲染视频(包含渐变效果)。
3 自定义环绕Object的相机路径
render.py使用的相机外参和内参分别存储在images.bin和cameras.bin中。
cameras.bin(内参)
该文件解析(read_intrinsics_binary函数)后,得到如下key-value(int-Camera对象)组成的字典。
{...,
1: Camera(id=1, model='PINHOLE', width=1332, height=876, params=array([1035.49659905, 1034.97186374,  666.  , 438.])),...}
images.bin(外参)
该文件解析(read_extrinsics_binary函数)后,得到如下key-value(int-Image对象)组成的字典
{...,
263: Image(id=263, qvec=array([-0.15935236, -0.46899572,  0.35922958,  0.79095129]), tvec=array([-0.68604342, -0.24766367,  1.17531395]), camera_id=1, name='IMG_6597.jpg', xys=array([[ 826.85421273,    3.56521302],[ 791.22610197,    6.24990826],[1318.28015465,    6.96729477],...,[1041.33873779,  316.22219915],[ 737.99930832,  487.77142606],[ 649.78058365,   72.14452395]]), point3D_ids=array([   -1,    -1, 75770, ...,    -1,    -1,   -1]))
,...}
在不考虑测试集的时候,我们不会使用该字典的xys和point3D_ids,相机外参仅由qvec和tvec构成。
修改images.bin(外参)
为了生成自定义的相机路径,我们仅需修改images.bin中每一帧的qvec和tvec。核心代码如下:
# 读取相机内外参
images = read_extrinsics_binary('../C4879_4/sparse/0/images_original.bin')
qvecs, tvecs = get_qvec_tvec('../C4879_4/sparse/0/images_original.bin')  # 获取qvecs, tvecsqvecs = np.array(qvecs)
tvecs = np.array(tvecs)
mean_x = tvecs[:,0].sum() / len(tvecs)
mean_y = tvecs[:,1].sum() / len(tvecs)
mean_z = tvecs[:,2].sum() / len(tvecs)
print(mean_x,mean_y,mean_z)
#################################以二维平面中的一个圆的轨迹为例############################
# 定义圆形轨迹的参数
radius = 1.0  # 圆的半径
num_poses = len(qvecs)  # 生成的外参数量
center = np.array([mean_x,mean_y,mean_z])  # 圆心坐标# 生成沿着圆形轨迹的外参
poses = []
for i in range(num_poses):angle = 2 * np.pi * i / num_poses  # 在圆上均匀分布的角度position = center + np.array([radius * np.cos(angle), radius * np.sin(angle), 0])  # 根据角度计算位置q = R.from_euler('xyz', [0, angle, 0]).as_quat()  # 根据角度计算旋转四元数tvec = position  # 平移向量即为位置poses.append((q, tvec))new_images = {}
for i in range(len(images)):new_images[i+1] = Image(id=images[i+1].id, qvec=np.array(poses[i][0]), tvec=np.array(poses[i][1]),camera_id=images[i+1].camera_id, name='{:03d}'.format(i), xys=images[i+1].xys, point3D_ids=images[i+1].point3D_ids)# 写入相机内外参
write_images_binary(new_images, '../C4879_4/sparse/0/images.bin')
使用到的依赖库和函数:
import numpy as np
import struct
import collections
from PIL import Image
from scipy.spatial.transform import Rotation
import pandas as pd
from scipy.spatial.transform import Rotation as RCameraModel = collections.namedtuple("CameraModel", ["model_id", "model_name", "num_params"])
Camera = collections.namedtuple("Camera", ["id", "model", "width", "height", "params"])
BaseImage = collections.namedtuple("Image", ["id", "qvec", "tvec", "camera_id", "name", "xys", "point3D_ids"])
Point3D = collections.namedtuple("Point3D", ["id", "xyz", "rgb", "error", "image_ids", "point2D_idxs"])
CAMERA_MODELS = {CameraModel(model_id=0, model_name="SIMPLE_PINHOLE", num_params=3),CameraModel(model_id=1, model_name="PINHOLE", num_params=4),CameraModel(model_id=2, model_name="SIMPLE_RADIAL", num_params=4),CameraModel(model_id=3, model_name="RADIAL", num_params=5),CameraModel(model_id=4, model_name="OPENCV", num_params=8),CameraModel(model_id=5, model_name="OPENCV_FISHEYE", num_params=8),CameraModel(model_id=6, model_name="FULL_OPENCV", num_params=12),CameraModel(model_id=7, model_name="FOV", num_params=5),CameraModel(model_id=8, model_name="SIMPLE_RADIAL_FISHEYE", num_params=4),CameraModel(model_id=9, model_name="RADIAL_FISHEYE", num_params=5),CameraModel(model_id=10, model_name="THIN_PRISM_FISHEYE", num_params=12)
}
CAMERA_MODEL_IDS = dict([(camera_model.model_id, camera_model)for camera_model in CAMERA_MODELS])def qvec2rotmat(qvec):return np.array([[1 - 2 * qvec[2]**2 - 2 * qvec[3]**2,2 * qvec[1] * qvec[2] - 2 * qvec[0] * qvec[3],2 * qvec[3] * qvec[1] + 2 * qvec[0] * qvec[2]],[2 * qvec[1] * qvec[2] + 2 * qvec[0] * qvec[3],1 - 2 * qvec[1]**2 - 2 * qvec[3]**2,2 * qvec[2] * qvec[3] - 2 * qvec[0] * qvec[1]],[2 * qvec[3] * qvec[1] - 2 * qvec[0] * qvec[2],2 * qvec[2] * qvec[3] + 2 * qvec[0] * qvec[1],1 - 2 * qvec[1]**2 - 2 * qvec[2]**2]])def rotmat2qvec(R):Rxx, Ryx, Rzx, Rxy, Ryy, Rzy, Rxz, Ryz, Rzz = R.flatK = np.array([[Rxx - Ryy - Rzz, 0, 0, 0],[Ryx + Rxy, Ryy - Rxx - Rzz, 0, 0],[Rzx + Rxz, Rzy + Ryz, Rzz - Rxx - Ryy, 0],[Ryz - Rzy, Rzx - Rxz, Rxy - Ryx, Rxx + Ryy + Rzz]]) / 3.0eigvals, eigvecs = np.linalg.eigh(K)qvec = eigvecs[[3, 0, 1, 2], np.argmax(eigvals)]if qvec[0] < 0:qvec *= -1return qvecclass Image(BaseImage):def qvec2rotmat(self):return qvec2rotmat(self.qvec)def read_next_bytes(fid, num_bytes, format_char_sequence, endian_character="<"):"""Read and unpack the next bytes from a binary file.:param fid::param num_bytes: Sum of combination of {2, 4, 8}, e.g. 2, 6, 16, 30, etc.:param format_char_sequence: List of {c, e, f, d, h, H, i, I, l, L, q, Q}.:param endian_character: Any of {@, =, <, >, !}:return: Tuple of read and unpacked values."""data = fid.read(num_bytes)return struct.unpack(endian_character + format_char_sequence, data)def read_extrinsics_binary(path_to_model_file):"""see: src/base/reconstruction.ccvoid Reconstruction::ReadImagesBinary(const std::string& path)void Reconstruction::WriteImagesBinary(const std::string& path)"""images = {}with open(path_to_model_file, "rb") as fid:num_reg_images = read_next_bytes(fid, 8, "Q")[0]for i in range(num_reg_images):binary_image_properties = read_next_bytes(fid, num_bytes=64, format_char_sequence="idddddddi")image_id = binary_image_properties[0]qvec = np.array(binary_image_properties[1:5])tvec = np.array(binary_image_properties[5:8])camera_id = binary_image_properties[8]image_name = ""current_char = read_next_bytes(fid, 1, "c")[0]while current_char != b"\x00":   # look for the ASCII 0 entryimage_name += current_char.decode("utf-8")current_char = read_next_bytes(fid, 1, "c")[0]num_points2D = read_next_bytes(fid, num_bytes=8,format_char_sequence="Q")[0]x_y_id_s = read_next_bytes(fid, num_bytes=24*num_points2D,format_char_sequence="ddq"*num_points2D)xys = np.column_stack([tuple(map(float, x_y_id_s[0::3])),tuple(map(float, x_y_id_s[1::3]))])point3D_ids = np.array(tuple(map(int, x_y_id_s[2::3])))images[image_id] = Image(id=image_id, qvec=qvec, tvec=tvec,camera_id=camera_id, name=image_name,xys=xys, point3D_ids=point3D_ids)# if i>3:#     breakreturn imagesdef write_next_bytes(fid, data, format_char_sequence, endian_character="<"):"""pack and write to a binary file.:param fid::param data: data to send, if multiple elements are sent at the same time,they should be encapsuled either in a list or a tuple:param format_char_sequence: List of {c, e, f, d, h, H, i, I, l, L, q, Q}.should be the same length as the data list or tuple:param endian_character: Any of {@, =, <, >, !}"""if isinstance(data, (list, tuple)):bytes = struct.pack(endian_character + format_char_sequence, *data)else:bytes = struct.pack(endian_character + format_char_sequence, data)fid.write(bytes)def write_images_binary(images, path_to_model_file):"""see: src/colmap/scene/reconstruction.ccvoid Reconstruction::ReadImagesBinary(const std::string& path)void Reconstruction::WriteImagesBinary(const std::string& path)"""with open(path_to_model_file, "wb") as fid:write_next_bytes(fid, len(images), "Q")for i, img in images.items():write_next_bytes(fid, img.id, "i")tmp_qvec = [q*1.01 for q in img.qvec.tolist()]write_next_bytes(fid, tmp_qvec, "dddd")tmp_tvec = [v*1.02 for v in img.tvec.tolist()]write_next_bytes(fid, tmp_tvec, "ddd")write_next_bytes(fid, img.camera_id, "i")for char in img.name:write_next_bytes(fid, char.encode("utf-8"), "c")write_next_bytes(fid, b"\x00", "c")write_next_bytes(fid, len(img.point3D_ids), "Q")for xy, p3d_id in zip(np.zeros_like(img.xys), np.zeros_like(img.point3D_ids)):write_next_bytes(fid, [*xy, p3d_id], "ddq")def get_qvec_tvec(path_to_model_file):qvecs = []tvecs = []with open(path_to_model_file, "rb") as fid:num_reg_images = read_next_bytes(fid, 8, "Q")[0]for i in range(num_reg_images):binary_image_properties = read_next_bytes(fid, num_bytes=64, format_char_sequence="idddddddi")image_id = binary_image_properties[0]qvec = np.array(binary_image_properties[1:5])qvecs.append(qvec)tvec = np.array(binary_image_properties[5:8])tvecs.append(tvec)camera_id = binary_image_properties[8]image_name = ""current_char = read_next_bytes(fid, 1, "c")[0]while current_char != b"\x00":   # look for the ASCII 0 entryimage_name += current_char.decode("utf-8")current_char = read_next_bytes(fid, 1, "c")[0]num_points2D = read_next_bytes(fid, num_bytes=8,format_char_sequence="Q")[0]x_y_id_s = read_next_bytes(fid, num_bytes=24*num_points2D,format_char_sequence="ddq"*num_points2D)xys = np.column_stack([tuple(map(float, x_y_id_s[0::3])),tuple(map(float, x_y_id_s[1::3]))])point3D_ids = np.array(tuple(map(int, x_y_id_s[2::3])))return qvecs, tvecs