背景
之前我只在STM32F0上基于HAL库和CubeMX移植FreeRTOS,但最近发现国产化替代热潮正盛,许多项目都有国产化器件指标,而且国产单片机确实比意法的便宜,所以也买了块兆易创新的GD32F303开发板,试一试它的优劣。虽然GD32F系列基本都可以和同名的ST单片机pin-to-pin替换,程序也通用,但GD自己也开发了一套库函数,基于GD的库函数开发有利于熟悉GD设计的逻辑,对于未来学习GD的RISC-V单片机也有帮助。另外,不用ST的HAL库,也能降低代码量。
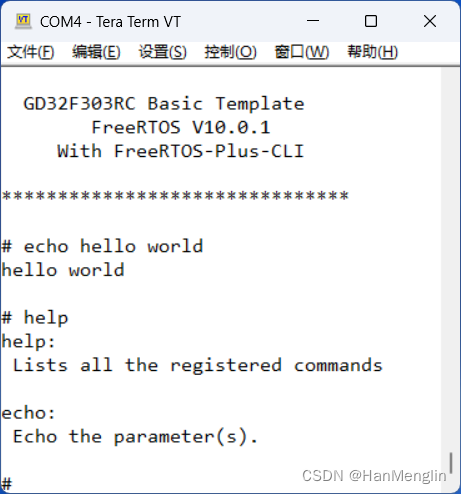
FreeRTOS我们已经很熟悉了,官方又提供了FreeRTOS-Plus库,简化应用的开发。其中FreeRTOS-Plus-CLI,即 command line interpreter,命令行翻译器,可以为运行FreeRTOS的嵌入式设备提供一套命令接口,便于设备在线配置。移植FreeRTOS-Plus-CLI显然对改善嵌入式产品很有帮助。
(串口运行输入和输出)
GD32串口输入输出和编译器配置
大多数开发板会引出USART0,的通信管脚以便ISP下载。为便于插线,我就直接用USART0进行数据的输入输出,其中输出无需中断,输入可以用中断给出信号量。在系统初始化时,我们应该避免用户输入,故把输入和输出的初始化分开成两个函数:
/*!\brief      uart_init function\param[in]  none\param[out] none\retval     none
*/
void uart_init(void)
{// enable GPIO and USART RCU clockrcu_periph_clock_enable(USART0_RCU_PORT); // USART0_RCU_PORT define为串口所在的RCU_GPIOxrcu_periph_clock_enable(RCU_USART0);gpio_init(USART0_PORT,GPIO_MODE_AF_PP,GPIO_OSPEED_50MHZ,USART0_TX_PIN); // USART0_PORT define为串口管脚对应的GPIOxgpio_init(USART0_PORT,GPIO_MODE_IN_FLOATING,GPIO_OSPEED_50MHZ,USART0_RX_PIN);usart_deinit(USART0);usart_baudrate_set(USART0,UASRT0_BAUDRATE);usart_word_length_set(USART0,USART_WL_8BIT);usart_stop_bit_set(USART0,USART_STB_1BIT);usart_parity_config(USART0,USART_PM_NONE);usart_hardware_flow_rts_config(USART0,USART_RTS_DISABLE);usart_hardware_flow_cts_config(USART0,USART_CTS_DISABLE);usart_transmit_config(USART0,USART_TRANSMIT_ENABLE);usart_enable(USART0);
}
/*!\brief      uart_recv_init function\param[in]  none\param[out] none\retval     none
*/
void uart_recv_init(void)
{usart_disable(USART0);usart_receive_config(USART0,USART_RECEIVE_ENABLE);usart_enable(USART0);nvic_irq_enable(USART0_IRQn, 15, 0);usart_interrupt_enable(USART0, USART_INT_RBNE);
}
这里有关中断优先级的设置在后面再讲解,此处先按下。在GD官方的许多例程中,都通过重载fputc把标准库函数的输出定向到串口,在我们这里,就按如下定向到USART0:
/* retarget the C library printf function to the USART */
int fputc(int ch, FILE *f)
{usart_data_transmit(USART0, (uint8_t)ch);while(RESET == usart_flag_get(USART0, USART_FLAG_TBE));return ch;
}
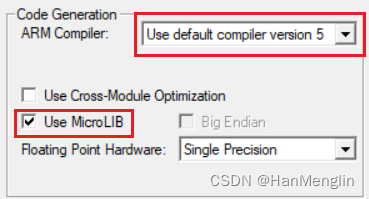
需要注意的是,标准库太大,直接按默认方式编译可能塞不进单片机中。为此,要在 Options for Targets 中 Target一栏下, Code Generation 卡中做如下设置,启用MicroLIB:
FreeRTOS的进程和信号量设计
FreeRTOS移植到GD32的文章很多,因此这里不多赘述,具体移植过程可参考
freertos学习01-移植到gd32。在这个系统中,我给输入输出各准备一个buffer,然后编写两个task分别处理单字节输入(uart_one_char_fxn())和单行输入(uart_one_line_fxn())。具体来说,串口每接收到一个字节就发生一次中断,在中断中将收到的字节移入uart_rxbuffer,然后提供一个提示收到单字节的信号量(命名为sem_uart_one_char);进程uart_one_char_fxn()接收该信号量,并在检测到回车时,释放单行信号量sem_uart_one_line供单行处理函数uart_one_line_fxn()做命令解释。以上两个信号量都设计为Counting型信号量。这样整个系统中就有两个信号量和两个线程。我为此额外多写了一个线程作为初始化线程,该线程最先被挂载,并在运行结束后自行删除(为了支持删除,采用heap4.c的堆栈结构):
#include <stdio.h>
#include <string.h>
#include "FreeRTOS.h"
#include "task.h"
#include "semphr.h"
TaskHandle_t TaskStart_Handler;
void task_start_fxn(void *pvParameter)
{BaseType_t isPass;taskENTER_CRITICAL(); // ENTER_CRITICAL, 防止初始化被打断sem_uart_one_char = xSemaphoreCreateCounting(MAX_RX_BUF_LEN,0);if (sem_uart_one_char == NULL) printf("Error in creating sem.\n");sem_uart_one_line = xSemaphoreCreateCounting(10,0);if (sem_uart_one_char == NULL) printf("Error in creating sem.\n");isPass = xTaskCreate(uart_one_char_fxn, "task_one_char", 128, NULL, 1, &Task_uart_one_char);if (isPass != pdPASS) printf("Error in creating task.\n");isPass = xTaskCreate(uart_one_line_fxn, "task_one_line", 128, NULL, 2, &Task_uart_one_line);if (isPass != pdPASS) printf("Error in creating task.\n");uart_recv_init(); // 都初始化完成后再允许接收中断printf("# "); // the first # waiting for command inputvTaskDelete(TaskStart_Handler);taskEXIT_CRITICAL();
}
串口的中断函数如下:
#include "FreeRTOS.h"
#include "task.h"
#include "semphr.h"
void USART0_IRQHandler(void)
{BaseType_t xHigherPriorityTaskWoken = pdFALSE;if(RESET != usart_interrupt_flag_get(USART0, USART_INT_FLAG_RBNE)){/* receive data */uart_rxbuffer[uart_rxcount] = usart_data_receive(USART0); // 数据放入rx_bufferxSemaphoreGiveFromISR(sem_uart_one_char,&xHigherPriorityTaskWoken); // 给信号量uart_rxcount++;}// portYIELD_FROM_ISR(xHigherPriorityTaskWoken); //该行注释掉,表明不要求退出中断时重新调度task
}
单字符处理task的函数如下:
void uart_one_char_fxn(void *pvParameter)
{while(1){xSemaphoreTake(sem_uart_one_char,portMAX_DELAY); // 接收中断给出的信号量 sem_uart_one_charusart_data_transmit(USART0, uart_rxbuffer[uart_rtn_print_count]); // 数据回显if (uart_rtn_print_count!=0 && uart_rxbuffer[uart_rtn_print_count]==0x08) // 检测backspace{uart_rtn_print_count--;uart_rxcount = uart_rxcount -2;}else if (uart_rxbuffer[uart_rtn_print_count]== '\n') // 回车时释放单行信号量sem_uart_one_line{xSemaphoreGive(sem_uart_one_line);}else{uart_rtn_print_count++;}}
}
中断设置
FreeRTOS官方文档指出,对于STM32,应采用NVIC_PriorityGroup_4,即4位抢占优先级0~15:
If you are using an STM32 with the STM32 driver library then ensure all the priority bits are assigned to be preempt priority bits by calling NVIC_PriorityGroupConfig( NVIC_PriorityGroup_4 ); before the RTOS is started.
如果您使用 STM32 和 STM32 驱动器库, 请通过 调用 NVIC_PriorityGroupConfig( NVIC_PriorityGroup_4 ) 来确保所有优先级位都被指定为抢占优先级位,这一步需要 在启动 RTOS 前完成。
考虑到GD32和STM32基本一致,我们也采用这种中断优先级设置,在GD32的标准库中由下列语句实现:
nvic_priority_group_set(NVIC_PRIGROUP_PRE4_SUB0);
同样我们可以直接抄STM32的FreeRTOSConfig.h,但这里有两个宏要注意:
/* !!!! configMAX_SYSCALL_INTERRUPT_PRIORITY must not be set to zero !!!!
See http://www.FreeRTOS.org/RTOS-Cortex-M3-M4.html. */
#define configMAX_SYSCALL_INTERRUPT_PRIORITY 	191 /* equivalent to 0xb0, or priority 11. *//* This is the value being used as per the ST library which permits 16
priority values, 0 to 15.  This must correspond to the
configKERNEL_INTERRUPT_PRIORITY setting.  Here 15 corresponds to the lowest
NVIC value of 255. */
#define configLIBRARY_KERNEL_INTERRUPT_PRIORITY	15
调用了FreeRTOS API的中断的优先级数不能小于configMAX_SYSCALL_INTERRUPT_PRIORITY 的前4bit所定义的优先级,这里是11;又不能大于configLIBRARY_KERNEL_INTERRUPT_PRIORITY 定义的优先级(这里是最小的15),具体原因该博客有讲述。回看前面我设置的串口优先级就是15:
nvic_irq_enable(USART0_IRQn, 15, 0); // 对 NVIC_PRIGROUP_PRE4_SUB0, 最后一个参数无意义
其实我最初设置成nvic_irq_enable(USART0_IRQn, 0, 0),结果发生中断时调用xSemaphoreGiveFromISR(),被甩到 FreeRTOS底层接口代码port.c中的函数vPortValidateInterruptPriority(void)中,无法继续运行,原因也在这段代码的注释中给出:
#if( configASSERT_DEFINED == 1 )void vPortValidateInterruptPriority( void ){uint32_t ulCurrentInterrupt;uint8_t ucCurrentPriority;/* Obtain the number of the currently executing interrupt. */ulCurrentInterrupt = vPortGetIPSR();/* Is the interrupt number a user defined interrupt? */if( ulCurrentInterrupt >= portFIRST_USER_INTERRUPT_NUMBER ){/* Look up the interrupt's priority. */ucCurrentPriority = pcInterruptPriorityRegisters[ ulCurrentInterrupt ];/* The following assertion will fail if a service routine (ISR) foran interrupt that has been assigned a priority aboveconfigMAX_SYSCALL_INTERRUPT_PRIORITY calls an ISR safe FreeRTOS APIfunction. ISR safe FreeRTOS API functions must *only* be calledfrom interrupts that have been assigned a priority at or belowconfigMAX_SYSCALL_INTERRUPT_PRIORITY. ... */configASSERT( ucCurrentPriority >= ucMaxSysCallPriority ); // 运行卡死到此处}configASSERT( ( portAIRCR_REG & portPRIORITY_GROUP_MASK ) <= ulMaxPRIGROUPValue );}#endif /* configASSERT_DEFINED */
CLI移植和单行处理函数设计
FreeRTOS-Plus-CLI可以从FreeRTOS官方包中的FreeRTOS-Plus文件夹里找到,其实只有两个文件FreeRTOS_CLI.c和FreeRTOS_CLI.h。将这两个文件加入Keil工程中的代码目录和include目录后就可以使用。FreeRTOS_CLI的命令行解释器函数原型如下:
BaseType_t FreeRTOS_CLIProcessCommand( const char * const pcCommandInput, char * pcWriteBuffer, size_t xWriteBufferLen );
其中,pcCommandInput是输入的命令,pcWriteBuffer是执行输出的缓存区,xWriteBufferLen 则是容许写入缓存区的长度。其返回值有pdTRUE和pdFALSE两种可能,pdTRUE表示还没输出完,让我们先把pcWriteBuffer里的数据都打印掉,保留pcCommandInput,然后再执行一次该函数;pdFALSE则表示输出已结束,不必再执行。这个设计乍看是有点反直觉的,基于此我编写的单行处理task如下:
#include <stdio.h>
#include <string.h>
#include "FreeRTOS.h"
#include "task.h"
#include "semphr.h"
#include "FreeRTOS_CLI.h"
TaskHandle_t Task_uart_one_line;
void uart_one_line_fxn(void *pvParameter)
{uint16_t i;BaseType_t CLIProcessCommandRet;while(1) {xSemaphoreTake(sem_uart_one_line,portMAX_DELAY);// 保证FreeRTOS_CLIProcessCommand()至少执行一次CLIProcessCommandRet = pdTRUE;// disable USART0 interruptusart_interrupt_disable(USART0, USART_INT_RBNE);for (i=0;i<uart_rxcount;i++) command_buffer[i] = uart_rxbuffer[i]; // 复制命令到command_buffercommand_buffer[i-1] = 0;// 清零输入bufferuart_rxcount = 0;uart_rtn_print_count = 0;while(CLIProcessCommandRet == pdTRUE) // 检测是否要执行CLI{CLIProcessCommandRet = FreeRTOS_CLIProcessCommand( (char *)command_buffer, (char *)write_buffer, MAX_TX_BUF_LEN);printf(write_buffer); // 输出缓存}printf("# "); // 类似linux的输入提示符// re-enable USART0 interruptusart_interrupt_enable(USART0, USART_INT_RBNE);}
}
典型需要输出多行的命令就是FreeRTOS-Plus-CLI官方提供的help命令。
自己设计的echo命令
FreeRTOS-Plus-CLI允许开发者自己加入自定义的命令,我也加入echo命令,验证移植是否成功。echo,回传,是最简单验证命令的输入输出功能是否正常的一种功能。自定义命令的回调函数原型应满足:
typedef BaseType_t (*pdCOMMAND_LINE_CALLBACK)( char *pcWriteBuffer, size_t xWriteBufferLen, const char *pcCommandString );
其中pcWriteBuffer和xWriteBufferLen就是翻译器函数FreeRTOS_CLIProcessCommand()传入的同名参数,供我们自己写入;pcCommandString也将传入FreeRTOS_CLIProcessCommand()的最后一个参数pcCommandInput,供用户程序提取输入参数。我编写的echo回答函数比较简单:
#include <string.h>
#include "FreeRTOS.h"
#include "FreeRTOS_CLI.h"
BaseType_t prvEchoCommand ( char *pcWriteBuffer, size_t xWriteBufferLen, const char *pcCommandString )
{char * parameter;BaseType_t pxParameterStringLength;parameter = (char *)FreeRTOS_CLIGetParameter(pcCommandString,1,&pxParameterStringLength);strncpy(pcWriteBuffer,parameter,xWriteBufferLen);strncat(pcWriteBuffer,"\r\n\r\n\0",5);return pdFALSE;
}
命令需要注册,注册前先在需要定义出如下的结构体:
const CLI_Command_Definition_t xEchoCommand =
{"echo","echo:\r\n Echo the parameter(s).\r\n\r\n",prvEchoCommand,-1 // -1 allow a variable number of parameters
};
其中第一行是命令原文字符,第二行是help输出信息,第三行是回调函数,第四行指定该命令要输入多少个参数,如果是-1则不限参数数目。我写的echo其实是接收了第一个参数开始的指针,然后把后面整个字符串(到\0为止)全部输出完了事,简单但满足的echo的需要。命令注册也是在初始化定义其他task和信号量时,通过调用CLI的API完成:
isPass = FreeRTOS_CLIRegisterCommand(&xEchoCommand);
if (isPass != pdPASS) printf("Error in registering command.\n");
至此,一个具备基础功能的FreeRTOS+CLI模板就搭好了,可以根据不同应用场景再添加额外功能使用。