scrapy的入门使用
学习目标:
- 掌握 scrapy的安装
- 应用 创建scrapy的项目
- 应用 创建scrapy爬虫
- 应用 运行scrapy爬虫
- 应用 scrapy定位以及提取数据或属性值的方法
- 掌握 response响应对象的常用属性
1 安装scrapy
命令:
sudo apt-get install scrapy
或者:
pip/pip3 install scrapy
2 scrapy项目开发流程
- 创建项目:
scrapy startproject mySpider - 生成一个爬虫:
scrapy genspider lianjia lianjia.com - 提取数据:
根据网站结构在spider中实现数据采集相关内容 - 保存数据:
使用pipeline进行数据后续处理和保存
3. 创建项目
通过命令将scrapy项目的的文件生成出来,后续步骤都是在项目文件中进行相关操作,下面以抓取传智师资库来学习scrapy的入门使
创建scrapy项目的命令:
scrapy startproject <项目名字>
示例:
scrapy startproject myspider
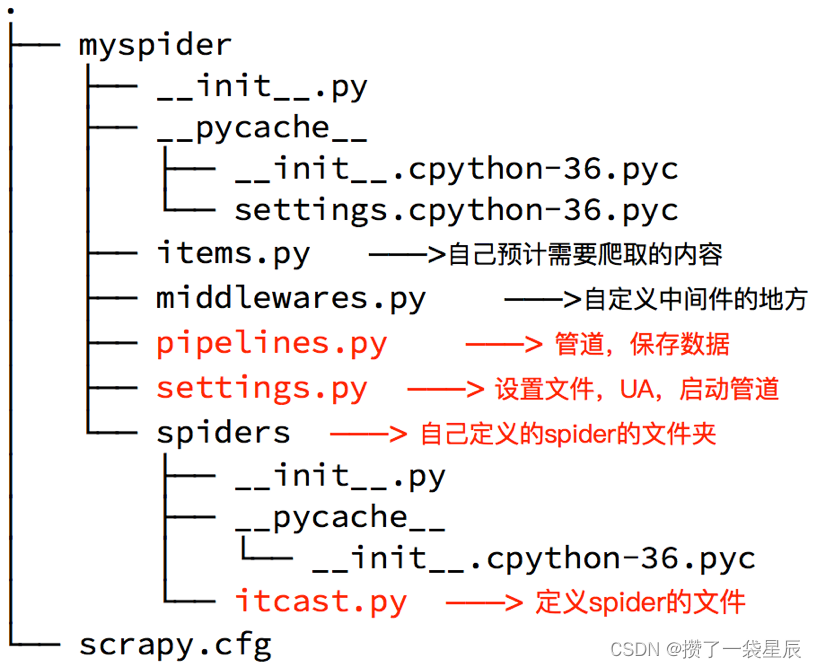
生成的目录和文件结果如下:

对几个py文件做如下说明:
- items.py
# Define here the models for your scraped items# See documentation in:
# https://docs.scrapy.org/en/latest/topics/items.htmlimport scrapy# 实际是一个模板类  主要是用来定义数据存储模型
# 通过这个类实例化 数据实际存到实例(对象)中
class MyspiderItem(scrapy.Item):# 实际是一个模板类(数据建模) 事先定义好你要爬取的字段name = scrapy.Field() # 租房标题content = scrapy.Field() # 详情信息price = scrapy.Field() # 价格link = scrapy.Field() # 详情链接- middlewares.py 用于编写中间件(下载中间件+爬虫中间件) – 无特殊需求,一般不需要编写
 Define here the models for your spider middleware
#
# See documentation in:
# https://docs.scrapy.org/en/latest/topics/spider-middleware.htmlfrom scrapy import signals# useful for handling different item types with a single interface
from itemadapter import is_item, ItemAdapterclass MyspiderSpiderMiddleware:# Not all methods need to be defined. If a method is not defined,# scrapy acts as if the spider middleware does not modify the# passed objects.@classmethoddef from_crawler(cls, crawler):# This method is used by Scrapy to create your spiders.s = cls()crawler.signals.connect(s.spider_opened, signal=signals.spider_opened)return sdef process_spider_input(self, response, spider):# Called for each response that goes through the spider# middleware and into the spider.# Should return None or raise an exception.return Nonedef process_spider_output(self, response, result, spider):# Called with the results returned from the Spider, after# it has processed the response.# Must return an iterable of Request, or item objects.for i in result:yield idef process_spider_exception(self, response, exception, spider):# Called when a spider or process_spider_input() method# (from other spider middleware) raises an exception.# Should return either None or an iterable of Request or item objects.passdef process_start_requests(self, start_requests, spider):# Called with the start requests of the spider, and works# similarly to the process_spider_output() method, except# that it doesn’t have a response associated.# Must return only requests (not items).for r in start_requests:yield rdef spider_opened(self, spider):spider.logger.info('Spider opened: %s' % spider.name)class MyspiderDownloaderMiddleware:# Not all methods need to be defined. If a method is not defined,# scrapy acts as if the downloader middleware does not modify the# passed objects.@classmethoddef from_crawler(cls, crawler):# This method is used by Scrapy to create your spiders.s = cls()crawler.signals.connect(s.spider_opened, signal=signals.spider_opened)return sdef process_request(self, request, spider):# Called for each request that goes through the downloader# middleware.# Must either:# - return None: continue processing this request# - or return a Response object# - or return a Request object# - or raise IgnoreRequest: process_exception() methods of# installed downloader middleware will be calledreturn Nonedef process_response(self, request, response, spider):# Called with the response returned from the downloader.# Must either;# - return a Response object# - return a Request object# - or raise IgnoreRequestreturn responsedef process_exception(self, request, exception, spider):# Called when a download handler or a process_request()# (from other downloader middleware) raises an exception.# Must either:# - return None: continue processing this exception# - return a Response object: stops process_exception() chain# - return a Request object: stops process_exception() chainpassdef spider_opened(self, spider):spider.logger.info('Spider opened: %s' % spider.name)- pipelines.py 管道 – 主要用于编写数据处理步骤 (数据的清洗+保存)
# Define your item pipelines here# Don't forget to add your pipeline to the ITEM_PIPELINES setting
# See: https://docs.scrapy.org/en/latest/topics/item-pipeline.html# useful for handling different item types with a single interface
from itemadapter import ItemAdapterclass MyspiderPipeline:def process_item(self, itemder):return item- settings.py 详细的配置信息(设置文件 UA 启动管道)
 Scrapy settings for mySpider project
#
# For simplicity, this file contains only settings considered important or
# commonly used. You can find more settings consulting the documentation:
#
#     https://docs.scrapy.org/en/latest/topics/settings.html
#     https://docs.scrapy.org/en/latest/topics/downloader-middleware.html
#     https://docs.scrapy.org/en/latest/topics/spider-middleware.htmlBOT_NAME = 'mySpider'SPIDER_MODULES = ['mySpider.spiders']
NEWSPIDER_MODULE = 'mySpider.spiders'# Crawl responsibly by identifying yourself (and your website) on the user-agent
# 需要手动修改成自己浏览器的UA
USER_AGENT = 'mySpider (+http://www.yourdomain.com)'# Obey robots.txt rules
ROBOTSTXT_OBEY = False # 需要手动修改为False# Configure maximum concurrent requests performed by Scrapy (default: 16)
#CONCURRENT_REQUESTS = 32# Configure a delay for requests for the same website (default: 0)
# See https://docs.scrapy.org/en/latest/topics/settings.html#download-delay
# See also autothrottle settings and docs
#DOWNLOAD_DELAY = 3
# The download delay setting will honor only one of:
#CONCURRENT_REQUESTS_PER_DOMAIN = 16
#CONCURRENT_REQUESTS_PER_IP = 16# Disable cookies (enabled by default)
#COOKIES_ENABLED = False# Disable Telnet Console (enabled by default)
#TELNETCONSOLE_ENABLED = False# Override the default request headers:
# 可以写入一些爬虫所需要的身份信息
#DEFAULT_REQUEST_HEADERS = {
#   'Accept': 'text/html,application/xhtml+xml,application/xml;q=0.9,*/*;q=0.8',
#   'Accept-Language': 'en',
#}# Enable or disable spider middlewares
# See https://docs.scrapy.org/en/latest/topics/spider-middleware.html
# SPIDER_MIDDLEWARES = {
#    'mySpider.middlewares.MyspiderSpiderMiddleware': 543,
# }# Enable or disable downloader middlewares
# See https://docs.scrapy.org/en/latest/topics/downloader-middleware.html
#DOWNLOADER_MIDDLEWARES = {
#    'mySpider.middlewares.MyspiderDownloaderMiddleware': 543,
#}# Enable or disable extensions
# See https://docs.scrapy.org/en/latest/topics/extensions.html
#EXTENSIONS = {
#    'scrapy.extensions.telnet.TelnetConsole': None,
#}# Configure item pipelines
# See https://docs.scrapy.org/en/latest/topics/item-pipeline.html
# 开启管道类才能写入数据
ITEM_PIPELINES = {'mySpider.pipelines.MyspiderPipeline': 300,
}# Enable and configure the AutoThrottle extension (disabled by default)
# See https://docs.scrapy.org/en/latest/topics/autothrottle.html
#AUTOTHROTTLE_ENABLED = True
# The initial download delay
#AUTOTHROTTLE_START_DELAY = 5
# The maximum download delay to be set in case of high latencies
#AUTOTHROTTLE_MAX_DELAY = 60
# The average number of requests Scrapy should be sending in parallel to
# each remote server
#AUTOTHROTTLE_TARGET_CONCURRENCY = 1.0
# Enable showing throttling stats for every response received:
#AUTOTHROTTLE_DEBUG = False# Enable and configure HTTP caching (disabled by default)
# See https://docs.scrapy.org/en/latest/topics/downloader-middleware.html#httpcache-middleware-settings
#HTTPCACHE_ENABLED = True
#HTTPCACHE_EXPIRATION_SECS = 0
#HTTPCACHE_DIR = 'httpcache'
#HTTPCACHE_IGNORE_HTTP_CODES = []
#HTTPCACHE_STORAGE = 'scrapy.extensions.httpcache.FilesystemCacheStorage'
4. 创建爬虫
通过命令创建出爬虫文件,爬虫文件为主要的代码作业文件,通常一个网站的爬取动作都会在爬虫文件中进行编写。
命令:
在项目路径下执行:
scrapy genspider <爬虫名字> <允许爬取的域名>
爬虫名字: 作为爬虫运行时的参数
允许爬取的域名: 为对于爬虫设置的爬取范围,设置之后用于过滤要爬取的url,如果爬取的url与允许的域不通则被过滤掉。
示例:
cd myspiderscrapy genspider itcast itcast.cn
生成的目录和文件结果如下:
5. 完善爬虫
在上一步生成出来的爬虫文件中编写指定网站的数据采集操作,实现数据提取
5.1 在/myspider/myspider/spiders/itcast.py中修改内容如下:
import scrapyclass ItcastSpider(scrapy.Spider): # 继承scrapy.spider# 爬虫名字 name = 'itcast' # 允许爬取的范围allowed_domains = ['itcast.cn'] # 开始爬取的url地址start_urls = ['http://www.itcast.cn/channel/teacher.shtml']# 数据提取的方法,接受下载中间件传过来的responsedef parse(self, response): # scrapy的response对象可以直接进行xpathnames = response.xpath('//div[@class="tea_con"]//li/div/h3/text()') print(names)# 获取具体数据文本的方式如下# 分组li_list = response.xpath('//div[@class="tea_con"]//li') for li in li_list:# 创建一个数据字典item = {}# 利用scrapy封装好的xpath选择器定位元素,并通过extract()或extract_first()来获取结果# extract_first()如果没结果就返回None 值只有一个的时候可以选择该方法item['name'] = li.xpath('.//h3/text()').sc_first() # 老师的名字item['level'] = li.xpath('.//h4/text()').extract_first() # 老师的级别item['text'] = li.xpath('.//p/text()').extract_first() # 老师的介绍print(item)# 使用yield返回数据yield temp
注意:
- scrapy.Spider爬虫类中必须有名为parse的解析
- 如果网站结构层次比较复杂,也可以自定义其他解析函数
- 在解析函数中提取的url地址如果要发送请求,则必须属于allowed_domains范围内,但是start_urls中的url地址不受这个限制,我们会在后续的课程中学习如何在解析函数中构造发送请求
- 启动爬虫的时候注意启动的位置,是在项目路径下启动
- parse()函数中使用yield返回数据,注意:解析函数中的yield能够传递的对象只能是:BaseItem, Request, dict, None
5.2 定位元素以及提取数据、属性值的方法
解析并获取scrapy爬虫中的数据: 利用xpath规则字符串进行定位和提取
- response.xpath方法的返回结果是一个类似list的类型,其中包含的是selector对象,操作和列表一样,但是有一些额外的方法
- 额外方法extract():返回一个包含有字符串的列表
- 额外方法extract_first():返回列表中的第一个字符串,列表为空没有返回None
5.3 response响应对象的常用属性
- response.url:当前响应的url地址
- response.request.url:当前响应对应的请求的url地址
- response.headers:响应头
- response.requests.headers:当前响应的请求头
- response.body:响应体,也就是html代码,byte类型
- response.status:响应状态码
6 保存数据
利用管道pipeline来处理(保存)数据
6.1 在pipelines.py文件中定义对数据的操作
- 定义一个管道类
- 重写管道类的process_item方法
- process_item方法处理完item之后必须返回给引擎
import jsonclass ItcastPipeline():# 爬虫文件中提取数据的方法每yield一次item,就会运行一次# 该方法为固定名称函数def process_item(self, item, spider): # 参数item:是爬虫文件中yield的返回的数据对象(引擎会把这个交给管道中的这个item参数)print(item)return item # 默认使用完管道之后需要把数据返回给引擎
6.2 在settings.py配置启用管道
ITEM_PIPELINES = {#      目录文件                      该值的大小决定管道执行的顺序,值越小优先级越高(该值最好 不要大于1000)'myspider.pipelines.lianjiaPipeline': 400
}
配置项中键为使用的管道类,管道类使用.进行分割,第一个为项目目录,第二个为文件,第三个为定义的管道类。
配置项中值为管道的使用顺序,设置的数值约小越优先执行,该值一般设置为1000以内。
7. 运行scrapy
命令:在项目目录下执行scrapy crawl <爬虫名字>
示例:r 【scrapy crawl itcast --nolog 忽略日志信息】
小结
- scrapy的安装:pip install scrapy
- 创建scrapy的项目: scrapy startproject myspider
- 创建scrapy爬虫:在项目目录下执行 scrapy genspider itcast itcast.cn
- 运行scrapy爬虫:在项目目录下执行 scrapy crawl itcast 【scrapy crawl itcast --nolog 忽略日志信息】
- 解析并获取scrapy爬虫中的数据:
- response.xpath方法的返回结果是一个类似list的类型,其中包含的是selector对象,操作和列表一样,但是有一些额外的方法
- extract() 返回一个包含有字符串的列表
- extract_first() 返回列表中的第一个字符串,列表为空没有返回None
- scrapy管道的基本使用:
- 完善pipelines.py中的process_item函数
- 在settings.py中设置开启pipeline
- response响应对象的常用属性
- response.url:当前响应的url地址
- response.request.url:当前响应对应的请求的url地址
- response.headers:响应头
- response.requests.headers:当前响应的请求头
- response.body:响应体,也就是html代码,byte类型
- response.status:响应状态码