MyBatis 详解 2 -- 增删改操作
- 前言
- 一、准备工作
- 1.1 创建数据库和表
- 1.2 添加实体类
- 1.3 添加 mapper 接口 (数据持久层)
- 1.4 创建与接口对应的 xml 文件
- 二、增加操作
- 2.1 默认返回受影响的行数
- 2.2 特殊的新增:返回自增 id
- 三、删除操作
- 四、修改操作
- 五、实现完整交互
- 5.1 添加 Service
- 5.2 添加 Controller
- 5.3 验证
前言
承接上篇博客 (环境搭建、查询操作):https://blog.csdn.net/yyhgo_/article/details/128695930?spm=1001.2014.3001.5501
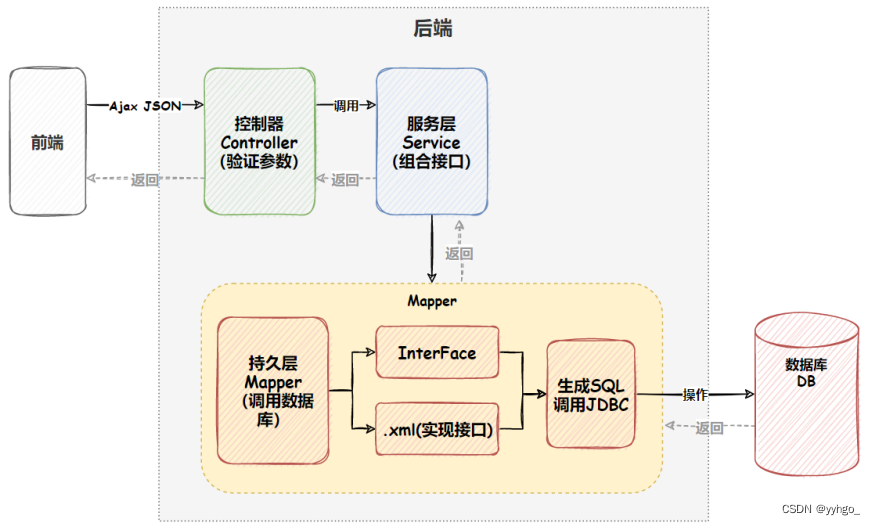
上篇博客我们实现了 MyBatis 环境搭建与查询操作。接下来,我们实现增加、删除和修改操作,对应使用 MyBatis 的标签如下:
<insert>标签:插⼊语句<update>标签:修改语句<delete>标签:删除语句
一、准备工作
1.1 创建数据库和表
-- 创建数据库
drop database if exists mycnblog;
create database mycnblog DEFAULT CHARACTER SET utf8mb4;-- 使用数据数据
use mycnblog;-- 创建表[用户表]
drop table if exists  userinfo;
create table userinfo(id int primary key auto_increment,username varchar(100) not null,password varchar(32) not null,photo varchar(500) default '',createtime datetime default now(),updatetime datetime default now(),`state` int default 1
) default charset 'utf8mb4';-- 创建文章表
drop table if exists  articleinfo;
create table articleinfo(id int primary key auto_increment,title varchar(100) not null,content text not null,createtime datetime default now(),updatetime datetime default now(),uid int not null,rcount int not null default 1,`state` int default 1
)default charset 'utf8mb4';
1.2 添加实体类
package com.example.demo.model;import lombok.Data;import java.util.Date;/*** 文章表的实体类*/
@Data
public class ArticleInfo {private int id;private String title;private String content;private Date createtime;private Date updatetime;private int uid;private int rcount; // 访问量private int state; // 状态(预览字段)private String name; // 文章作者名//..
}
1.3 添加 mapper 接口 (数据持久层)
package com.example.demo.mapper;import org.apache.ibatis.annotations.Mapper;@Mapper
public interface ArticleInfoMapper {}
1.4 创建与接口对应的 xml 文件
<?xml version="1.0" encoding="UTF-8"?>
<!DOCTYPE mapper PUBLIC "-//mybatis.org//DTD Mapper 3.0//EN" "http://mybatis.org/dtd/mybatis-3-mapper.dtd">
<mapper namespace="com.example.demo.mapper.ArticleInfoMapper"></mapper>
二、增加操作
2.1 默认返回受影响的行数
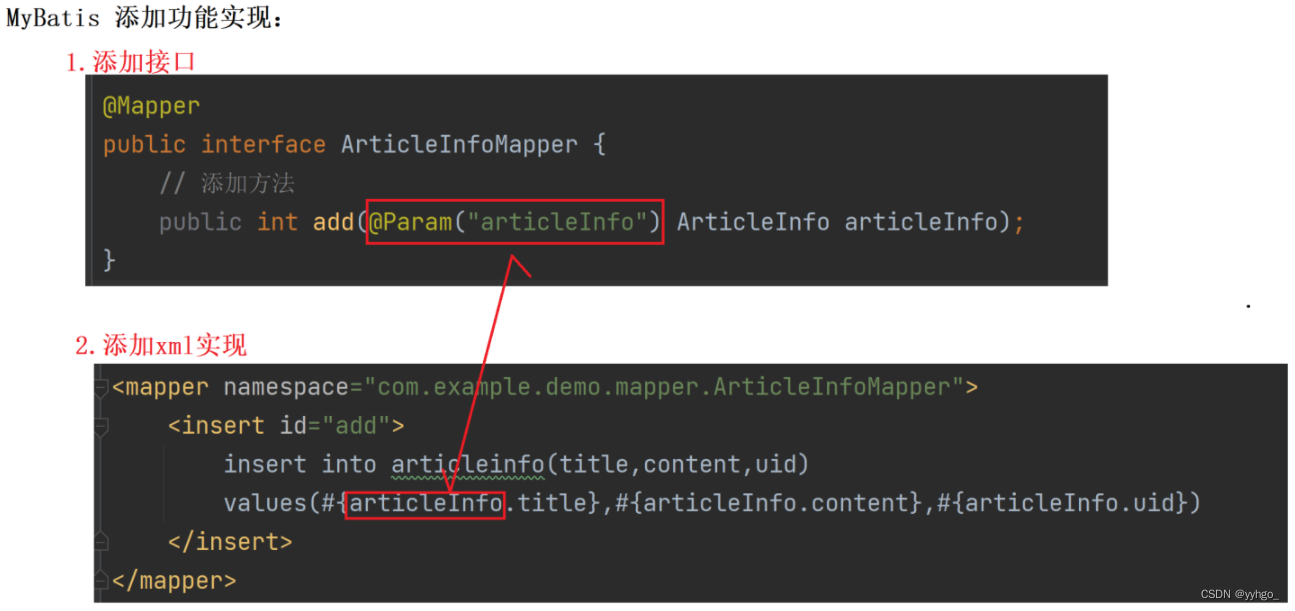
ArticleInfoMapper 接口:
@Mapper
public interface ArticleInfoMapper {// 添加方法public int add(@Param("articleInfo") ArticleInfo articleInfo);
}
ArticleMapper.xml:
<insert id="add">insert into articleinfo(title,uid,content)values(#{articleInfo.title},#{articleInfo.uid},#{articleInfo.content})</insert>
插入默认返回的是受影响的行数,所以不需要设置 resultType / resultMap。
另一种格式:接口中方法参数不带
@Param("articleInfo");.xml 文件中的字段不需要添加articleInfo.,直接写字段名即可。
单元测试:
package com.example.demo.mapper;import com.example.demo.model.ArticleInfo;
import org.junit.jupiter.api.Test;
import org.springframework.beans.factory.annotation.Autowired;
import org.springframework.boot.test.context.SpringBootTest;import static org.junit.jupiter.api.Assertions.*;@SpringBootTest // 当前测试的上下文环境为 springboot
class ArticleInfoMapperTest {@Autowiredprivate ArticleInfoMapper articleInfoMapper;@Testvoid add() {ArticleInfo articleInfo = new ArticleInfo();articleInfo.setTitle("111");articleInfo.setContent("很高兴认识你~");articleInfo.setUid(1);int result = articleInfoMapper.add(articleInfo);System.out.println("添加结果:" + result);}
}
经测试,新增成功。
2.2 特殊的新增:返回自增 id
ArticleInfoMapper 接口:
// 添加方法(得到自增主键的id)public int addGetId(@Param("articleInfo") ArticleInfo articleInfo);
ArticleMapper.xml:
<insert id="addGetId" useGeneratedKeys="true" keyProperty="id">insert into articleinfo(title,content,uid)values(#{articleInfo.title},#{articleInfo.content},#{articleInfo.uid})</insert>
- useGeneratedKeys:这会令 MyBatis 使⽤ JDBC 的 getGeneratedKeys ⽅法来取出由数据库内部⽣成的主键(⽐如:像 MySQL 和 SQL Server 这样的关系型数据库管理系统的⾃动递增字段),默认值:false。
- keyColumn:设置⽣成键值在表中的列名,在某些数据库(像 PostgreSQL)中,当主键列不是表中的第⼀列的时候,是必须设置的。如果⽣成列不⽌⼀个,可以⽤逗号分隔多个属性名称。
- keyProperty:指定能够唯⼀识别对象的属性,MyBatis 会使⽤ getGeneratedKeys 的返回值或 insert 语句的 selectKey ⼦元素设置它的值,默认值:未设置(unset)。如果⽣成列不⽌⼀个,可以⽤逗号分隔多个属性名称。
单元测试:
@Testvoid addGetId() {ArticleInfo articleInfo = new ArticleInfo();articleInfo.setTitle("mybaits添加并返回自增id");articleInfo.setContent("设置xml中的useGeneratedKeys=\"true\" keyProperty=\"id\"");articleInfo.setUid(1);int result = articleInfoMapper.addGetId(articleInfo); // 返回受影响的行数System.out.println("添加结果:" + result + " |自增id:" + articleInfo.getId());}
因为设置了
keyProperty="id",所以通过articleInfo.getId()拿到 自增id!
(默认的返回值依然是 受影响的行数)
经测试,新增成功。
三、删除操作
ArticleInfoMapper 接口:
// 删除单条数据public int delById(@Param("id") Integer id);
ArticleMapper.xml:
<delete id="delById">delete from articleinfo where id=#{id}</delete>
默认返回值依然是受影响的行数。
单元测试:
@Testvoid delById() {int result = articleInfoMapper.delById(3);System.out.println("删除结果:" + result);}
经测试,删除成功。
四、修改操作
ArticleInfoMapper 接口:
// 修改标题public int updateTitle(@Param("id") Integer id, @Param("title") String title);
ArticleMapper.xml:
<update id="updateTitle">update articleinfo set title=#{title} where id=#{id}</update>
默认返回值依然是受影响的行数。
单元测试:
@Testvoid updateTitle() {int result = articleInfoMapper.updateTitle(1, "你好世界");System.out.println("修改结果:" + result);}
经测试,修改成功。
五、实现完整交互
5.1 添加 Service
先在数据持久层 (mapper) 实现接口与 xml 文件。
服务层实现代码如下:
package com.example.demo.service;import com.example.demo.mapper.UserMapper;
import com.example.demo.model.UserInfo;
import org.springframework.stereotype.Service;
import javax.annotation.Resource;
import java.util.List;@Service
public class UserService {@Resourceprivate UserMapper userMapper;public List<UserInfo> getAll() {return userMapper.getAll();}
}
5.2 添加 Controller
控制器层实现代码如下:
package com.example.demo.controller;import com.example.demo.model.UserInfo;
import com.example.demo.service.UserService;
import org.springframework.web.bind.annotation.RequestMapping;
import org.springframework.web.bind.annotation.RestController;
import javax.annotation.Resource;
import java.util.List;@RestController
@RequestMapping("/u")
public class UserController {@Resourceprivate UserService userService;@RequestMapping("/getall")public List<UserInfo> getAll(){return userService.getAll();}
}
5.3 验证
启动后,访问 http://localhost:8080/u/getall:
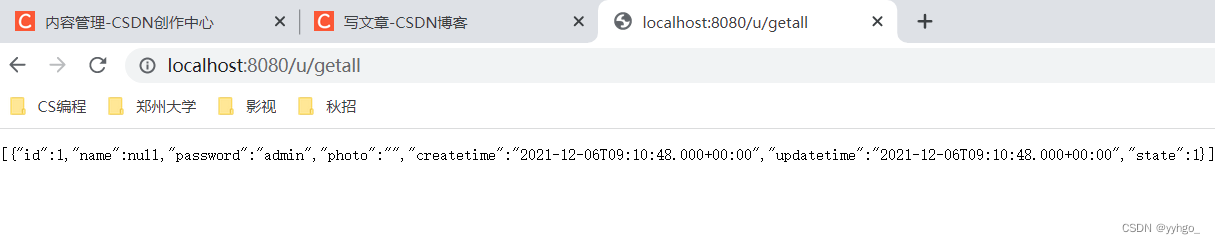
交互成功了 ~