Windows10环境下Docker安装主从MySQL5.7数据库
- 1 软件环境概览
- 2 Docker分别安装主从MySQL5.7数据库
- 2.1 主数据库安装
- 2.1.1 配置文件
- 2.1.1.1 mysqld.cnf文件
- 2.1.2、主数据库镜像制作
- 2.1.2.1 Dockerfile文件制作
- 2.1.2.2 构建镜像
- 2.1.2.3 创建网络
- 2.1.2.4 启动容器
- 2.2 从数据库安装
- 2.2.1 配置文件
- 2.2.1.1 mysqld.cnf文件
- 2.2.2、主数据库镜像制作
- 2.2.2.1 Dockerfile文件制作
- 2.2.2.2 构建镜像
- 2.2.2.3 启动容器
- 2.2.2.4 查看localnet网络信息
- 3 查看主从数据库是否按照配置文件加载
- 3.1 主数据库查看
- 3.2 从数据库查看
- 4 主从MySQL5.7数据库配置
- 4.1 主数据库配置
- 4.1.1 创建同步用户
- 4.1.2 赋予同步用户权限
- 4.1.3 查看master的状态
- 4.2 从数据库配置
- 4.2.1 更改主数据库MASTER信息
- 4.2.2 开启同步
- 4.2.3 查看slave信息
- 5 验证是否同步
1 软件环境概览
- Docker: 20.10.7, build f0df350
- OS: Windows11
- WSL: 2
- Navicat: 11.2.7
- MySQL: 5.7
2 Docker分别安装主从MySQL5.7数据库
2.1 主数据库安装
2.1.1 配置文件
2.1.1.1 mysqld.cnf文件
创建MySQL启动的配置文件mysqld.cnf

其内容为:
#mysql master1 config
[mysqld]
server-id = 1        # 节点ID,确保唯一# log config
log-bin = mysql-bin    #开启mysql的binlog日志功能
sync_binlog = 1         #控制数据库的binlog刷到磁盘上去 , 0 不控制,性能最好,1每次事物提交都会刷到日志文件中,性能最差,最安全
binlog_format = mixed   #binlog日志格式,mysql默认采用statement,建议使用mixed
expire_logs_days = 7                           #binlog过期清理时间
max_binlog_size = 100m                    #binlog每个日志文件大小
binlog_cache_size = 4m                        #binlog缓存大小
max_binlog_cache_size= 512m              #最大binlog缓存大
binlog-ignore-db=mysql #不生成日志文件的数据库,多个忽略数据库可以用逗号拼接,或者 复制这句话,写多行auto-increment-offset = 1     # 自增值的偏移量
auto-increment-increment = 1  # 自增值的自增量
slave-skip-errors = all #跳过从库错误
2.1.2、主数据库镜像制作
为什么要制作镜像?
因为要修改MySQL启动时加载的配置文件,配置文件在
/etc/mysql/mysql.conf.d/文件夹下。直接使用官方镜像,是加载的默认配置。
2.1.2.1 Dockerfile文件制作
Dockerfile内容为:
FROM mysql:5.7COPY mysqld.cnf /etc/mysql/mysql.conf.d/
2.1.2.2 构建镜像
使用构建命令构建镜像
docker build -t mysql57:zbk .
2.1.2.3 创建网络
docker network create localnet
2.1.2.4 启动容器
使用容器命令启动
docker run --restart=always --privileged=true -d -v /e/home/mysql/data/:/var/lib/mysql -p 33306:3306 --name mysql-master --network localnet -e MYSQL_ROOT_PASSWORD=123456 mysql5.7:zbk
注意:Windows的本地挂载文件路径,是/开头。
2.2 从数据库安装
2.2.1 配置文件
2.2.1.1 mysqld.cnf文件
创建MySQL启动的配置文件mysqld.cnf

其内容为:
[mysqld]
server-id = 2
log-bin=mysql-bin
relay-log = mysql-relay-bin
replicate-wild-ignore-table=mysql.%
replicate-wild-ignore-table=test.%
replicate-wild-ignore-table=information_schema.%
2.2.2、主数据库镜像制作
2.2.2.1 Dockerfile文件制作
Dockerfile内容为:
FROM mysql:5.7COPY mysqld.cnf /etc/mysql/mysql.conf.d/
2.2.2.2 构建镜像
使用构建命令构建镜像
docker build -t mysql57:zbk001 .
2.2.2.3 启动容器
使用容器命令启动
docker run --restart=always --privileged=true -d -v /e/home/mysql/data/:/var/lib/mysql -p 33307:3306 --name mysql-slave --network localnet -e MYSQL_ROOT_PASSWORD=123456 mysql5.7:zbk001
2.2.2.4 查看localnet网络信息
docker network inspect localnet
可以看到两个数据库容器均已组网

主数据库容器的Ip地址为172.19.0.2,从数据库容器的Ip地址为172.19.0.3。
3 查看主从数据库是否按照配置文件加载
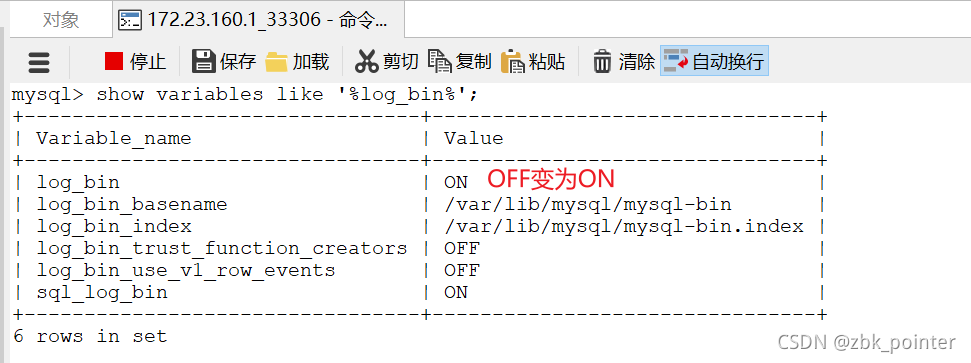
笔者通过Navicat连接到容器数据库,Ip地址是WSL2的网卡地址。
3.1 主数据库查看
输入下列命令查看
show variables like '%log_bin%';

3.2 从数据库查看

4 主从MySQL5.7数据库配置
4.1 主数据库配置
4.1.1 创建同步用户
CREATE USER repl_user IDENTIFIED BY 'repl_passwd';
4.1.2 赋予同步用户权限
grant replication slave on *.* to 'repl_user'@'172.19.0.3' identified by 'repl_passwd';FLUSH PRIVILEGES;
4.1.3 查看master的状态
mysql>  show master status;
+------------------+----------+--------------+------------------+-------------------+
| File             | Position | Binlog_Do_DB | Binlog_Ignore_DB | Executed_Gtid_Set |
+------------------+----------+--------------+------------------+-------------------+
| mysql-bin.000002 |     3306 |              | mysql            |                   |
+------------------+----------+--------------+------------------+-------------------+
1 row in set
后面从数据库的配置会使用到文件名mysql-bin.000002及位置3306 。
4.2 从数据库配置
4.2.1 更改主数据库MASTER信息
mysql> CHANGE MASTER TO
MASTER_HOST = '172.19.0.2',
MASTER_USER = 'repl_user',
MASTER_PASSWORD = 'repl_passwd',
MASTER_PORT = 3306,
MASTER_LOG_FILE='mysql-bin.000002',
MASTER_LOG_POS=3306,
MASTER_RETRY_COUNT = 60,
MASTER_HEARTBEAT_PERIOD = 10000;
4.2.2 开启同步
mysql> start slave;
4.2.3 查看slave信息
mysql> show slave status \G;
*************************** 1. row ***************************Slave_IO_State: Waiting for master to send eventMaster_Host: 172.19.0.2Master_User: repl_userMaster_Port: 3306Connect_Retry: 60Master_Log_File: mysql-bin.000002Read_Master_Log_Pos: 3067Relay_Log_File: mysql-relay-bin.000015Relay_Log_Pos: 320Relay_Master_Log_File: mysql-bin.000002Slave_IO_Running: YesSlave_SQL_Running: YesReplicate_Do_DB:Replicate_Ignore_DB:Replicate_Do_Table:Replicate_Ignore_Table:Replicate_Wild_Do_Table:Replicate_Wild_Ignore_Table: mysql.%,test.%,information_schema.%Last_Errno: 0Last_Error:Skip_Counter: 0Exec_Master_Log_Pos: 3067Relay_Log_Space: 1246Until_Condition: NoneUntil_Log_File:Until_Log_Pos: 0Master_SSL_Allowed: NoMaster_SSL_CA_File:Master_SSL_CA_Path:Master_SSL_Cert:Master_SSL_Cipher:Master_SSL_Key:Seconds_Behind_Master: 0
Master_SSL_Verify_Server_Cert: NoLast_IO_Errno: 0Last_IO_Error:Last_SQL_Errno: 0Last_SQL_Error:Replicate_Ignore_Server_Ids:Master_Server_Id: 1Master_UUID: 1371c90d-0f8c-11ec-b520-0242ac110002Master_Info_File: /var/lib/mysql/master.infoSQL_Delay: 0SQL_Remaining_Delay: NULLSlave_SQL_Running_State: Slave has read all relay log; waiting for more updatesMaster_Retry_Count: 60Master_Bind:Last_IO_Error_Timestamp:Last_SQL_Error_Timestamp:Master_SSL_Crl:Master_SSL_Crlpath:Retrieved_Gtid_Set:Executed_Gtid_Set:Auto_Position: 0Replicate_Rewrite_DB:Channel_Name:Master_TLS_Version:
1 row in set (0.00 sec)ERROR:
No query specified
5 验证是否同步
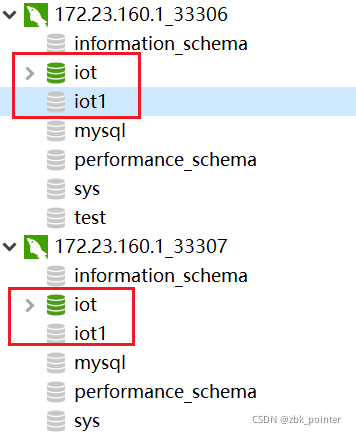
新建数据库iot、iot1,可以看到从数据库已经同步过来。

看完 点个赞吧 亲 ❤️ ❤️ ❤️ ❤️ ❤️


