目标:实时linux内核中运行IgH主站,ethercat的用户态工具能看到主站信息。
一、需要的软件
1,vbox虚拟机
https://www.virtualbox.org/,下载VirtualBox 7.0,
备注:windows中不要用wsl开发,wsl运行unbuntu后,没有grub相关的目录,update-grub无法正确更新引导分区。
2,Ubuntu 20.04
http://releases.ubuntu.com/20.04/ ,下载ubuntu-20.04.6-desktop-amd64.iso
3,rt linux
方法一,打补丁方式(本文采用的方法):
原生kernel:https://mirrors.edge.kernel.org/pub/linux/kernel/
实时补丁:https://git.kernel.org/pub/scm/linux/kernel/git/rt/linux-rt-devel.git
方法二,下载已经打好补丁的kernel:
https://git.kernel.org/pub/scm/linux/kernel/git/rt/linux-stable-rt.git/refs/tags
4,IgH主站
https://gitlab.com/etherlab.org/ethercat/-/branches,下载stable-1.5源码
二、运行rt linux
1,ubuntu20.04环境
vbox安装ubuntu-20.04.6-desktop-amd64.iso
2,配置ubuntu系统
参考博文,https://blog.csdn.net/geshifei/article/details/111937461
-
若无法打开terminal,参考下面解决:
| CTRL + ALT + F3 # 进入命令行模式(需要返回桌面时CTRL + ALT + F1) root@ubuntu-20:/home/gsf# vim /etc/default/locale 把文件中的 “en_US” 改成 “en_US.UTF-8” 保存退出 root@ubuntu-20:/home/gsf# locale-gen --purge root@ubuntu-20:/home/gsf# reboot |
-
安装编译IgH用到的工具:root@ubuntu-20:/home/gsf# apt-get install autoconf autogen libtool
3,编译rt linux
下载原生5.4.28内核(https://mirrors.edge.kernel.org/pub/linux/kernel/)
下载对应的实时补丁v5.4.28-rt19(https://git.kernel.org/pub/scm/linux/kernel/git/rt/linux-stable-rt.git/refs/tags)
打补丁:
| root@ubuntu-20:/home/gsf/IgH# ls linux-5.4.28.tar.gz patch-5.4.28-rt19.patch root@ubuntu-20:/home/gsf/IgH# 解压kernel root@ubuntu-20:/home/gsf/IgH# tar zxvf linux-5.4.28.tar.gz 打实时补丁 root@ubuntu-20:/home/gsf/IgH# cp patch-5.4.28-rt19.patch ./linux-5.4.28 root@ubuntu-20:/home/gsf/IgH# cd linux-5.4.28 root@ubuntu-20:/home/gsf/IgH/linux-5.4.28# patch -p1 < patch-5.4.28-rt19.patch |
编译内核:
| root@ubuntu-20:/home/gsf/IgH/linux-5.4.28# make menuconfig General setup -> Preemption Model,选中Real-Time内核:
root@ubuntu-20:/home/gsf/IgH/linux-5.4.28# make-kpkg --rootcmd fakeroot --initrd kernel_image kernel_headers |

如编译问题,参考附2。
安装内核:
| root@ubuntu-20:/home/gsf/IgH/linux-5.4.28# cd .. root@ubuntu-20:/home/gsf/IgH/linux-5.4.28# dpkg -i linux-headers-5.4.28-rt19_5.4.28-rt19-10.00.Custom_amd64.deb linux-image-5.4.28-rt19_5.4.28-rt19-10.00.Custom_amd64.deb |
修改grub配置,重启ubuntu后可以选择内核::
| root@ubuntu-20:/home/gsf# vim /etc/default/grub If you change this file, run 'update-grub' afterwards to update /boot/grub/grub.cfg. For full documentation of the options in this file, see: # info -f grub -n 'Simple configuration' GRUB_DEFAULT=0 #注释掉下面一行 #GRUB_TIMEOUT_STYLE=hidden #默认超时值0,改成20 GRUB_TIMEOUT=20 GRUB_DISTRIBUTOR= #字符串"quiet splash"改成"text" GRUB_CMDLINE_LINUX_DEFAULT="text" GRUB_CMDLINE_LINUX="" root@ubuntu-20:/home/gsf# update-grub |
4,启动rt linux
reboot重启系统,进入grup界面,选择刚刚编译的rt内核启动。

启动后,检查一下rt内核是否加载:
| gsf@ubuntu-20:~$ uname -a Linux ubuntu-20 5.4.28-rt19 #2 SMP PREEMPT Mon Sep 18 19:19:46 CST 2023 x86_64 x86_64 x86_64 GNU/Linux |
三、运行IgH Master
1,编译IgH
https://gitlab.com/etherlab.org/ethercat/-/branches,下载ethercat-stable-1.5.tar
| root@ubuntu-20:/home/gsf/IgH/ethercat-stable-1.5# ./configure --enable-8139too=no (注:需要disable 8139too网卡,见附2) root@ubuntu-20:/home/gsf/IgH/ethercat-stable-1.5# make all modules root@ubuntu-20:/home/gsf/IgH/ethercat-stable-1.5# make modules_install install root@ubuntu-20:/home/gsf/IgH/ethercat-stable-1.5# depmod |
编译出来的inti脚本/usr/local/etc/init.d目录中的(不同linux发行版可能有区别,ubuntu20.04对应这个路径):
| root@ubuntu-20:/home/gsf/IgH/ethercat-stable-1.5# ln -s /usr/local/etc/init.d/ethercat /etc/init.d/ethercat root@ubuntu-20:/home/gsf/IgH/ethercat-stable-1.5# root@ubuntu-20:/home/gsf/IgH/ethercat-stable-1.5# mkdir /etc/sysconfig root@ubuntu-20:/home/gsf/IgH/ethercat-stable-1.5# cp /usr/local/etc/sysconfig/ethercat /etc/sysconfig/ethercat root@ubuntu-20:/home/gsf/IgH/ethercat-stable-1.5# |
2,配置ethercat device
| root@ubuntu-20:/usr/local/etc/init.d# vim /etc/init.d/ethercat #修改/etc/sysconfig/ethercat的两处位置 MASTER0_DEVICE="ifconfig命令看到的mac地址" DEVICE_MODULES="generic" |
3,启动IgH
| root@ubuntu-20:/usr/local/etc/init.d# /etc/init.d/ethercat start Starting EtherCAT master 1.5.2 done |
如果启动出现错误,参考附3。
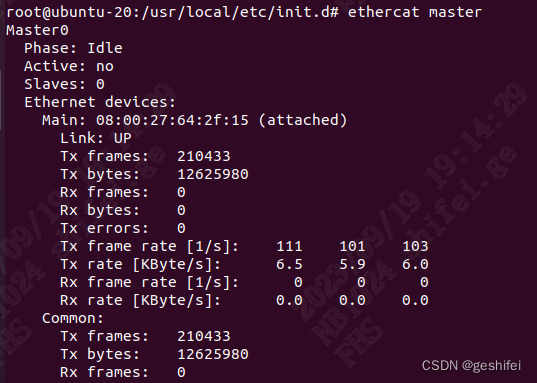
此时,IgH Master已经跑起来,可通过ethercat用户空间工具进行调试,比如:
附:
1,rt linux编译BTF报错
| LD vmlinux.o MODPOST vmlinux.o MODINFO modules.builtin.modinfo BTF: .tmp_vmlinux.btf: pahole (pahole) is not available Failed to generate BTF for vmlinux Try to disable CONFIG_DEBUG_INFO_BTF make[1]: * [Makefile:1076: vmlinux] Error 1 make[1]: Leaving directory '/home/gsf/IgH/linux-5.4.28' make: * [debian/ruleset/targets/common.mk:301: debian/stamp/build/kernel] Error 2 root@ubuntu-20:/home/gsf/IgH/linux-5.4.28# vim .config root@ubuntu-20:/home/gsf/IgH/linux-5.4.28# |
解决:config文件中关闭CONFIG_DEBUG_INFO_BTF选项。
2,IgH编译config出错
| root@ubuntu-20:/home/gsf/IgH/ethercat-stable-1.5# ./configure checking whether the g++ linker (/usr/bin/ld -m elf_x86_64) supports shared libraries... yes checking dynamic linker characteristics... (cached) GNU/Linux ld.so checking how to hardcode library paths into programs... immediate checking whether to build kernel modules... yes checking for Linux kernel sources... /home/gsf/IgH/linux-5.4.28 (Kernel 5.4) checking for Linux modules installation directory... ethercat checking for kernel for 8139too driver... configure: error: kernel 5.4 not available for 8139too driver! |
解决:当前内核不支持8139too网卡,disable掉8139too重新执行 ./configure --enable-8139too=no
3,IgH启动错误
| root@ubuntu-20:/usr/local/etc/init.d# /etc/init.d/ethercat start Starting EtherCAT master 1.5.2 modprobe: ERROR: could not insert 'ec_master': Invalid argument failed |
解决:参考“配置ethercat device”一节,修改 /etc/init.d/ethercat中的mac地址。
参考资料
-
rt linux 官网:https://wiki.linuxfoundation.org/realtime/start