自定义endpoint实现内部pod访问外部应用
endpoint除了可以暴露pod的IP和端口还可以代理到外部的ip和端口
使用场景
-
公司业务还还没有完成上云, 一部分云原生的,一部分是实体的
-
业务上云期间逐步实现上云,保证各个模块之间的解耦性
比如使用云数据库或者实体数据库服务器啥的,因为像数据库实现容器化的话在实际生产环境中是不推荐的
所以一些静态服务上云以后pod还是需要访问外部应用服务的
k8s的Endpoint自定义实验
还是用tomcat+mysql的zrlog来实验
首先准备好tomcat的zrlog代码,我直接用上个博文实验用的yaml文件,因为现在主要探讨的是pod通过service与外部网络通信
[root@server153 test]# cat tomcat-deploy.yaml
apiVersion: v1
kind: Service  # 声明版本为Service
metadata:name: tomcat-service   # 定义Service的名字labels:name: show-tomcat-pod    # 定义Service的标签
spec:type: NodePort   # 定义Service的类型,自动分配一个集群serviceipselector:app: tomcat-deploy   #定义标签选择器,会代理后端app=tomcat-deploy的Podports:- port: 80   #内部暴露的端口    targetPort: 8080  #代理的pod的端口 nodePort: 31111 #暴露给主机外部访问的端口(default: 30000-32767)---
apiVersion: apps/v1
kind: Deployment
metadata:labels:app: tomcat-deployname: tomcat-deploynamespace: default
spec:progressDeadlineSeconds: 600replicas: 1revisionHistoryLimit: 10selector:matchLabels:app: tomcat-deploystrategy:rollingUpdate:maxSurge: 25%maxUnavailable: 25%type: RollingUpdatetemplate:metadata:labels:app: tomcat-deployspec:#创建init容器initContainers:#代码镜像- image: www.test.com/mytest/zrlog:v1#init容器名字name: init#将代码复制到匿名数据卷command: ["cp","-r","/tmp/ROOT.war","/www"]#将匿名数据卷挂载到容器中的/www目录下volumeMounts:- mountPath: /wwwname: tomcat-volume#创建tomcat容器containers:- image: oxnme/tomcatimagePullPolicy: Alwaysname: tomcatterminationMessagePath: /dev/termination-logterminationMessagePolicy: File#将数据卷挂载到tomcat的代码目录下volumeMounts:- mountPath: /usr/local/tomcat/webapps/name: tomcat-volumednsPolicy: ClusterFirstrestartPolicy: AlwaysschedulerName: default-schedulerterminationGracePeriodSeconds: 10#创建匿名数据卷volumes:- name: tomcat-volumeemptyDir: {}
tomcat的文件yaml文件这样就可以了,还是暴露主机的31111端口
然后就去配置我们的mysql数据库,创建数据库并创建一个连接数据库的用户,给与权限
[root@server160 ~]# mysql -uroot -pMySQL@666mysql> CREATE USER 'zrtest'@'%' IDENTIFIED BY 'MySQL@666';
Query OK, 0 rows affected (0.02 sec)mysql> CREATE DATABASE Zrlog;
Query OK, 1 row affected (0.00 sec)mysql> GRANT ALL PRIVILEGES ON `Zrlog`.* TO 'zrtest'@'%';
Query OK, 0 rows affected (0.00 sec)mysql> FLUSH PRIVILEGES;
Query OK, 0 rows affected (0.00 sec)mysql> show databases;
+--------------------+
| Database           |
+--------------------+
| information_schema |
| Zrlog              |
| mysql              |
| performance_schema |
| sys                |
| zabbix             |
+--------------------+
6 rows in set (0.00 sec)
数据库这样就配置好了
然后去配置我们自定义的Endpoint 和service
[root@server153 test]# cat endpoint.yaml
apiVersion: v1
kind: Endpoints
metadata: name: mysqlnamespace: default
#指定自定义的point的目标地址
subsets:
- addresses:#外部的reids ip- ip: 192.168.121.160# 外部redis的真实的工作端口ports:- port: 3306# 定义端口的名称,必须与 service 中的 ports.name 一致name: mysqlport
---
#这里的service配置大家都熟悉了,主要就是上面的endpoint而已
kind: Service
apiVersion: v1
metadata:name: mysqlnamespace: default
spec:ports:- port: 3306protocol: TCPname: mysqlporttargetPort: 3306type: ClusterIP
这样配置就可以了,然后执行配置文件
[root@server153 test]# kubectl apply -f tomcat-deploy.yaml
[root@server153 test]# kubectl apply -f endpoint.yaml
然后去查看mysql endpoint的详细信息
[root@server153 test]# kubectl describe endpoints mysql
Name:         mysql
Namespace:    default
Labels:       <none>
Annotations:  <none>
Subsets:Addresses:          192.168.121.160NotReadyAddresses:  <none>Ports:Name       Port  Protocol----       ----  --------mysqlport  3306  TCPEvents:  <none>
还有service的信息
[root@server153 test]# kubectl describe services mysql
Name:              mysql
Namespace:         default
Labels:            <none>
Annotations:       <none>
Selector:          <none>
Type:              ClusterIP
IP Family Policy:  SingleStack
IP Families:       IPv4
IP:                10.1.30.160
IPs:               10.1.30.160
Port:              mysqlport  3306/TCP
TargetPort:        3306/TCP
Endpoints:         192.168.121.160:3306
Session Affinity:  None
Events:            <none>
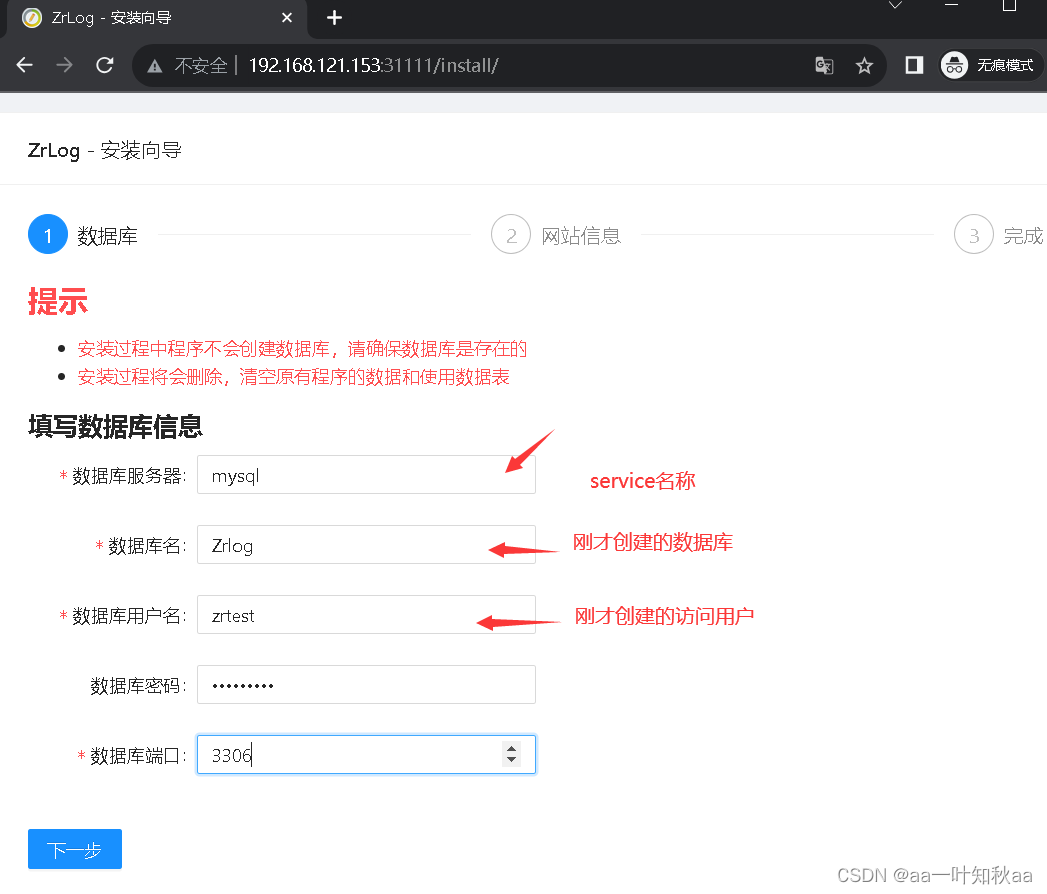
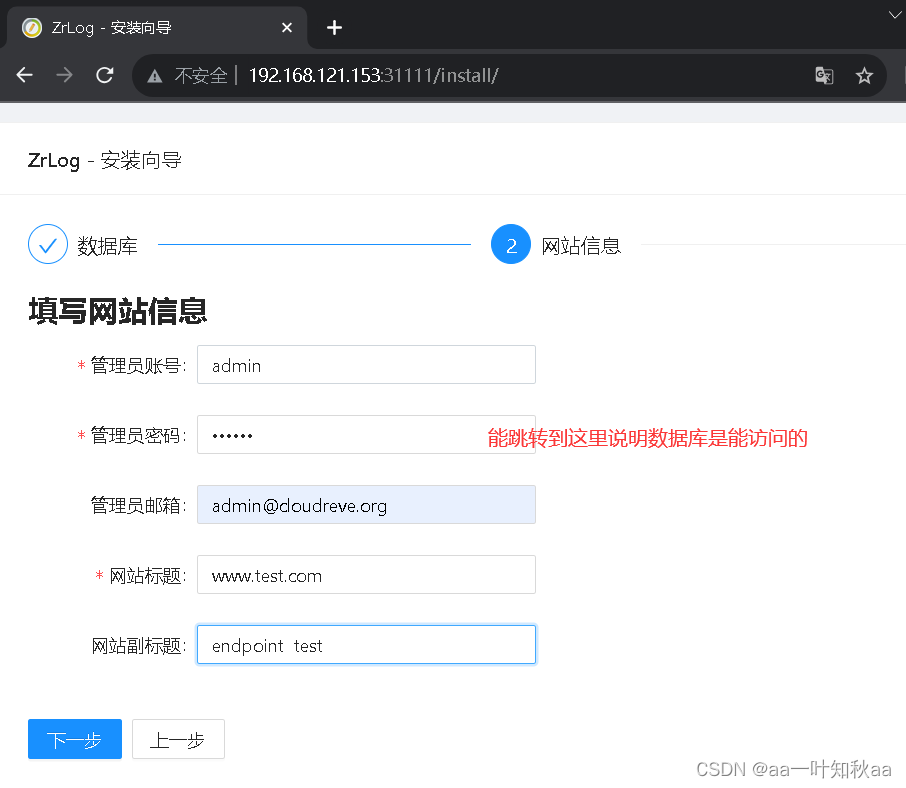
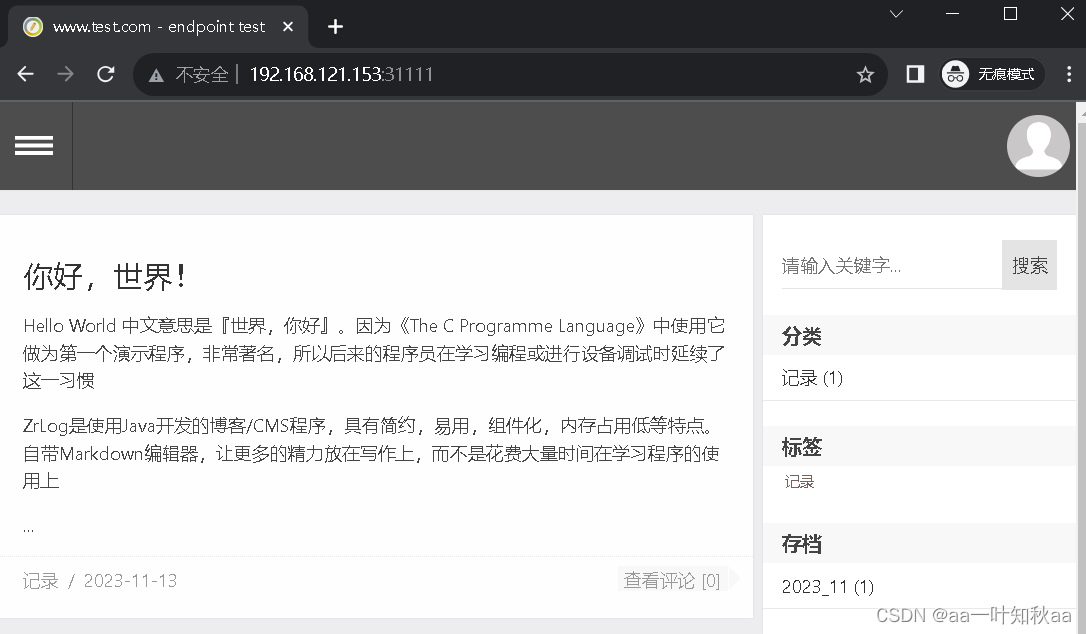
可以看到service是代理到了160主机,然后去浏览器访问31111端口安装测试
查看数据库内容
mysql> use Zrlog;
mysql> show tables;
+-----------------+
| Tables_in_Zrlog |
+-----------------+
| comment         |
| link            |
| log             |
| lognav          |
| plugin          |
| tag             |
| type            |
| user            |
| website         |
+-----------------+
9 rows in set (0.00 sec)
可以看到安装完毕就是这样的,只靠service的自动发现服务是没办法访问到外部网络的
所以自定义的Endpoint作用就体现出来了,这个还是比较有必要了解的
因为数据库数据的特殊性,一般是不容器化的
希望对大家有帮助