了解事务的都知道,在我们日常开发中单单靠事务管理就可以解决绝大多数问题了,但是为啥还要提出JTA这个玩意呢,到底JTA是什么呢?他又是具体来解决啥问题的呢?
JTA
JTA(Java Transaction API)是Java平台上用于管理分布式事务的API。它提供了一组接口和类,用于协调和控制跨多个资源(如数据库、消息队列等)的事务操作。
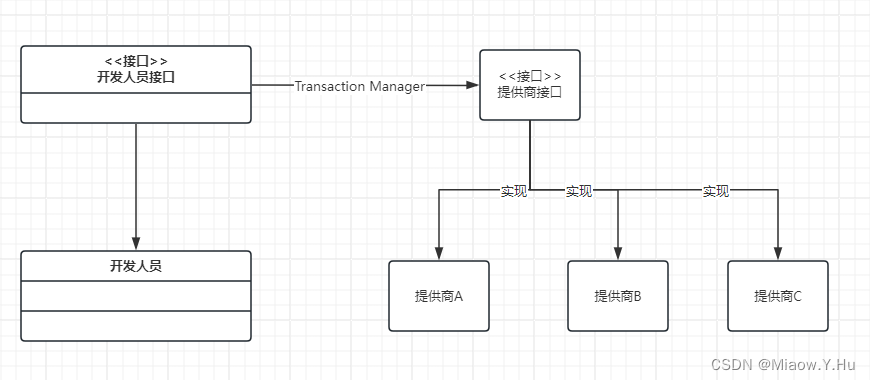
JTA的架构体系如下:

JTA的主要目标是确保分布式环境中的事务的原子性、一致性、隔离性和持久性(ACID属性)。它通过以下几个关键概念和组件来实现:
-
事务管理器(Transaction Manager):负责协调和管理事务的开始、提交和回滚等操作。它是JTA的核心组件,负责跟踪和控制事务的状态。
-
用户事务(User Transaction):表示应用程序发起的事务,通过事务管理器来管理和控制。
-
XA资源管理器(XA Resource Manager):表示分布式环境中的资源,如数据库、消息队列等。它实现了XA接口,可以参与到分布式事务中。
-
XA事务(XA Transaction):表示跨多个XA资源管理器的分布式事务。它遵循XA协议,通过两阶段提交(Two-Phase Commit)来保证事务的一致性。
使用JTA,开发人员可以在分布式环境中编写具有事务保证的应用程序。它提供了一种标准化的方式来处理分布式事务,简化了开发人员的工作,同时确保了数据的一致性和可靠性。
JTA事务比我们常用的JDBC事务更加强大,一个JTA事务可以有多个参与者,而一个JDBC事务则别限定在一个单一的数据库连接。
这么说吧,我举个栗子:
我们采用多数据源的时候,假设我们对A数据源的更新与B数据源的更新具有事务性,比如:我们对订单中创建一条新的订单数据,同时我也需要在商品库中进行相关商品的扣减库存,假设我们对库存进行扣减失败了,那么我们肯定希望我们的订单也返回到之前没下订单之前的状态,毕竟我下了订单了,库存没减少,我这算哪门子的下了订单。
如果这两条数据位于一个数据库,那么我们可以通过简单的事务管理就可以完成操作,那么我们至此就可以结束了,但是当我们的这两个操作要是在不同的数据库中,那么我们该怎么办呢?
那么我们就来测试一下:
Spring Boot中引入相关依赖:
<dependency><groupId>org.springframework.boot</groupId><artifactId>spring-boot-starter-web</artifactId></dependency><dependency><groupId>org.springframework.boot</groupId><artifactId>spring-boot-starter-jdbc</artifactId></dependency><!--重点围绕这个类--><dependency><groupId>org.springframework.boot</groupId><artifactId>spring-boot-starter-jta-atomikos</artifactId></dependency><dependency><groupId>mysql</groupId><artifactId>mysql-connector-java</artifactId></dependency><dependency><groupId>org.projectlombok</groupId><artifactId>lombok</artifactId><scope>provided</scope></dependency><dependency><groupId>org.springframework.boot</groupId><artifactId>spring-boot-starter-test</artifactId><scope>test</scope></dependency>
之后再Spring Boot application配置连接数据库的相关配置:
spring.jta.enabled=truespring.jta.atomikos.datasource.primary.xa-properties.url=jdbc:mysql://localhost:3306/test1?useUnicode=true&characterEncoding=utf-8&useSSL=true&serverTimezone=UTC
spring.jta.atomikos.datasource.primary.xa-properties.user=root
spring.jta.atomikos.datasource.primary.xa-properties.password=123456
spring.jta.atomikos.datasource.primary.xa-data-source-class-name=com.mysql.cj.jdbc.MysqlXADataSource
spring.jta.atomikos.datasource.primary.unique-resource-name=test1
spring.jta.atomikos.datasource.primary.max-pool-size=25
spring.jta.atomikos.datasource.primary.min-pool-size=3
spring.jta.atomikos.datasource.primary.max-lifetime=20000
spring.jta.atomikos.datasource.primary.borrow-connection-timeout=10000spring.jta.atomikos.datasource.secondary.xa-properties.url=jdbc:mysql://localhost:3306/test2?useUnicode=true&characterEncoding=utf-8&useSSL=true&serverTimezone=UTC
spring.jta.atomikos.datasource.secondary.xa-properties.user=root
spring.jta.atomikos.datasource.secondary.xa-properties.password=123456
spring.jta.atomikos.datasource.secondary.xa-data-source-class-name=com.mysql.cj.jdbc.MysqlXADataSource
spring.jta.atomikos.datasource.secondary.unique-resource-name=test2
spring.jta.atomikos.datasource.secondary.max-pool-size=25
spring.jta.atomikos.datasource.secondary.min-pool-size=3
spring.jta.atomikos.datasource.secondary.max-lifetime=20000
spring.jta.atomikos.datasource.secondary.borrow-connection-timeout=10000
@Configuration
public class DataSourceConfiguration {@Primary@Bean@ConfigurationProperties(prefix = "spring.jta.atomikos.datasource.primary")public DataSource primaryDataSource() {return new AtomikosDataSourceBean();}@Bean@ConfigurationProperties(prefix = "spring.jta.atomikos.datasource.secondary")public DataSource secondaryDataSource() {return new AtomikosDataSourceBean();}@Beanpublic JdbcTemplate primaryJdbcTemplate(@Qualifier("primaryDataSource") DataSource primaryDataSource) {return new JdbcTemplate(primaryDataSource);}@Beanpublic JdbcTemplate secondaryJdbcTemplate(@Qualifier("secondaryDataSource") DataSource secondaryDataSource) {return new JdbcTemplate(secondaryDataSource);}}
创建一个测试Service用来校验我们的JTA是否可以完成我们想要的工作。
@Service
public class TestService {private JdbcTemplate primaryJdbcTemplate;private JdbcTemplate secondaryJdbcTemplate;public TestService(JdbcTemplate primaryJdbcTemplate, JdbcTemplate secondaryJdbcTemplate) {this.primaryJdbcTemplate = primaryJdbcTemplate;this.secondaryJdbcTemplate = secondaryJdbcTemplate;}@Transactionalpublic void tx() {// 修改test1库中的数据primaryJdbcTemplate.update("update user set age = ? where name = ?", 30, "aaa");// 修改test2库中的数据secondaryJdbcTemplate.update("update user set age = ? where name = ?", 30, "aaa");}@Transactionalpublic void tx2() {// 修改test1库中的数据primaryJdbcTemplate.update("update user set age = ? where name = ?", 40, "aaa");// 模拟:修改test2库之前抛出异常throw new RuntimeException();}
}
在以上操作中,我们定义tx方法中,一般会成功,但tx2方法中,我们自己给他定义了一个异常,这个是在test1数据库更新后才会产生的,这样就可以测试一test1更新成功后,是否还能再JTA的帮助下实现回滚。
创建一个单元测试类:
@SpringBootTest(classes = Application.class)
public class ApplicationTests {@Autowiredprotected JdbcTemplate primaryJdbcTemplate;@Autowiredprotected JdbcTemplate secondaryJdbcTemplate;@Autowiredprivate TestService testService;@Testpublic void test1() throws Exception {// 正确更新的情况testService.tx();Assertions.assertEquals(30, primaryJdbcTemplate.queryForObject("select age from user where name=?", Integer.class, "aaa"));Assertions.assertEquals(30, secondaryJdbcTemplate.queryForObject("select age from user where name=?", Integer.class, "aaa"));}@Testpublic void test2() throws Exception {// 更新失败的情况try {testService.tx2();} catch (Exception e) {e.printStackTrace();} finally {// 部分更新失败,test1中的更新应该回滚Assertions.assertEquals(30, primaryJdbcTemplate.queryForObject("select age from user where name=?", Integer.class, "aaa"));Assertions.assertEquals(30, secondaryJdbcTemplate.queryForObject("select age from user where name=?", Integer.class, "aaa"));}}
}
对以上测试用例:
test1:因为没有故意制造的异常,一般情况下两个库的update都会成功,然后我们根据name=aaa去把两个数据查出来,看age是否都被更新到了30。
test2:tx2函数会把test1中name=aaa的用户age更新为40,然后抛出异常,JTA事务生效的话,会把age回滚回30,所以这里的检查也是两个库的aaa用户的age应该都为30,这样就意味着JTA事务生效,保证了test1和test2两个库中的User表数据更新一致,没有制造出脏数据。


