文章目录
- 前言
- 集成
- 使用
- 定义实体
- 配置
- 定义Repository
- 查询方法
- 方式一:@Query
- 方式二:Cypher语法构建器
- 方式三:Example条件构建器
- 方式四:DSL语法
- 自定义方法
- 自定义接口
- 继承自定义接口
- 实现自定义接口
- neo4jTemplate
- Neo4jClient
- 自定义抽象类(执行与结果转换)
前言
本篇主要是对neo4j的集成应用,会给出普遍的用法,但不是很详细,如果需要详细的话,每种方式都可以单独一篇说明,但应用都是举一反三,并没有必要都进行详解,而且,一些特殊的用法也举例了,也给出了一个自定义方式的查询和结果转换,虽然算不上完美,但也是很简单的,也希望大家有所收获。
集成
使用高版本的Spring data,我boot版本2.7,下面两个依赖,随便引入一个就行,我试过都是可以地
        <dependency><groupId>org.springframework.boot</groupId><artifactId>spring-boot-starter-data-neo4j</artifactId></dependency>
<!--两者任选其一,--><dependency><groupId>org.springframework.data</groupId><artifactId>spring-data-neo4j</artifactId><version>3.3.11</version></dependency>
使用
定义实体
我们先定义三个实体
- job:作业实体
- table:表实体
- JobRelationship:关系实体
@Data
@Node("Job")
public class Job {@Id@GeneratedValueprivate Long id;private String name;@Propertyprivate String type;@Relationship("dep")private List<TableRelationship> tables;@Relationship("dep")private List<JobRelationship> jobs;
}
@Data
@Node
public class Table {@Id@GeneratedValueprivate Long id;private String name;private String type;@Relationship("dep")private List<Job> jobs;
}@Data
@RelationshipProperties
public class JobRelationship {@Id@GeneratedValueprivate Long id;@TargetNodeprivate Job job;
}@Data
@RelationshipProperties
public class TableRelationship {@Id@GeneratedValueprivate Long id;@TargetNodeprivate Table table;
}上面三个实体的写法都一些不同,这里需要注意下:
@Node:标注的实体为数据库对象实体,表示一个节点,其value值就是标签,如果不设置就是类名;@Id:标注的属性是主键字段;@GeneratedValue:主键字段,必须设置它的一个生成方式,如果是自己设置可以忽略;@Property标注的属性为数据库属性字段,可以不写这个注解,@Node标注的实体中的属性默认为数据库属性字段,同样,其value值也是数据库属性字段,也可以不写,类似做了映射;@Relationship:标注的属性为关系属性,值为关系的标签值,另一个值为关系的指向,默认从当前节点向外指向,类似关系型数据库的关系;@RelationshipProperties:标注的类为关系实体,是对@Relationship类型的描述;@TargetNode:标注的属性是关系中的目标节点;
更加详细说明在:spring Data Neo4j
配置
application.yml
spring:neo4j:uri: bolt://192.168.0.103:7687authentication:username: neo4jpassword: password
定义Repository
这里使用的是spring jpa的开发方式,它提供了增删改查的基础功能,定义如下:
@Repository
public interface TableRepository extends Neo4jRepository<Table, Long> {
}
@Repository
public interface JobRepository extends Neo4jRepository<Job, Long> {/*** 根据名称查找*/Job findByName(String name);/*** 节点name是否包含指定的值*/boolean existsByNameContaining(String name);/*** 强制删除节点*/Long deleteByName(String name);
}那这个JPA的方式的话可以通过关键字和属性名定义查询方法,如上面的的findByName就可以实现通过名称查询,不需要写实现,这里只说这么多,详细的可以看:Spring Data JPA - Reference Documentation
查询方法
spring data提供的基础增删改查其实在在业务中是不够用的,但是,它额外的提供了一些条件构建器,使得我们可以借助一些快捷的API进行查询条件构造,以适应这些复杂查询,也就是动态语法。
方式一:@Query
说起JPA,自定义查询好像大多是用@Query注解进行标注的,比如:
@Query("match(a:Job{name:$name}) return a")Job findByName2(@Param("name") String name);@Query("match(a:Job{name: $0) return a")List<Job> findByName3(@Param("name") String name);
这样的方式很简单是不是,但是存在的问题是,语句中的Job,name都是对应数据库里的标签和字段,所以这就和mybatis xml里的方式一样,如果数据库字段变更或标签变更需要全局替换。
方式二:Cypher语法构建器
Spring data提供了针对Cypher语法的构建器,可以让我们对复杂cypher的语法构建;
示例一:
match(a:Job) where a.name=‘liry’ return a order by a.id limit 1
// match(a:Job) where a.name='liry' return a order by a.id  limit 1// 创建节点对象:标签为 Job,别名 a  -> (a:Job)
Node temp = Cypher.node("Job").named("a");
// 构建查询声明对象
// 创建match查询:-> match(a:Job)
ResultStatement statement = Cypher.match(temp)// 添加条件:-> a.name=$name.where(temp.property("name").isEqualTo(Cypher.anonParameter(job.getName())))// 返回对象:return 别名 -> return a.returning(temp.getRequiredSymbolicName())// 排序:以属性id正序.orderBy(temp.property("id"))// 限制数量:1.limit(1)// 构建为语法对象.build();
示例二:
//  merge(a:Job{name:$name}) set a.type=$type return a// 构建参数
Map<String, Object> pro = new HashMap<>();
pro.put("name", job.getName());
// 创建节点对象:标签Job,别名a,并且设置参数  -> (a:Job{name:$name})
Node temp = Cypher.node("Job").named("a").withProperties(pro);
// 创建merge查询: -> merge(a:Job{name:$name})
ResultStatement statement = Cypher.merge(temp)// 设置值:-> a.type=$type.set(temp.property("type"),Cypher.anonParameter(job.getType()))// 返回对象:return别名 -> return a.returning(temp.getRequiredSymbolicName())// 构建声明对象.build();
示例三:
// MATCH (a:`Job` {name: $pcdsl01})-[r*..2]-(b:`Job`) RETURN a,b,r// 创建两个节点给,都死标签Job,别名分别是a,b,a节点关联属性name
Node node = Cypher.node("Job").named("a").withProperties("name", Cypher.anonParameter(name));
Node node2 = Cypher.node("Job").named("b");// 创建a-r-b的关系
Relationship r = node.relationshipBetween(node2).named("r").max(length);
// a-r->b
//        Relationship r = node.relationshipTo(node2).named("r").max(length);
// a<-r-b
//        Relationship r = node.relationshipFrom(node2).named("r").max(length);
// 创建match查询
ResultStatement statement = Cypher.match(r)// 返回对象.returning("a","b","r")// 构建声明对象.build();
这里的withProperties,我又用了另一种方式.withProperties("name", Cypher.anonParameter(name));,上面我传的是一个map,它这里其实很巧妙的做了一个适配,只要你以key value,那么便是偶数个参数,他会自动帮你绑定,或者传map也行。
方式三:Example条件构建器
Spring Data默认的Neo4jRepository是继承 了QueryByExampleExecutor,如下:
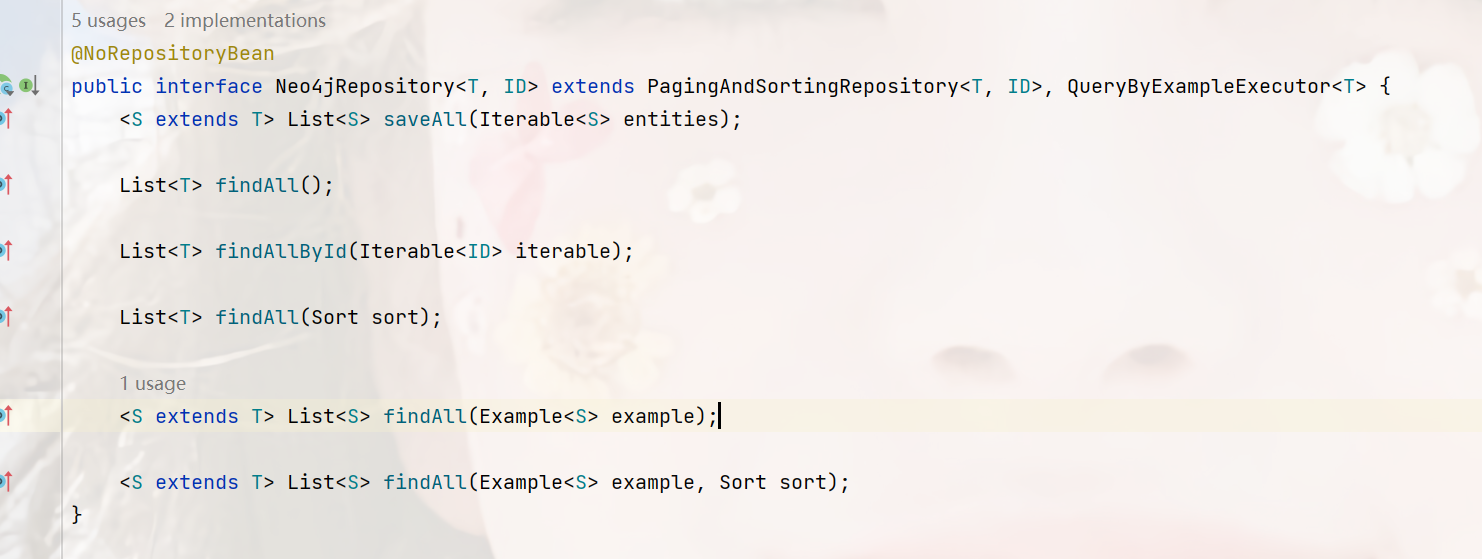
那么它所能使用的方法是这些:

其应用示例一:
// Neo4jRepository默认继承了example功能Job job = new Job();job.setName("liry");ExampleMatcher exampleMatcher = ExampleMatcher.matching().withMatcher("na", ExampleMatcher.GenericPropertyMatchers.endsWith());// 根据示例匹配器规则进行条件重组 查询List<Job> all1 = jobRepository.findAll(Example.of(job, exampleMatcher));// 精确查询List<Job> all2 = jobRepository.findAll(Example.of(job));List<Job> all3 = jobRepository.findAll(Example.of(job), Sort.by(Sort.Order.desc("id")));Page<Job> all4 = jobRepository.findAll(Example.of(job), PageRequest.of(1, 10));
示例二:
流处理查询
  Job job = new Job();job.setJobName(name);// 查询一个一个值Job one = jobRepository.findBy(Example.of(job), query -> query.oneValue());// lambda简化
//        Job one = jobRepository.findBy(Example.of(job), FluentQuery.FetchableFluentQuery::oneValue);// 查询countLong count = jobRepository.findBy(Example.of(job), query -> query.count());// lambda简化
//        Long count = jobRepository.findBy(Example.of(job), FluentQuery.FetchableFluentQuery::count);// 是否存在Boolean exist = jobRepository.findBy(Example.of(job), query -> query.exists());// lambda简化
//        Boolean exist = jobRepository.findBy(Example.of(job), FluentQuery.FetchableFluentQuery::exists);// 查询全部List<Job> list = jobRepository.findBy(Example.of(job), query -> query.all());// lambda简化
//                List<Job> list = jobRepository.findBy(Example.of(job), FluentQuery.FetchableFluentQuery::all);// 查询2个List<Job> list2 = jobRepository.findBy(Example.of(job),query -> query.stream().limit(2).collect(Collectors.toList()));// 查询并进行处理List<Object> list3 = jobRepository.findBy(Example.of(job),query -> query.stream().peek(d -> d.setName(d.getName() + "1")).collect(Collectors.toList()));// 查询并排序List<Job> list4 = jobRepository.findBy(Example.of(job),query -> query.sortBy(Sort.by(Sort.Order.asc("id")))).all();
上面这个流处理查询都可以用lambda表达式来处理。
注意:使用example查询时,不要有关联关系,不然他会报错,即不要有@Relationship这个注解
方式四:DSL语法
这个是借助DSL框架实现的语法构建,添加DSL依赖
<dependency><groupId>com.querydsl</groupId><artifactId>querydsl-jpa</artifactId></dependency><dependency><groupId>com.querydsl</groupId><artifactId>querydsl-apt</artifactId></dependency>
添加插件
 <plugin><groupId>com.mysema.maven</groupId><artifactId>apt-maven-plugin</artifactId><version>1.1.3</version><executions><execution><goals><goal>process</goal></goals><configuration><outputDirectory>target/generated-sources/java</outputDirectory><processor>com.querydsl.apt.jpa.JPAAnnotationProcessor</processor></configuration></execution></executions>
</plugin>
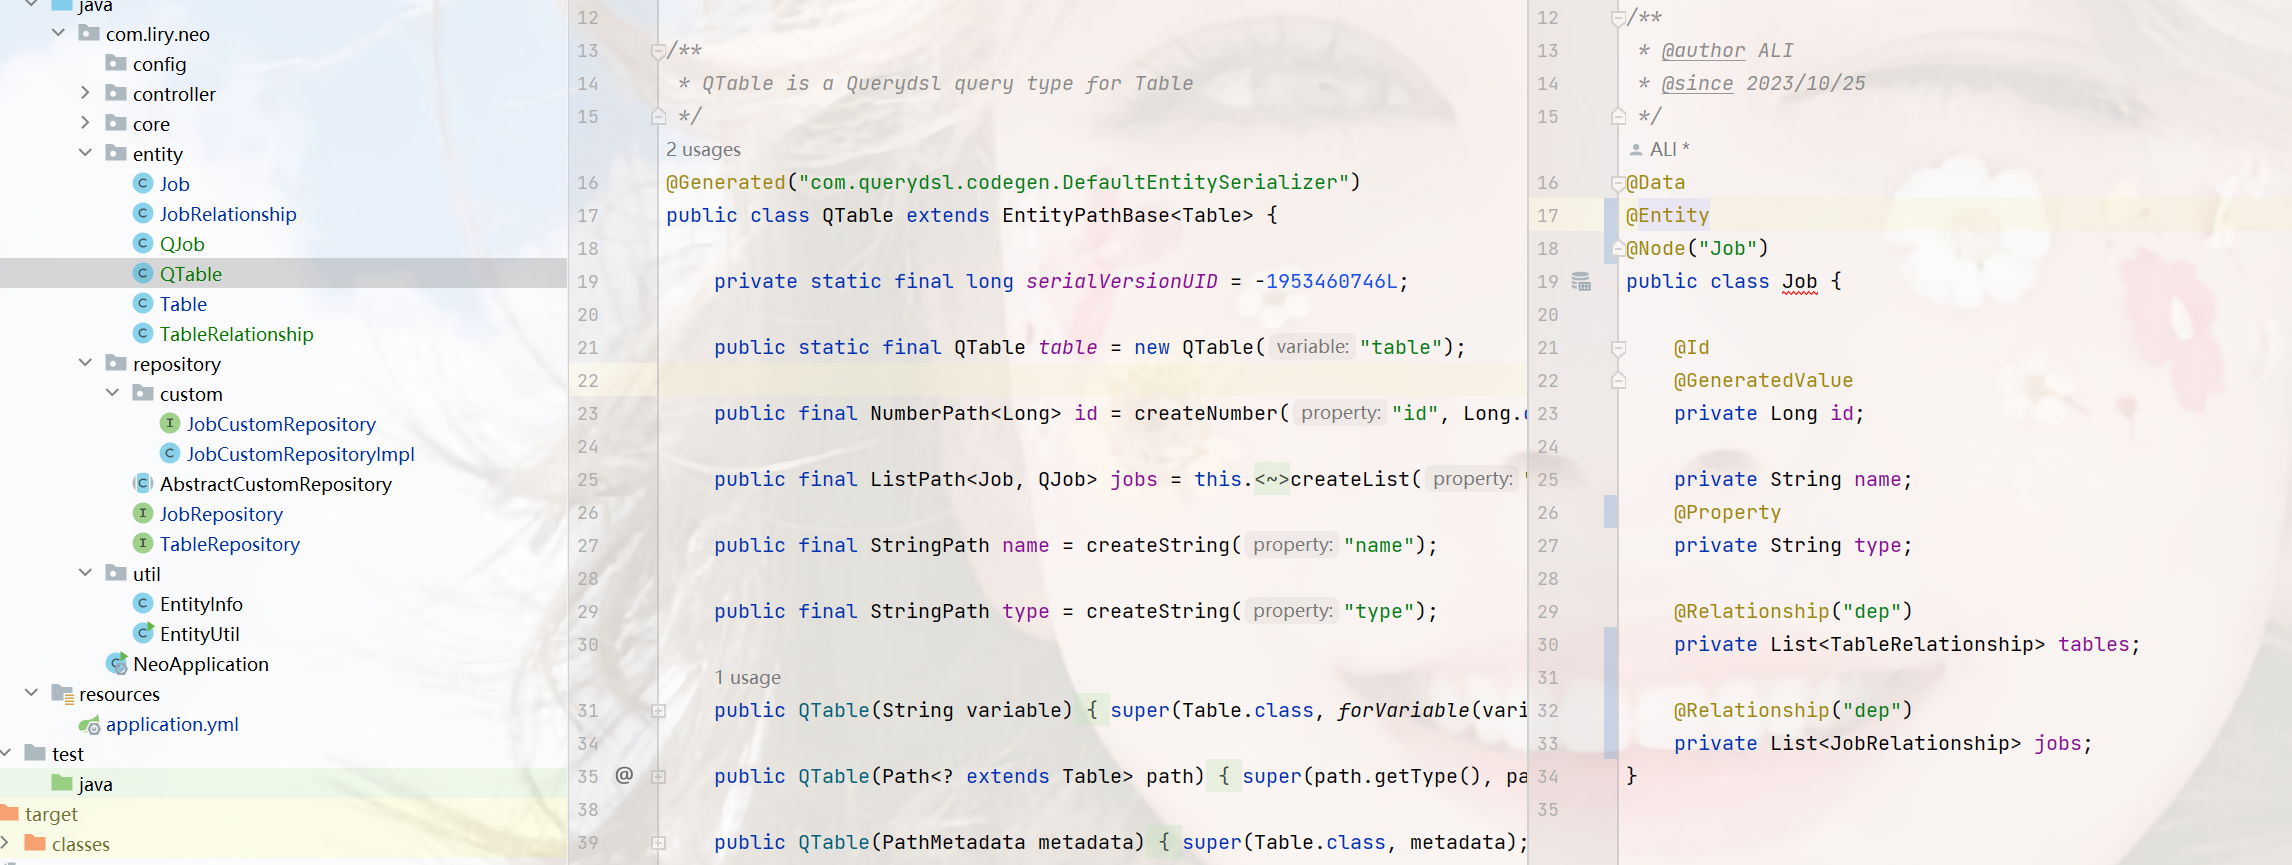
- 实体类上需要加上
@Entity
但是只引入neo4j的依赖,是不行的,还需要jpa的依赖,因为JPA依赖数据库,所以可以先引入,生成之后,再删除掉。
<dependency><groupId>org.springframework.boot</groupId><artifactId>spring-boot-starter-data-jpa</artifactId>
</dependency>
<dependency><groupId>org.springframework.boot</groupId><artifactId>spring-boot-starter-jdbc</artifactId>
</dependency>
<dependency><groupId>mysql</groupId><artifactId>mysql-connector-java</artifactId><version>8.0.28</version>
</dependency>
然后maven compile编译,一下,会在target/generated-sources/java目录下找到生成的Q类,把它复制到我们实体目录下
-
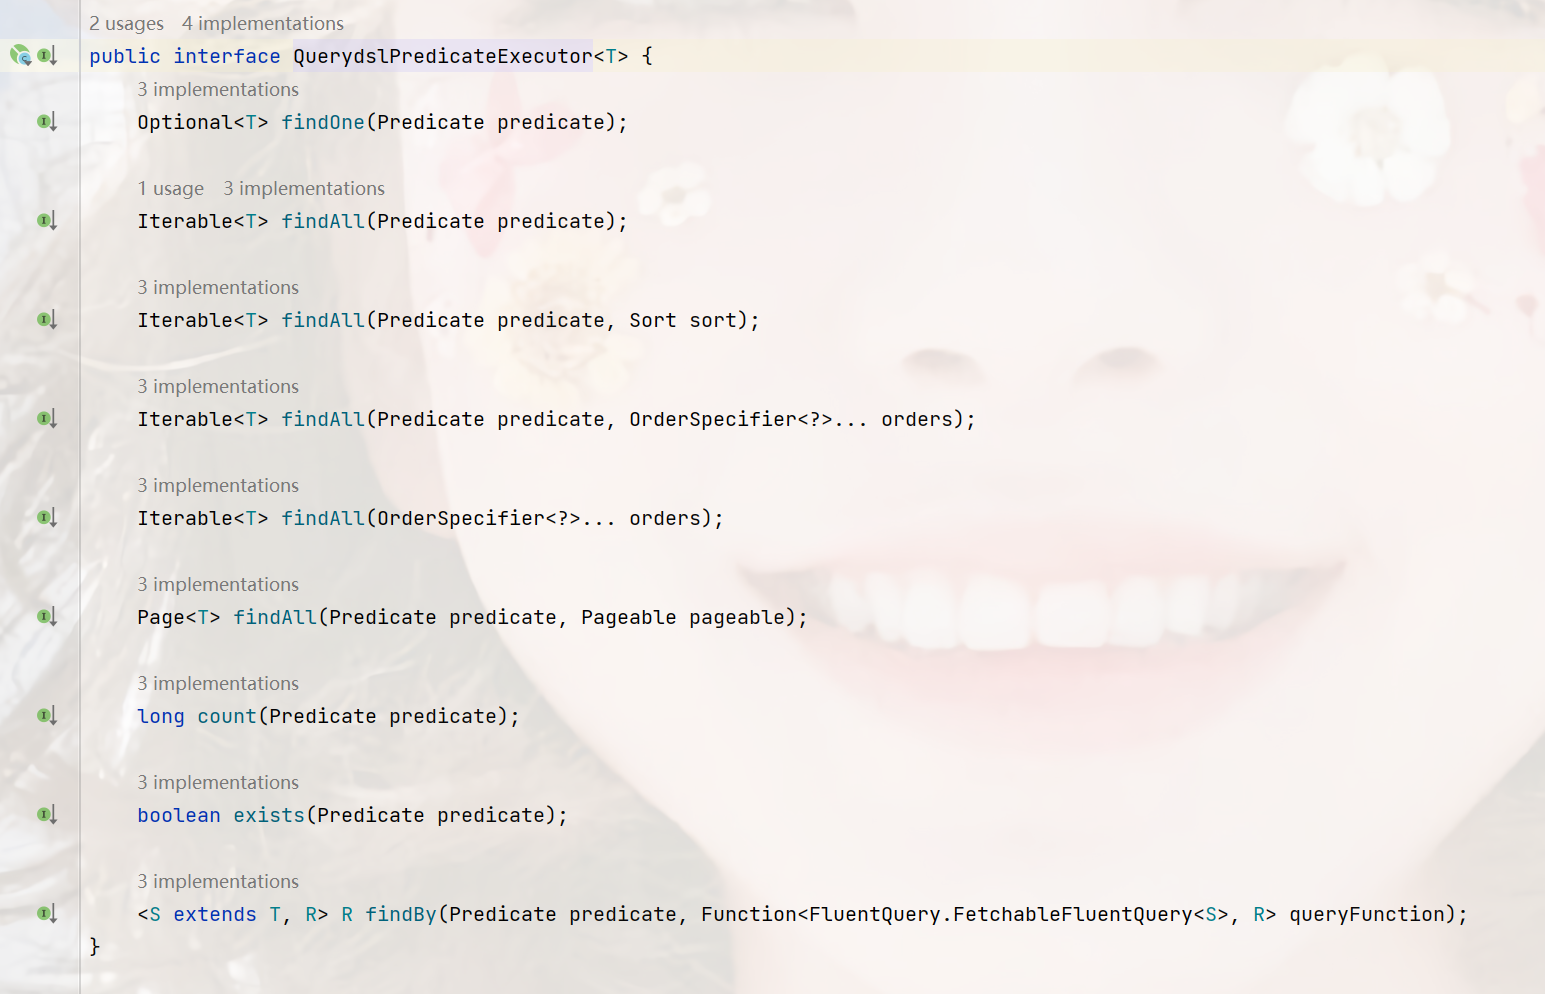
继承接口
QuerydslPredicateExecutor它的使用方式和Example一样。
@Repository
public interface JobRepository extends Neo4jRepository<Job, Long> ,  QuerydslPredicateExecutor<Job>{
}
这个接口下的功能都可以使用
示例一:
 QJob job = QJob.job;
// name=$nameIterable<Job> all = jobRepository.findAll(job.name.eq(name));// name like $name and type = $typeBooleanExpression exp = job.name.like(name).and(job.type.eq("test"));boolean exists = jobRepository.exists(exp);Iterable<Job> all1 = jobRepository.findAll(exp);
// 排序Iterable<Job> id = jobRepository.findAll(exp, Sort.by(Sort.Order.desc("id")));
// 分月Page<Job> all2 = jobRepository.findAll(exp, PageRequest.of(1, 10));// in查询  exp = job.name.in("liryc", "xx");jobRepository.findAll(exp);
示例二:
// 查询一个一个值Job one = jobRepository.findBy(exp, query -> query.oneValue());// lambda简化// Job one = jobRepository.findBy(exp, FluentQuery.FetchableFluentQuery::oneValue);// 查询countLong count = jobRepository.findBy(exp, query -> query.count());// lambda简化// Long count = jobRepository.findBy(exp, FluentQuery.FetchableFluentQuery::count);// 是否存在Boolean exist = jobRepository.findBy(exp, query -> query.exists());// lambda简化// Boolean exist = jobRepository.findBy(exp, FluentQuery.FetchableFluentQuery::exists);// 查询全部List<Job> list = jobRepository.findBy(exp, query -> query.all());// lambda简化// List<Job> list = jobRepository.findBy(exp, FluentQuery.FetchableFluentQuery::all);// 查询2个List<Job> list2 = jobRepository.findBy(exp,query -> query.stream().limit(2).collect(Collectors.toList()));// 查询并进行处理List<Object> list3 = jobRepository.findBy(exp,query -> query.stream().peek(d -> d.setName(d.getName() + "1")).collect(Collectors.toList()));// 查询并排序List<Job> list4 = jobRepository.findBy(exp,query -> query.sortBy(Sort.by(Sort.Order.asc("id")))).all();
自定义方法
上面都是spring data自带的方法,已经可以实现大部分的复杂查询了,当时在业务层的时候我们一般不会把这些数据访问放在业务层中,这些都应该是置于底层作为最基本的数据能力,不该带入业务,并且也不该把数据访问的逻辑赤裸的放到业务层中,那么我们就会需要子党员方法。
自定义接口
public interface JobCustomRepository {/*** 查询所有*/Object selectAll();/*** 保持节点信息,会先判断是否存在*/Job saveCondition(Job job);/*** 创建或合并节点*/Job saveMerge(Job job);
}
继承自定义接口
@Repository
public interface JobRepository extends Neo4jRepository<Job, Long> , JobCustomRepository {}
实现自定义接口
@Component("jobCustomRepository")
public class JobCustomRepositoryImpl implements JobCustomRepository {
}
如此我们就可以在业务层中这样:
// 这里引入的接口,就具备了原本spring的能力,和你自定义的能力
@Autowiredprivate JobRepository jobRepository;
neo4jTemplate
在自定义中可以引入这个作为执行类,这个类实现Neo4jOperations,template它是支持直接写cypher语句的,比如下面这个


如果需要参数分离的话,参数占位用$,那么cypher语句应该是这样:
match(a) where a.name=$name return a
示例:
// 方式一:template执行cql字符串String cql = String.format("merge(a:Job{name:'%s'}) set a.time=2 return a", job.getName());List<Job> all = neo4jTemplate.findAll(cql, Job.class);// 方式二:cypher语句cql = String.format("merge(a:Job{name:'%s'}) set a.time=$time return a", job.getName());Map<String, Object> param = new HashMap<>();param.put("time", 1);all = neo4jTemplate.findAll(cql, param, Job.class);// 方式三:Cypher构建声明对象Map<String, Object> pro = new HashMap<>();pro.put("name", job.getName());Node temp = Cypher.node("Job").named("a").withProperties(pro);ResultStatement statement = Cypher.merge(temp).set(temp.property("type"), Cypher.anonParameter(job.getType())).returning(temp.getRequiredSymbolicName()).build();List<Job> all1 = neo4jTemplate.findAll(statement, statement.getParameters(), Job.class);
Neo4jClient
除了neo4jTemplate还可以用neo4jClient
示例
String cpl = "match(a) where a.name contains 'liry' return a limit 1";// 执行cypherResult run = client.getQueryRunner().run(cpl);// 结果获取的方式// **** 注意,下面的几种方式中,只能选用一种,在结果读取后,就不能在读取了 ****// 方式一:迭代器while (run.hasNext()) {Record d = run.next();// 这几个的结构差不多List<Pair<String, Value>> fields = d.fields();List<Value> values = d.values();Map<String, Object> stringObjectMap = d.asMap();System.out.println(d);}// 方式二:lambda// 或者直接获取列表List<Record> list = run.list();List<Record> dd = list.stream().map(d -> {List<Pair<String, Value>> fields = d.fields();List<Value> values = d.values();Map<String, Object> stringObjectMap = d.asMap();return d;}).collect(Collectors.toList());// 方式三:函数式接口List<Object> result = run.list(map -> {return map;});
这里有需要注意的地方,就是在run执行后,只能获取一次结果,如上代码所示,不论用那种方式进行结果的获取,都只能获取一次;
自定义抽象类(执行与结果转换)
但是很多人就会觉得这个方式需要自己处理结果集,确实,它的这个结果集不是很友好,所以我这里也提供一个结果处理案例;
我这里就直接贴已经完成的代码了,可以直接复制使用,同时这个类也提供了执行cypher语句的方法,和JPA一样。
package com.liry.neo.repository;import com.liry.neo.entity.RelationshipInfo;
import java.util.Map;
import java.util.function.BiFunction;
import java.util.function.Supplier;
import org.neo4j.driver.internal.types.InternalTypeSystem;
import org.neo4j.driver.internal.value.NodeValue;
import org.neo4j.driver.types.MapAccessor;
import org.neo4j.driver.types.Relationship;
import org.neo4j.driver.types.TypeSystem;
import org.springframework.beans.BeansException;
import org.springframework.context.ApplicationContext;
import org.springframework.context.ApplicationContextAware;
import org.springframework.data.neo4j.core.Neo4jOperations;
import org.springframework.data.neo4j.core.Neo4jTemplate;
import org.springframework.data.neo4j.core.PreparedQuery;
import org.springframework.data.neo4j.core.mapping.EntityInstanceWithSource;
import org.springframework.data.neo4j.core.mapping.Neo4jMappingContext;
import org.springframework.lang.Nullable;
import org.springframework.util.Assert;/*** @author ALI* @since 2023/10/25*/
public abstract class AbstractCustomRepository implements ApplicationContextAware {protected ApplicationContext applicationContext;private Neo4jMappingContext neo4jMappingContext;private Neo4jTemplate neo4jTemplate;private static <T> Supplier<BiFunction<TypeSystem, MapAccessor, ?>> getAndDecorateMappingFunction(Neo4jMappingContext mappingContext, Class<T> domainType, @Nullable Class<?> resultType) {Assert.notNull(mappingContext.getPersistentEntity(domainType), "Cannot get or create persistent entity.");return () -> {BiFunction<TypeSystem, MapAccessor, ?> mappingFunction = mappingContext.getRequiredMappingFunctionFor(domainType);if (resultType != null && domainType != resultType && !resultType.isInterface()) {mappingFunction = EntityInstanceWithSource.decorateMappingFunction(mappingFunction);}return mappingFunction;};}@Overridepublic void setApplicationContext(ApplicationContext applicationContext) throws BeansException {this.applicationContext = applicationContext;}private Neo4jMappingContext getNeo4jMappingContext() {if (neo4jMappingContext == null) {neo4jMappingContext = applicationContext.getBean(Neo4jMappingContext.class);}return neo4jMappingContext;}private Neo4jTemplate getNeo4jTemplate() {if (neo4jTemplate == null) {neo4jTemplate = applicationContext.getBean(Neo4jTemplate.class);}return neo4jTemplate;}/*** 执行cypher查询** @param domainType      实体类型* @param cypherStatement cypher语句* @param parameters      参数*/protected <T> Neo4jOperations.ExecutableQuery<T> createExecutableQuery(Class<T> domainType, String cypherStatement,Map<String, Object> parameters) {return createExecutableQuery(domainType, domainType, cypherStatement, parameters);}/*** 执行cypher查询** @param domainType      实体类型* @param resultType      返回的结果类型* @param cypherStatement cypher语句* @param parameters      参数*/protected <T> Neo4jOperations.ExecutableQuery<T> createExecutableQuery(Class<?> domainType, Class<T> resultType, String cypherStatement,Map<String, Object> parameters) {PreparedQuery.OptionalBuildSteps<T> step = PreparedQuery.queryFor(resultType).withCypherQuery(cypherStatement).withParameters(parameters);// 基本类型转换if (!Number.class.isAssignableFrom(resultType) && !Boolean.class.isAssignableFrom(resultType) && !String.class.isAssignableFrom(resultType)) {Supplier<BiFunction<TypeSystem, MapAccessor, ?>> mappingFunction = getAndDecorateMappingFunction(getNeo4jMappingContext(),domainType,resultType);step.usingMappingFunction(mappingFunction);}return getNeo4jTemplate().toExecutableQuery(step.build());}protected <T> T mapping(Class<T> domainType, NodeValue node) {Object apply = getMappingFunction(domainType).get().apply(InternalTypeSystem.TYPE_SYSTEM, node);return (T) ((EntityInstanceWithSource) apply).getEntityInstance();}protected RelationshipInfo mapping(Relationship node) {RelationshipInfo result = new RelationshipInfo();result.setStart(node.startNodeId());result.setEnd(node.endNodeId());result.setType(node.type());result.setId(node.id());return result;}/*** 结果映射** @param domainType 实体类型,也是结果类型* @return 映射方法*/protected <T> Supplier<BiFunction<TypeSystem, MapAccessor, ?>> getMappingFunction(Class<T> domainType) {return () -> {BiFunction<TypeSystem, MapAccessor, T> mappingFunction = getNeo4jMappingContext().getRequiredMappingFunctionFor(domainType);return EntityInstanceWithSource.decorateMappingFunction(mappingFunction);};}
}之后我们自定义的Repository就要继承这个抽象类,以达到可以直接使用的功能,如下:
@Component("jobCustomRepository")
public class JobCustomRepositoryImpl extends AbstractCustomRepository implements JobCustomRepository {@Autowiredprivate Neo4jTemplate neo4jTemplate;
}
再定义一个关系实体:
@Data
public class RelationshipDto {private Long id;private Long start;private Long end;private String type;
}
然后我们查询并转换如下:
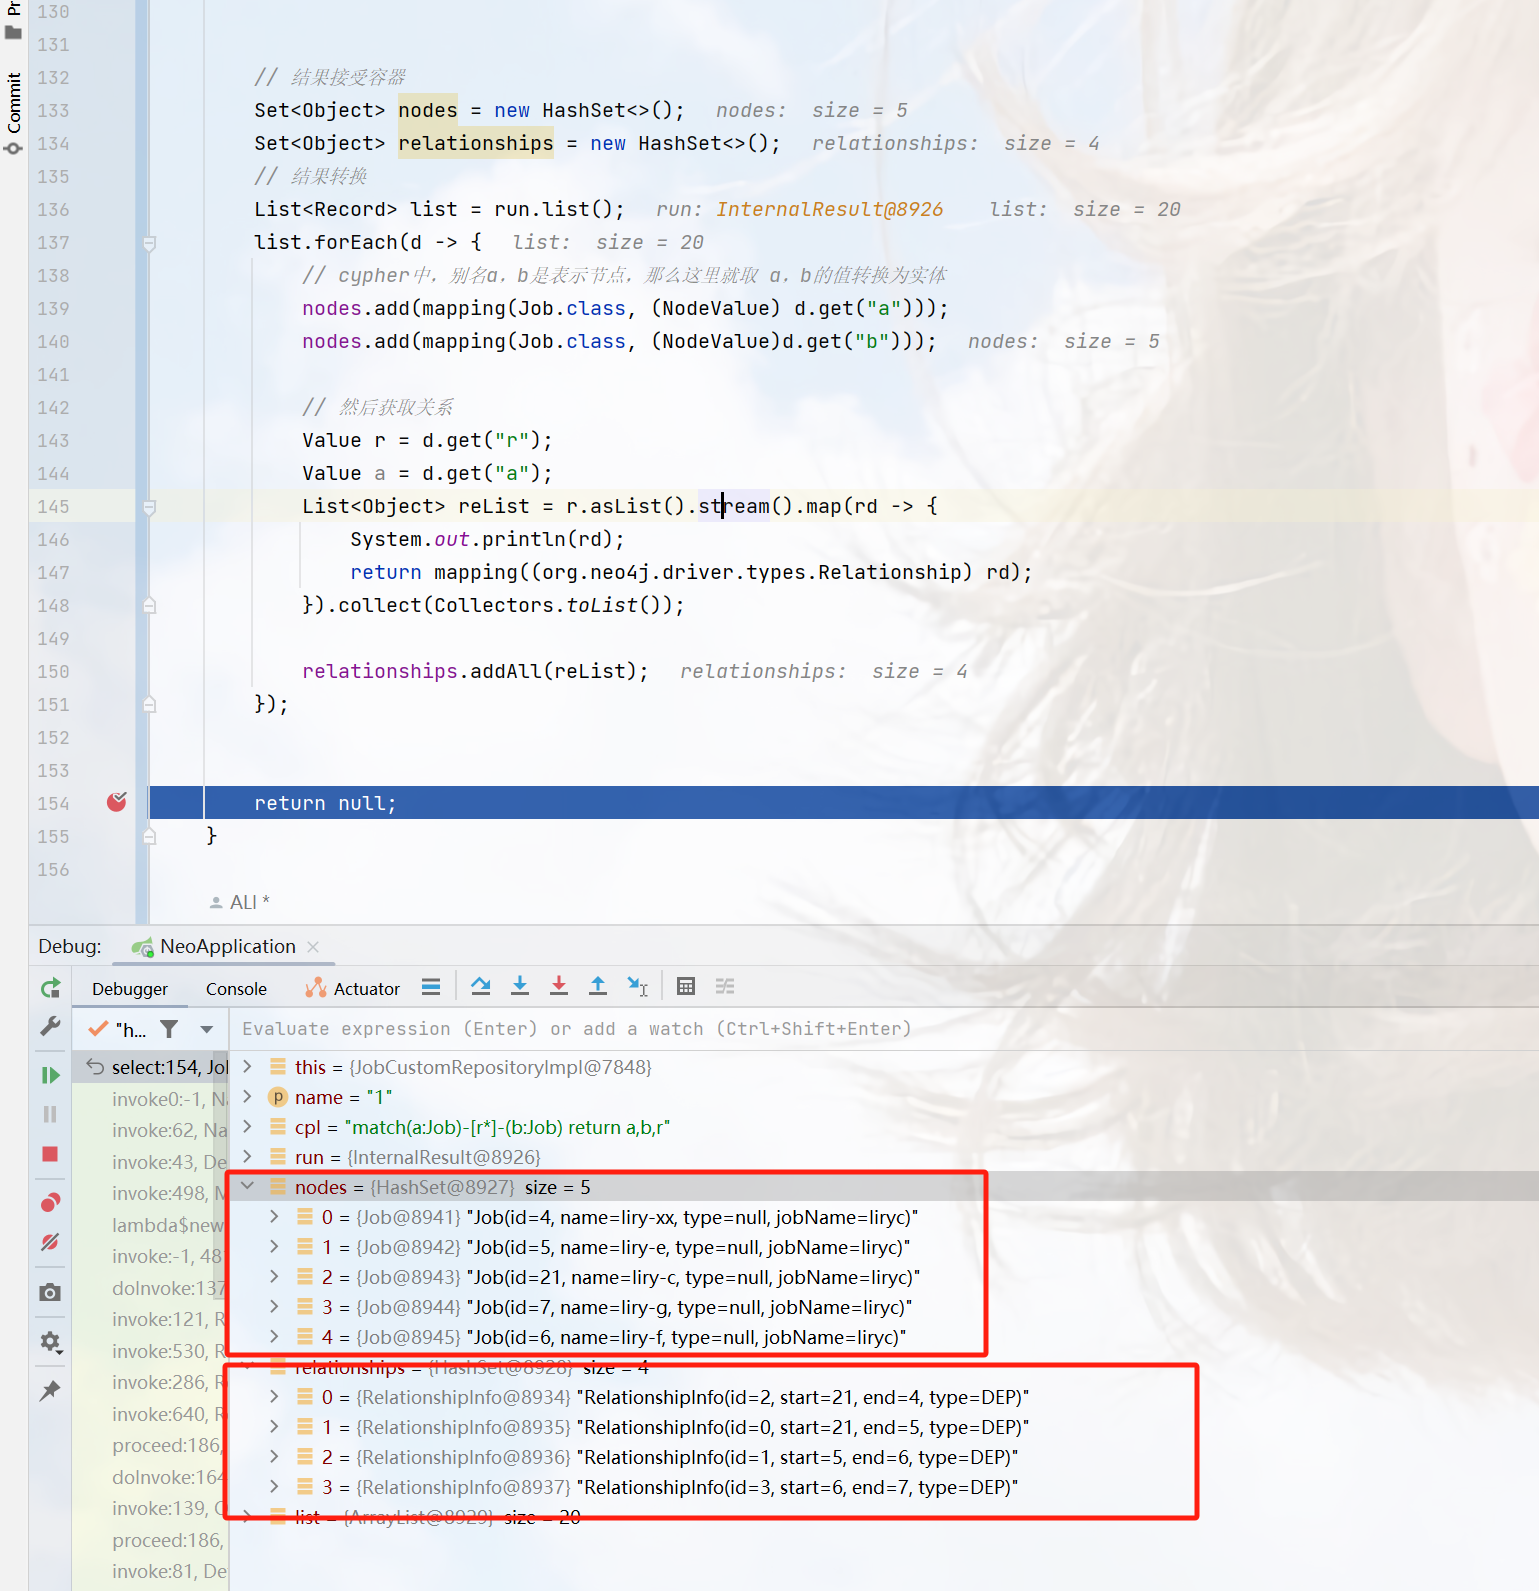
String cpl = "match(a:Job)-[r*]-(b:Job) return a,b,r";// 执行cypher
Result run = client.getQueryRunner().run(cpl);// 结果接受容器
Set<Object> nodes = new HashSet<>();
Set<Object> relationships = new HashSet<>();
// 结果转换
List<Record> list = run.list();
list.forEach(d -> {// cypher中,别名a,b是表示节点,那么这里就取 a,b的值转换为实体nodes.add(mapping(Job.class, (NodeValue) d.get("a")));nodes.add(mapping(Job.class, (NodeValue)d.get("b")));// 然后获取关系Value r = d.get("r");Value a = d.get("a");List<Object> reList = r.asList().stream().map(rd -> {System.out.println(rd);return mapping((org.neo4j.driver.types.Relationship) rd);}).collect(Collectors.toList());relationships.addAll(reList);
});