前言:写这篇文章的目的主要是这方面的知识我是第一次实际运用到,在项目里面有个功能,需要登录的时候根据手机号发送短信验证码,我看了公司的代码是用redis过期key监控实现的,由于之前没有接触过这类,现在写下来记一下,主要是简单的实现对redis过期key的监控。
第一步:搭建springboot、redis
为了避免redis与spring存在版本冲突导致的不必要的麻烦,我所使用的spring版本是 2.2.2.RELEASE版本,使用自带的redis-starter,pom依赖最简单化为:
<?xml version="1.0" encoding="UTF-8"?>
<project xmlns="http://maven.apache.org/POM/4.0.0" xmlns:xsi="http://www.w3.org/2001/XMLSchema-instance"xsi:schemaLocation="http://maven.apache.org/POM/4.0.0 https://maven.apache.org/xsd/maven-4.0.0.xsd"><modelVersion>4.0.0</modelVersion><parent><groupId>org.springframework.boot</groupId><artifactId>spring-boot-starter-parent</artifactId><version>2.2.2.RELEASE</version><relativePath/> <!-- lookup parent from repository --></parent><groupId>com.example</groupId><artifactId>demo</artifactId><version>0.0.1-SNAPSHOT</version><name>domeOne</name><description>Demo project for Spring Boot</description><properties><java.version>8</java.version></properties><dependencies><dependency><groupId>org.springframework.boot</groupId><artifactId>spring-boot-starter-data-redis</artifactId></dependency><dependency><groupId>org.springframework.boot</groupId><artifactId>spring-boot-starter-web</artifactId></dependency><dependency><groupId>org.springframework.boot</groupId><artifactId>spring-boot-starter-test</artifactId><scope>test</scope></dependency><dependency><groupId>org.projectlombok</groupId><artifactId>lombok</artifactId><optional>true</optional></dependency></dependencies><build><plugins><plugin><groupId>org.springframework.boot</groupId><artifactId>spring-boot-maven-plugin</artifactId></plugin></plugins></build></project>
配置application.yml为:
spring:redis:port: 6379host: 127.0.0.1password: redisdatabase: 1timeout: 30000
server:port: 8081
第二步:简单测试springboot与redis是否连接成功
@Slf4j
@RestController
public class Controller {@Autowiredprivate RedisTemplate<Object, Object> redisTemplate;@GetMapping("/test")public void test() {log.info("test方法运行了");redisTemplate.opsForValue().set("key","value112值");log.info("测试redis是否正常,取值key:{}", redisTemplate.opsForValue().get("key"));}
}
这些操作较为简单,一般不会出错,访问127.0.0.1:8081/test 正常打印日志则说明连接正常。
第三步:新增RedisConfig.java配置类
在该配置类里面添加监控Bean,设置监控topic(全部key过期皆会被监测到),这里写得简单了,正常还需要设置线程池以及封装RedisTemplate。
@Configuration
public class RedisConfig implements ApplicationContextAware {@Autowiredprivate RedisTemplate<Object, Object> redisTemplate;@Autowiredprivate LettuceConnectionFactory connectionFactory;private ApplicationContext applicationContext;@Overridepublic void setApplicationContext(ApplicationContext applicationContext) throws BeansException {this.applicationContext = applicationContext;}@Beanpublic RedisMessageListenerContainer configRedisMessageListenerContainer(Executor executor) {RedisMessageListenerContainer container = new RedisMessageListenerContainer();// 设置Redis的连接工厂container.setConnectionFactory(redisTemplate.getConnectionFactory());// 设置监听使用的线程池container.setTaskExecutor(executor);// 设置监听的TopicChannelTopic channelTopic = new ChannelTopic("__keyevent@" + connectionFactory.getDatabase() + "__:expired");Map<String, MessageListener> listeners = applicationContext.getBeansOfType(MessageListener.class);if (listeners != null && !listeners.isEmpty()) {for (String key : listeners.keySet()) {// 设置监听器container.addMessageListener(listeners.get(key), channelTopic);}}return container;}}
第四步:自定义监控类MyMessageListener
onMessage方法来自于MessageListener接口,主要就是对过期key进行监控
@Slf4j
@Component
public class MyMessageListener implements MessageListener, ApplicationContextAware {private ApplicationContext applicationContext;@Autowiredprivate IMessageHandler messageHandler;@Overridepublic void setApplicationContext(ApplicationContext applicationContext) throws BeansException {this.applicationContext = applicationContext;}public MyMessageListener() {}@Overridepublic void onMessage(Message message, byte[] bytes) {log.info("进入监控方法....");String body = new String(message.getBody());log.info("监控到的body为: {}", body);messageHandler.handleMessage(body);}
}
第五步:其他业务处理代码,根据业务进行逻辑处理:
public interface IMessageHandler {/*** 处理redis的key值过期事件*/void handleMessage(String body);
}
@Slf4j
@Service
public class MessageServiceImpl implements IMessageHandler {@Overridepublic void handleMessage(String body) {log.info("开始处理消息");}
}
第六步:测试,修改controller类
这里为了方便,将过期key设置为10秒过期,执行方法10秒后,代码能够自动处理消息则说明成功
@Slf4j
@RestController
public class Controller {@Autowiredprivate RedisTemplate<Object, Object> redisTemplate;@GetMapping("/test")public void test() {log.info("test方法运行了");
//    redisTemplate.opsForValue().set("key","value112值");
//    log.info("测试redis是否正常,取值key:{}", redisTemplate.opsForValue().get("key"));long expire = 10L;// 监控key_timeout过期setExpire("key_timeout","value", expire);}private RedisSerializer<String> getRedisSerializer() {return redisTemplate.getStringSerializer();}private void setExpire(final String key, final String value, final long time) {redisTemplate.execute((RedisCallback<Long>) connection -> {RedisSerializer<String> serializer = getRedisSerializer();byte[] keys = serializer.serialize(key);byte[] values = serializer.serialize(value);connection.set(keys, values);connection.expire(keys, time);return 1L;});}
}
注意!!!
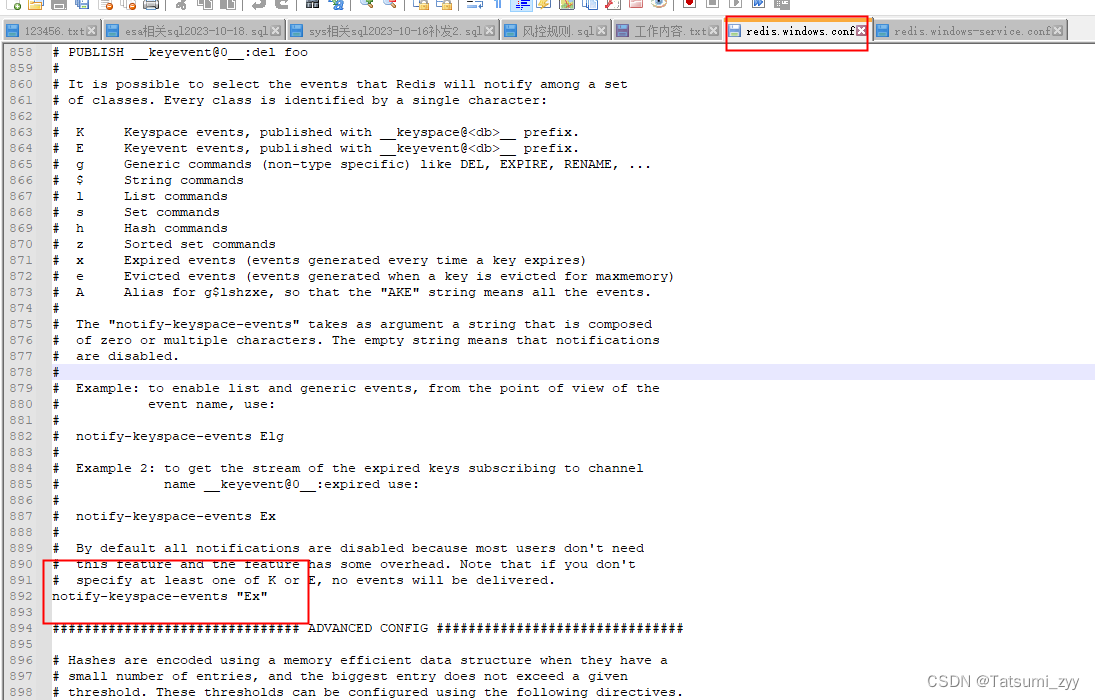
redis需要开启监控过期key需要修改redis.conf文件(windows的文件名叫做redis.windows.conf),修改后需重启redis,否则不生效。
设置为 notify-keyspace-events "Ex"
