目录
前言
一、WeChat中的自定义组件
1. 基本概述
2. 包含文件及作用
3. 自定义组件的作用
4.使用步骤:
二、tabs组件及会议管理布局
tabs组件
1. 创建组件
准备
创建
使用组件
会议管理布局
tabs.wxml指定组件模版
tabs.wxss完成样式设计
tabs.js定义属性
在会议界面中运用组件
添加数据
tabs.js定义点击事件
定义函数绑定显示数据及显示内容编译
list.wxml
list.wxss
效果演示
三、个人中心布局及效果搭建
ucenter/index/index.wxml
ucenter/index/index.wxss
页面效果
四、扩展:投票页面布局
1. 创建运用组件
list.json
创造导航数据
2. 页面运用组件及布局
3. 编写样式
页面效果

前言
老铁们好啊,今天又到了日常知识点的时候了。我们一起来回顾一下上期博客我们都收货到了什么,首先我们先是了解到了什么是FLex弹性布局,以及将弹性布局运用在实例中去展示效果以及演示了利用mock.js实现模拟后台数据交互,最后搭建会议OA首页界面。今天我要给大家带来的是微信小程序中的自定义组件的知识分享以及搭建会议OA其他界面。
一、WeChat中的自定义组件
1. 基本概述
微信小程序中的自定义组件是一种可以在小程序中复用的组件。它由一个独立的文件夹组成,包含了相应的 wxml、wxss 和 js 文件。通过自定义组件,可以将页面上的一些模块化的功能或样式封装成一个组件,然后在不同的页面中重复使用。
使用自定义组件的好处是提高代码的复用性和可维护性。当多个页面都需要某个功能或样式时,只需要在不同的页面中引用同一个自定义组件即可,减少了重复编写相同代码的工作量。同时,自定义组件也可以实现封装复杂的逻辑和交互,使页面结构更加清晰。
自定义组件有自己的一套生命周期和数据传递机制。在组件的 js 文件中,可以定义组件的属性、方法和生命周期函数,用于实现组件的特定功能。在引用组件的页面中,可以通过设置属性值传递数据给组件,并通过事件机制与组件进行交互。
2. 包含文件及作用
| 文件 | 作用 |
| .json | 用于配置自定义组件的基本信息,例如组件的名称、引用时的标签名、是否启用插槽等。 |
| .wxml | 定义自定义组件的模板。可以使用小程序的模板语法,包括数据绑定、条件判断、循环等。 |
| .wxss | 设置自定义组件的样式。对应的是组件内部的样式,并不会影响到使用组件的页面。 |
| .js | 编写自定义组件的逻辑部分。你可以在这里定义组件的属性、方法和生命周期函数,实现组件的功能。 |
在自定义组件中,通过使用
properties字段来声明组件的属性,这样可以让页面在使用组件时进行数据的传递。通过在组件内部使用this.properties来获取传递进来的属性值。另外,还可以在组件中定义响应事件,并通过this.triggerEvent()来触发事件并传递数据给页面。要在页面中使用自定义组件,需要在页面的
.json文件中进行注册,以便能够在页面的模板中引用。注册时需要指定自定义组件对应的文件路径和组件名。
3. 自定义组件的作用
微信小程序自定义组价有以下作用:
提高开发效率:通过将页面拆分为多个自定义组件,可以使开发团队更高效地并行开发。每个组件负责一部分功能,可以独立调试和测试,同时也方便重复使用。
规范化UI:自定义组件可以根据设计规范建立一套UI风格,确保小程序中各个页面和组件的一致性。这有助于提升用户体验并增加小程序的品牌价值。
提供丰富的功能:自定义组件可以封装一些常见的功能和交互效果,比如轮播图、下拉刷新、导航等。开发者只需引入并配置相应的组件,无需从零开始实现这些功能。
易于维护和扩展:自定义组件具备良好的封装性,内部的实现细节对外部是隐藏的,这样可以避免代码耦合和冲突。当需要修改或扩展某个功能时,只需要修改自定义组件的代码,而不会影响其他部分。
4.使用步骤:
创建自定义组件:在小程序项目中创建一个新的文件夹来存放自定义组件相关的文件,通常以
.wxml、.wxss、.js和.json为后缀。其中,.js文件负责组件的逻辑,.wxml文件负责组件的视图结构,.wxss文件负责组件的样式,.json文件用于配置组件的属性、样式和行为。注册自定义组件:在使用自定义组件的页面或其他自定义组件中,需要在
json文件中的usingComponents字段中注册组件。使用自定义组件时,可以通过指定标签名来引入和使用该组件。例如,在页面的
json文件中注册自定义组件的示例代码如下:{"usingComponents": {"custom-component": "/components/custom-component/custom-component"} }
- 使用自定义组件:在页面的
wxml文件中,直接使用组件的标签名来引入该组件。可以在组件标签上设置组件的属性,并通过data属性传递数据给组件。例如,在页面中使用自定义组件的示例代码如下:
<custom-component prop1="value1" prop2="{{data}}" bind:customEvent="handleCustomEvent"></custom-component>
- 在自定义组件中处理事件:自定义组件可以触发事件并将数据传递给父组件。在组件的
js文件中,通过this.triggerEvent来触发自定义事件,并通过参数传递数据给父组件。例如,在组件的
js文件中触发自定义事件的示例代码如下:// 在组件的内部逻辑中触发自定义事件 this.triggerEvent('customEvent', { data: "Hello, parent component!" });
- 在父组件中处理自定义事件:在使用自定义组件的父组件中,可以通过在组件上绑定相应的事件处理函数来接收自定义事件传递的数据。
例如,在父组件的
js文件中处理自定义事件的示例代码如下:// 在父组件的事件处理函数中接收自定义事件传递的数据 Page({handleCustomEvent(e) {console.log(e.detail); // 输出自定义事件传递的数据} });通过以上步骤,你就可以在微信小程序中使用自定义组件了。记得在开发过程中,要确保正确引入和使用自定义组件,并处理好组件间的通信和交互。
二、tabs组件及会议管理布局
tabs组件
1. 创建组件
准备
在创建组件的之前,先创建一个文件夹用于存放组件,每创建一个组件在该文件夹下再创建一个文件存放该组件。
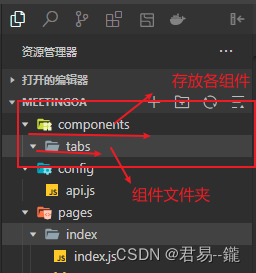
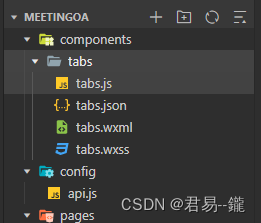
右击tabs,点击新建component选项,会在该文件夹下生成四个文件
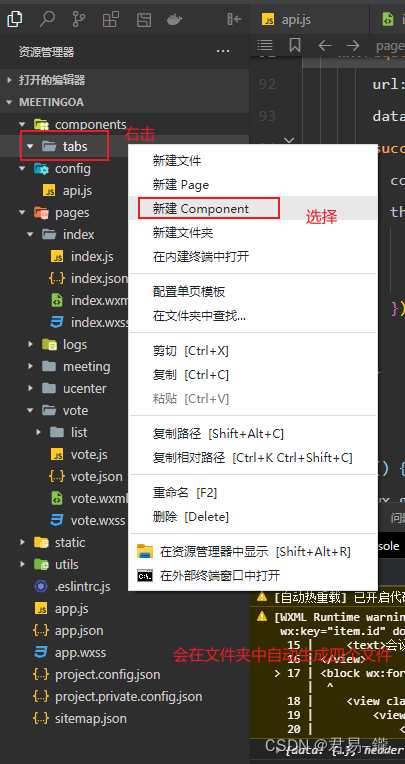
创建好之后控制台会出现一个错误,需要我们添加一个设置。
"ignoreDevUnusedFiles": false, "ignoreUploadUnusedFiles": false,将该代码添加到project.config.json文件中,然后重新编译一下。
报错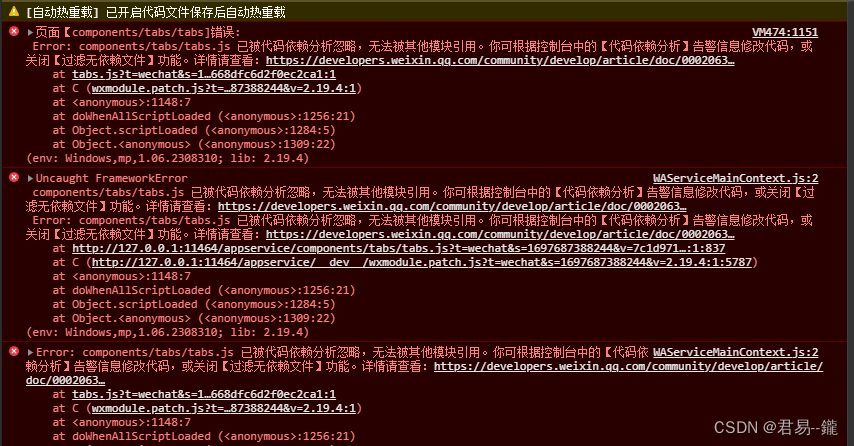

创建
类似于页面,一个自定义组件由
jsonwxmlwxssjs4个文件组成。要编写一个自定义组件,首先需要在json文件中进行自定义组件声明(将component字段设为true可将这一组文件设为自定义组件):{"component": true }
同时,还要在
wxml文件中编写组件模板,在wxss文件中加入组件样式,它们的写法与页面的写法类似。具体细节和注意事项参见 组件模板和样式 。代码:
内容
<!-- 这是自定义组件的内部WXML结构 -->
<view class="inner">{{innerText}}
</view>
<slot></slot>
样式
/* 这里的样式只应用于这个自定义组件 */
.inner {color: red;
}
在自定义组件的
js文件中,需要使用Component()来注册组件,并提供组件的属性定义、内部数据和自定义方法。代码:
Component({properties: {// 这里定义了innerText属性,属性值可以在组件使用时指定innerText: {type: String,value: 'default value',}},data: {// 这里是一些组件内部数据someData: {}},methods: {// 这里是一个自定义方法customMethod: function(){}}
})
使用组件
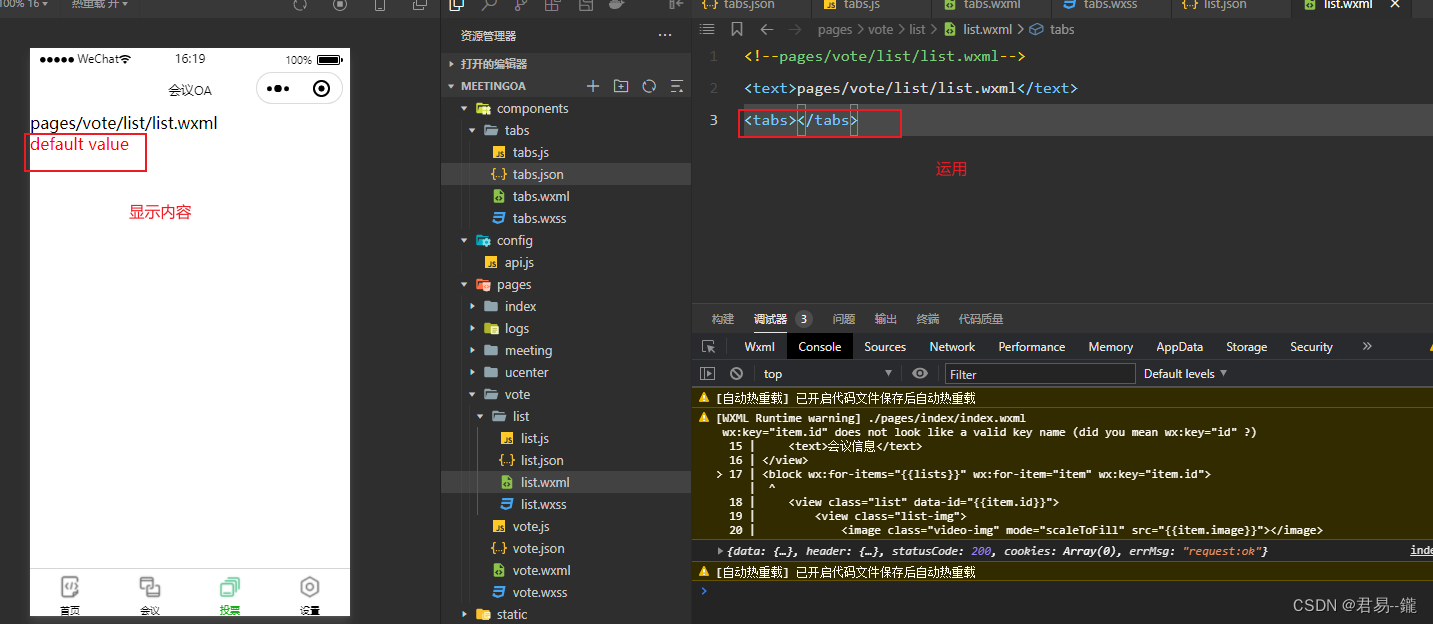
使用已注册的自定义组件前,首先要在页面的
json文件中进行引用声明。此时需要提供每个自定义组件的标签名和对应的自定义组件文件路径:{"usingComponents": {"component-tag-name": "path/to/the/custom/component"} }
效果
会议管理布局
tabs.wxml指定组件模版
<view class="tabs"><view class="tabs_title"><view wx:for="{{tabList}}" wx:key="id" class="title_item  {{index==tabIndex?'item_active':''}}" bindtap="handleItemTap" data-index="{{index}}"><view style="margin-bottom:5rpx">{{item}}</view><view style="width:30px" class="{{index==tabIndex?'item_active1':''}}"></view></view></view><view class="tabs_content"><slot></slot></view>
</view>
tabs.wxss完成样式设计
.tabs {position: fixed;top: 0;width: 100%;background-color: #fff;z-index: 99;border-bottom: 1px solid #efefef;padding-bottom: 20rpx;
}.tabs_title {/* width: 400rpx; */width: 90%;display: flex;font-size: 9pt;padding: 0 20rpx;
}.title_item {color: #999;padding: 15rpx 0;display: flex;flex: 1;flex-flow: column nowrap;justify-content: center;align-items: center;
}.item_active {/* color:#ED8137; */color: #000000;font-size: 11pt;font-weight: 800;
}.item_active1 {/* color:#ED8137; */color: #000000;font-size: 11pt;font-weight: 800;border-bottom: 6rpx solid #333;border-radius: 2px;
}
tabs.js定义属性

在会议界面中运用组件

添加数据
在对应界面的list.js文件中造数据。根据自身需求进行添加或删除
tabs:['会议中','已完成','已取消','全部会议'],

添加点击导航栏显示的对应数据
lists: [{'id': '1','image': '/static/persons/1.jpg','title': '对话产品总监 | 深圳·北京PM大会 【深度对话小米/京东/等产品总监】','num':'304','state':'进行中','time': '10月09日 17:59','address': '深圳市·南山区'},{'id': '1','image': '/static/persons/2.jpg','title': 'AI WORLD 2016世界人工智能大会','num':'380','state':'已结束','time': '10月09日 17:39','address': '北京市·朝阳区'},{'id': '1','image': '/static/persons/3.jpg','title': 'H100太空商业大会','num':'500','state':'进行中','time': '10月09日 17:31','address': '大连市'},{'id': '1','image': '/static/persons/4.jpg','title': '报名年度盛事,大咖云集!2016凤凰国际论坛邀您“与世界对话”','num':'150','state':'已结束','time': '10月09日 17:21','address': '北京市·朝阳区'},{'id': '1','image': '/static/persons/5.jpg','title': '新质生活 · 品质时代 2016消费升级创新大会','num':'217','state':'进行中','time': '10月09日 16:59','address': '北京市·朝阳区'}],lists1: [{'id': '1','image': '/static/persons/1.jpg','title': '对话产品总监 | 深圳·北京PM大会 【深度对话小米/京东/等产品总监】','num':'304','state':'进行中','time': '10月09日 17:59','address': '深圳市·南山区'},{'id': '1','image': '/static/persons/2.jpg','title': 'AI WORLD 2016世界人工智能大会','num':'380','state':'已结束','time': '10月09日 17:39','address': '北京市·朝阳区'},{'id': '1','image': '/static/persons/3.jpg','title': 'H100太空商业大会','num':'500','state':'进行中','time': '10月09日 17:31','address': '大连市'}],lists2: [{'id': '1','image': '/static/persons/1.jpg','title': '对话产品总监 | 深圳·北京PM大会 【深度对话小米/京东/等产品总监】','num':'304','state':'进行中','time': '10月09日 17:59','address': '深圳市·南山区'},{'id': '1','image': '/static/persons/2.jpg','title': 'AI WORLD 2016世界人工智能大会','num':'380','state':'已结束','time': '10月09日 17:39','address': '北京市·朝阳区'}],lists3: [{'id': '1','image': '/static/persons/1.jpg','title': '对话产品总监 | 深圳·北京PM大会 【深度对话小米/京东/等产品总监】','num':'304','state':'进行中','time': '10月09日 17:59','address': '深圳市·南山区'},{'id': '1','image': '/static/persons/2.jpg','title': 'AI WORLD 2016世界人工智能大会','num':'380','state':'已结束','time': '10月09日 17:39','address': '北京市·朝阳区'},{'id': '1','image': '/static/persons/3.jpg','title': 'H100太空商业大会','num':'500','state':'进行中','time': '10月09日 17:31','address': '大连市'},{'id': '1','image': '/static/persons/4.jpg','title': '报名年度盛事,大咖云集!2016凤凰国际论坛邀您“与世界对话”','num':'150','state':'已结束','time': '10月09日 17:21','address': '北京市·朝阳区'},{'id': '1','image': '/static/persons/5.jpg','title': '新质生活 · 品质时代 2016消费升级创新大会','num':'217','state':'进行中','time': '10月09日 16:59','address': '北京市·朝阳区'}] 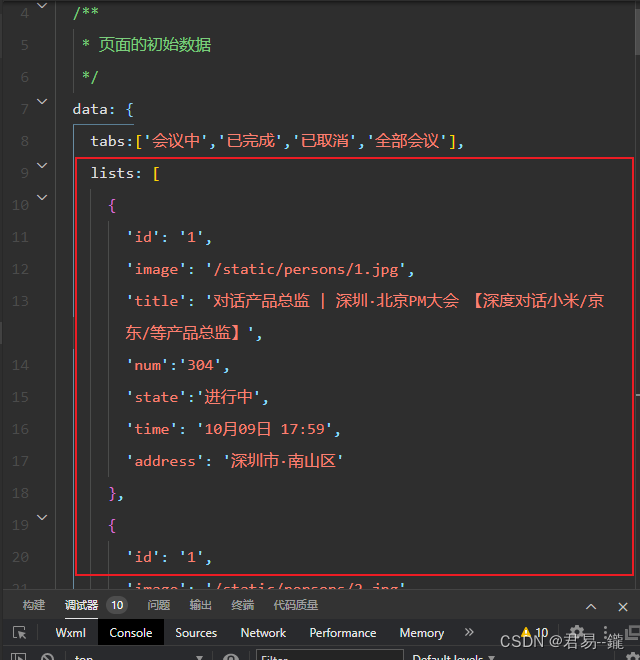
tabs.js定义点击事件
handleItemTap(e){// 获取索引const {index} = e.currentTarget.dataset;// 触发 父组件的事件this.triggerEvent("tabsItemChange",{index})this.setData({tabIndex:index})} 
效果

定义函数绑定显示数据及显示内容编译
在list.js文件中定义一个函数绑定数据。
tabsItemChange(e){let tolists;if(e.detail.index==1){tolists = this.data.lists1;}else if(e.detail.index==2){tolists = this.data.lists2;}else{tolists = this.data.lists3;}this.setData({lists: tolists})}
编写页面显示内容及样式
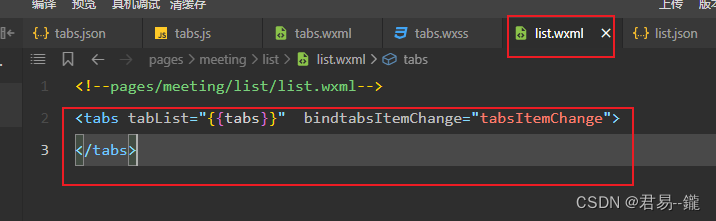
list.wxml
<!--pages/meeting/list/list.wxml-->
<tabs tabList="{{tabs}}"  bindtabsItemChange="tabsItemChange">
</tabs>
<view style="height: 50px;"></view>
<block wx:for-items="{{lists}}" wx:for-item="item" wx:key="item.id"><view class="list" data-id="{{item.id}}"><view class="list-img"><image class="video-img" mode="scaleToFill" src="{{item.image}}"></image></view><view class="list-detail"><view class="list-title"><text>{{item.title}}</text></view><view class="list-tag"><view class="state">{{item.state}}</view><view class="join"><text class="list-num">{{item.num}}</text>人报名</view></view><view class="list-info"><text>{{item.address}}</text>|<text>{{item.time}}</text></view></view></view>
</block>
list.wxss
/**index.wxss**/
.mobi-title{background-color: lightgray;padding: 10px;
}
.mobi-icon{border: 1px solid red;margin-right: 5px;
}
.mobi-title text{font-weight: 700;
}
.list{
display: flex;
align-items: center;
/* background-color: lightgray; */
border-bottom: 3px solid lightgray;
}
.list-img{
padding:0 10px;
}
.video-img{height: 80px;width: 80px;
}
.list-detail{display: flex;flex-direction: column;margin: 0px 0px 0px 5px;}
.list-title{
font-weight: 700;
margin: 3px 0;
}
.list-tag{display: flex;align-items: center;
}
.state{
border: 2px solid lightblue;
padding: 3px 8px;
color: lightblue;
margin-right:0 5px 10px 0 ;
}
.join{
color: lightgray;
}
.list-num{font-weight: 700;color: red;
}
.list-info{color: lightgray;font-size: 13px;
}
.bottom-line {text-align: center;
}
效果演示

三、个人中心布局及效果搭建
ucenter/index/index.wxml
<!--pages/ucenter/index/index.wxml-->
<!-- <text>pages/ucenter/index/index.wxml</text> -->
<!-- 用户信息 -->
<view class="user">
<image class="user-img" src="/static/persons/110.jpg"></image>
<view class="user-name">木易</view>
<view class="user-oper">修改</view>
</view>
<!-- 会议选项 -->
<view class="info">
<view class="item1">
<!-- 图标 -->
<view class="icon">
<image class="item-icon" src="/static/tabBar/sdk.png" />
</view>
<!-- 选项标题 -->
<view class="item-title">
我主持的会议
</view>
<!-- 数量 -->
<view class="item-num">10</view>
<!-- 操作符 -->
<view class="item-oper">></view>
</view><view class="item2">
<!-- 图标 -->
<view class="icon">
<image class="item-icon" src="/static/tabBar/sdk.png" />
</view>
<!-- 选项标题 -->
<view class="item-title">
我参与的会议
</view>
<!-- 数量 -->
<view class="item-num">10</view>
<!-- 操作符 -->
<view class="item-oper">></view>
</view>
</view><!-- 投票选项 -->
<view class="vote">
<view class="item1">
<!-- 图标 -->
<view class="icon">
<image class="item-icon" src="/static/tabBar/sdk.png" />
</view>
<!-- 选项标题 -->
<view class="item-title">
我发布的投票
</view>
<!-- 数量 -->
<view class="item-num">8</view>
<!-- 操作符 -->
<view class="item-oper">></view>
</view><view class="item2">
<!-- 图标 -->
<view class="icon">
<image class="item-icon" src="/static/tabBar/sdk.png" />
</view>
<!-- 选项标题 -->
<view class="item-title">
我参与的投票
</view>
<!-- 数量 -->
<view class="item-num">9</view>
<!-- 操作符 -->
<view class="item-oper">></view>
</view>
</view><!-- 操作 -->
<view class="work">
<view class="item1">
<!-- 图标 -->
<view class="icon">
<image class="item-icon" src="/static/tabBar/template.png" />
</view>
<!-- 选项标题 -->
<view class="work-title">
消息
</view><!-- 操作符 -->
<view class="item-oper">></view>
</view><view class="item2">
<!-- 图标 -->
<view class="icon">
<image class="item-icon" src="/static/tabBar/component.png" />
</view>
<!-- 选项标题 -->
<view class="work-title">
设置
</view>
<!-- 操作符 -->
<view class="item-oper">></view>
</view>
</view>
ucenter/index/index.wxss
/* pages/ucenter/index/index.wxss */
.user{
display: flex;
align-items: center;
border-bottom: 15px solid #F5F5F5;
}
.user-img{
height: 80px;
width: 80px;
margin: 10px;
border-radius: 5px;
border:2px solid lightgreen
}
.user-name{
font-weight: 700;
width:170px ;
}
.user-oper{
color: lightgray;
font-weight: 700;
}
.info{border-bottom: 15px solid #F5F5F5;
}
.item1{
display: flex;
align-items: center;
padding: 5px 10px;
border: 1px solid lightgrey;
}
.item-icon{
width: 30px;
height: 30px;
}
.item-title{
width: 210px;
margin-left: 5px;
}
.item-num{
width: 35px;
}
.item-oper{
color: lightgrey;
font-weight: 700;
}
.item2{display: flex;
align-items: center;
padding: 5px 10px;
}
.vote{border-bottom: 15px solid #F5F5F5;
}
.work-title{width: 245px;
margin-left: 5px;
}
页面效果

四、扩展:投票页面布局
1. 创建运用组件
list.json
{j"usingComponents": {"tabs": "/components/tabs/tabs"}
}
创造导航数据
tabs:['全部','已发布','已参与','未参与',],
2. 页面运用组件及布局
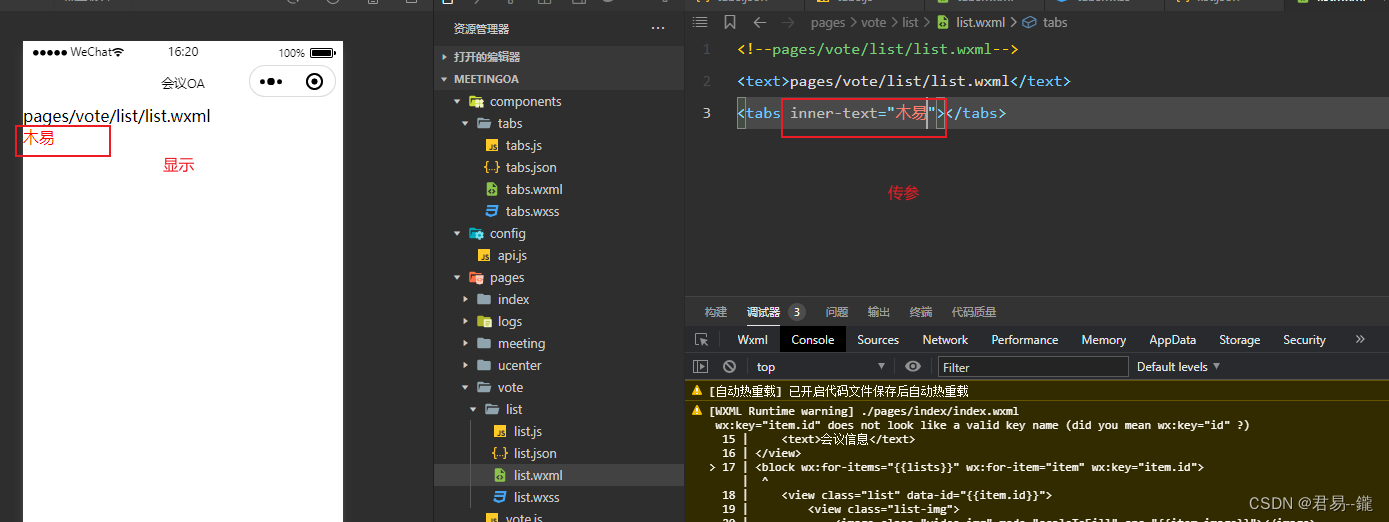
<!--pages/vote/list/list.wxml-->
<text>pages/vote/list/list.wxml</text>
<tabs tabList="{{tabs}}"  bindtabsItemChange="tabsItemChange">
</tabs>
<view style="height: 50px;"></view>
<view class="vote">
<!-- 投票标题 -->
<view class="votetitle">
<!--图标  -->
<image class="votetitle-img" src="/static/tabBar/sdk.png"></image>
<!-- 标题 -->
<view class="votetitle-titie">你最喜欢的QQ头像</view></view>
<!-- 投票内容 -->
<view class="voteinfo">
<!-- 左侧 -->
<view class="left">
<image class="left-image" src="/static/persons/111.jpg"></image>
<!-- 票数 -->
<view class="votenum">票数:
<view class="num">55</view>
</view>
<!-- 投票按钮 -->
<view class="votebtn">
<image class="btn-img" src="/static/tabBar/vote.png" bin></image>
</view></view><!-- 右侧 -->
<view class="right"><image class="right-image" src="/static/persons/112.jpg"></image><!-- 票数 --><view class="votenum">票数:<view class="num">99</view></view><!-- 投票按钮 -->
<!-- 投票按钮 -->
<view class="votebtn" >
<image class="btn-img" src="/static/tabBar/vote.png"></image>
</view>
</view>
</view><view class="tishs">点击图标进行投票</view>
</view><!-- 第二个 -->
<view class="vote">
<!-- 投票标题 -->
<view class="votetitle">
<!--图标  -->
<image class="votetitle-img" src="/static/tabBar/sdk.png"></image>
<!-- 标题 -->
<view class="votetitle-titie">你最喜欢的微信头像</view></view>
<!-- 投票内容 -->
<view class="voteinfo">
<!-- 左侧 -->
<view class="left">
<image class="left-image" src="/static/persons/113.jpg"></image>
<!-- 票数 -->
<view class="votenum">票数:
<view class="num">55</view>
</view>
<!-- 投票按钮 -->
<view class="votebtn">
<image class="btn-img" src="/static/tabBar/vote.png" bin></image>
</view></view><!-- 右侧 -->
<view class="right"><image class="right-image" src="/static/persons/114.jpg"></image><!-- 票数 --><view class="votenum">票数:<view class="num">99</view></view><!-- 投票按钮 -->
<!-- 投票按钮 -->
<view class="votebtn" >
<image class="btn-img" src="/static/tabBar/vote.png"></image>
</view>
</view>
</view><view class="tishs">点击图标进行投票</view>
</view>
3. 编写样式
/* pages/vote/list/list.wxss */
.votetitle{display: flex;align-items: center;
}
.votetitle-img{width: 30px;height: 30px;
}
.votetitle-titie{font-weight: 700;width: 250px;/* background-color: lightseagreen; */text-align: center;
}
.vote{border-bottom: 5px solid lightgray;
}
.voteinfo{padding: 10px;
}.left{
padding: 0 15px 0 15px;
}
.right{padding: 0 15px 0 15px;
}
.left-image{width: 120px;height:120px;border-radius: 5px;
}
.right-image{width: 120px;height:120px;border-radius: 5px;
}
.voteinfo{display: flex;
}
.votenum{font-size: 15px;font-weight: 600;color: red;display: flex;text-align: center;margin-left: 25px;
}
.num{width: 40px;}.btn-img{width: 25px;height: 25px;margin-left: 50px;
}
.tishs{font-size: 15px;color: lightgray;text-align: center;
}
页面效果

本期博客分享到此结束,三连加关注就是对博主最大的支持,下期博客会进行进一步的功能拓展,敬请期待