首先这里制作了一个简单交互,使用shader grapgh,根据计算距离和变化数值的差实现交互后的扩散,同时计算消散遮罩让它逐渐谈去。
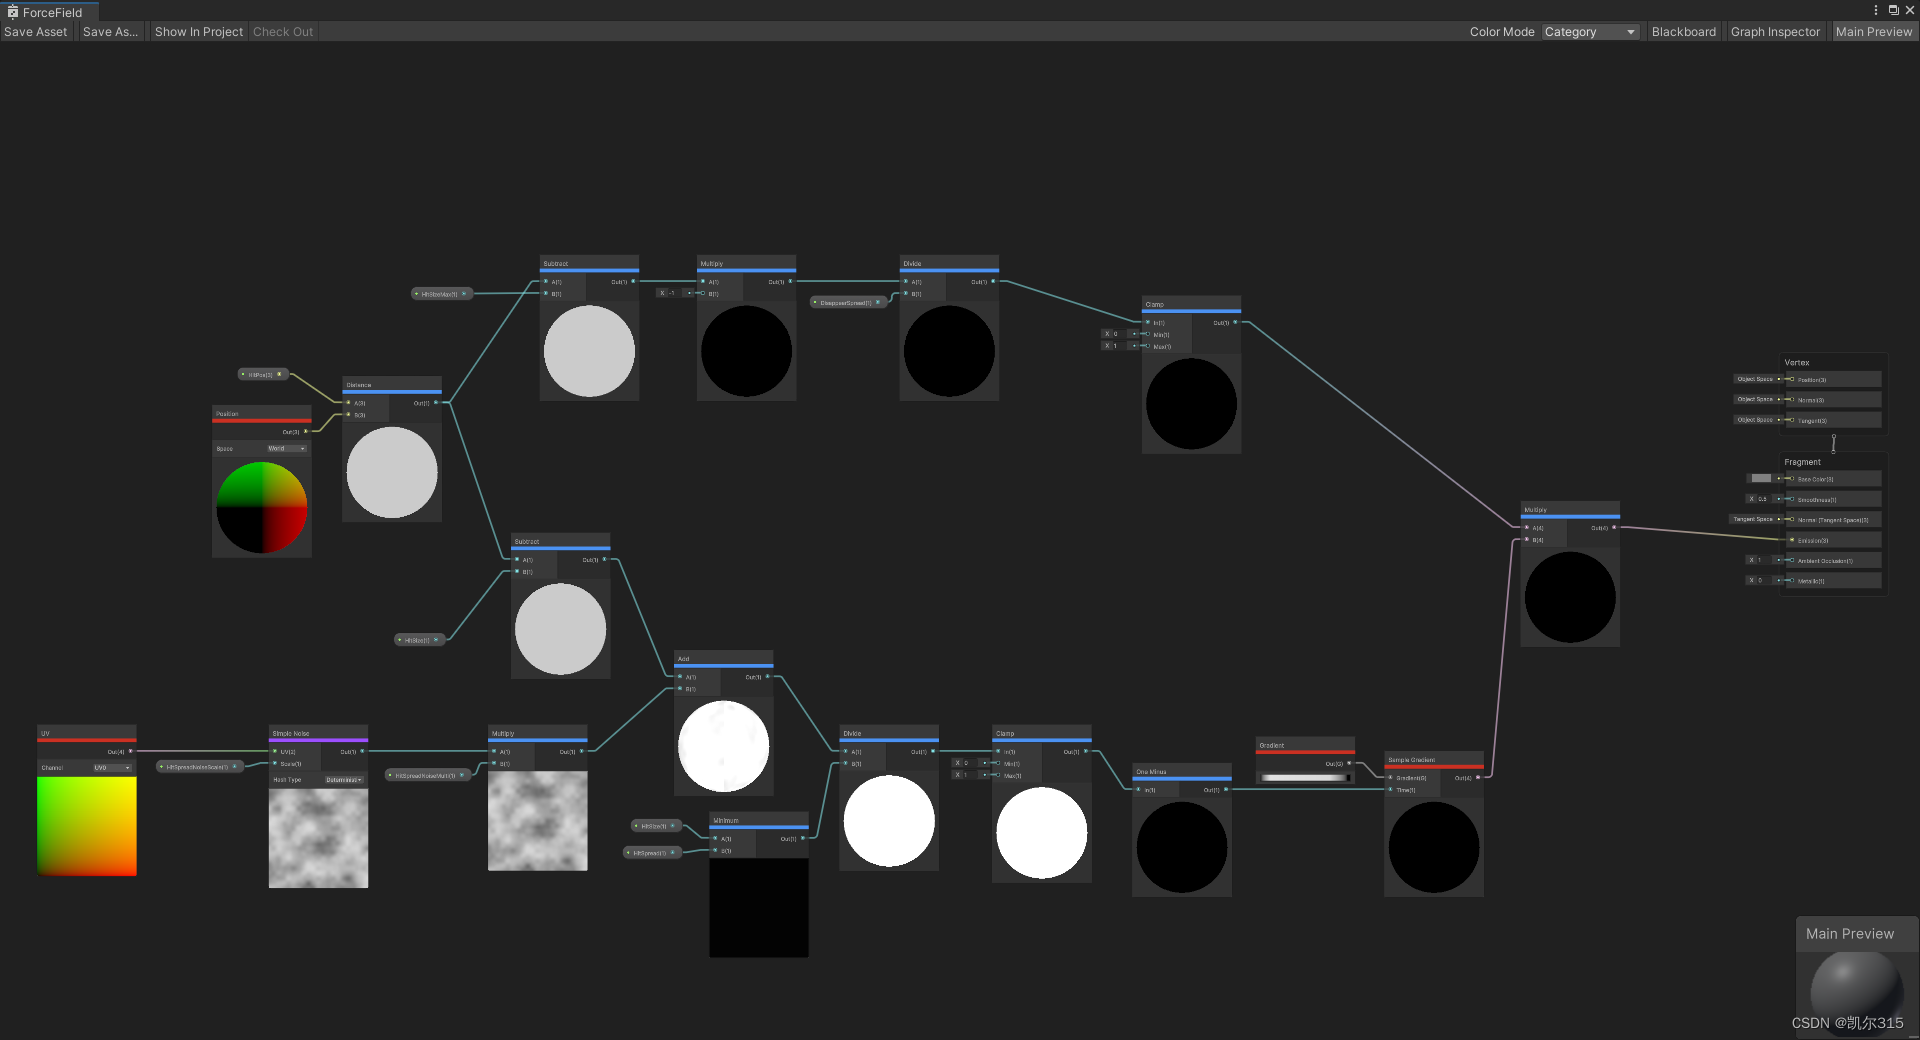
将他赋予材质物体,根据脚本传入位置和逐渐变化的大小后,呈现这样的效果。
但是,shader graph这样的工具,在做这种效果非常快的同时,也存在不少缺点,比如这里我希望我传入的位置和大小变化都是数组,使用shader graph就不太好办了。
这时候就需要把它翻译成代码,根据连线图的逻辑翻译即可,此外把传入的位置和size值替换为数组。
Shader "yourname"
{Properties{_MainTex ("Texture", 2D) = "white" {}_HitPos("HitPos", Vector) = (0, 0, 0, 0)_HitSize("HitSize", Float) = 0.001_HitSpread("HitSpread", Range(0, 10)) = 1_HitSizeMax("HitSizeMax", Float) = 0_DisappearSpread("DisappearSpread", Float) = 1_HitSpreadNoiseMulti("HitSpreadNoiseMulti", Range(0.01, 10)) = 1_HitSpreadNoiseScale("HitSpreadNoiseScale", Range(1, 200)) = 20[HideInInspector]_QueueOffset("_QueueOffset", Float) = 0[HideInInspector]_QueueControl("_QueueControl", Float) = -1[HideInInspector][NoScaleOffset]unity_Lightmaps("unity_Lightmaps", 2DArray) = "" {}[HideInInspector][NoScaleOffset]unity_LightmapsInd("unity_LightmapsInd", 2DArray) = "" {}[HideInInspector][NoScaleOffset]unity_ShadowMasks("unity_ShadowMasks", 2DArray) = "" {}}SubShader{Tags{"RenderPipeline"="UniversalPipeline""RenderType"="Opaque"//"UniversalMaterialType" = "Lit""Queue"="Geometry""DisableBatching"="False"}Pass{Name "Universal Forward"Tags{"LightMode" = "UniversalForward"}Cull BackBlend One ZeroZTest LEqualZWrite OnHLSLPROGRAM#pragma enable_d3d11_debug_symbols  //  debug信息#pragma multi_compile_instancing#pragma target 4.0  // 默认2.5 target的详细信息 https://docs.unity3d.com/Manual/SL-ShaderCompileTargets.html#pragma vertex vert#pragma fragment frag//https://github.com/Unity-Technologies/Graphics/tree/master/Packages/com.unity.render-pipelines.universal/ShaderLibrary#include_with_pragmas "Packages/com.unity.render-pipelines.universal/ShaderLibrary/DOTS.hlsl"#include_with_pragmas "Packages/com.unity.render-pipelines.universal/ShaderLibrary/RenderingLayers.hlsl"#include "Packages/com.unity.render-pipelines.core/ShaderLibrary/Color.hlsl"#include "Packages/com.unity.render-pipelines.core/ShaderLibrary/Texture.hlsl"#include "Packages/com.unity.render-pipelines.universal/ShaderLibrary/Core.hlsl"#include "Packages/com.unity.render-pipelines.universal/ShaderLibrary/Lighting.hlsl"#include "Packages/com.unity.render-pipelines.universal/ShaderLibrary/Input.hlsl"#include "Packages/com.unity.render-pipelines.core/ShaderLibrary/TextureStack.hlsl"#include "Packages/com.unity.render-pipelines.universal/ShaderLibrary/Shadows.hlsl"#include "Packages/com.unity.render-pipelines.universal/ShaderLibrary/ShaderGraphFunctions.hlsl"#include "Packages/com.unity.render-pipelines.universal/ShaderLibrary/DBuffer.hlsl"#include "Packages/com.unity.render-pipelines.universal/Editor/ShaderGraph/Includes/ShaderPass.hlsl"#include "Packages/com.unity.render-pipelines.core/ShaderLibrary/Hashes.hlsl"float Unity_SimpleNoise_ValueNoise_Deterministic_float (float2 uv){float2 i = floor(uv);float2 f = frac(uv);f = f * f * (3.0 - 2.0 * f);uv = abs(frac(uv) - 0.5);float2 c0 = i + float2(0.0, 0.0);float2 c1 = i + float2(1.0, 0.0);float2 c2 = i + float2(0.0, 1.0);float2 c3 = i + float2(1.0, 1.0);float r0; Hash_Tchou_2_1_float(c0, r0);float r1; Hash_Tchou_2_1_float(c1, r1);float r2; Hash_Tchou_2_1_float(c2, r2);float r3; Hash_Tchou_2_1_float(c3, r3);float bottomOfGrid = lerp(r0, r1, f.x);float topOfGrid = lerp(r2, r3, f.x);float t = lerp(bottomOfGrid, topOfGrid, f.y);return t;}void Unity_SimpleNoise_Deterministic_float(float2 UV, float Scale, out float Out){float freq, amp;Out = 0.0f;freq = pow(2.0, float(0));amp = pow(0.5, float(3-0));Out += Unity_SimpleNoise_ValueNoise_Deterministic_float(float2(UV.xy*(Scale/freq)))*amp;freq = pow(2.0, float(1));amp = pow(0.5, float(3-1));Out += Unity_SimpleNoise_ValueNoise_Deterministic_float(float2(UV.xy*(Scale/freq)))*amp;freq = pow(2.0, float(2));amp = pow(0.5, float(3-2));Out += Unity_SimpleNoise_ValueNoise_Deterministic_float(float2(UV.xy*(Scale/freq)))*amp;}void Unity_SampleGradientV1_float(Gradient Gradient, float Time, out float4 Out){float3 color = Gradient.colors[0].rgb;[unroll]for (int c = 1; c < Gradient.colorsLength; c++){float colorPos = saturate((Time - Gradient.colors[c - 1].w) / (Gradient.colors[c].w - Gradient.colors[c - 1].w)) * step(c, Gradient.colorsLength - 1);color = lerp(color, Gradient.colors[c].rgb, lerp(colorPos, step(0.01, colorPos), Gradient.type));}#ifdef UNITY_COLORSPACE_GAMMAcolor = LinearToSRGB(color);#endiffloat alpha = Gradient.alphas[0].x;[unroll]for (int a = 1; a < Gradient.alphasLength; a++){float alphaPos = saturate((Time - Gradient.alphas[a - 1].y) / (Gradient.alphas[a].y - Gradient.alphas[a - 1].y)) * step(a, Gradient.alphasLength - 1);alpha = lerp(alpha, Gradient.alphas[a].x, lerp(alphaPos, step(0.01, alphaPos), Gradient.type));}Out = float4(color, alpha);}struct appdata{//顶点着色器语义 https://learn.microsoft.com/zh-cn/windows/win32/direct3dhlsl/dx-graphics-hlsl-semantics?redirectedfrom=MSDNfloat4 vertex : POSITION;float3  normal  : NORMAL;float4  tan  : TANGENT;float2 uv : TEXCOORD0;};struct v2f{//像素着色器语义 https://learn.microsoft.com/zh-cn/windows/win32/direct3dhlsl/dx-graphics-hlsl-semantics?redirectedfrom=MSDNfloat4 positionCS : SV_POSITION;float3  normal  : NORMAL;float2 uv : TEXCOORD0;float3 positionWS : TEXCOORD1;};//从片段着色器的返回结构,SV_Target,SV_Depth等,不知道这两个之外还有能用的不。SV_Target可以从0到7,在多渲染目标(MRT)时很有用struct fragOutput {//语义 https://learn.microsoft.com/zh-cn/windows/win32/direct3dhlsl/dx-graphics-hlsl-semantics?redirectedfrom=MSDNfloat4 Emission : SV_Target;};sampler2D _MainTex;float4 _MainTex_ST; float _HitSpreadNoiseScale;float _HitSpreadNoiseMulti;int count;float3 hitposarray[20];float hitsizearray[20];float hitspreadarray[20];float hitsizemaxarray[20];float disappearspreadarray[20];v2f vert(appdata v, uint vid : SV_VertexID){v2f o;o.positionCS = TransformObjectToHClip(v.vertex);o.positionWS = TransformObjectToWorld(v.vertex);o.uv = TRANSFORM_TEX(v.uv, _MainTex);o.normal = v.normal;return o;}float4 CalculateCircle(v2f i, float3 _HitPos, float _HitSize, float _HitSpread, float _HitSizeMax, float _DisappearSpread){float3 tempdis = distance(_HitPos, i.positionWS);float tempupmul = clamp(((tempdis - _HitSizeMax) * (-1) )/ _DisappearSpread, 0, 1);float noiseout = 0;Unity_SimpleNoise_Deterministic_float(i.uv, _HitSpreadNoiseScale, noiseout);noiseout = noiseout * _HitSpreadNoiseMulti;float temp1 = noiseout + (tempdis - _HitSize);float temp2 = 1 - clamp(temp1 / min(_HitSize, _HitSpread), 0, 1);Gradient _Gradient = NewGradient(0, 4, 2, float4(0, 0, 0, 0),float4(0.767647, 0.767647, 0.767647, 0.1058824),float4(0.6861503, 0.6861503, 0.6861503, 0.7705958),float4(0, 0, 0, 0.9647059),float4(0, 0, 0, 0),float4(0, 0, 0, 0),float4(0, 0, 0, 0),float4(0, 0, 0, 0), float2(1, 0),float2(1, 1),float2(0, 0),float2(0, 0),float2(0, 0),float2(0, 0),float2(0, 0),float2(0, 0));float4 gradientout = 0;Unity_SampleGradientV1_float(_Gradient, temp2, gradientout);return tempupmul * gradientout;}fragOutput frag(v2f i) : SV_Target{fragOutput o = (fragOutput)0;float4 tempemission = 0;for(int j = 0; j < count; j++){tempemission += CalculateCircle(i, hitposarray[j], hitsizearray[j], hitspreadarray[j], hitsizemaxarray[j], disappearspreadarray[j]);};o.Emission = tempemission;return o;}ENDHLSL}}Fallback Off
}
particle system制作为在点击位置射线检测,生成粒子,并逐渐放大,最后消失。
弄好后关闭粒子的renderer,使其不可见。
然后创建脚本根据particle system产生的粒子位置和大小,particle system,按个数传入shader代码的数组中,按照粒子的位置和大小同步shader数组中的值以实现效果。
using System.Collections;
using System.Collections.Generic;
using Unity.Mathematics;
using UnityEngine;
using UnityEngine.InputSystem;
using static UnityEngine.Rendering.DebugUI;[ExecuteAlways]
public class ForceField : MonoBehaviour
{//编辑器引用public GameObject forcefield;public ParticleSystem ps;//静态存储[Header("粒子系统最大数量")]public int psAmount = 20;Material material;Shader shader;Mouse mouse;//动态变化存储RaycastHit raycastHit;ParticleSystem.Particle[] particles;bool isInited = false;void Init(){if (material == null)material = forcefield.GetComponent<MeshRenderer>().sharedMaterial;if (shader == null)shader = material.shader;if (mouse == null)mouse = Mouse.current;particles = new ParticleSystem.Particle[psAmount];}void Update(){//编辑器模式下就要做的事情if (forcefield == null) return;if (ps == null) return;if (!isInited){Init();isInited = true;}//运行模式下才要做的事情if (!Application.isPlaying) return;if (mouse.leftButton.wasPressedThisFrame)//Status:鼠标左键按下  运行时才有作用{Vector2 mousePos = Pointer.current.position.ReadValue();Ray ray = Camera.main.ScreenPointToRay(mousePos);Physics.Raycast(ray, out raycastHit, 1000, LayerMask.GetMask("ForceField"));if(raycastHit.collider != null)//检测有效,做以下操作{ps.transform.position = raycastHit.point;ps.Emit(1);}}ParticleSystem.MainModule psMainModule = ps.main;int count = ps.GetParticles(particles);Debug.Log(count);material.SetInteger("count", count);  //  激活的个数if(count > 0){Vector4[] hitposs = new Vector4[20];float[] hitsizes = new float[20];float[] hitspreads = new float[20];float[] hitsizemaxs = new float[20];float[] disappearspreads = new float[20];for (int i = 0; i < count; i++){hitposs[i] = new Vector4(particles[i].position.x, particles[i].position.y, particles[i].position.z, 1);hitsizes[i] = particles[i].GetCurrentSize(ps);hitspreads[i] = 1;hitsizemaxs[i] = psMainModule.startSize.constantMax;disappearspreads[i] = psMainModule.startSize.constantMax / 2;}material.SetVectorArray("hitposarray", hitposs);material.SetFloatArray("hitsizearray", hitsizes);material.SetFloatArray("hitspreadarray", hitspreads);material.SetFloatArray("hitsizemaxarray", hitsizemaxs);material.SetFloatArray("disappearspreadarray", disappearspreads);}}}