如果对你有用的话,希望能够点赞支持一下,这样我就能有更多的动力更新更多的学习笔记了。😄😄
使用ResNet进行CIFAR-10数据集进行测试,这里使用的是将CIFAR-10数据集的分辨率扩大到32X32,因为算力相关的问题所以我选择了较低的训练图像分辨率。但是假如你自己的算力比较充足的话,我建议使用训练的使用图像的分辨率设置为224X224(这个可以在代码里面的transforms.RandomResizedCrop(32)和transforms.Resize((32, 32)),进行修改,很简单),因为在测试训练的时候,发现将CIFAR10数据集的分辨率拉大可以让模型更快地进行收敛,并且识别的效果也是比低分辨率的更加好。
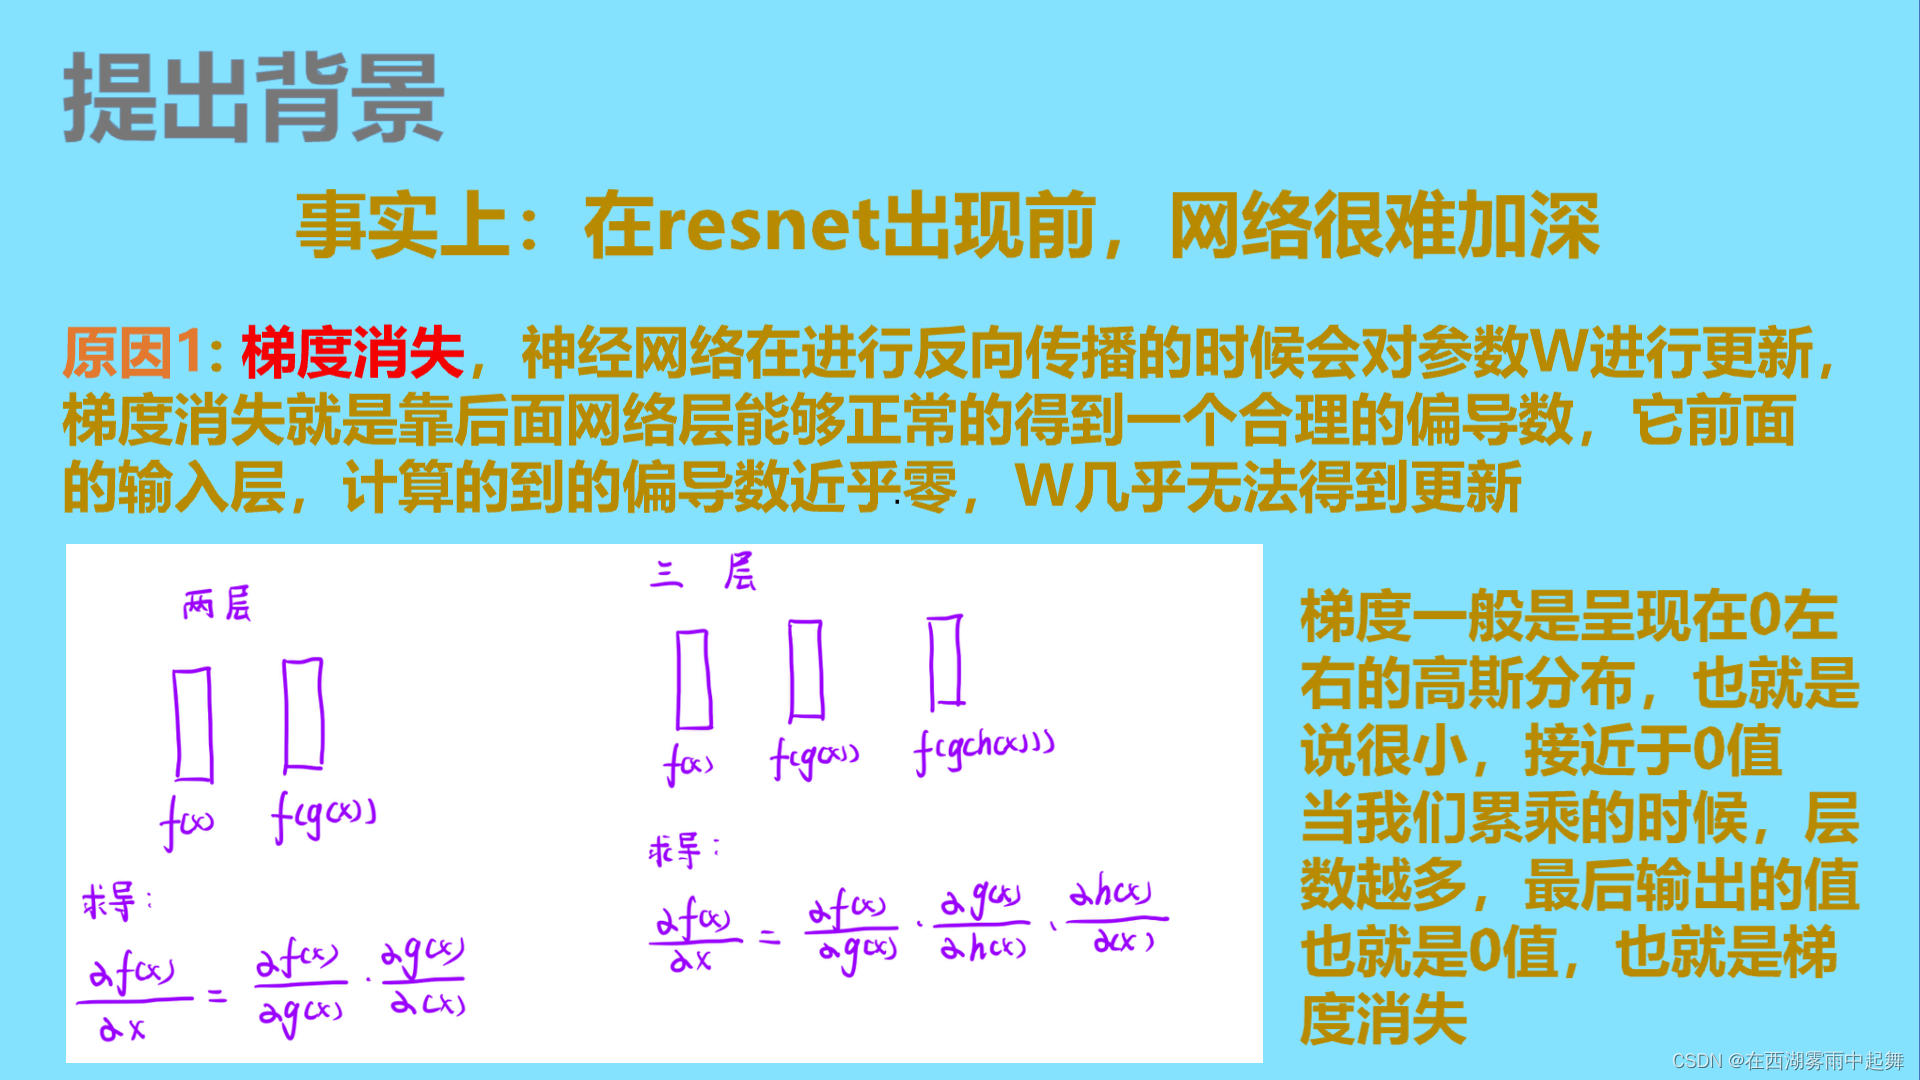
首先来介绍一下,ResNet:
1.论文下载地址:https://arxiv.org/pdf/1512.03385.pdf
2.ResNet的介绍:




代码实现:
数据集的处理:
调用torchvision里面封装好的数据集进行数据的训练,并且利用官方已经做好的数据集分类是数据集的划分大小。进行了一些简单的数据增强,分别是随机的随机剪切和随机的水平拉伸操作。
模型的代码结构目录:
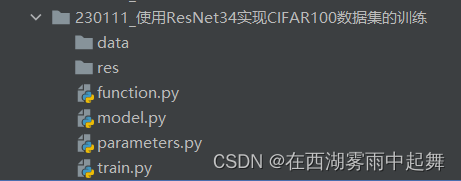
train.py文件内容:
# -*- coding:utf-8 -*-
# @Time : 2023-01-11 20:25
# @Author : DaFuChen
# @File : CSDN写作代码笔记
# @software: PyCharmimport torchvisionfrom model import resnet34
import os
import parameters
import function
import torch
import torch.nn as nn
import torch.optim as optim
from torchvision import transforms
from tqdm import tqdmdef main():device = torch.device("cuda:0" if torch.cuda.is_available() else "cpu")print("using {} device.".format(device))epochs = parameters.epochsave_model = parameters.resnet_save_modelsave_path = parameters.resnet_save_path_CIFAR100data_transform = {"train": transforms.Compose([transforms.RandomResizedCrop(32),transforms.RandomHorizontalFlip(),transforms.ToTensor(),transforms.Normalize((0.5, 0.5, 0.5), (0.5, 0.5, 0.5))]),"val": transforms.Compose([transforms.Resize((32, 32)),  # cannot 224, must (224, 224)transforms.ToTensor(),transforms.Normalize((0.5, 0.5, 0.5), (0.5, 0.5, 0.5))]),}train_dataset = torchvision.datasets.CIFAR100(root='./data/CIFAR100', train=True,download=True, transform=data_transform["train"])val_dataset = torchvision.datasets.CIFAR100(root='./data/CIFAR100', train=False,download=False, transform=data_transform["val"])train_num = len(train_dataset)val_num = len(val_dataset)print("using {} images for training, {} images for validation.".format(train_num, val_num))# #################################################################################################################batch_size = parameters.batch_sizenw = min([os.cpu_count(), batch_size if batch_size > 1 else 0, 8])  # number of workersprint('Using {} dataloader workers every process'.format(nw))# ##################################################################################################################train_loader = torch.utils.data.DataLoader(train_dataset,batch_size=batch_size,shuffle=True,pin_memory=True,num_workers=nw,)val_loader = torch.utils.data.DataLoader(val_dataset,batch_size=batch_size,shuffle=False,pin_memory=True,num_workers=nw,)model = resnet34(num_classes=parameters.CIFAR100_class)model.to(device)loss_function = nn.CrossEntropyLoss()optimizer = optim.Adam(model.parameters(), lr=parameters.resnet_lr)best_acc = 0.0# 为后面制作表图train_acc_list = []train_loss_list = []val_acc_list = []for epoch in range(epochs):# trainmodel.train()running_loss_train = 0.0train_accurate = 0.0train_bar = tqdm(train_loader)for images, labels in train_bar:optimizer.zero_grad()outputs = model(images.to(device))loss = loss_function(outputs, labels.to(device))loss.backward()optimizer.step()predict = torch.max(outputs, dim=1)[1]train_accurate += torch.eq(predict, labels.to(device)).sum().item()running_loss_train += loss.item()train_accurate = train_accurate / train_numrunning_loss_train = running_loss_train / train_numtrain_acc_list.append(train_accurate)train_loss_list.append(running_loss_train)print('[epoch %d] train_loss: %.7f  train_accuracy: %.3f' %(epoch + 1, running_loss_train, train_accurate))# validatemodel.eval()acc = 0.0  # accumulate accurate number / epochwith torch.no_grad():val_loader = tqdm(val_loader)for val_data in val_loader:val_images, val_labels = val_dataoutputs = model(val_images.to(device))predict_y = torch.max(outputs, dim=1)[1]acc += torch.eq(predict_y, val_labels.to(device)).sum().item()val_accurate = acc / val_numval_acc_list.append(val_accurate)print('[epoch %d] val_accuracy: %.3f' %(epoch + 1, val_accurate))function.writer_into_excel_onlyval(save_path, train_loss_list, train_acc_list, val_acc_list,"CIFAR100")# 选择最best的模型进行保存 评价指标此处是accif val_accurate > best_acc:best_acc = val_accuratetorch.save(model.state_dict(), save_model)if __name__ == '__main__':main()
model.py文件:
# -*- coding:utf-8 -*-
# @Time : 2023-01-11 20:24
# @Author : DaFuChen
# @File : CSDN写作代码笔记
# @software: PyCharmimport torch.nn as nn
import torchclass BasicBlock(nn.Module):expansion = 1def __init__(self, in_channel, out_channel, stride=1, downsample=None, **kwargs):super(BasicBlock, self).__init__()self.conv1 = nn.Conv2d(in_channels=in_channel, out_channels=out_channel,kernel_size=3, stride=stride, padding=1, bias=False)self.bn1 = nn.BatchNorm2d(out_channel)self.relu = nn.ReLU()self.conv2 = nn.Conv2d(in_channels=out_channel, out_channels=out_channel,kernel_size=3, stride=1, padding=1, bias=False)self.bn2 = nn.BatchNorm2d(out_channel)self.downsample = downsampledef forward(self, x):identity = xif self.downsample is not None:identity = self.downsample(x)out = self.conv1(x)out = self.bn1(out)out = self.relu(out)out = self.conv2(out)out = self.bn2(out)out += identityout = self.relu(out)return outclass Bottleneck(nn.Module):"""注意:原论文中,在虚线残差结构的主分支上,第一个1x1卷积层的步距是2,第二个3x3卷积层步距是1。但在pytorch官方实现过程中是第一个1x1卷积层的步距是1,第二个3x3卷积层步距是2,这么做的好处是能够在top1上提升大概0.5%的准确率。可参考Resnet v1.5 https://ngc.nvidia.com/catalog/model-scripts/nvidia:resnet_50_v1_5_for_pytorch"""expansion = 4def __init__(self, in_channel, out_channel, stride=1, downsample=None,groups=1, width_per_group=64):super(Bottleneck, self).__init__()width = int(out_channel * (width_per_group / 64.)) * groupsself.conv1 = nn.Conv2d(in_channels=in_channel, out_channels=width,kernel_size=1, stride=1, bias=False)  # squeeze channelsself.bn1 = nn.BatchNorm2d(width)# -----------------------------------------self.conv2 = nn.Conv2d(in_channels=width, out_channels=width, groups=groups,kernel_size=3, stride=stride, bias=False, padding=1)self.bn2 = nn.BatchNorm2d(width)# -----------------------------------------self.conv3 = nn.Conv2d(in_channels=width, out_channels=out_channel*self.expansion,kernel_size=1, stride=1, bias=False)  # unsqueeze channelsself.bn3 = nn.BatchNorm2d(out_channel*self.expansion)self.relu = nn.ReLU(inplace=True)self.downsample = downsampledef forward(self, x):identity = xif self.downsample is not None:identity = self.downsample(x)out = self.conv1(x)out = self.bn1(out)out = self.relu(out)out = self.conv2(out)out = self.bn2(out)out = self.relu(out)out = self.conv3(out)out = self.bn3(out)out += identityout = self.relu(out)return outclass ResNet(nn.Module):def __init__(self,block,blocks_num,num_classes=1000,include_top=True,groups=1,width_per_group=64):super(ResNet, self).__init__()self.include_top = include_topself.in_channel = 64self.groups = groupsself.width_per_group = width_per_groupself.conv1 = nn.Conv2d(3, self.in_channel, kernel_size=7, stride=2,padding=3, bias=False)self.bn1 = nn.BatchNorm2d(self.in_channel)self.relu = nn.ReLU(inplace=True)self.maxpool = nn.MaxPool2d(kernel_size=3, stride=2, padding=1)self.layer1 = self._make_layer(block, 64, blocks_num[0])self.layer2 = self._make_layer(block, 128, blocks_num[1], stride=2)self.layer3 = self._make_layer(block, 256, blocks_num[2], stride=2)self.layer4 = self._make_layer(block, 512, blocks_num[3], stride=2)if self.include_top:self.avgpool = nn.AdaptiveAvgPool2d((1, 1))  # output size = (1, 1)self.fc = nn.Linear(512 * block.expansion, num_classes)for m in self.modules():if isinstance(m, nn.Conv2d):nn.init.kaiming_normal_(m.weight, mode='fan_out', nonlinearity='relu')self.classifier = nn.Sequential(nn.Dropout(p=0.5),nn.Linear(512 * block.expansion, 512),  # [2 512 1 1]nn.ReLU(inplace=True),# nn.Linear(512, num_classes),)def _make_layer(self, block, channel, block_num, stride=1):downsample = Noneif stride != 1 or self.in_channel != channel * block.expansion:downsample = nn.Sequential(nn.Conv2d(self.in_channel, channel * block.expansion, kernel_size=1, stride=stride, bias=False),nn.BatchNorm2d(channel * block.expansion))layers = []layers.append(block(self.in_channel,channel,downsample=downsample,stride=stride,groups=self.groups,width_per_group=self.width_per_group))self.in_channel = channel * block.expansionfor _ in range(1, block_num):layers.append(block(self.in_channel,channel,groups=self.groups,width_per_group=self.width_per_group))return nn.Sequential(*layers)def forward(self, x):x = self.conv1(x)x = self.bn1(x)x = self.relu(x)x = self.maxpool(x)x = self.layer1(x)x = self.layer2(x)x = self.layer3(x)x = self.layer4(x)if self.include_top:x = self.avgpool(x)x = torch.flatten(x, 1)# x = self.fc(x)# print((x.shape()))x = self.classifier(x)return xclass AlexnetChange(nn.Module):def __init__(self, ):super(AlexnetChange, self).__init__()self.features = nn.Sequential(nn.Conv2d(3, 48, kernel_size=11, stride=4, padding=2),  # input[3, 224, 224]  output[48, 55, 55]nn.ReLU(inplace=True),nn.MaxPool2d(kernel_size=3, stride=2),                  # output[48, 27, 27]nn.Conv2d(48, 128, kernel_size=5, padding=2),           # output[128, 27, 27]nn.ReLU(inplace=True),nn.MaxPool2d(kernel_size=3, stride=2),                  # output[128, 13, 13]nn.Conv2d(128, 192, kernel_size=3, padding=1),          # output[192, 13, 13]nn.ReLU(inplace=True),nn.Conv2d(192, 128, kernel_size=3, padding=1),          # output[128, 13, 13]nn.ReLU(inplace=True),nn.MaxPool2d(kernel_size=13, stride=2, padding=0),                  # output[128, 1, 1])self.classifier = nn.Sequential(nn.Dropout(p=0.5),nn.Linear(128 * 1 * 1, 512),        # [batchsize值 512 1 1]nn.ReLU(inplace=True),# nn.Linear(512, num_classes),)def forward(self, x):x = self.features(x)x = torch.flatten(x, start_dim=1)x = self.classifier(x)      # output[512, 1, 1]return xclass Classifier(nn.Module):def __init__(self, num_classe=1000):super(Classifier, self).__init__()self.FC = nn.Sequential(nn.Linear(512 * 1 * 1, 128),nn.ReLU(inplace=True),nn.Linear(128, num_classe),)def forward(self, x1=None, x2=None):if x1 != None and x2 != None:x = x1.add(x2)x = self.FC(x)# print("x1 add x2  ")elif x1 != None and x2 == None:x = self.FC(x1)# print("only x1  ")elif x1 == None and x2 != None:x = self.FC(x2)# print("only x2  ")else:print("Alexnet_Con has wrong")return xdef resnet18(num_classes=1000, include_top=True):# https://download.pytorch.org/models/resnet34-333f7ec4.pthreturn ResNet(BasicBlock, [2, 2, 2, 2], num_classes=num_classes, include_top=include_top)def resnet34(num_classes=1000, include_top=True):# https://download.pytorch.org/models/resnet34-333f7ec4.pthreturn ResNet(BasicBlock, [3, 4, 6, 3], num_classes=num_classes, include_top=include_top)def resnet50(num_classes=1000, include_top=True):# https://download.pytorch.org/models/resnet50-19c8e357.pthreturn ResNet(Bottleneck, [3, 4, 6, 3], num_classes=num_classes, include_top=include_top)
function.py文件:
# -*- coding:utf-8 -*-
# @Time : 2023-01-11 20:25
# @Author : DaFuChen
# @File : CSDN写作代码笔记
# @software: PyCharmimport xlwtdef writer_into_excel_onlyval(excel_path,loss_train_list, acc_train_list, val_acc_list,dataset_name:str=""):workbook = xlwt.Workbook(encoding='utf-8')  # 设置一个workbook,其编码是utf-8worksheet = workbook.add_sheet("sheet1", cell_overwrite_ok=True)  # 新增一个sheetworksheet.write(0, 0, label='Train_loss')worksheet.write(0, 1, label='Train_acc')worksheet.write(0, 2, label='Val_acc')for i in range(len(loss_train_list)):  # 循环将a和b列表的数据插入至excelworksheet.write(i + 1, 0, label=loss_train_list[i])  # 切片的原来是传进来的Imgs是一个路径的信息worksheet.write(i + 1, 1, label=acc_train_list[i])worksheet.write(i + 1, 2, label=val_acc_list[i])workbook.save(excel_path + str(dataset_name) +".xls")  # 这里save需要特别注意,文件格式只能是xls,不能是xlsx,不然会报错print('save success!   .')
parameters.py文件:
# -*- coding:utf-8 -*-
# @Time : 2023-01-11 20:25
# @Author : DaFuChen
# @File : CSDN写作代码笔记
# @software: PyCharm# 训练的次数
epoch = 2# 训练的批次大小
batch_size = 1024# 数据集的分类类别数量
CIFAR100_class = 100# 模型训练时候的学习率大小
resnet_lr = 0.002# 保存模型权重的路径 保存xml文件的路径
resnet_save_path_CIFAR100 = './res/'
resnet_save_model = './res/best_model.pth'
其中部分参数,例如是学习率的大小,训练的批次大小,数据增强的一些小参数,可以根据自己的经验和算力的现实情况进行调整。
如果对你有用的话,希望能够点赞支持一下,这样我就能有更多的动力更新更多的学习笔记了。😄😄
