Diffusers
A library that offers an implementation of various diffusion models, including text-to-image models.
提供不同扩散模型的实现的库,代码上最简洁,国内的问题是 huggingface 需要翻墙。
Transformers
A Hugging Face library that provides pre-trained deep learning models for natural language processing tasks.
提供了预训练深度学习模型,
Accelerate
This library, also from Hugging Face, simplifies the execution of deep learning models on multiple devices, such as multiple CPUs, GPUs, or even TPUs.
加速库,可以针对不同硬件CPUs, GPUs,TPUs 加快执行模型速度
Invisible_watermark
A package that allows embedding invisible watermarks in images. It is not used directly in the code shown, but could be useful for marking generated images.
不可见水印,可以给生成的图片加水印
Mediapy
A library that allows you to display and manipulate images and videos in a Jupyter notebook.
Pipelines
Pipelines provide a simple way to run state-of-the-art diffusion models in inference. Most diffusion systems consist of multiple independently-trained models and highly adaptable scheduler components - all of which are needed to have a functioning end-to-end diffusion system.
列如, Stable Diffusion 由3个独立的预训练模型组成
- Conditional Unet
- CLIP text encoder
- a scheduler component, scheduler,
- a CLIPFeatureExtractor,
- as well as a safety checker. All of these components are necessary to run stable diffusion in inference even though they were trained or created independently from each other.
Stable diffusion using Hugging Face
最简单的调用
from diffusers import StableDiffusionPipelinepipe = StableDiffusionPipeline.from_pretrained('CompVis/stable-diffusion-v1-4').to('cuda')# Initialize a prompt
prompt = "a dog wearing hat"# Pass the prompt in the pipeline
pipe(prompt).images[0]
理解核心模块
上面的文生图流程就是使用的扩散模型(diffusion models), Stable diffusion 模型是潜扩散模型(Latent Diffusion Model, LDM)。具体概念参考:深入浅出讲解Stable Diffusion原理,新手也能看明白 - 知乎
在latent diffusion里有3个重要的部分
- A text encoder 文本编码器, in this case, a CLIP Text encoder
- An autoencoder, in this case, a 变分自编码器(Variational Auto Encoder)也叫 VAE
- A U-Net
CLIP Text Encoder
概念
CLIP(Contrastive Language–Image Pre-training) 基于对比学习的语言-图像预训练,它将文本作为输入,并将输出的结果向量存储在 embedding 属性中。CLIP 模型可以把图像和文本,嵌入到相同的潜在特征空间 (latent space)。

任何机器模型都无法识别自然语言,需要将自然语言转换成一堆它能理解的数字,也叫embeddings,这个转换的过程可以分为2步
1. Tokenizer - 将文字(字词)切割,并使用lookup表来转换成数字
2. Token_To_Embedding Encoder - Converting those numerical sub-words into a representation that contains the representation of that text
代码
import torch, logging
## disable warnings
logging.disable(logging.WARNING)
## Import the CLIP artifacts
from transformers import CLIPTextModel, CLIPTokenizer
## Initiating tokenizer and encoder.
tokenizer = CLIPTokenizer.from_pretrained("openai/clip-vit-large-patch14", torch_dtype=torch.float16)
text_encoder = CLIPTextModel.from_pretrained("openai/clip-vit-large-patch14", torch_dtype=torch.float16).to("cuda")prompt = ["a dog wearing hat"]
tok =tokenizer(prompt, padding="max_length", max_length=tokenizer.model_max_length, truncation=True, return_tensors="pt")
print(tok.input_ids.shape)
tok
tokenizer 返回字典里有2个对象
1. input_ids -
A tensor of size 1x77 as one prompt was passed and padded to 77 max length. 49406 表示起始 token, 320 是 “a”, 1929 是 dog, 3309 是 wearing, 3801 是 hat, 49407 is the end of text token repeated till the pad length of 77.
2. attention_mask - 1 representing an embedded value and 0 representing padding.
for token in list(tok.input_ids[0,:7]): print(f"{token}:{tokenizer.convert_ids_to_tokens(int(token))}")
接着看Token_To_Embedding Encoder,它将 input_ids 转换成 embeddings
emb = text_encoder(tok.input_ids.to("cuda"))[0].half()
print(f"Shape of embedding : {emb.shape}")
emb
从中可以看出, 每个1x77 的 tokenized 输入被转换成 1x77x768 纬度的 embedding. 由此可见,每个输入的单词被转换成 768-dimensional 空间.
在Stable diffusion pipeline的表现
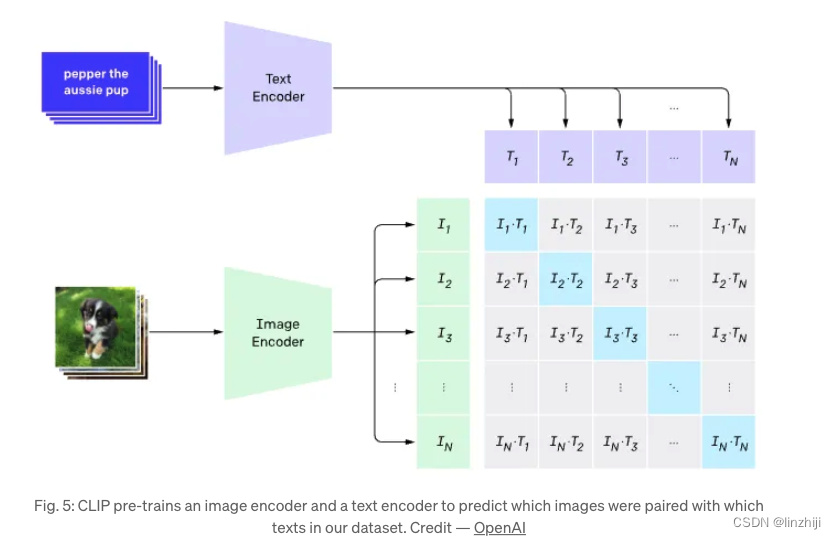
Stable diffusion 使用CLIP trained encoder 转换输入的文字,它成为U-net.的一个输入源。从另外一个方面来说,CLIP使用图片encoder和文字encoder,生成了在 latent space里相似的embeddings,这种相似更精确的定义是Contrastive objective。
VAE — Variational Auto Encoder变分自编码器
概念

autoencoder 包含2个部分
1. Encoder takes an image as input and converts it into a low dimensional latent representation
2. Decoder takes the latent representation and converts it back into an image
从图中可见,Encoder像粉碎机直接将图粉碎成几个碎片,decoder 又从碎片整合出原图
代码
## To import an image from a URL
from fastdownload import FastDownload
## Imaging  library
from PIL import Image
from torchvision import transforms as tfms
## Basic libraries
import numpy as np
import matplotlib.pyplot as plt
%matplotlib inline
## Loading a VAE model
from diffusers import AutoencoderKL
vae = AutoencoderKL.from_pretrained("CompVis/stable-diffusion-v1-4", subfolder="vae", torch_dtype=torch.float16).to("cuda")
def load_image(p):'''     Function to load images from a defined path     '''    return Image.open(p).convert('RGB').resize((512,512))
def pil_to_latents(image):'''     Function to convert image to latents     '''     init_image = tfms.ToTensor()(image).unsqueeze(0) * 2.0 - 1.0   init_image = init_image.to(device="cuda", dtype=torch.float16)init_latent_dist = vae.encode(init_image).latent_dist.sample() * 0.18215     return init_latent_dist
def latents_to_pil(latents):     '''     Function to convert latents to images     '''     latents = (1 / 0.18215) * latents     with torch.no_grad():         image = vae.decode(latents).sample     image = (image / 2 + 0.5).clamp(0, 1)     image = image.detach().cpu().permute(0, 2, 3, 1).numpy()      images = (image * 255).round().astype("uint8")     pil_images = [Image.fromarray(image) for image in images]        return pil_images
p = FastDownload().download('https://lafeber.com/pet-birds/wp-content/uploads/2018/06/Scarlet-Macaw-2.jpg')
img = load_image(p)
print(f"Dimension of this image: {np.array(img).shape}")
img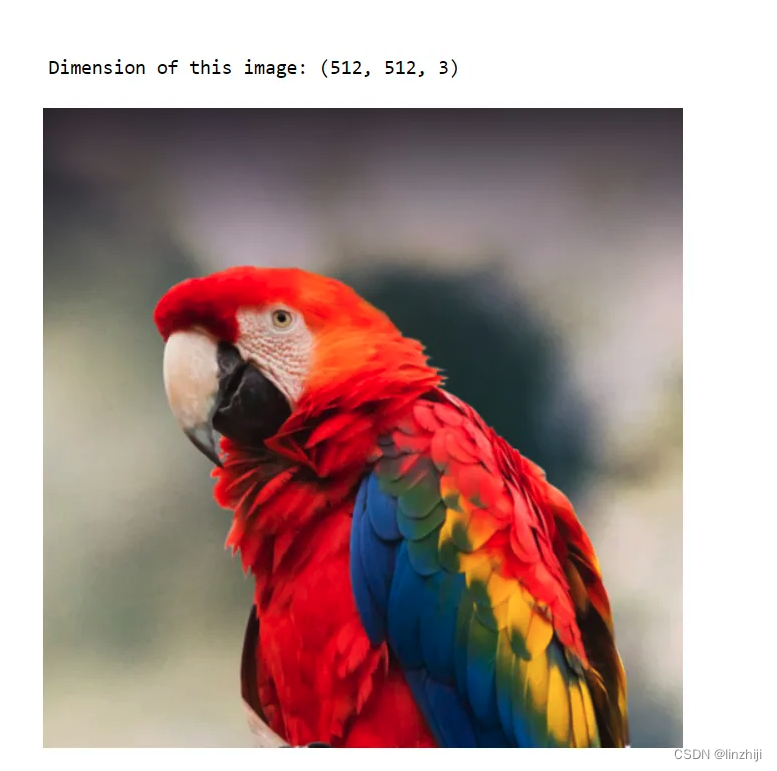
开始使用 VAE encoder 压缩图片
latent_img = pil_to_latents(img)
print(f"Dimension of this latent representation: {latent_img.shape}")
我们可以看到VAE 压缩一个 3 x 512 x 512 纬度的图片到 4 x 64 x 64 图片,压缩比例有48x,可以看看4通道的latent表现
fig, axs = plt.subplots(1, 4, figsize=(16, 4))
for c in range(4):axs[c].imshow(latent_img[0][c].detach().cpu(), cmap='Greys')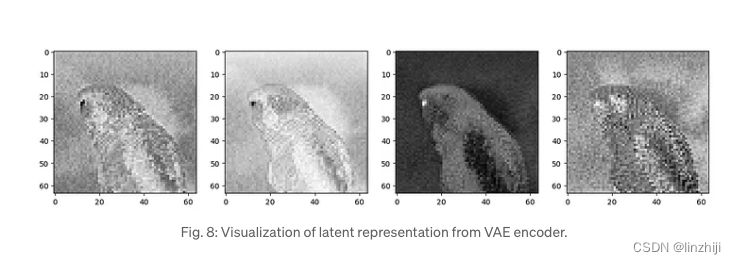
理论上从这四张图中能得到原图的很多信息,接着我们用 decoder来往回解压缩。
decoded_img = latents_to_pil(latent_img)
decoded_img[0]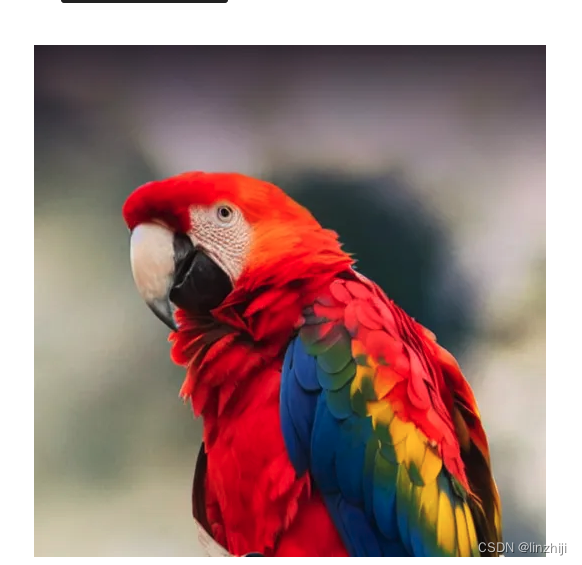
从中我们可以看出VAE decoder 可以从48x compressed latent representation 还原原图。
注意2张图里的眼镜,其实有细微差别,整个流程不是无损的
在Stable diffusion pipeline 里扮演的角色
没有 VAE 加入, Stable diffusion 也能完整使用,使用VAE能减少生成高清图的计算量。 The latent diffusion models can perform diffusion in this latent space produced by the VAE encoder and once we have our desired latent outputs produced by the diffusion process, we can convert them back to the high-resolution image by using the VAE decoder. To get a better intuitive understanding of Variation Autoencoders and how they are trained, read this blog by Irhum Shafkat.
U-Net model
概念
U-Net model 有2个输入
1. Noisy latent or Noise- Noisy latents are latents produced by a VAE encoder (in case an initial image is provided) with added noise or it can take pure noise input in case we want to create a random new image based solely on a textual description
2. Text embeddings - CLIP-based embedding generated by input textual prompts
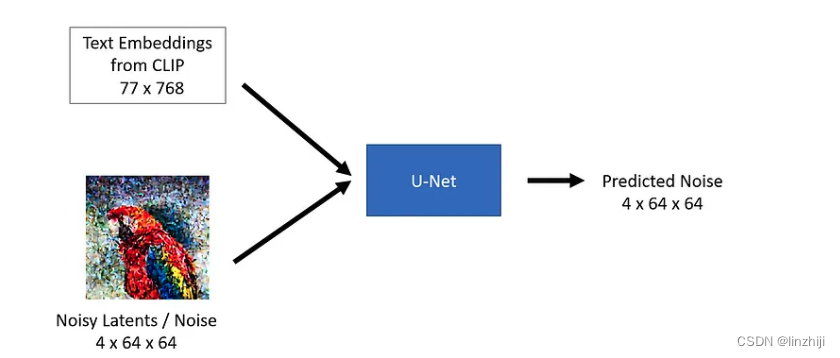
U-Net model 的输出是可预测的 noise residual which the input noisy latent contains. In other words, it predicts the noise which is subtracted from the noisy latents to return the original de-noised latents.
代码
from diffusers import UNet2DConditionModel, LMSDiscreteScheduler
## Initializing a scheduler
scheduler = LMSDiscreteScheduler(beta_start=0.00085, beta_end=0.012, beta_schedule="scaled_linear", num_train_timesteps=1000)
## Setting number of sampling steps
scheduler.set_timesteps(51)
## Initializing the U-Net model
unet = UNet2DConditionModel.from_pretrained("CompVis/stable-diffusion-v1-4", subfolder="unet", torch_dtype=torch.float16).to("cuda")
代码里 imported unet 也加入了 scheduler 。scheduler是用来确认指定diffusion 处理过程中指定步骤加入多少 noise latent

从图中可以看出,diffusion 处理中,一开始noise比较高或许逐步降低
noise = torch.randn_like(latent_img) # Random noise
fig, axs = plt.subplots(2, 3, figsize=(16, 12))
for c, sampling_step in enumerate(range(0,51,10)):encoded_and_noised = scheduler.add_noise(latent_img, noise, timesteps=torch.tensor([scheduler.timesteps[sampling_step]]))axs[c//3][c%3].imshow(latents_to_pil(encoded_and_noised)[0])axs[c//3][c%3].set_title(f"Step - {sampling_step}")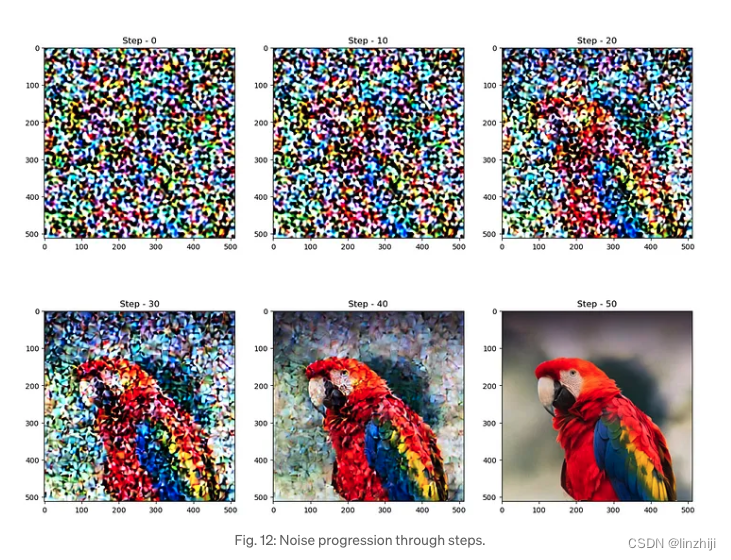
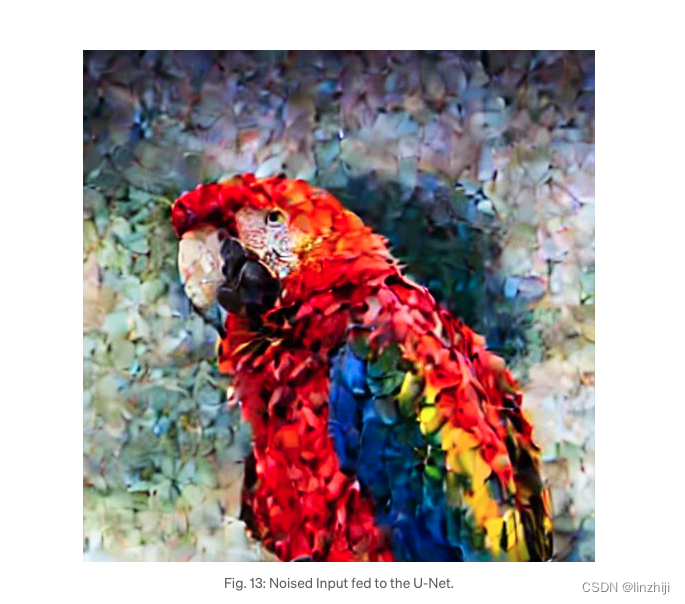
让我们看看 U-Net 如何从图片中去除noise。先加入些noise
encoded_and_noised = scheduler.add_noise(latent_img, noise, timesteps=torch.tensor([scheduler.timesteps[40]])) latents_to_pil(encoded_and_noised)[0]
跑个 U-Net 并试着去噪
## Unconditional textual prompt
prompt = [""]
## Using clip model to get embeddings
text_input = tokenizer(prompt, padding="max_length", max_length=tokenizer.model_max_length, truncation=True, return_tensors="pt")
with torch.no_grad(): text_embeddings = text_encoder(text_input.input_ids.to("cuda"))[0]## Using U-Net to predict noise
latent_model_input = torch.cat([encoded_and_noised.to("cuda").float()]).half()
with torch.no_grad():noise_pred = unet(latent_model_input,40,encoder_hidden_states=text_embeddings)["sample"]
## Visualize after subtracting noise
latents_to_pil(encoded_and_noised- noise_pred)[0]
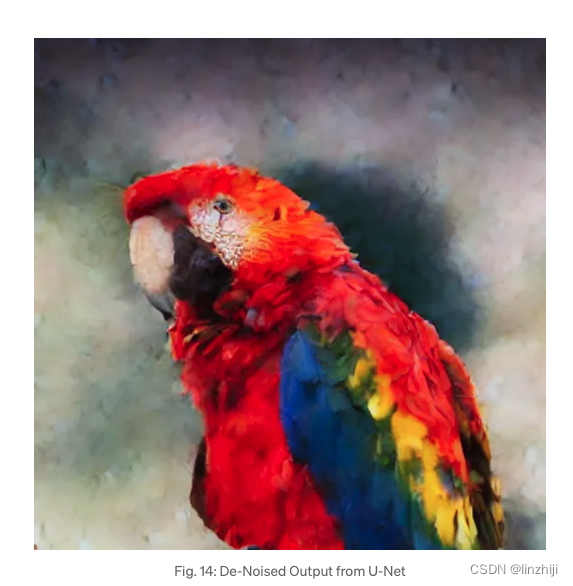
如上图,噪声已经去掉了不少
扮演的角色
Latent diffusion 在 latent 空间里使用 U-Net 逐步的降噪以达到预期的效果。在每一步中,加入到latents 的 noise 数量将会达到最总的降噪输出。 U-Net 最早是由 this paper 提出的。U-Net 由encoder 和 decoder ,组合成 ResNet blocks。The stable diffusion U-Net also has cross-attention layers to provide them with the ability to condition(影响) the output based on the 输入的文字。 The Cross-attention layers are added to both the encoder and the decoder part of the U-Net usually between ResNet blocks. You can learn more about this U-Net architecture here.
组合
我们将试着将 CLIP text encoder, VAE, and U-Net 三者一起组合,看看如何走通文生图流程
回顾The Diffusion Process
stable diffusion mode 需要文字输入和seed。文字输入通过CLIP转换成 77*768 的数组,seed用来生成高斯噪音(4x64x64),它将会成为第一个latent image representation.
Note — You will notice that there is an additional dimension mentioned (1x) in the image like 1x77x768 for text embedding, that is because it represents the batch size of 1.

Next, the U-Net iteratively denoises(降噪) the random latent image representations while conditioning(训练) on the text embeddings. The output of the U-Net is predicted(预测) noise residual(剩余), which is then used to compute conditioned(影响) latents via a scheduler algorithm. This process of denoising and text conditioning is repeated N times (We will use 50) to retrieve a better latent image representation.
Once this process is complete, the latent image representation (4x64x64) is decoded by the VAE decoder to retrieve the final output image (3x512x512).
Note — This iterative denoising is an important step for getting a good output image. Typical steps are in the range of 30–80. However, there are recent papers that claim to reduce it to 4–5 steps by using distillation techniques.
代码
import torch, logging
## disable warnings
logging.disable(logging.WARNING)
## Imaging  library
from PIL import Image
from torchvision import transforms as tfms
## Basic libraries
import numpy as np
from tqdm.auto import tqdm
import matplotlib.pyplot as plt
%matplotlib inline
from IPython.display import display
import shutil
import os
## For video display
from IPython.display import HTML
from base64 import b64encode## Import the CLIP artifacts
from transformers import CLIPTextModel, CLIPTokenizer
from diffusers import AutoencoderKL, UNet2DConditionModel, LMSDiscreteScheduler
## Initiating tokenizer and encoder.
tokenizer = CLIPTokenizer.from_pretrained("openai/clip-vit-large-patch14", torch_dtype=torch.float16)
text_encoder = CLIPTextModel.from_pretrained("openai/clip-vit-large-patch14", torch_dtype=torch.float16).to("cuda")
## Initiating the VAE
vae = AutoencoderKL.from_pretrained("CompVis/stable-diffusion-v1-4", subfolder="vae", torch_dtype=torch.float16).to("cuda")
## Initializing a scheduler and Setting number of sampling steps
scheduler = LMSDiscreteScheduler(beta_start=0.00085, beta_end=0.012, beta_schedule="scaled_linear", num_train_timesteps=1000)
scheduler.set_timesteps(50)
## Initializing the U-Net model
unet = UNet2DConditionModel.from_pretrained("CompVis/stable-diffusion-v1-4", subfolder="unet", torch_dtype=torch.float16).to("cuda")
## Helper functions
def load_image(p):'''Function to load images from a defined path'''return Image.open(p).convert('RGB').resize((512,512))
def pil_to_latents(image):'''Function to convert image to latents'''init_image = tfms.ToTensor()(image).unsqueeze(0) * 2.0 - 1.0init_image = init_image.to(device="cuda", dtype=torch.float16) init_latent_dist = vae.encode(init_image).latent_dist.sample() * 0.18215return init_latent_dist
def latents_to_pil(latents):'''Function to convert latents to images'''latents = (1 / 0.18215) * latentswith torch.no_grad():image = vae.decode(latents).sampleimage = (image / 2 + 0.5).clamp(0, 1)image = image.detach().cpu().permute(0, 2, 3, 1).numpy()images = (image * 255).round().astype("uint8")pil_images = [Image.fromarray(image) for image in images]return pil_images
def text_enc(prompts, maxlen=None):'''A function to take a texual promt and convert it into embeddings'''if maxlen is None: maxlen = tokenizer.model_max_lengthinp = tokenizer(prompts, padding="max_length", max_length=maxlen, truncation=True, return_tensors="pt") return text_encoder(inp.input_ids.to("cuda"))[0].half()后续代码是StableDiffusionPipeline.from_pretrained 简化版本,主要展示过程
def prompt_2_img(prompts, g=7.5, seed=100, steps=70, dim=512, save_int=False):"""Diffusion process to convert prompt to image"""# Defining batch sizebs = len(prompts) # Converting textual prompts to embeddingtext = text_enc(prompts) # Adding an unconditional prompt , helps in the generation processuncond = text_enc([""] * bs, text.shape[1])emb = torch.cat([uncond, text])# Setting the seedif seed: torch.manual_seed(seed)# Initiating random noiselatents = torch.randn((bs, unet.in_channels, dim//8, dim//8))# Setting number of steps in schedulerscheduler.set_timesteps(steps)# Adding noise to the latents latents = latents.to("cuda").half() * scheduler.init_noise_sigma# Iterating through defined stepsfor i,ts in enumerate(tqdm(scheduler.timesteps)):# We need to scale the i/p latents to match the varianceinp = scheduler.scale_model_input(torch.cat([latents] * 2), ts)# Predicting noise residual using U-Netwith torch.no_grad(): u,t = unet(inp, ts, encoder_hidden_states=emb).sample.chunk(2)# Performing Guidancepred = u + g*(t-u)# Conditioning the latentslatents = scheduler.step(pred, ts, latents).prev_sample# Saving intermediate imagesif save_int: if not os.path.exists(f'./steps'):os.mkdir(f'./steps')latents_to_pil(latents)[0].save(f'steps/{i:04}.jpeg')# Returning the latent representation to output an image of 3x512x512return latents_to_pil(latents)最终使用
images = prompt_2_img(["A dog wearing a hat", "a photograph of an astronaut riding a horse"], save_int=False)
for img in images:display(img)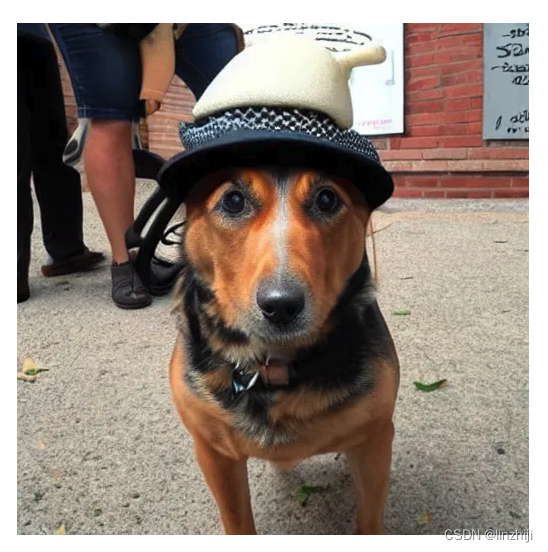

def prompt_2_img(prompts, g=7.5, seed=100, steps=70, dim=512, save_int=False):参数解释
1. prompt - 文字,文生图
2. g or guidance scale - It’s a value that determines how close the image should be to the textual prompt. This is related to a technique called Classifier free guidance which improves the quality of the images generated. The higher the value of the guidance scale, more close it will be to the textual prompt
3. seed - This sets the seed from which the initial Gaussian noisy latents are generated
4. steps - Number of de-noising steps taken for generating the final latents.
5. dim - dimension of the image, for simplicity we are currently generating square images, so only one value is needed
6. save_int - This is optional, a boolean flag, if we want to save intermediate latent images, helps in visualization.
也可以参考的webui里的界面

可视化整个过程
参考
https://towardsdatascience.com/stable-diffusion-using-hugging-face-501d8dbdd8
https://huggingface.co/blog/stable_diffusion