对话模块主要参考 【Unity教程】剧情对话系统 实现。
在这次模块的构建将基于 unity ui 组件 和 C#代码实现一个从excel 文件中按照相应规则读取数据并展示的逻辑。这套代码不仅能实现正常的对话,也实现了对话中可以通过选择不同选项达到不同效果的分支对话功能。
整一套代码分为分为两部分,一部分和库存模块一样通过 Collider 2D 和 Unity Event 构建了一个范围内可互动的功能,这一部分可以参考之前的库存模块。
剩下一部分就是对话框模块整体逻辑,先看一下效果:
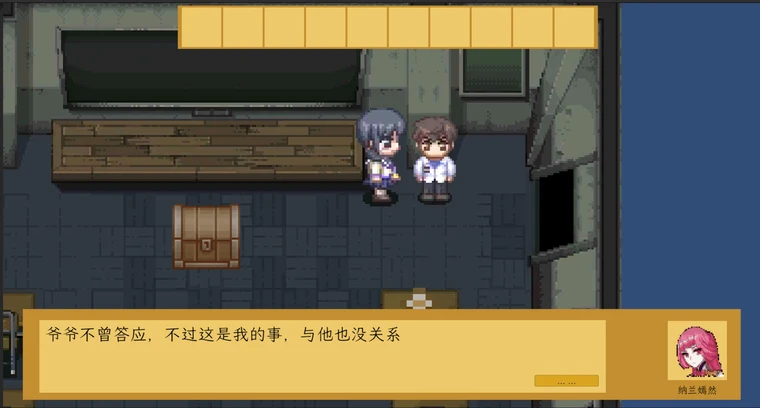

从上图中,可以看出整个对话框可以分为五个部分:头像、说话人名字、普通对话内容、跳转到下一句的按钮、和 选择对话框。可以简单将 普通对话内容和跳转按钮 划分成一个逻辑组件,而选择对话框划分成另一个逻辑组件,这样划分的原因在于两者实现方式不一样。
接下来内容将分为三个段落,我将自下而上一一实现:从Excel中读取对话内容的方式、普通对话实现 和 选择对话 这三个步骤:
从Excel中读取对话内容的方式
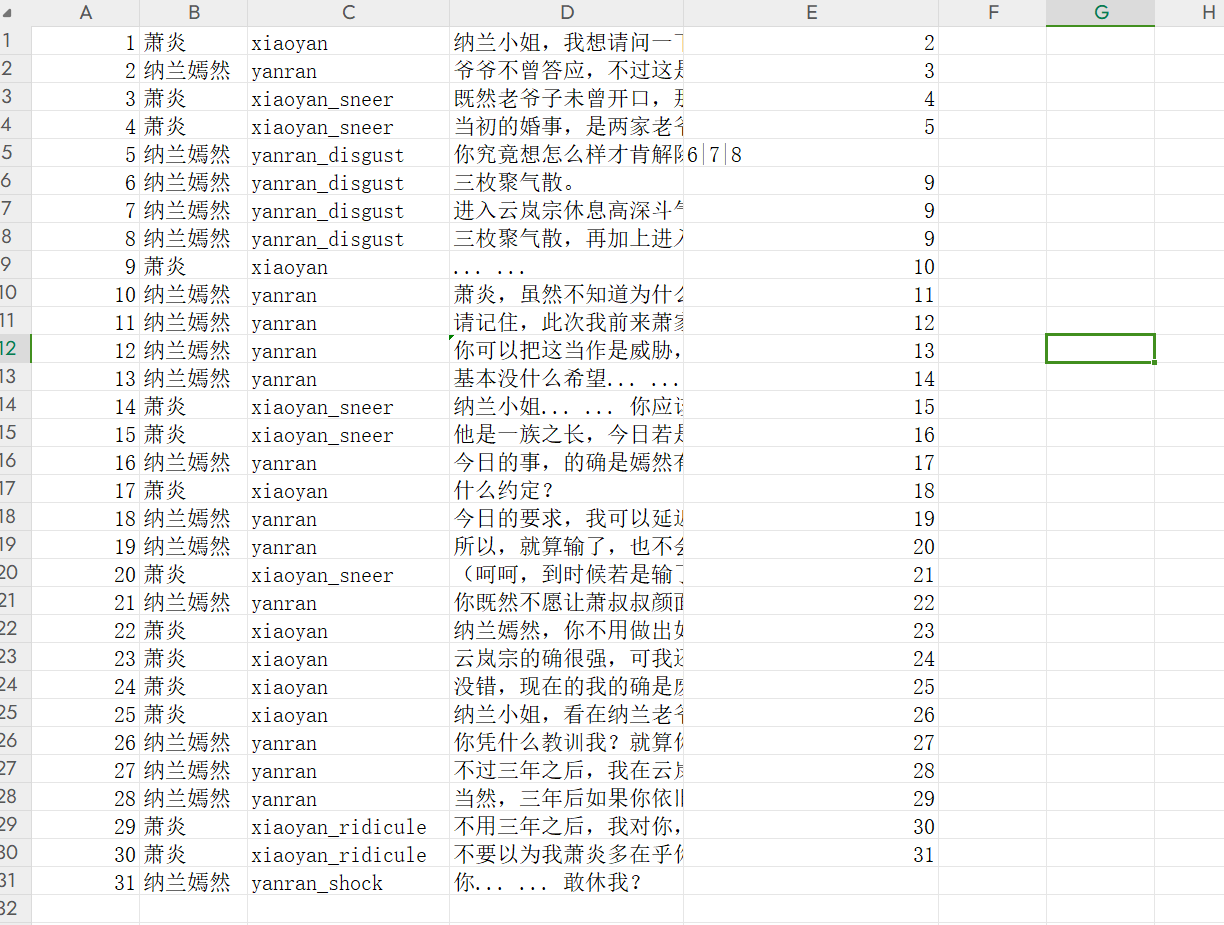
整一个Excel的内容分为了五个部分,如下图所述,分别是、
对话的id,用来快速定位到一个对话类,可以方便我们进行查找和使用
说话人的名字,用来展示在 对话框中的UI组件
说话人的头像,也是用来展示在对话框中的 UI 和 名字不同的是他是代表一个文件的路径
对话内容,用来展示在 对话框中的UI组件
下一句对话id,用来做跳转使用
定义好具体数据的Excel之后,需要将Excel导出成Unity可以识别的编码格式,否则在Unity中会被识别成乱码(这一步可以通过 txt 文本另存为的方式进行变更)。将另存为的文本保存在unity 项目中的 Assets/Resources/Dialogue/路径下,以便项目能够读取到。

接下来,在C#中定义一个对应的class,用来接住Excel读取出的数据,并在C#中通过Resources.Load的方法来读取。Resoruces.Load的方法会将整个文本以 string的方式进行读取,所以还需要对每一行文本进行拆分,才能处理成我们需要的对话类。最终,将 对话 id 和 对话实体保存到一个 dictionary里,方便后面的步骤进行调用。
// 对话类class Dialogue{public int dialogueId;public string characterName;public string characterIcon;public string dialogue;public List<int> toDialogueIdList;public Dialogue(int dialogueId, string characterName, string characterIcon, string dialogue, List<int> toDialogueIdList){this.dialogueId = dialogueId;this.characterName = characterName;this.characterIcon = characterIcon;this.dialogue = dialogue;this.toDialogueIdList = toDialogueIdList;}}//public void eventDialogueFileProcess(int eventId){ // 文件处理成 对话 id 和 对话对象 的映射dialogueDictionary.Clear();string filePath = dialogueFilePrefix + eventId;TextAsset textFile = Resources.Load<TextAsset>(filePath);processDialogueFile(textFile); }private void processDialogueFile(TextAsset dialogueFile){string[] dialogueArrays = dialogueFile.text.Split("\r\n");foreach(string strDialogue in dialogueArrays){if(string.IsNullOrEmpty(strDialogue)){continue;}string[] cols = strDialogue.Split(',');string[] strToDialogueIds = cols[4].Split('|');List<int> toDialogueIdList = new List<int>();foreach(string strToDialogueId in strToDialogueIds){ if(string.IsNullOrEmpty(strToDialogueId)){break;}Debug.Log(strToDialogueId);toDialogueIdList.Add(int.Parse(strToDialogueId));}Dialogue dialogue = new Dialogue(int.Parse(cols[0]), cols[1], cols[2], cols[3], toDialogueIdList);dialogueDictionary.Add(dialogue.dialogueId, dialogue);}}普通对话实现
普通对话实现的主要方式就是将当前对话的 id 保存为一个成员对象,这样在触发按钮的点击事件之后,便能通过事件监听的方式调用这个对话id来获取下一段对话。
// 正常对话int nextDialogueId = dialogueIdList[0];if(dialogueDictionary.TryGetValue(nextDialogueId, out Dialogue dialogue)){// 隐藏多选dialogueMutliBG.enabled = false;// 显示正常对话dialogueText.enabled = true;nextButton.gameObject.SetActive(true);characterIcon.sprite = Resources.Load<Sprite>(characterIconPrefix + dialogue.characterIcon);characterName.text = dialogue.characterName;dialogueText.text = dialogue.dialogue;currentDialogueIndex = dialogue.dialogueId; }选择对话
选择对话相比普通对话来说,实现有一些复杂,主要在于需要用C# 的 delegate 代理一个函数,来达成下一步对话的操作。这样做的原因在于选择对话每一个对话都会有一个下一个对话的选项,导致没有办法直接使用普通对话定义的当前对话id变量。
// 可选对话选择List<Dialogue> dialogues = new List<Dialogue>();foreach(int index in dialogueIdList){if(dialogueDictionary.TryGetValue(index, out Dialogue dialogue)){dialogues.Add(dialogue);}}// 隐藏正常对话dialogueText.enabled = false;nextButton.gameObject.SetActive(false);// 显示多选dialogueMutliBG.enabled = true;foreach(Dialogue dialogue in dialogues){// 依次生成对话 ButtonoptionButton = Instantiate(optionButton, dialogueMutliBG.transform);TextMeshProUGUI textMeshPro = optionButton.GetComponentInChildren<TextMeshProUGUI>();textMeshPro.text = dialogue.dialogue;// 添加事件监听optionButton.GetComponent<Button>().onClick.AddListener(delegate {// 点完以后 销毁选择对话框Button[] optionalButtons = dialogueMutliBG.GetComponentsInChildren<Button>();foreach(Button button in optionalButtons){Destroy(button.gameObject);}// 显示下一句对话showDialogue(dialogue.toDialogueIdList);});}将这两部分合入一个函数中,通过下一段对话id 的数量进行判断到底是 普通对话还是选择对话,合并后的代码如下:
using System.Collections;
using System.Collections.Generic;
using TMPro;
using UnityEngine;
using UnityEngine.UI;public class DialogueControl : MonoBehaviour
{class Dialogue{public int dialogueId;public string characterName;public string characterIcon;public string dialogue;public List<int> toDialogueIdList;public Dialogue(int dialogueId, string characterName, string characterIcon, string dialogue, List<int> toDialogueIdList){this.dialogueId = dialogueId;this.characterName = characterName;this.characterIcon = characterIcon;this.dialogue = dialogue;this.toDialogueIdList = toDialogueIdList;}}public Image characterIcon;public TextMeshProUGUI characterName;public TextMeshProUGUI dialogueText;private static string dialogueFilePrefix = "Dialogue/event_dialogue_";private static string characterIconPrefix = "Character/";private Dictionary<int, Dialogue> dialogueDictionary = new Dictionary<int, Dialogue>();private int currentDialogueIndex = 1;public Image dialogueMutliBG;public Button optionButton;public Button nextButton;public int lastEvent;// Start is called before the first frame updatevoid Start(){transform.gameObject.SetActive(false);}// Update is called once per framevoid Update(){}public void eventDialogueFileProcess(int eventId){   transform.gameObject.SetActive(true);// 文件处理成 对话 id 和 对话对象 的映射if(!lastEvent.Equals(eventId)){dialogueDictionary.Clear();string filePath = dialogueFilePrefix + eventId;TextAsset textFile = Resources.Load<TextAsset>(filePath);processDialogueFile(textFile);}// 显示第一段对话List<int> dialogueIdList = new List<int>(1);dialogueIdList.Add(1);showDialogue(dialogueIdList);lastEvent = eventId;}private void processDialogueFile(TextAsset dialogueFile){string[] dialogueArrays = dialogueFile.text.Split("\r\n");foreach(string strDialogue in dialogueArrays){if(string.IsNullOrEmpty(strDialogue)){continue;}string[] cols = strDialogue.Split(',');string[] strToDialogueIds = cols[4].Split('|');List<int> toDialogueIdList = new List<int>();foreach(string strToDialogueId in strToDialogueIds){   if(string.IsNullOrEmpty(strToDialogueId)){break;}Debug.Log(strToDialogueId);toDialogueIdList.Add(int.Parse(strToDialogueId));}Dialogue dialogue = new Dialogue(int.Parse(cols[0]), cols[1], cols[2], cols[3], toDialogueIdList);dialogueDictionary.Add(dialogue.dialogueId, dialogue);}}private void showDialogue(List<int> dialogueIdList){if(dialogueIdList.Count == 0){return;}if(dialogueIdList.Count > 1){// 可选对话选择List<Dialogue> dialogues = new List<Dialogue>();foreach(int index in dialogueIdList){if(dialogueDictionary.TryGetValue(index, out Dialogue dialogue)){dialogues.Add(dialogue);}}// 隐藏正常对话dialogueText.enabled = false;nextButton.gameObject.SetActive(false);// 显示多选dialogueMutliBG.enabled = true;foreach(Dialogue dialogue in dialogues){// 依次生成对话 ButtonoptionButton = Instantiate(optionButton, dialogueMutliBG.transform);TextMeshProUGUI textMeshPro = optionButton.GetComponentInChildren<TextMeshProUGUI>();textMeshPro.text = dialogue.dialogue;// 添加事件监听optionButton.GetComponent<Button>().onClick.AddListener(delegate {// 点完以后 销毁选择对话框Button[] optionalButtons = dialogueMutliBG.GetComponentsInChildren<Button>();foreach(Button button in optionalButtons){Destroy(button.gameObject);}// 显示下一句对话showDialogue(dialogue.toDialogueIdList);});}}else {// 正常对话int nextDialogueId = dialogueIdList[0];if(dialogueDictionary.TryGetValue(nextDialogueId, out Dialogue dialogue)){// 隐藏多选dialogueMutliBG.enabled = false;// 显示正常对话dialogueText.enabled = true;nextButton.gameObject.SetActive(true);characterIcon.sprite = Resources.Load<Sprite>(characterIconPrefix + dialogue.characterIcon);characterName.text = dialogue.characterName;dialogueText.text = dialogue.dialogue;currentDialogueIndex = dialogue.dialogueId;}}}public void nextDialogue(){if(dialogueDictionary.TryGetValue(currentDialogueIndex, out Dialogue dialogue)){if(dialogue.toDialogueIdList.Count == 0){transform.gameObject.SetActive(false);nextButton.gameObject.SetActive(false);}showDialogue(dialogue.toDialogueIdList);}}}
来看一下最终效果

![SpringBoot携带Jre绿色部署项目[Linux服务器]](/images/no-images.jpg)

