1.创建新项目
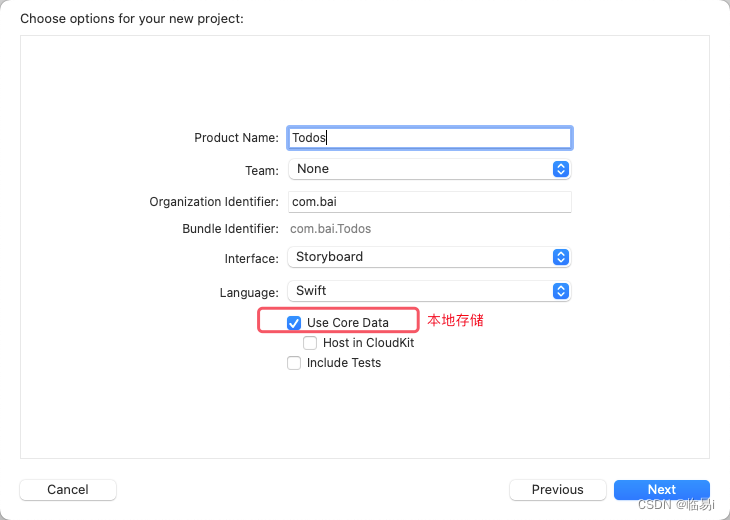
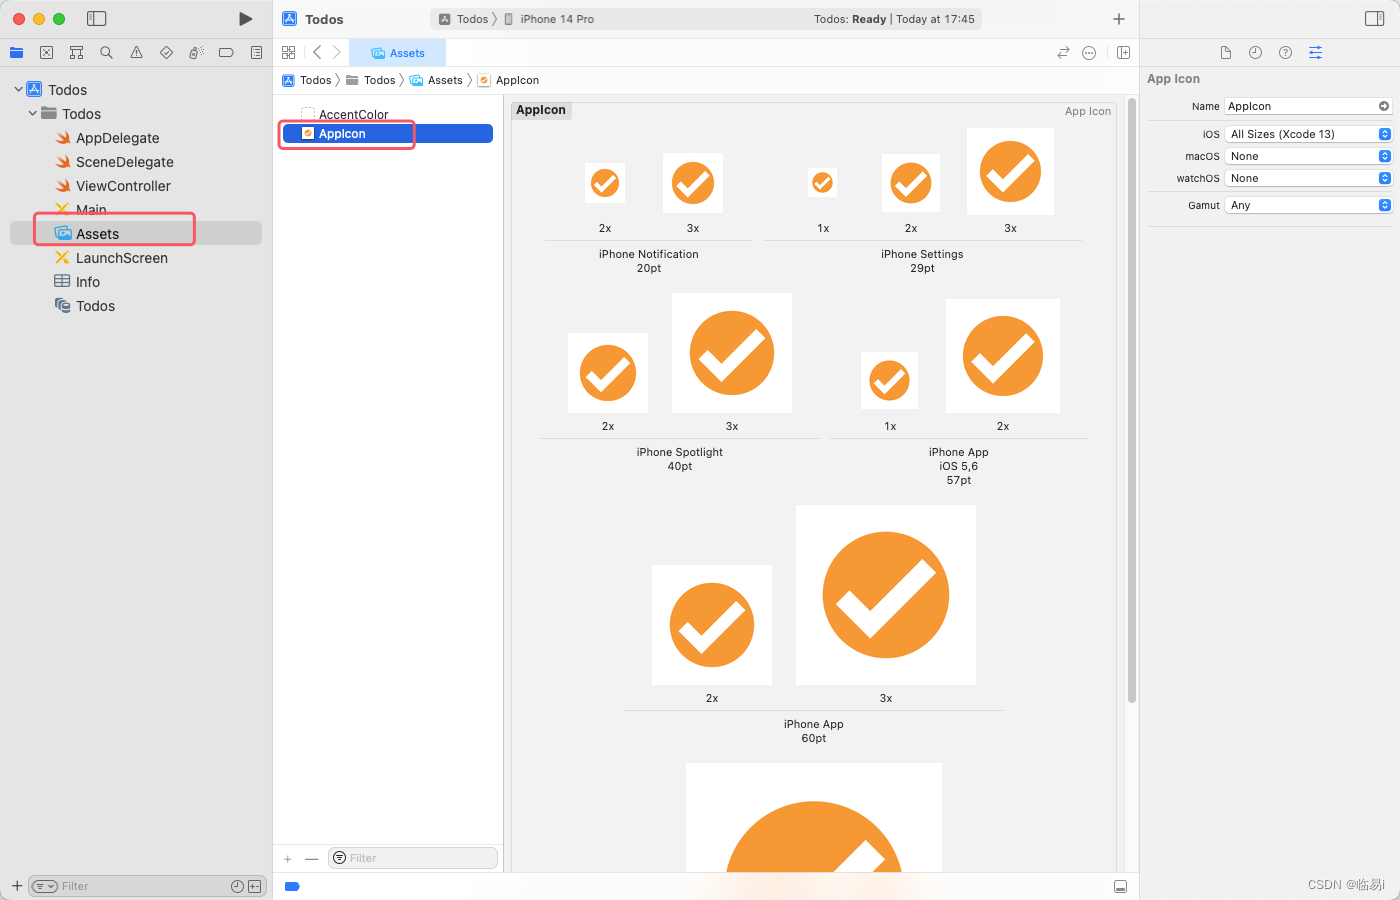
为项目添加图标
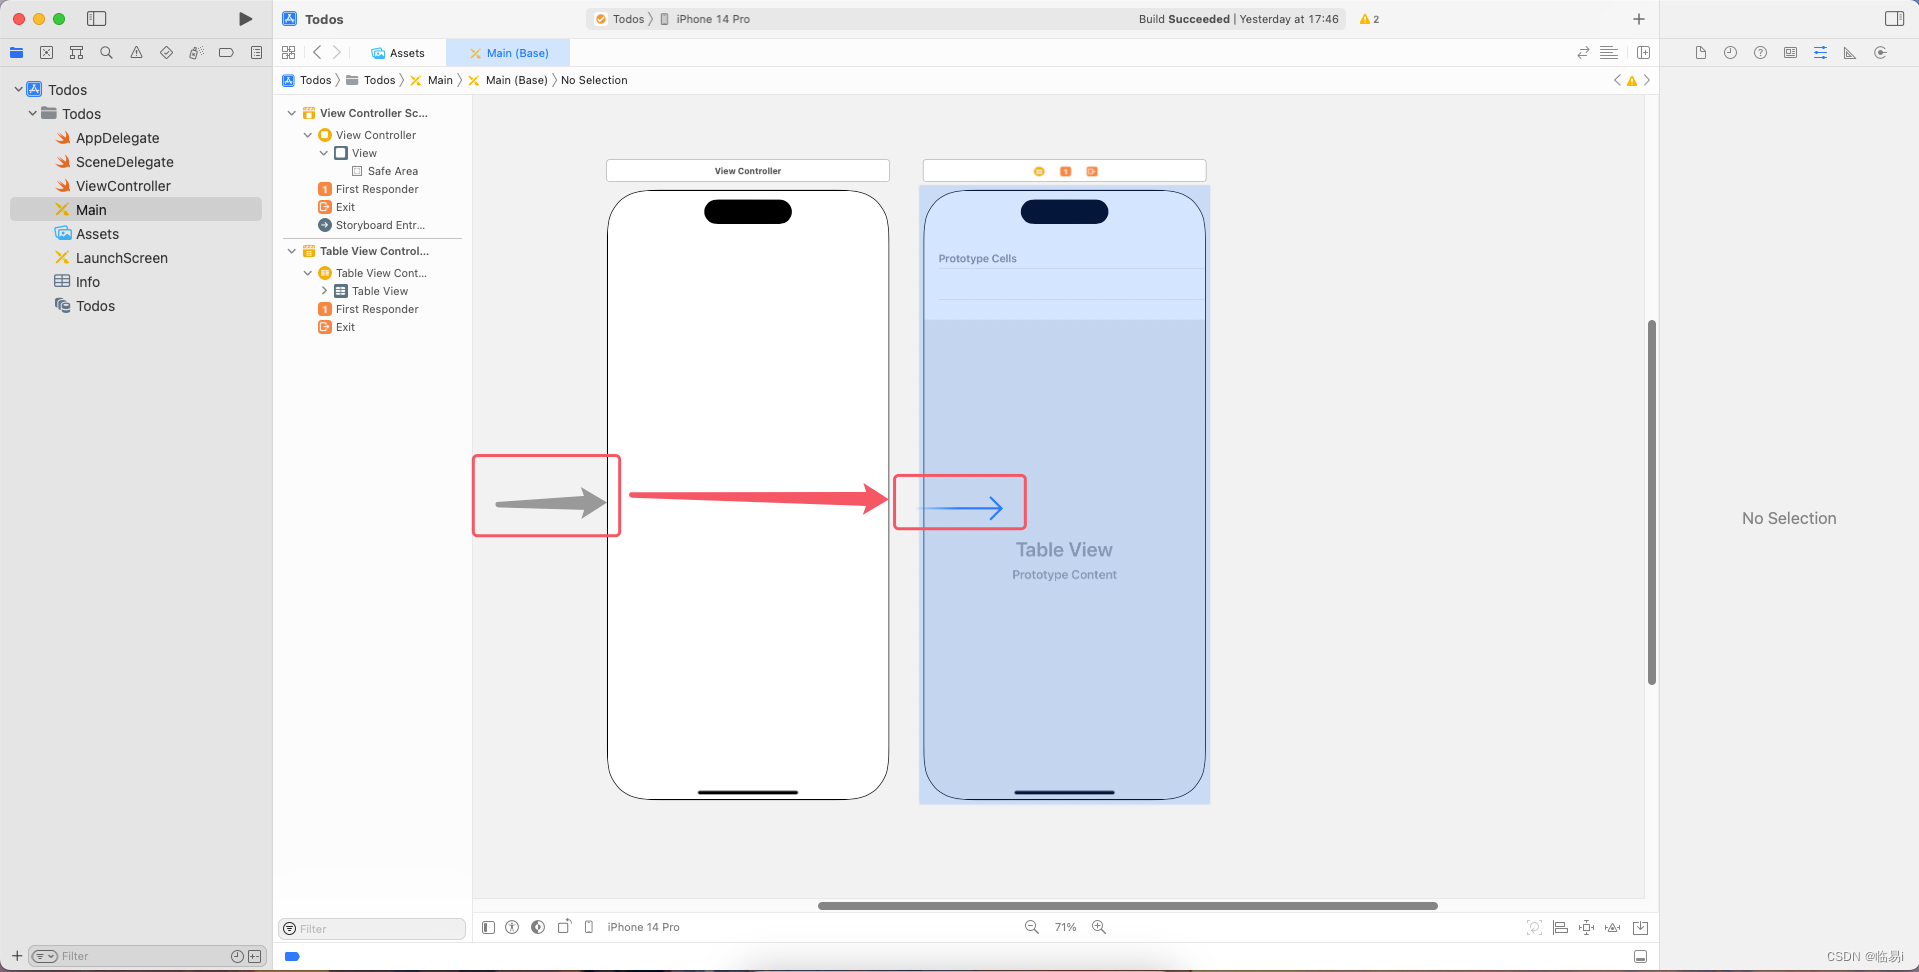
2.将Table View Controller添加到界面中
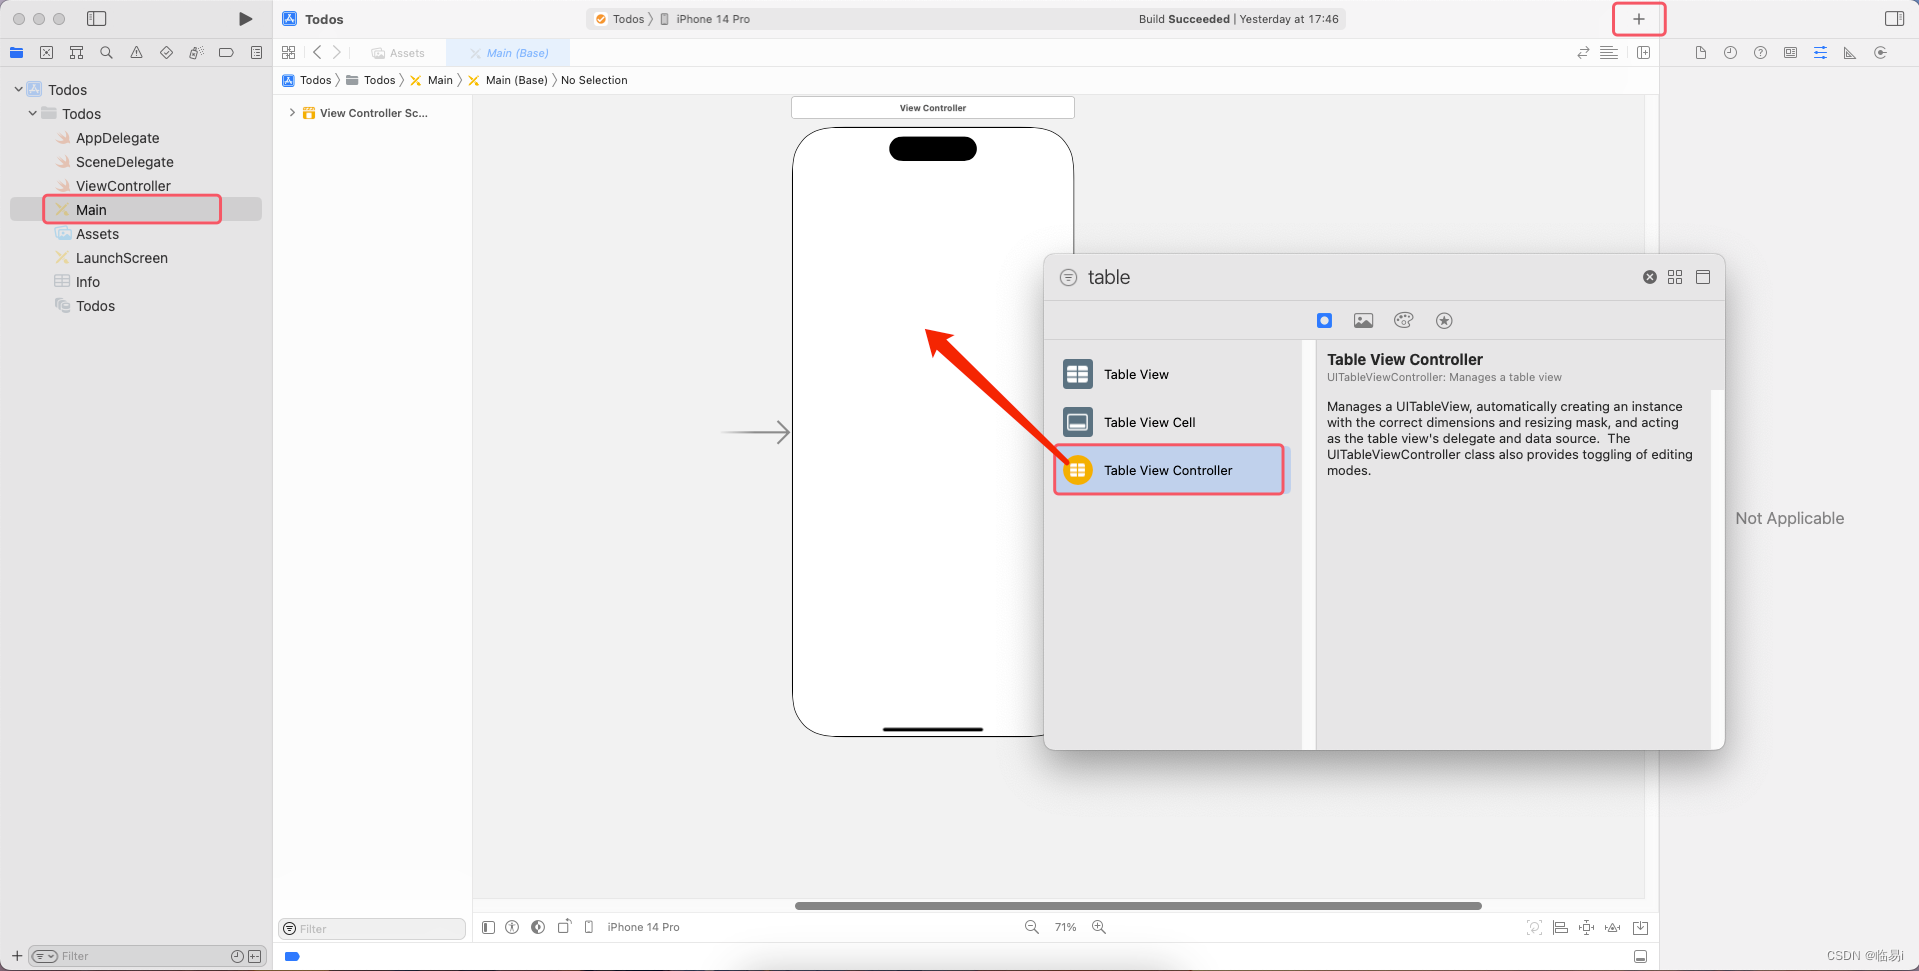
将箭头移动到Table View上来,代表它是首页(根页面).选中ViewController,点击Delete,对它进行删除.将代码ViewController.swift也删除掉.
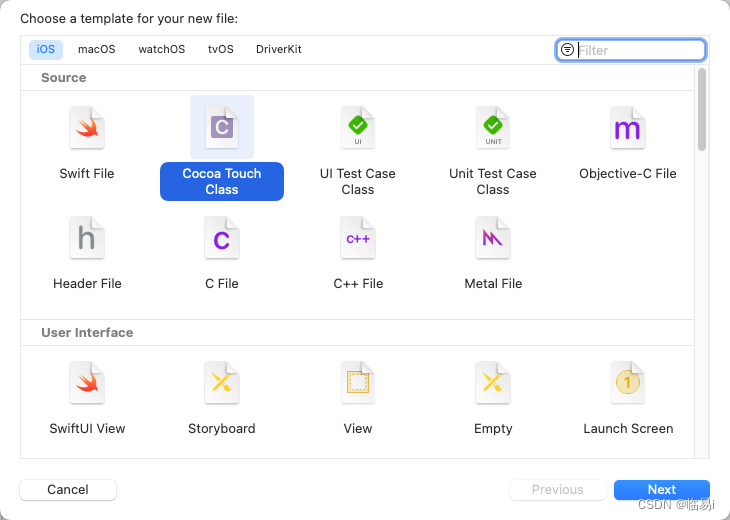
新建一个Cocoa Touch Class.
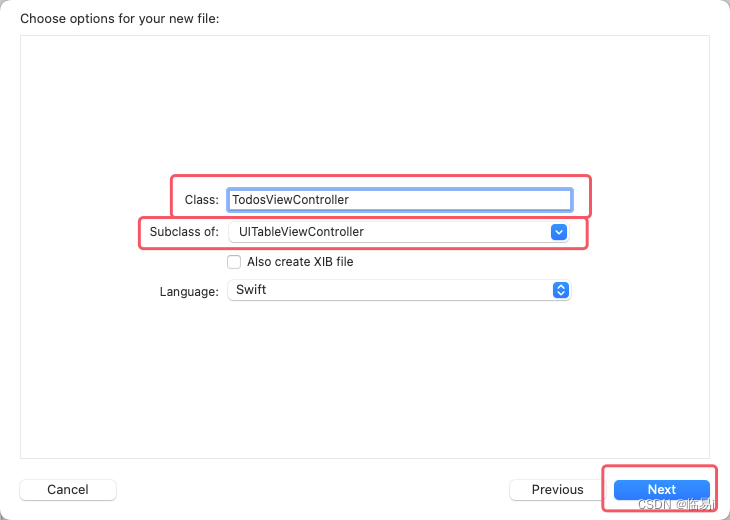
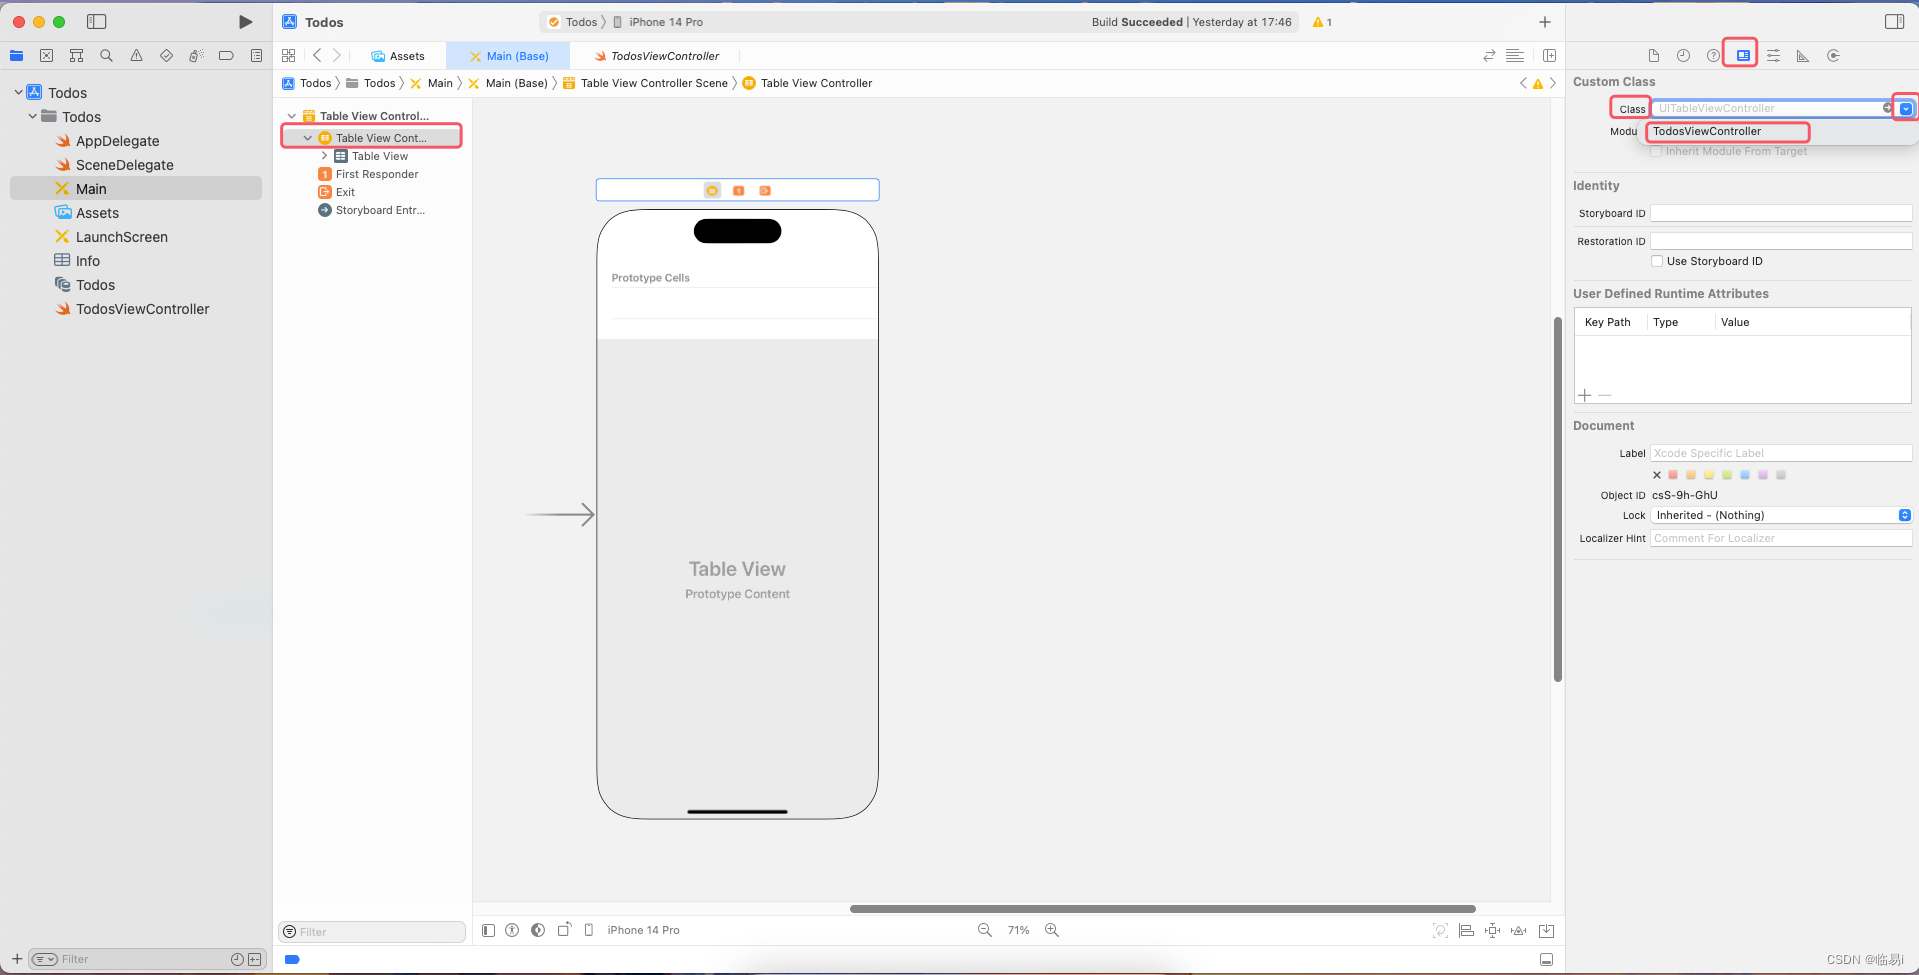
将TableViewController的class设置成TodosViewController.
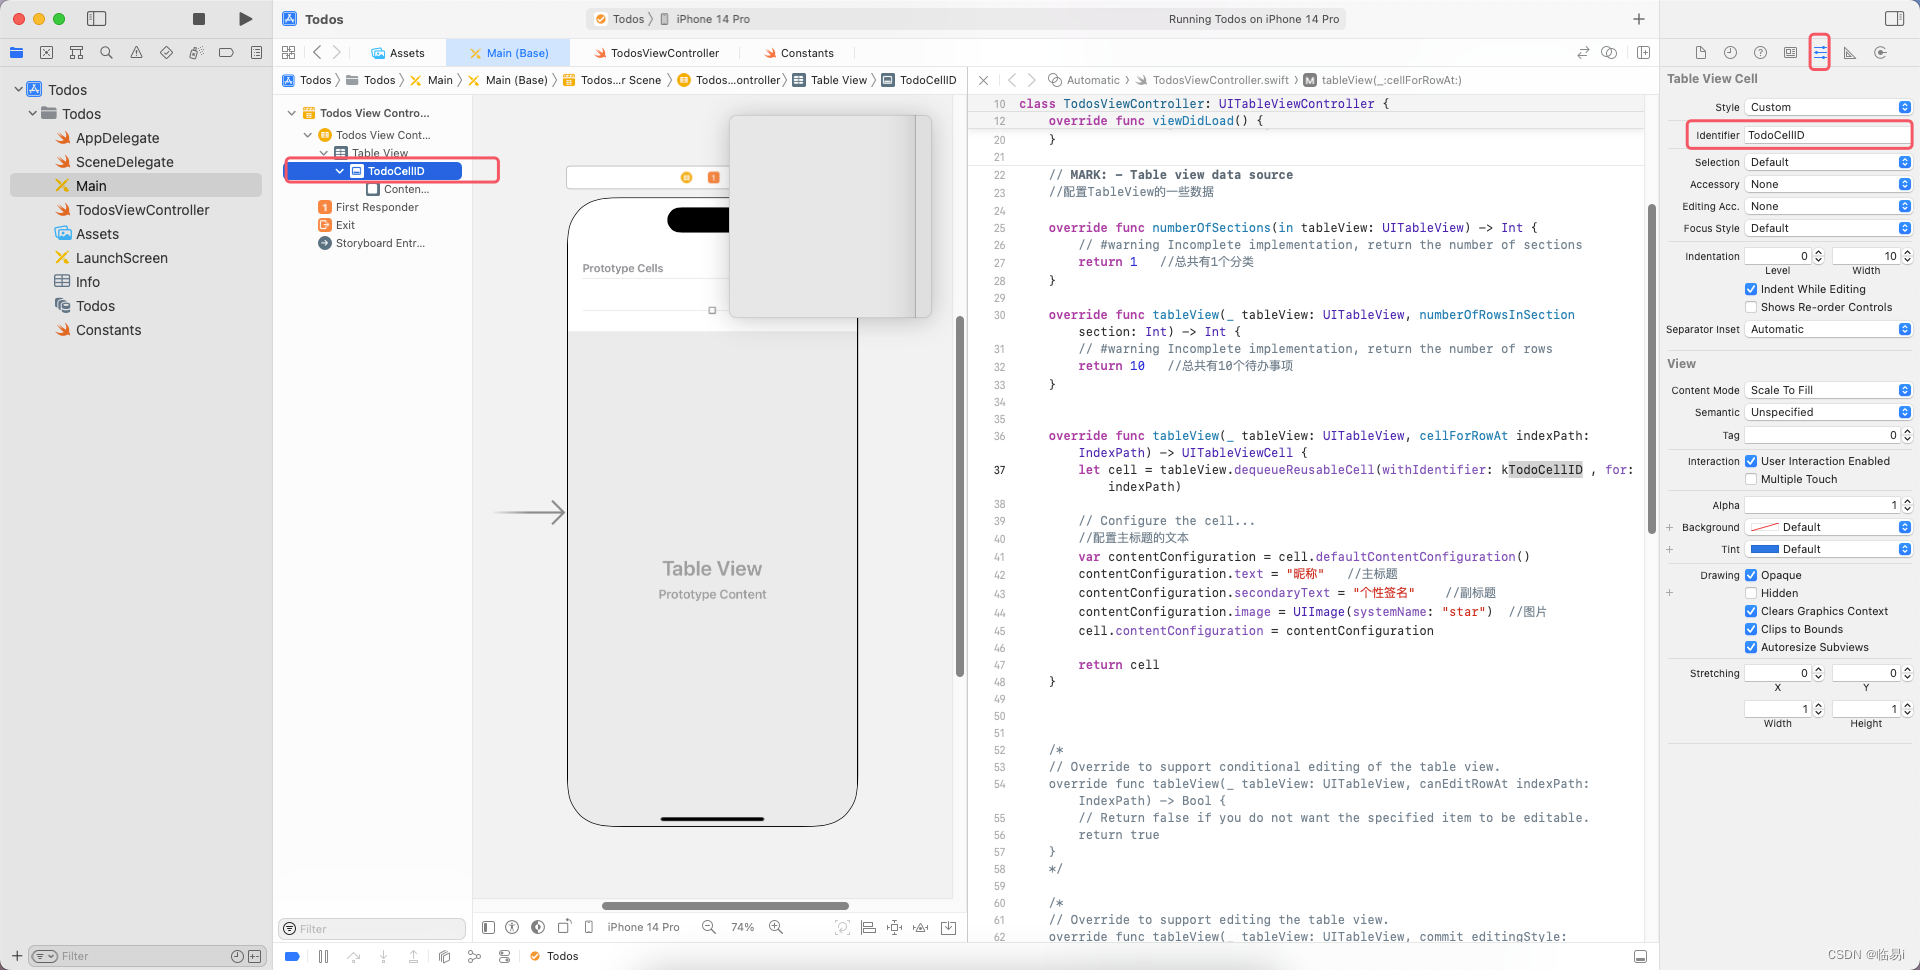
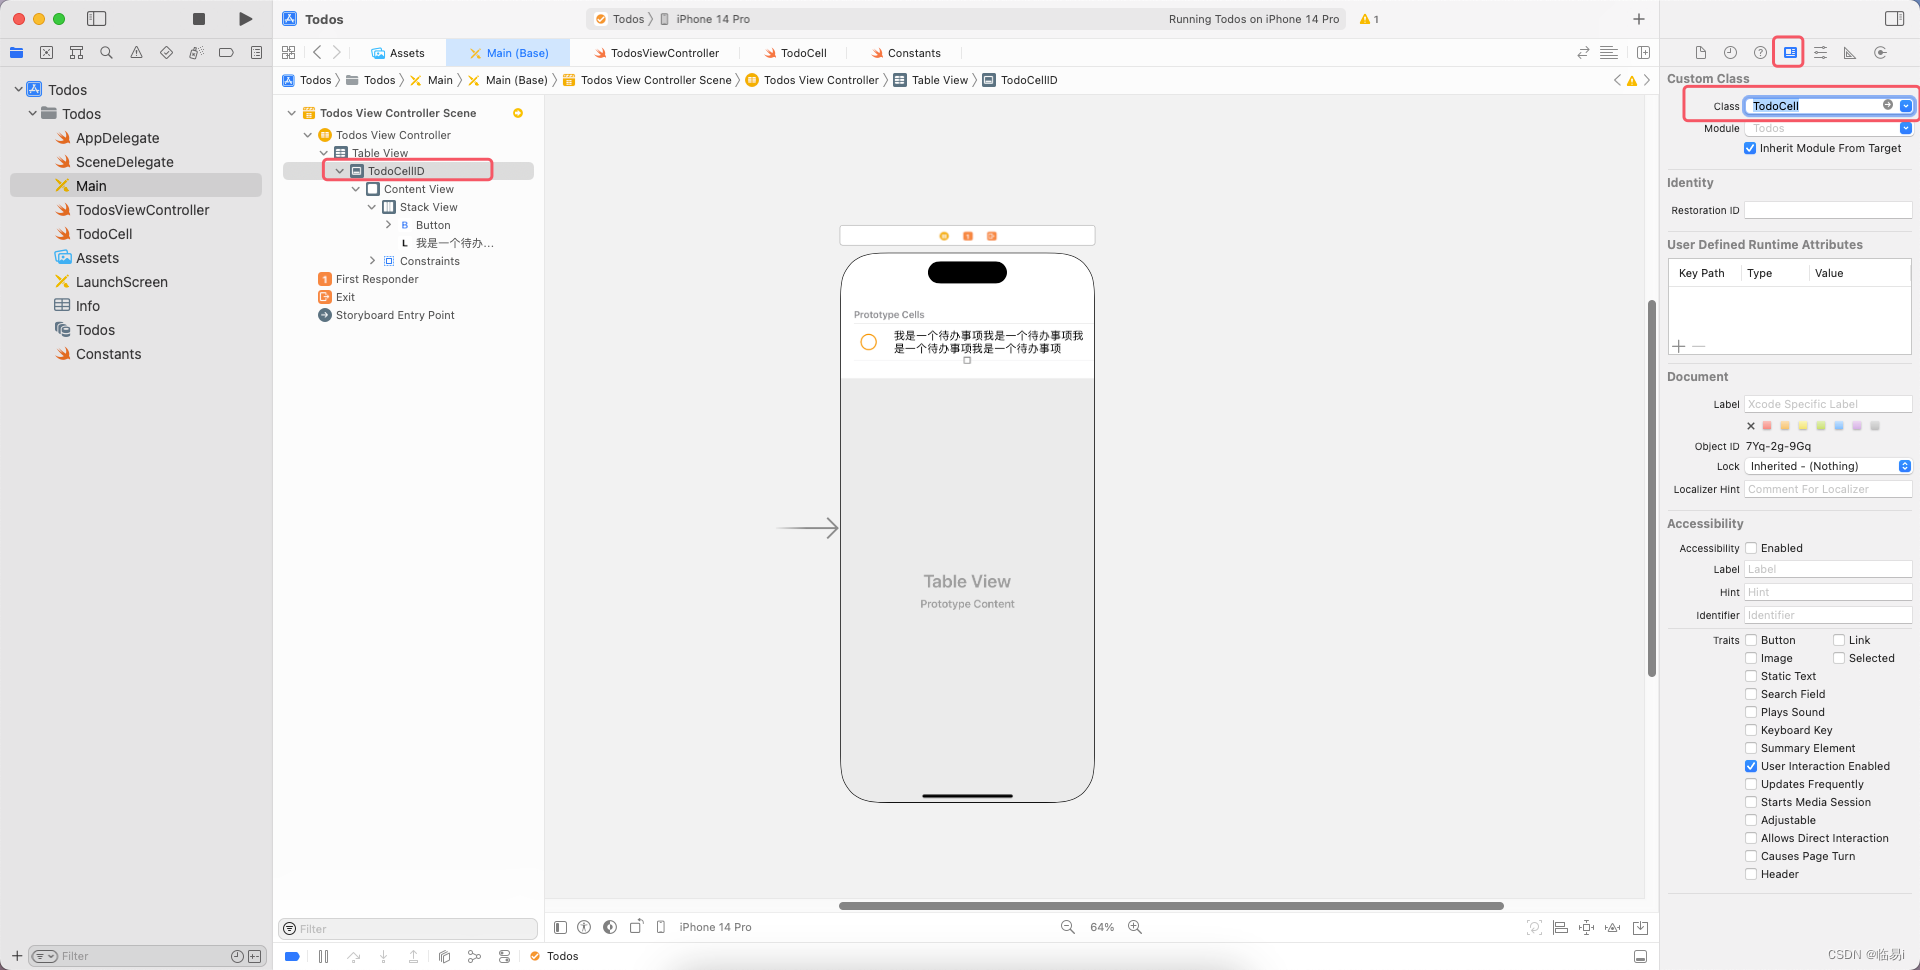
2.为cell取名为TodoCellID.
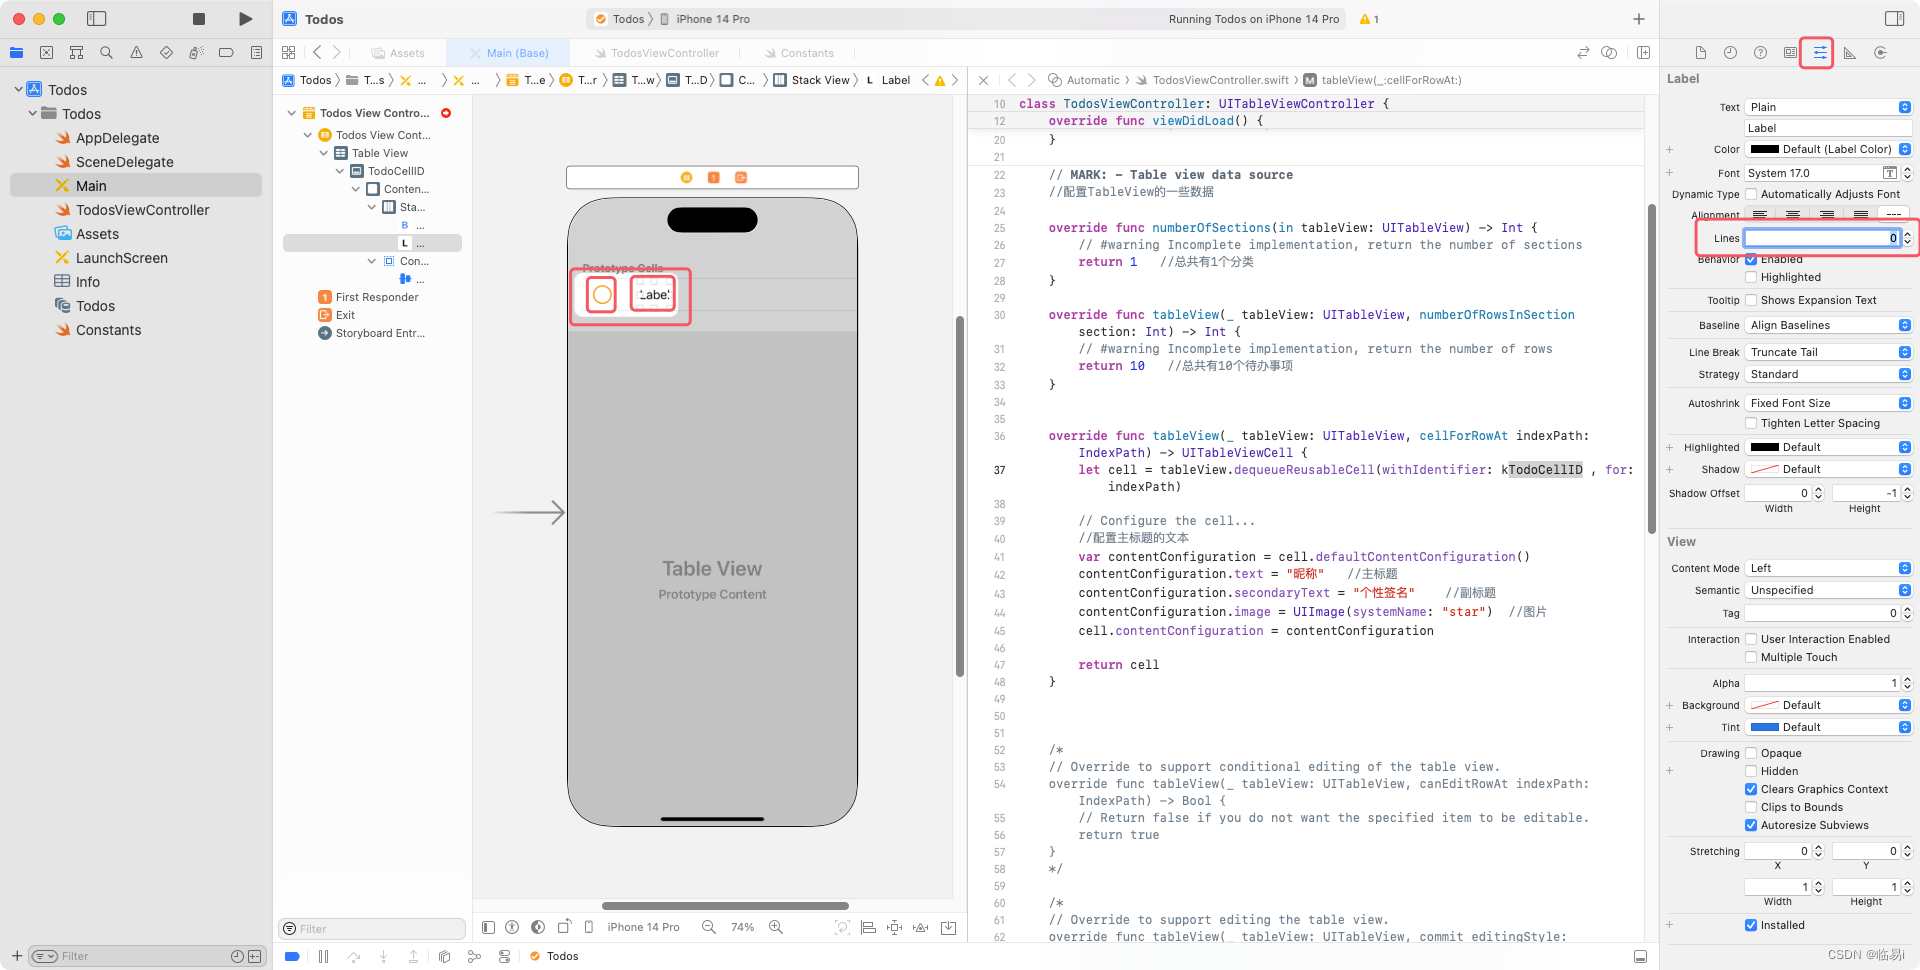
3.创建一个Button,将Button的Image改为circle.创建一个Lable,将Lable的Lines改为0,可以自动换行.将Button和Lable放到同一个StackView里,设置约束为垂直居中.
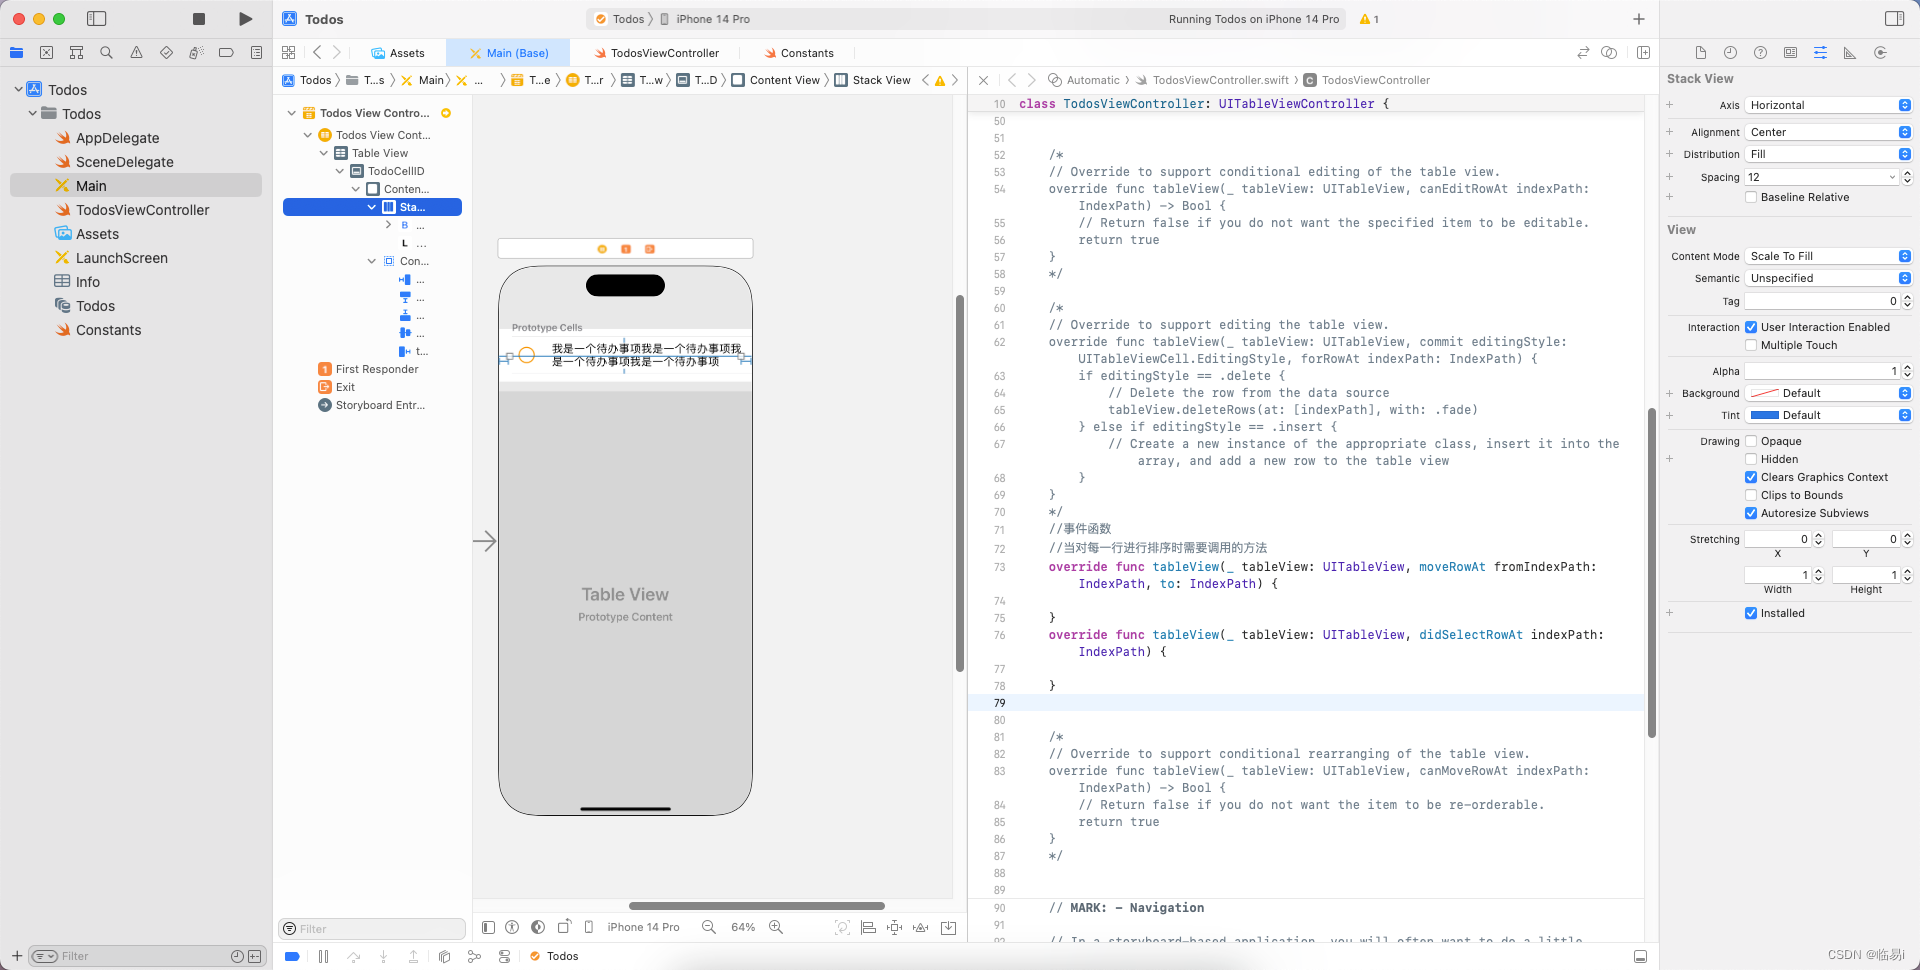
为Button设定宽高约束,为Stack View设定上下左右约束,设定Stack View的Allgnment为Center(所有字样居中),Distribution为Fill,Spacing(Button与Lable的间距)为12.
4.创建一个UITableViewCell类型的swift,用于动态响应Button勾选以及文本的变化.
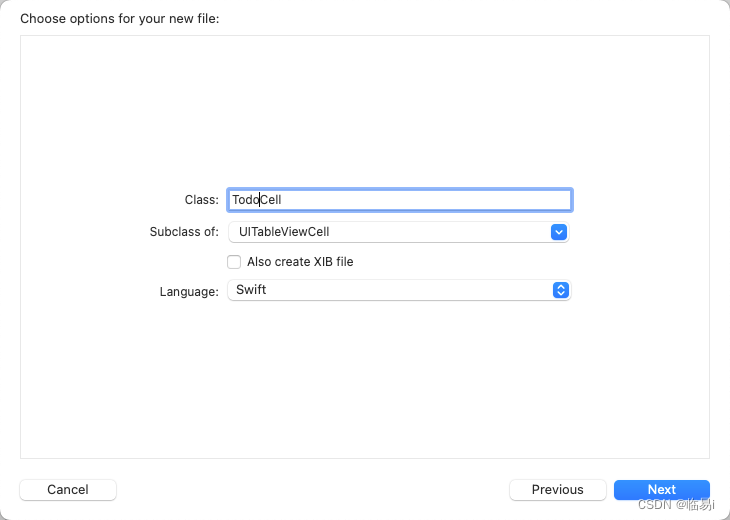
选择TodoCellID的Class为TodoCell.
5.创建一个Swift文件Todo.把他放到Modle文件夹下.

设定默认待办事项,并编码,使其展示在app首页上.
TodosViewController:
import UIKitclass TodosViewController: UITableViewController {let todos = [Todo(name: "学习iOS课程的基础课", checked: false),Todo(name: "学习iOS课程的零基础赏月App开发", checked: false),Todo(name: "学习iOS课程的零基础木琴App开发", checked: false),Todo(name: "学习iOS课程的零基础和风天气App开发", checked: false),Todo(name: "学习iOS课程的零基础待办事项App开发", checked: false),Todo(name: "学习iOS课程的小红书App开发", checked: false)]override func viewDidLoad() {super.viewDidLoad()// Uncomment the following line to preserve selection between presentations// self.clearsSelectionOnViewWillAppear = false// Uncomment the following line to display an Edit button in the navigation bar for this view controller.// self.navigationItem.rightBarButtonItem = self.editButtonItem}// MARK: - Table view data source//配置TableView的一些数据override func numberOfSections(in tableView: UITableView) -> Int {// #warning Incomplete implementation, return the number of sectionsreturn 1   //总共有1个分类}override func tableView(_ tableView: UITableView, numberOfRowsInSection section: Int) -> Int {// #warning Incomplete implementation, return the number of rowsreturn todos.count   //总共有10个待办事项}override func tableView(_ tableView: UITableView, cellForRowAt indexPath: IndexPath) -> UITableViewCell {  //此函数会根据上面两个函数(总共分类数和总共待办事项数)返回的内容多次执行let cell = tableView.dequeueReusableCell(withIdentifier: kTodoCellID , for: indexPath) as! TodoCell//        // Configure the cell...
//        //配置主标题的文本
//        var contentConfiguration = cell.defaultContentConfiguration()
//        contentConfiguration.text = "昵称"   //主标题
//        contentConfiguration.secondaryText = "个性签名"    //副标题
//        contentConfiguration.image = UIImage(systemName: "star")  //图片
//        cell.contentConfiguration = contentConfigurationcell.todoLable.text = todos[indexPath.row].namereturn cell}/*// Override to support conditional editing of the table view.override func tableView(_ tableView: UITableView, canEditRowAt indexPath: IndexPath) -> Bool {// Return false if you do not want the specified item to be editable.return true}*//*// Override to support editing the table view.override func tableView(_ tableView: UITableView, commit editingStyle: UITableViewCell.EditingStyle, forRowAt indexPath: IndexPath) {if editingStyle == .delete {// Delete the row from the data sourcetableView.deleteRows(at: [indexPath], with: .fade)} else if editingStyle == .insert {// Create a new instance of the appropriate class, insert it into the array, and add a new row to the table view}    }*///事件函数//当对每一行进行排序时需要调用的方法override func tableView(_ tableView: UITableView, moveRowAt fromIndexPath: IndexPath, to: IndexPath) {}override func tableView(_ tableView: UITableView, didSelectRowAt indexPath: IndexPath) {}/*// Override to support conditional rearranging of the table view.override func tableView(_ tableView: UITableView, canMoveRowAt indexPath: IndexPath) -> Bool {// Return false if you do not want the item to be re-orderable.return true}*/// MARK: - Navigation// In a storyboard-based application, you will often want to do a little preparation before navigationoverride func prepare(for segue: UIStoryboardSegue, sender: Any?) {// Get the new view controller using segue.destination.// Pass the selected object to the new view controller.}}
TodoCell:
import UIKitclass TodoCell: UITableViewCell {@IBOutlet weak var checkBoxBtn: UIButton!@IBOutlet weak var todoLable: UILabel!override func awakeFromNib() {super.awakeFromNib()// Initialization code}override func setSelected(_ selected: Bool, animated: Bool) {super.setSelected(selected, animated: animated)// Configure the view for the selected state}}
Todo:
import Foundationstruct Todo{   //结构体.struck:值类型,class:引用类型. strack不需要再额外写构造器,因为系统已经自动生成.var name: String   //文本var checked: Bool   //是否已经完成
}//相当于class的:
//class Todo{
//    var name = ""
//    var checked = false
//    init(name: String, checked: Bool){
//        self.name = name
//        self.checked = checked
//    }
//}
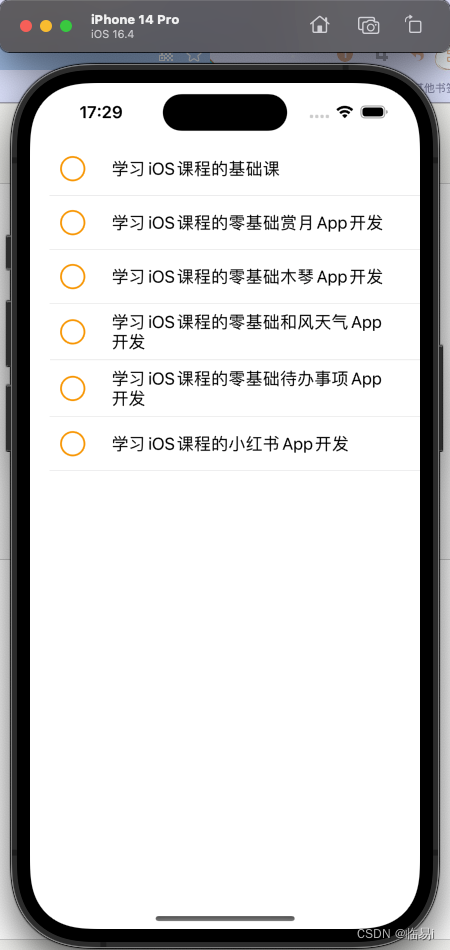
启动测试:
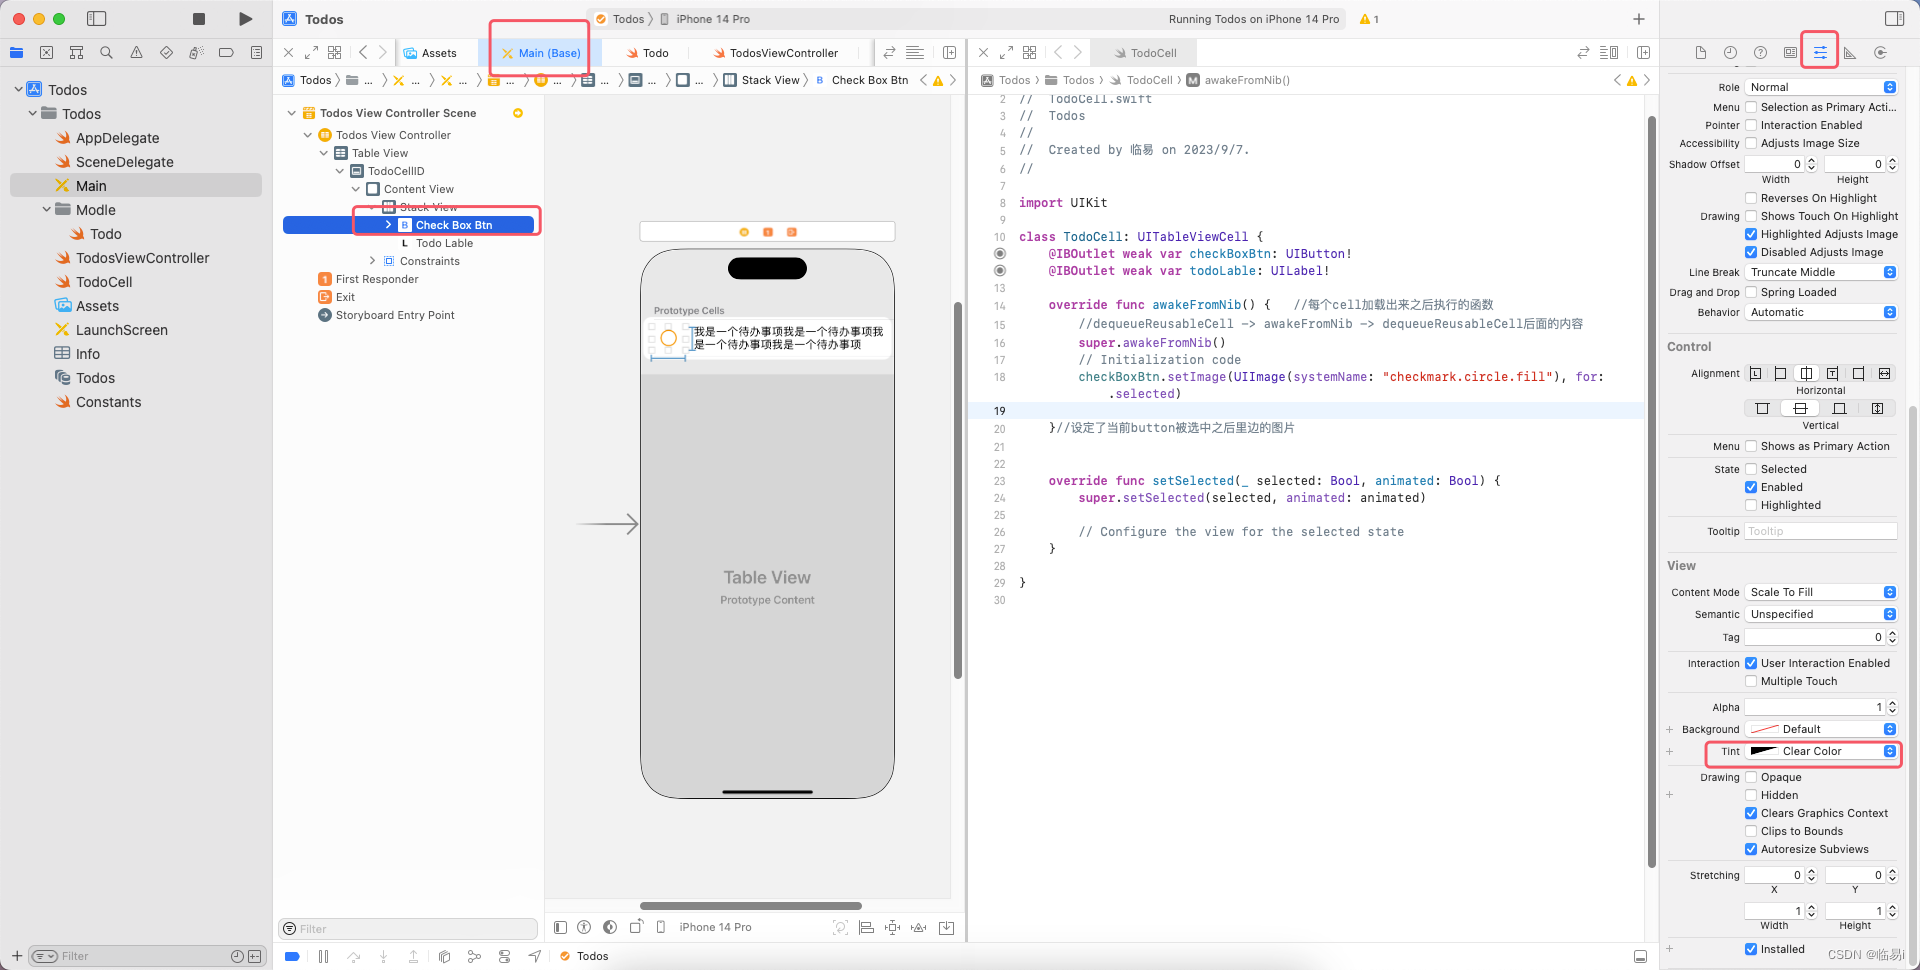
6.实现checkBox这个Button被选中之后变色.
将Button的Tint改为Clear Color.使选中后的淡蓝色消失.
TodosViewController:
import UIKitclass TodosViewController: UITableViewController {let todos = [Todo(name: "学习iOS课程的基础课", checked: false),Todo(name: "学习iOS课程的零基础赏月App开发", checked: false),Todo(name: "学习iOS课程的零基础木琴App开发", checked: false),Todo(name: "学习iOS课程的零基础和风天气App开发", checked: false),Todo(name: "学习iOS课程的零基础待办事项App开发", checked: false),Todo(name: "学习iOS课程的小红书App开发", checked: false)]override func viewDidLoad() {super.viewDidLoad()// Uncomment the following line to preserve selection between presentations// self.clearsSelectionOnViewWillAppear = false// Uncomment the following line to display an Edit button in the navigation bar for this view controller.// self.navigationItem.rightBarButtonItem = self.editButtonItem}// MARK: - Table view data source//配置TableView的一些数据override func numberOfSections(in tableView: UITableView) -> Int {// #warning Incomplete implementation, return the number of sectionsreturn 1   //总共有1个分类}override func tableView(_ tableView: UITableView, numberOfRowsInSection section: Int) -> Int {// #warning Incomplete implementation, return the number of rowsreturn todos.count   //总共有10个待办事项}override func tableView(_ tableView: UITableView, cellForRowAt indexPath: IndexPath) -> UITableViewCell {  //此函数会根据上面两个函数(总共分类数和总共待办事项数)返回的内容多次执行let cell = tableView.dequeueReusableCell(withIdentifier: kTodoCellID , for: indexPath) as! TodoCell//        // Configure the cell...
//        //配置主标题的文本
//        var contentConfiguration = cell.defaultContentConfiguration()
//        contentConfiguration.text = "昵称"   //主标题
//        contentConfiguration.secondaryText = "个性签名"    //副标题
//        contentConfiguration.image = UIImage(systemName: "star")  //图片
//        cell.contentConfiguration = contentConfigurationcell.checkBoxBtn.isSelected = todos[indexPath.row].checked  //将cell的是否被选中属性改为todos的当前行的checked属性cell.todoLable.text = todos[indexPath.row].namereturn cell}/*// Override to support conditional editing of the table view.override func tableView(_ tableView: UITableView, canEditRowAt indexPath: IndexPath) -> Bool {// Return false if you do not want the specified item to be editable.return true}*//*// Override to support editing the table view.override func tableView(_ tableView: UITableView, commit editingStyle: UITableViewCell.EditingStyle, forRowAt indexPath: IndexPath) {if editingStyle == .delete {// Delete the row from the data sourcetableView.deleteRows(at: [indexPath], with: .fade)} else if editingStyle == .insert {// Create a new instance of the appropriate class, insert it into the array, and add a new row to the table view}    }*///事件函数//当对每一行进行排序时需要调用的方法override func tableView(_ tableView: UITableView, moveRowAt fromIndexPath: IndexPath, to: IndexPath) {}override func tableView(_ tableView: UITableView, didSelectRowAt indexPath: IndexPath) {}/*// Override to support conditional rearranging of the table view.override func tableView(_ tableView: UITableView, canMoveRowAt indexPath: IndexPath) -> Bool {// Return false if you do not want the item to be re-orderable.return true}*/// MARK: - Navigation// In a storyboard-based application, you will often want to do a little preparation before navigationoverride func prepare(for segue: UIStoryboardSegue, sender: Any?) {// Get the new view controller using segue.destination.// Pass the selected object to the new view controller.}}
TodoCell:
import UIKitclass TodoCell: UITableViewCell {@IBOutlet weak var checkBoxBtn: UIButton!@IBOutlet weak var todoLable: UILabel!override func awakeFromNib() { //每个cell加载出来之后执行的函数//dequeueReusableCell -> awakeFromNib -> dequeueReusableCell后面的内容super.awakeFromNib()// Initialization codecheckBoxBtn.setImage(UIImage(systemName: "checkmark.circle.fill"), for: .selected)}//设定了当前button被选中之后里边的图片override func setSelected(_ selected: Bool, animated: Bool) {super.setSelected(selected, animated: animated)// Configure the view for the selected state}}
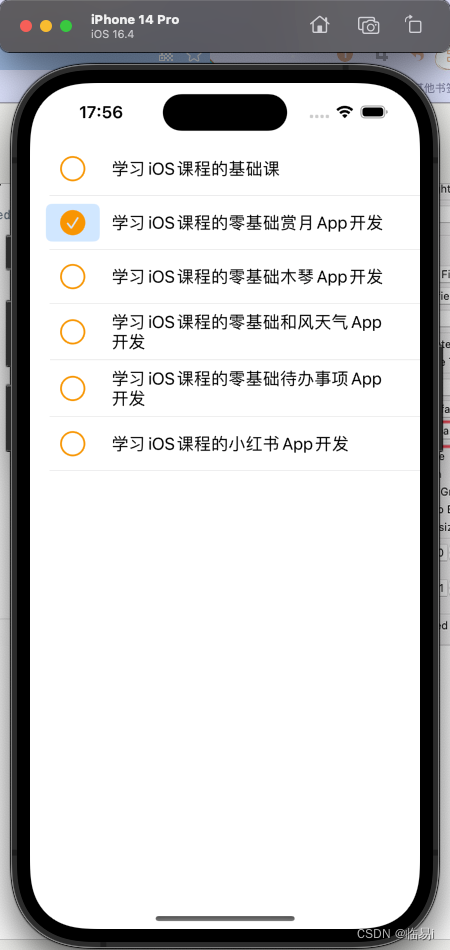
7.实现checkBox这个Lable被选中之后字体变灰色.
TodosViewController:
import UIKitclass TodosViewController: UITableViewController {let todos = [Todo(name: "学习iOS课程的基础课", checked: false),Todo(name: "学习iOS课程的零基础赏月App开发", checked: true),Todo(name: "学习iOS课程的零基础木琴App开发", checked: false),Todo(name: "学习iOS课程的零基础和风天气App开发", checked: false),Todo(name: "学习iOS课程的零基础待办事项App开发", checked: false),Todo(name: "学习iOS课程的小红书App开发", checked: false)]override func viewDidLoad() {super.viewDidLoad()// Uncomment the following line to preserve selection between presentations// self.clearsSelectionOnViewWillAppear = false// Uncomment the following line to display an Edit button in the navigation bar for this view controller.// self.navigationItem.rightBarButtonItem = self.editButtonItem}// MARK: - Table view data source//配置TableView的一些数据override func numberOfSections(in tableView: UITableView) -> Int {// #warning Incomplete implementation, return the number of sectionsreturn 1   //总共有1个分类}override func tableView(_ tableView: UITableView, numberOfRowsInSection section: Int) -> Int {// #warning Incomplete implementation, return the number of rowsreturn todos.count   //总共有10个待办事项}override func tableView(_ tableView: UITableView, cellForRowAt indexPath: IndexPath) -> UITableViewCell {  //此函数会根据上面两个函数(总共分类数和总共待办事项数)返回的内容多次执行let cell = tableView.dequeueReusableCell(withIdentifier: kTodoCellID , for: indexPath) as! TodoCell//        // Configure the cell...
//        //配置主标题的文本
//        var contentConfiguration = cell.defaultContentConfiguration()
//        contentConfiguration.text = "昵称"   //主标题
//        contentConfiguration.secondaryText = "个性签名"    //副标题
//        contentConfiguration.image = UIImage(systemName: "star")  //图片
//        cell.contentConfiguration = contentConfigurationcell.checkBoxBtn.isSelected = todos[indexPath.row].checked  //将cell的是否被选中属性改为todos的当前行的checked属性cell.todoLable.text = todos[indexPath.row].namecell.todoLable.textColor = todos[indexPath.row].checked ? .tertiaryLabel : .label   //三元运算符.根据是否被选中进行判断,如果被选中的话变成浅色,未被选中就是原来的Lable Color.return cell}/*// Override to support conditional editing of the table view.override func tableView(_ tableView: UITableView, canEditRowAt indexPath: IndexPath) -> Bool {// Return false if you do not want the specified item to be editable.return true}*//*// Override to support editing the table view.override func tableView(_ tableView: UITableView, commit editingStyle: UITableViewCell.EditingStyle, forRowAt indexPath: IndexPath) {if editingStyle == .delete {// Delete the row from the data sourcetableView.deleteRows(at: [indexPath], with: .fade)} else if editingStyle == .insert {// Create a new instance of the appropriate class, insert it into the array, and add a new row to the table view}    }*///事件函数//当对每一行进行排序时需要调用的方法override func tableView(_ tableView: UITableView, moveRowAt fromIndexPath: IndexPath, to: IndexPath) {}override func tableView(_ tableView: UITableView, didSelectRowAt indexPath: IndexPath) {}/*// Override to support conditional rearranging of the table view.override func tableView(_ tableView: UITableView, canMoveRowAt indexPath: IndexPath) -> Bool {// Return false if you do not want the item to be re-orderable.return true}*/// MARK: - Navigation// In a storyboard-based application, you will often want to do a little preparation before navigationoverride func prepare(for segue: UIStoryboardSegue, sender: Any?) {// Get the new view controller using segue.destination.// Pass the selected object to the new view controller.}}
启动测试: