一 Unity环境配置
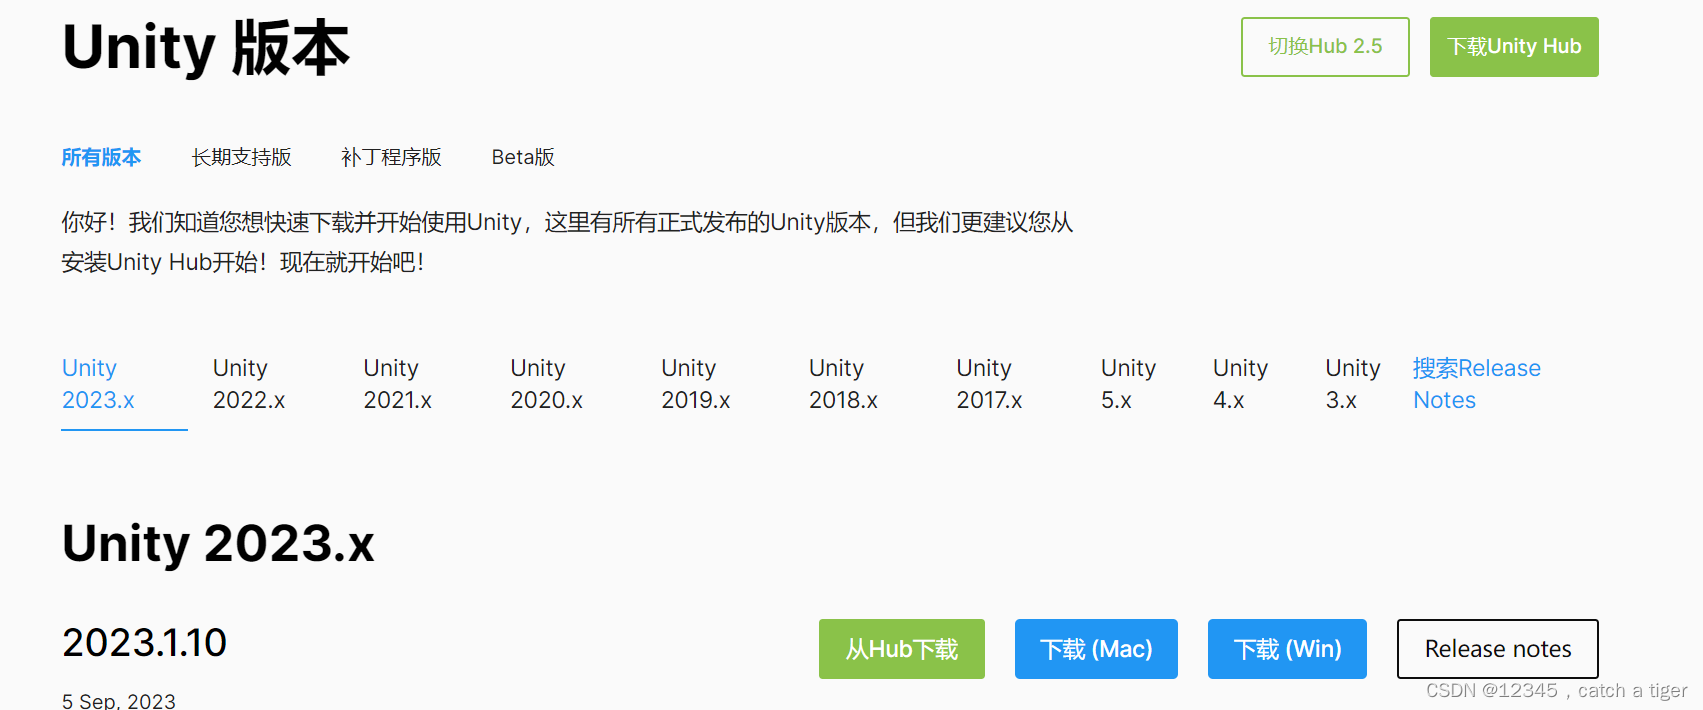
1.1 Untity资源官网下载:https://unity.cn/releases
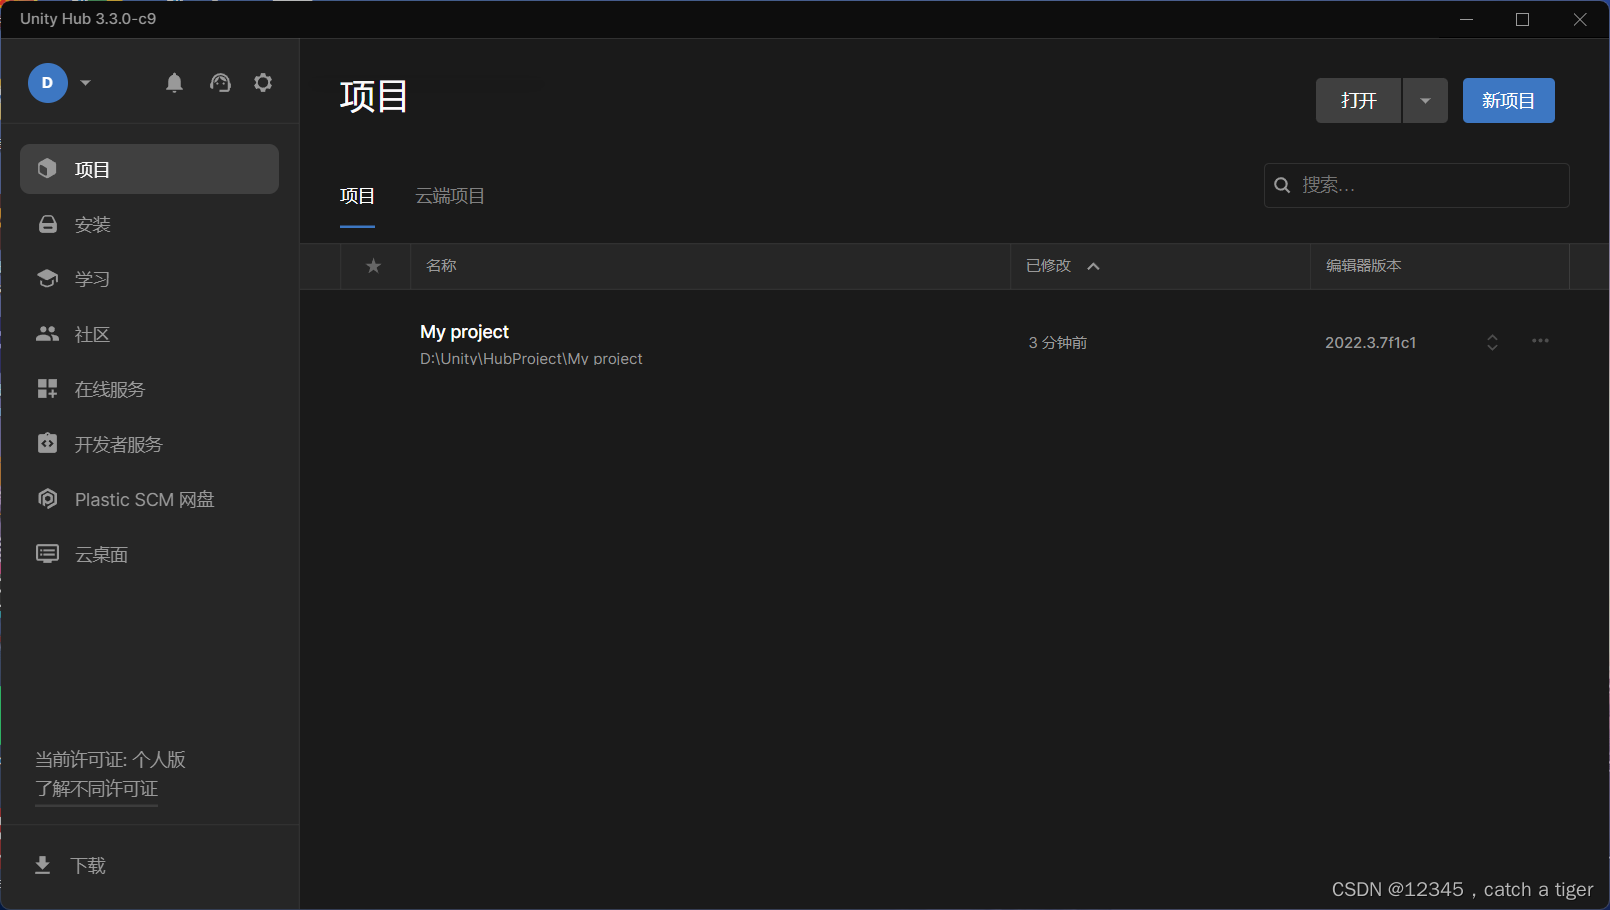
1.2 Unity Hub集成环境,包含工具和项目的管理
1.3 Unity Editor编辑器
 1.4 Visual Studio 2022脚本编辑器
1.5 AndroidSKD,JDK,NDK工具,用于android环境的运行
二 创建Unity项目
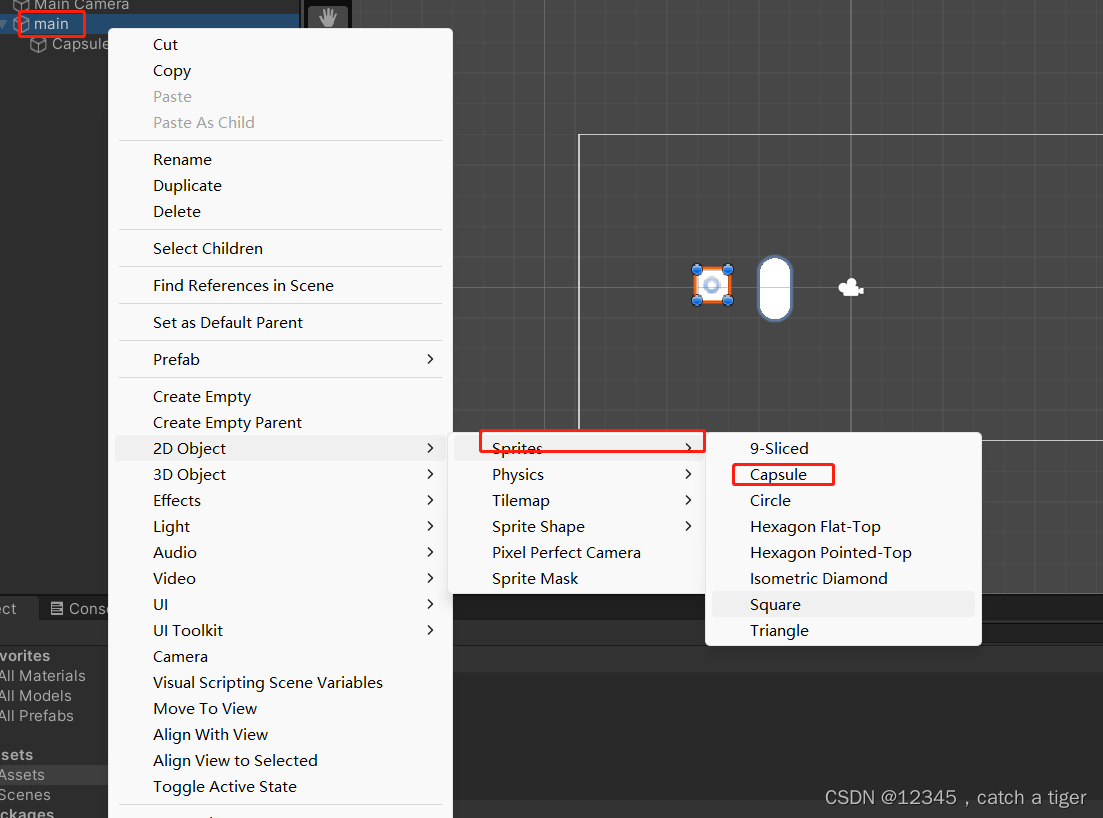
2.1 新建2D模板项目
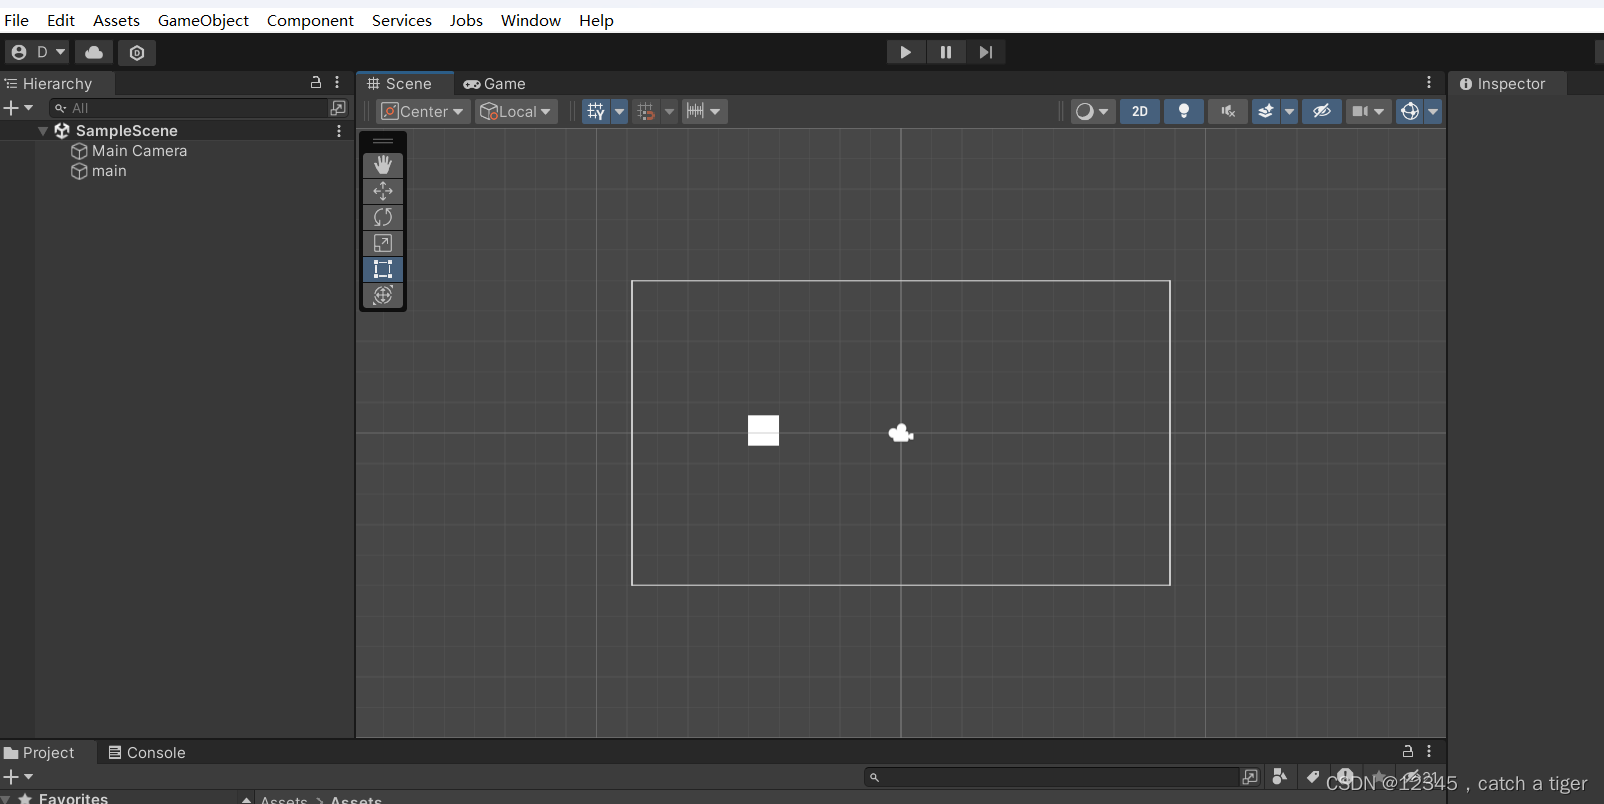
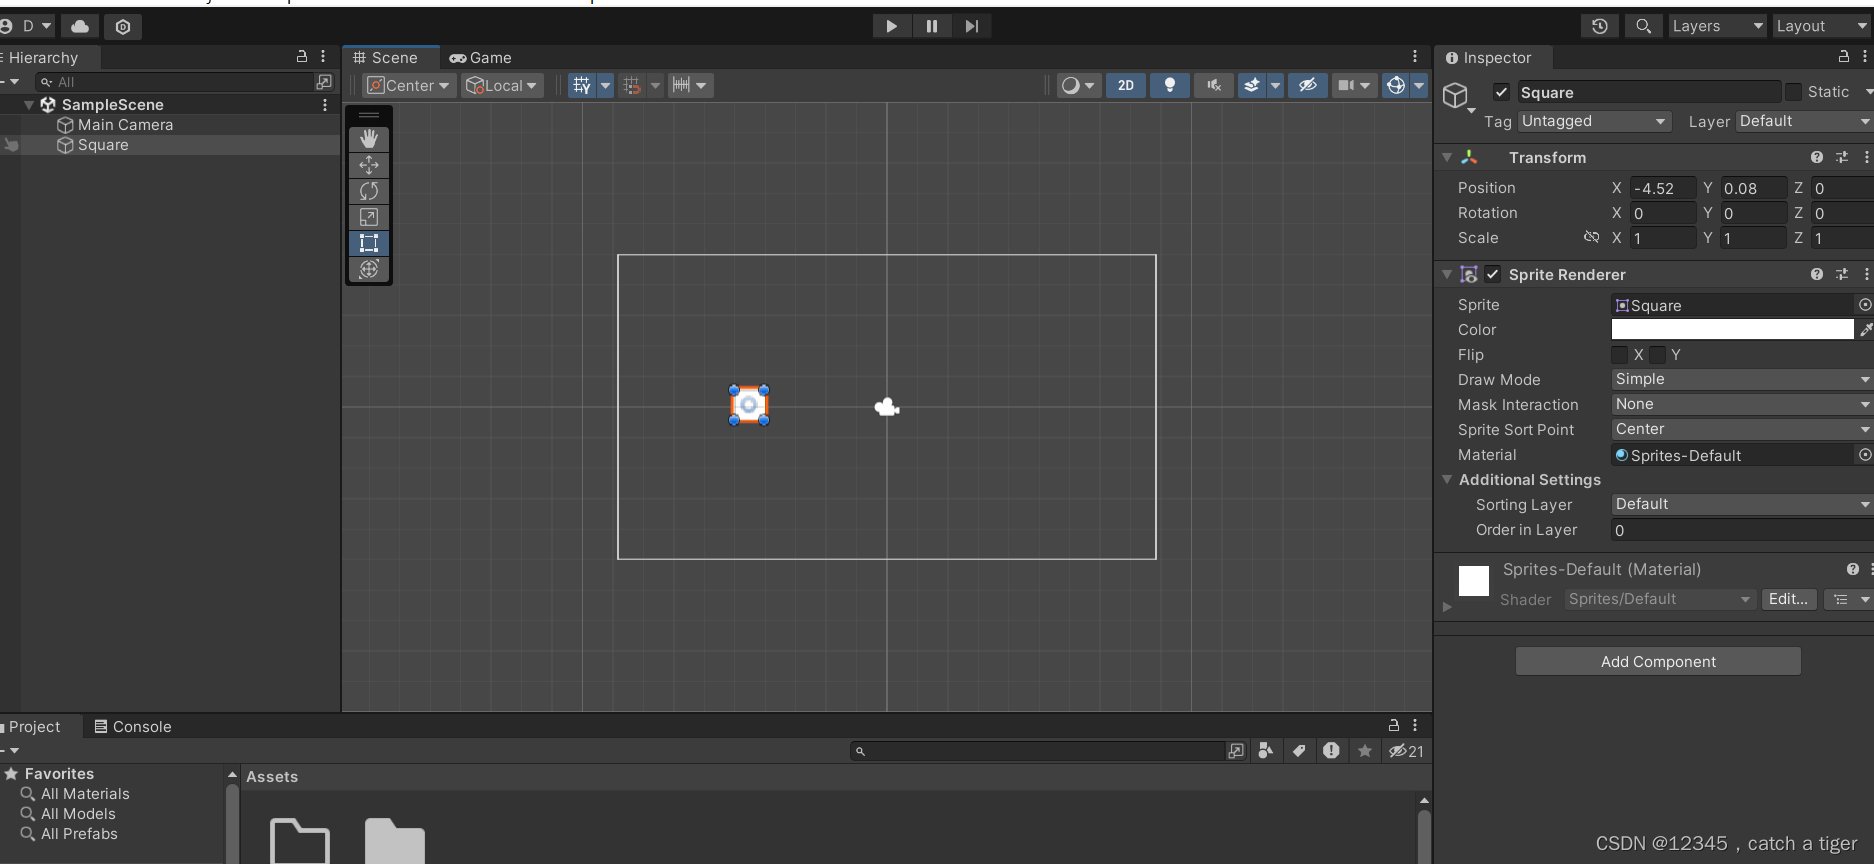
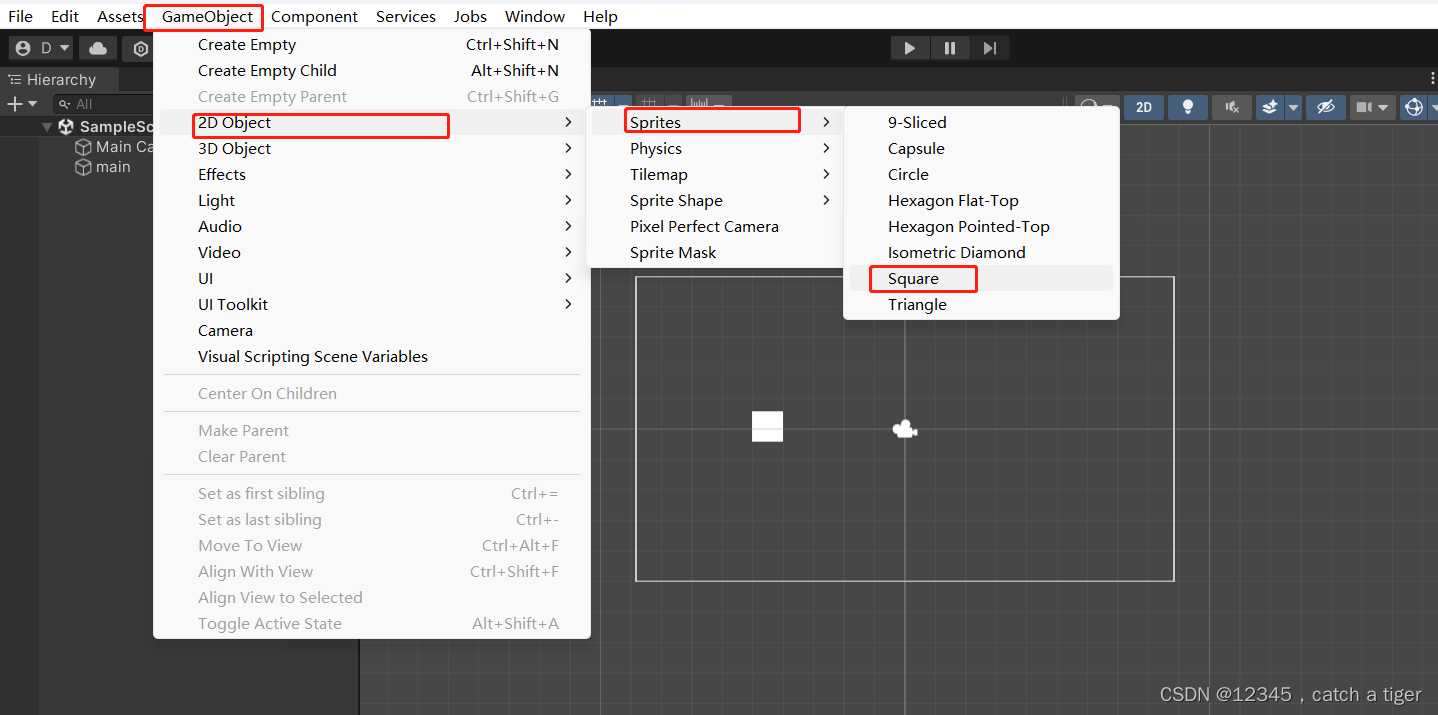
2.2 新建2D物体
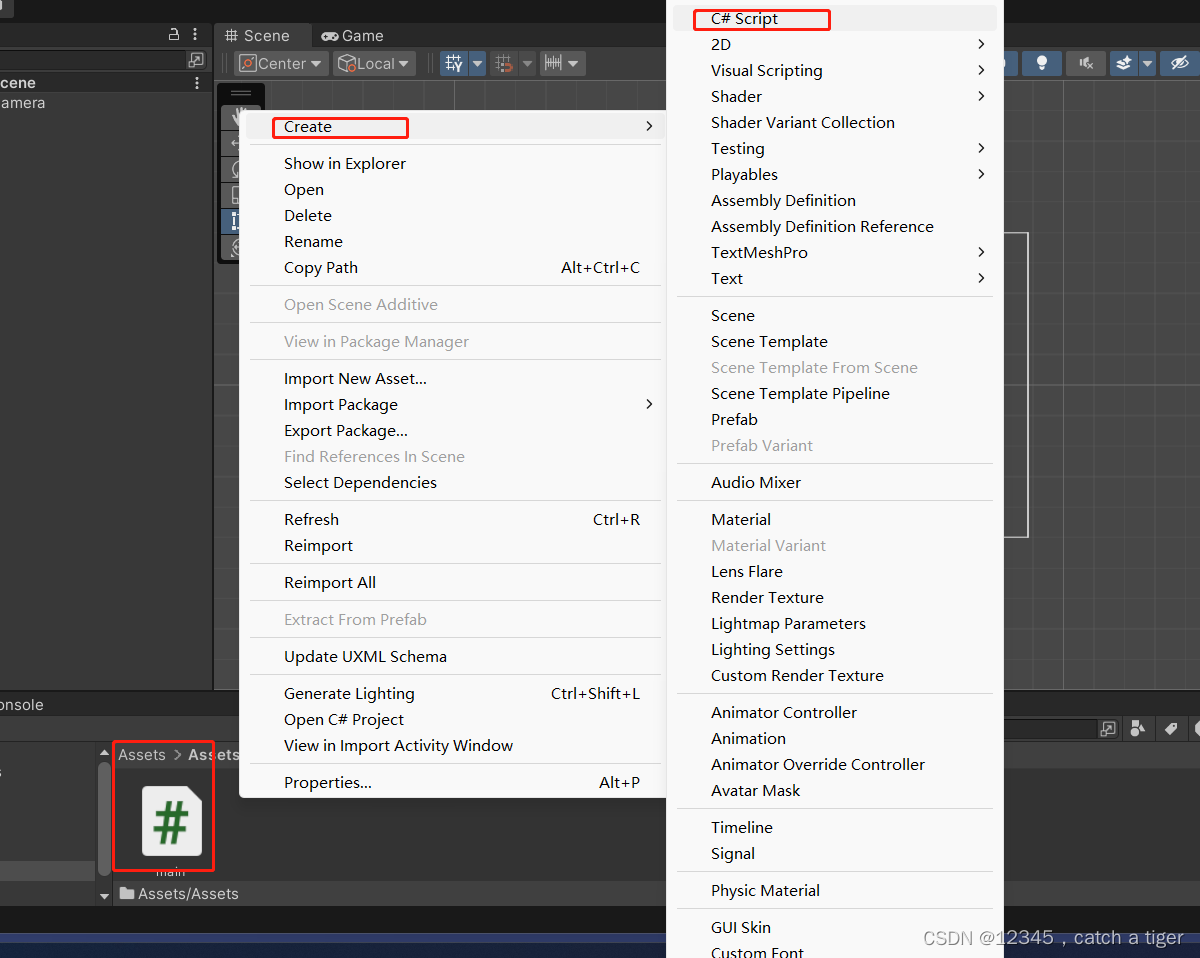
2.3 新建C#脚本文件
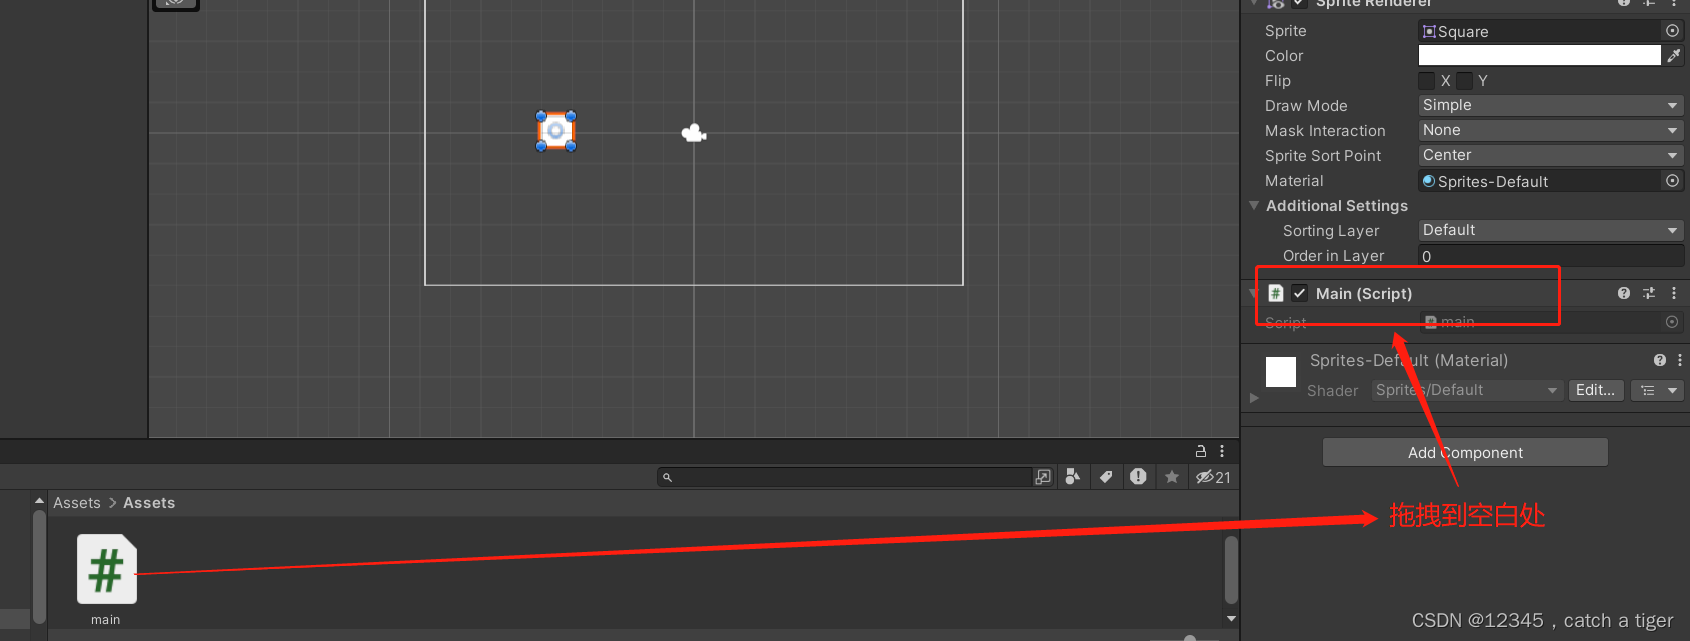
2.4 脚本文件拖拽到物理区域,关联物体
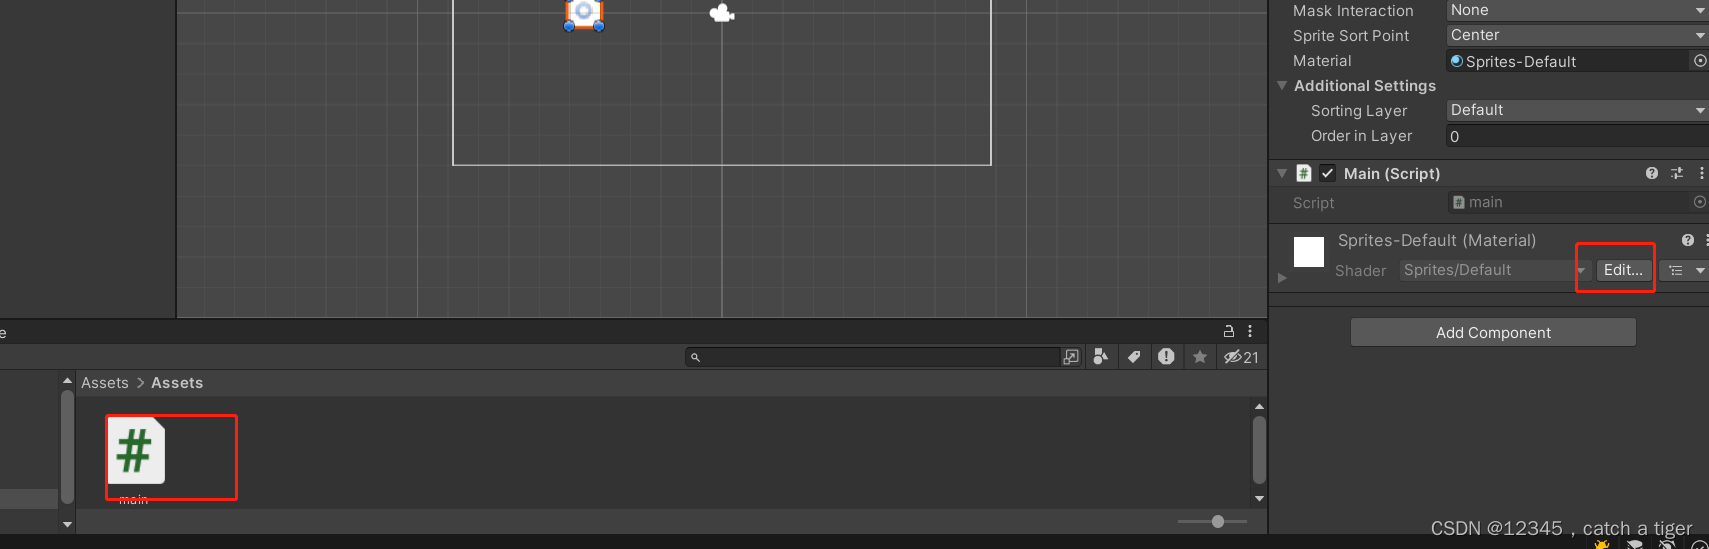
2.5 点击脚本打开 Visual Studio 进行编辑
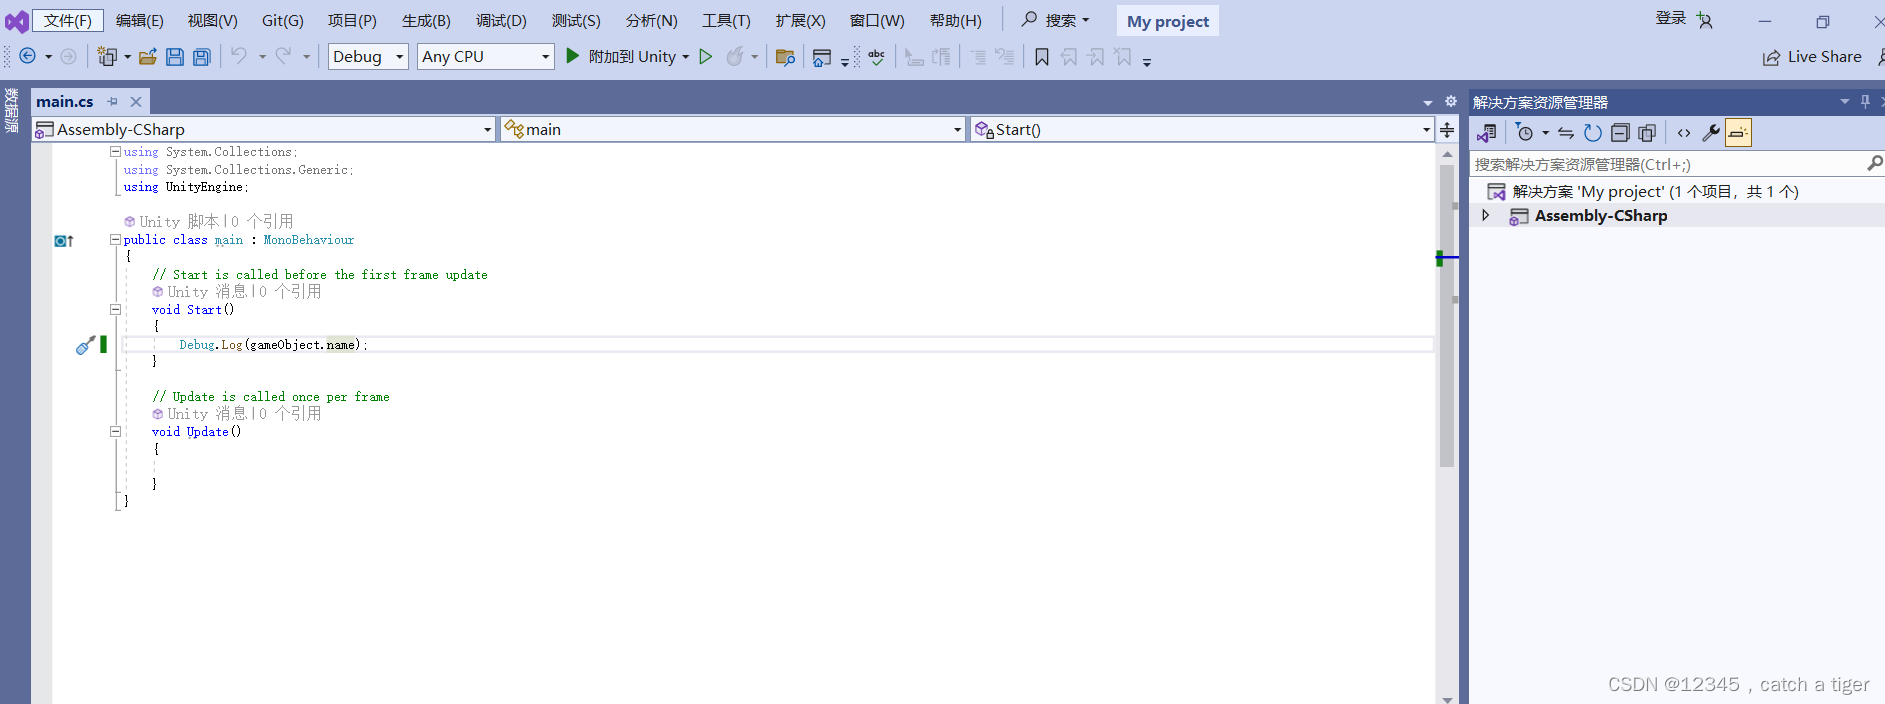
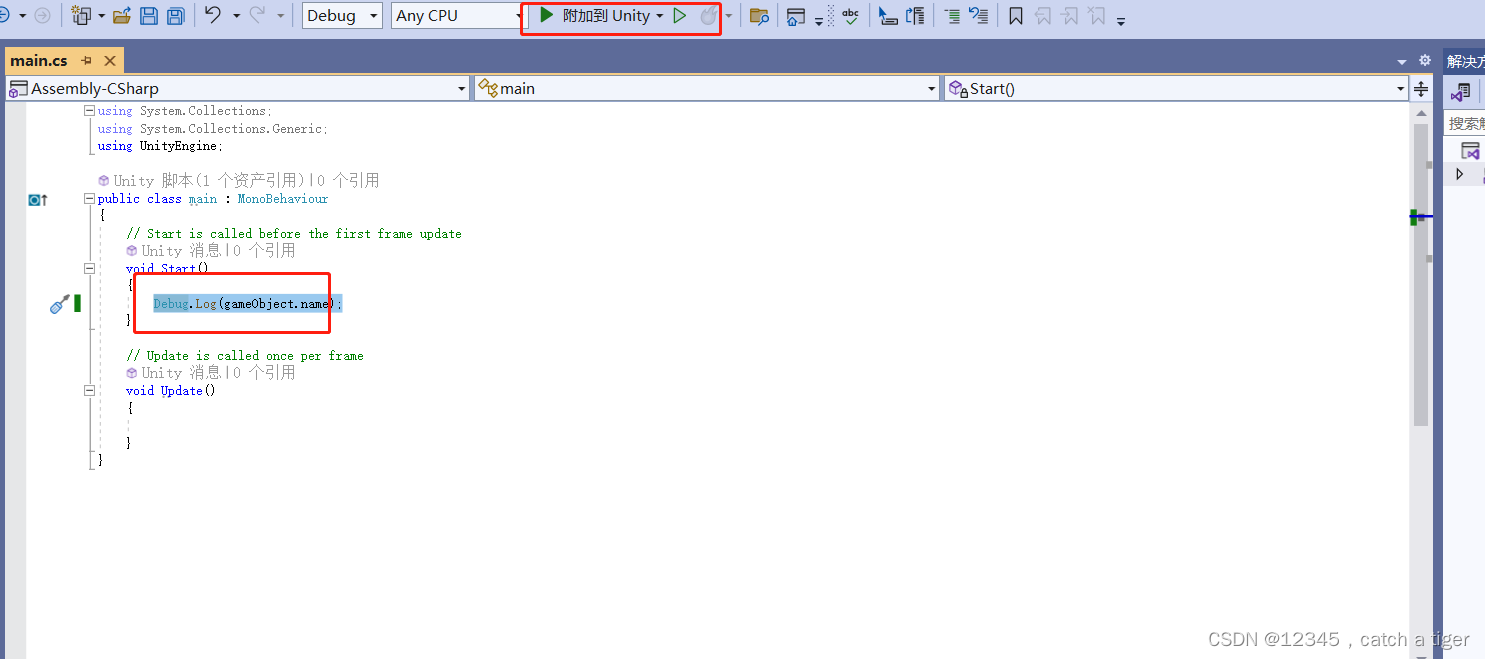
2.6 输入Debug.Log(gameObject.name);获取物体的名字,点击运行
2.7 调试 ,脚本文件保存后,可以看到UnityEditor里面的脚本文件会同步变化
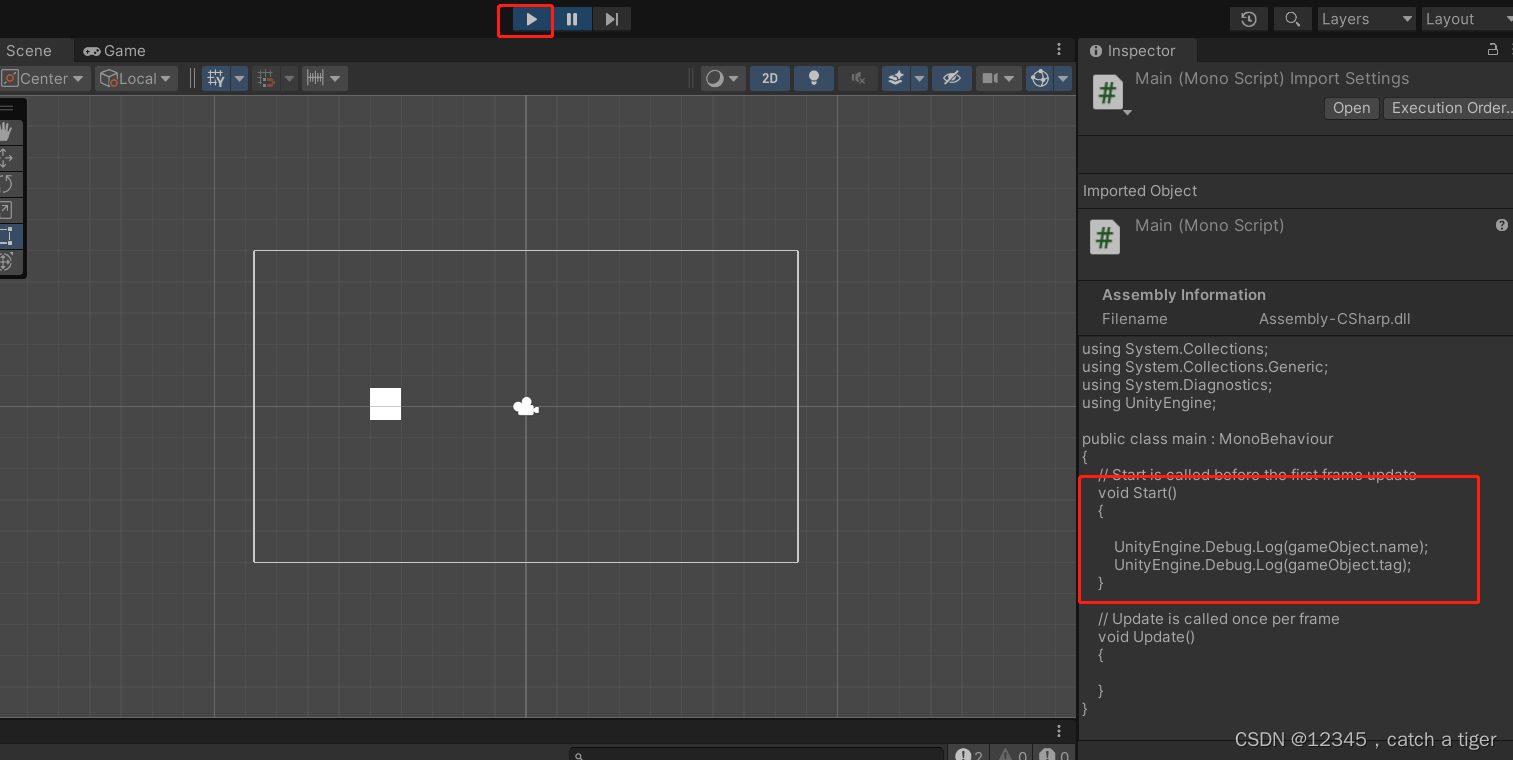
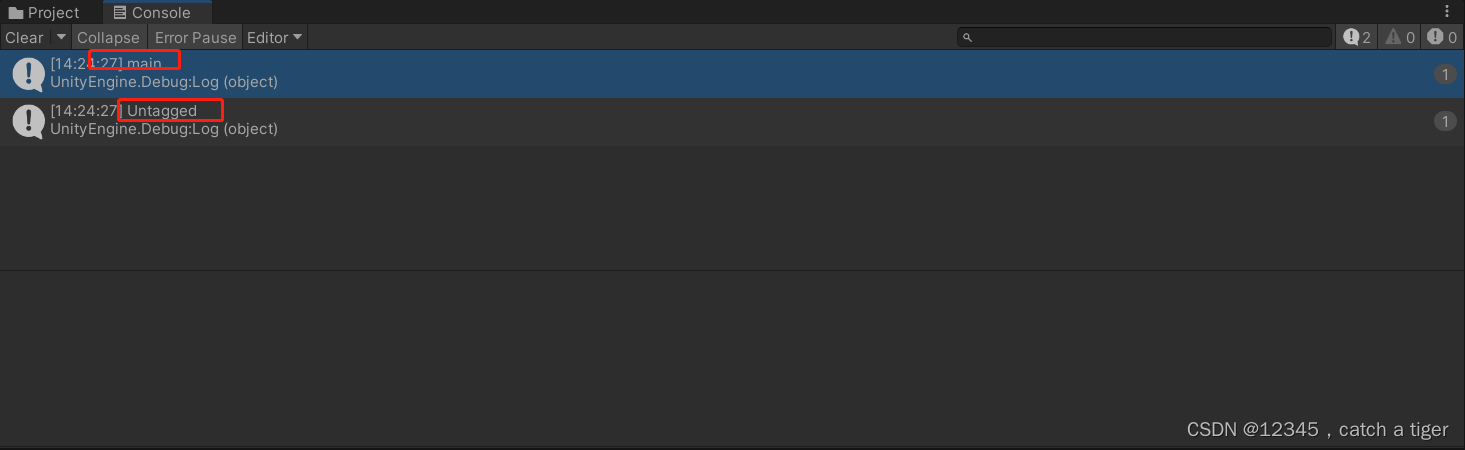
2.9 点击顶部运行按钮就可以在控制台看到日志输出信息,可以看到打印出了物理对象的名字和标签
三 运行问题
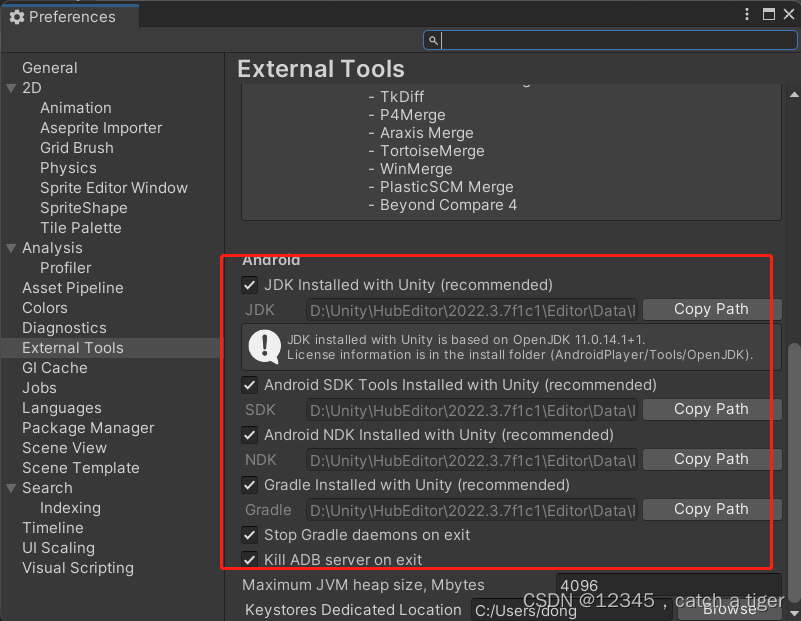
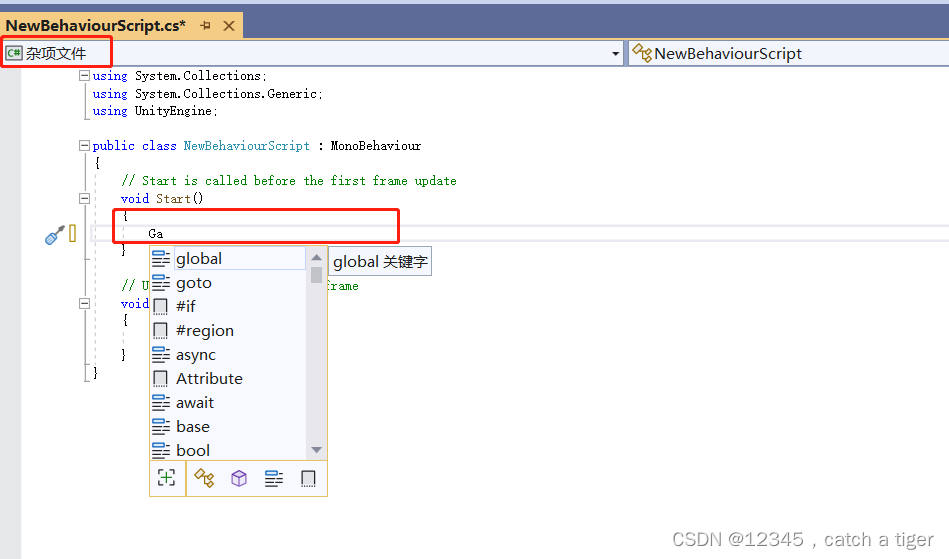
3.1 第一次运行可能会出现错误,显示Unity脚本显示“杂项文件”,并且无语法提示的问题
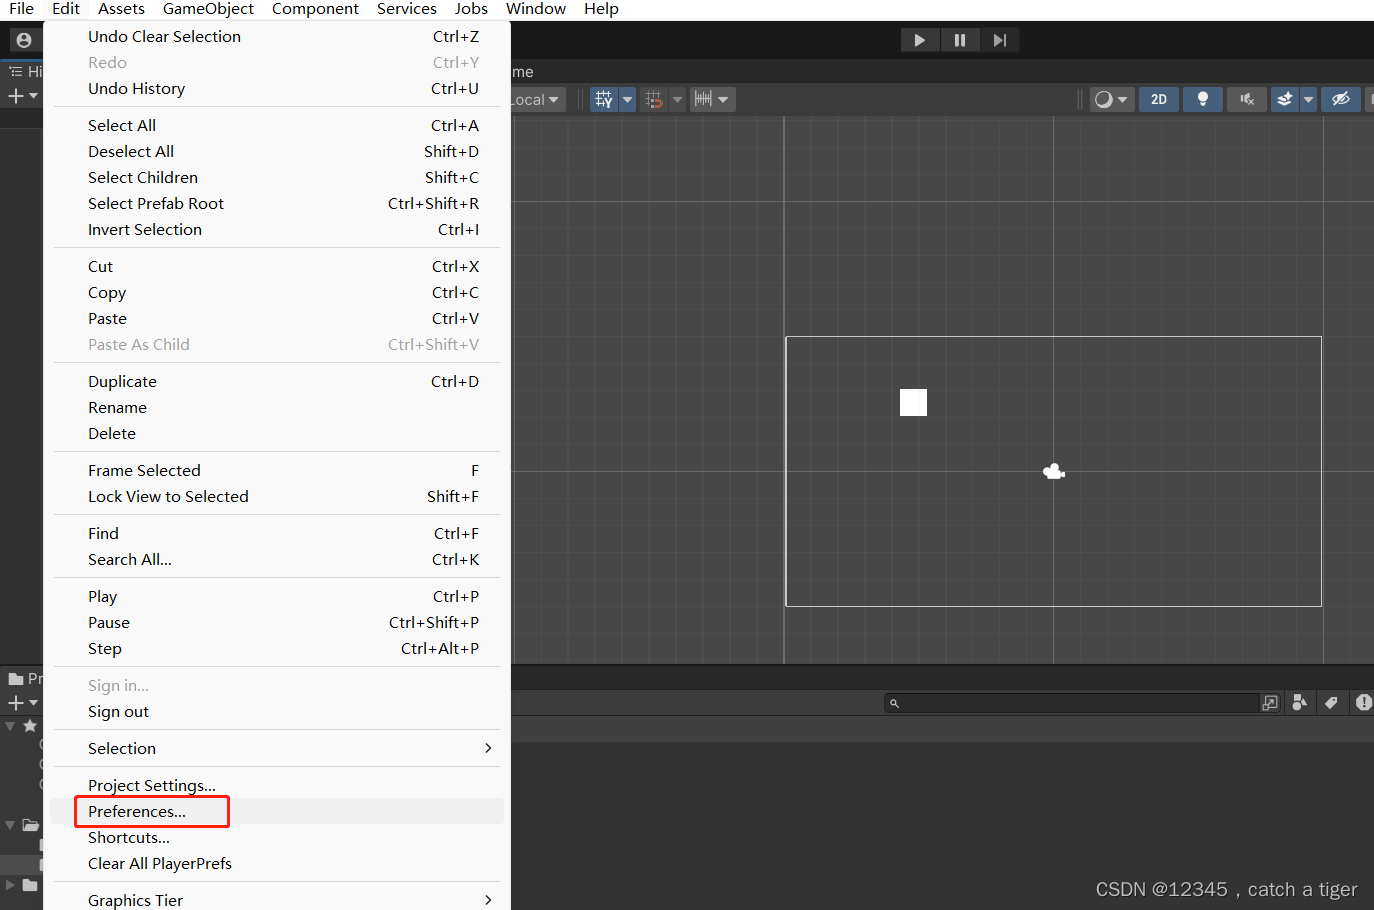
3.2 解决方法:点击 编辑(Edit)>首选项(Preferences)打开首选项窗口
3.3 在首选项窗口中,选择 外部工具(External Tools)选项卡,将 外部脚本编辑器(External Script Editor)的设置改为 Visual Studio 2019等编辑器 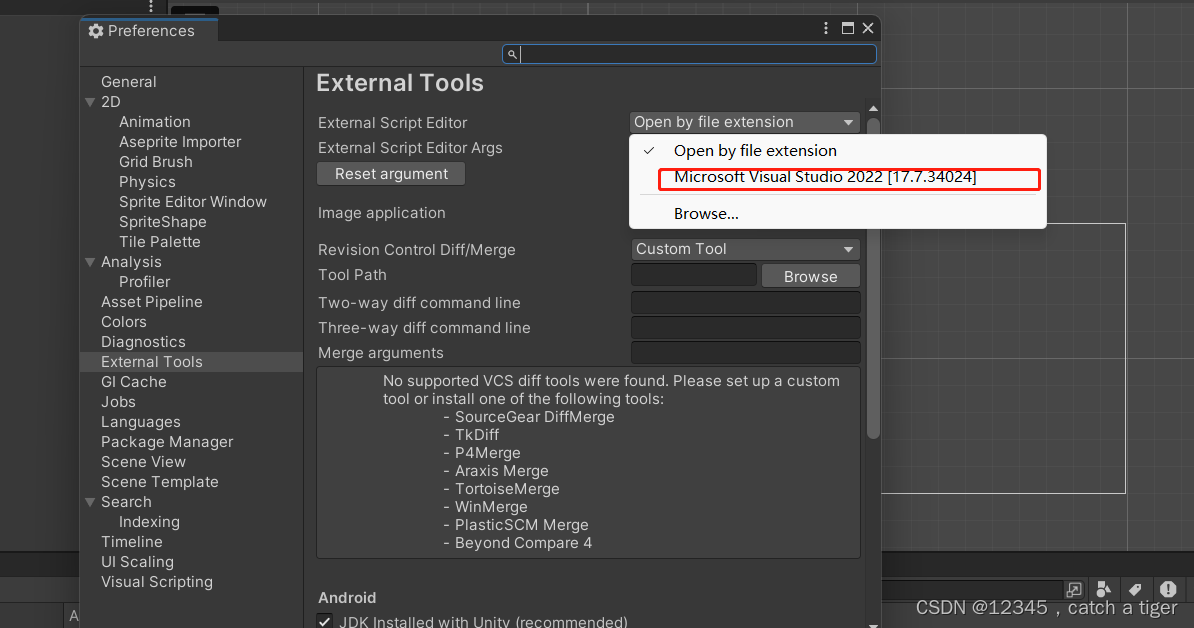
3.4 可以看到语法能够正常显示了
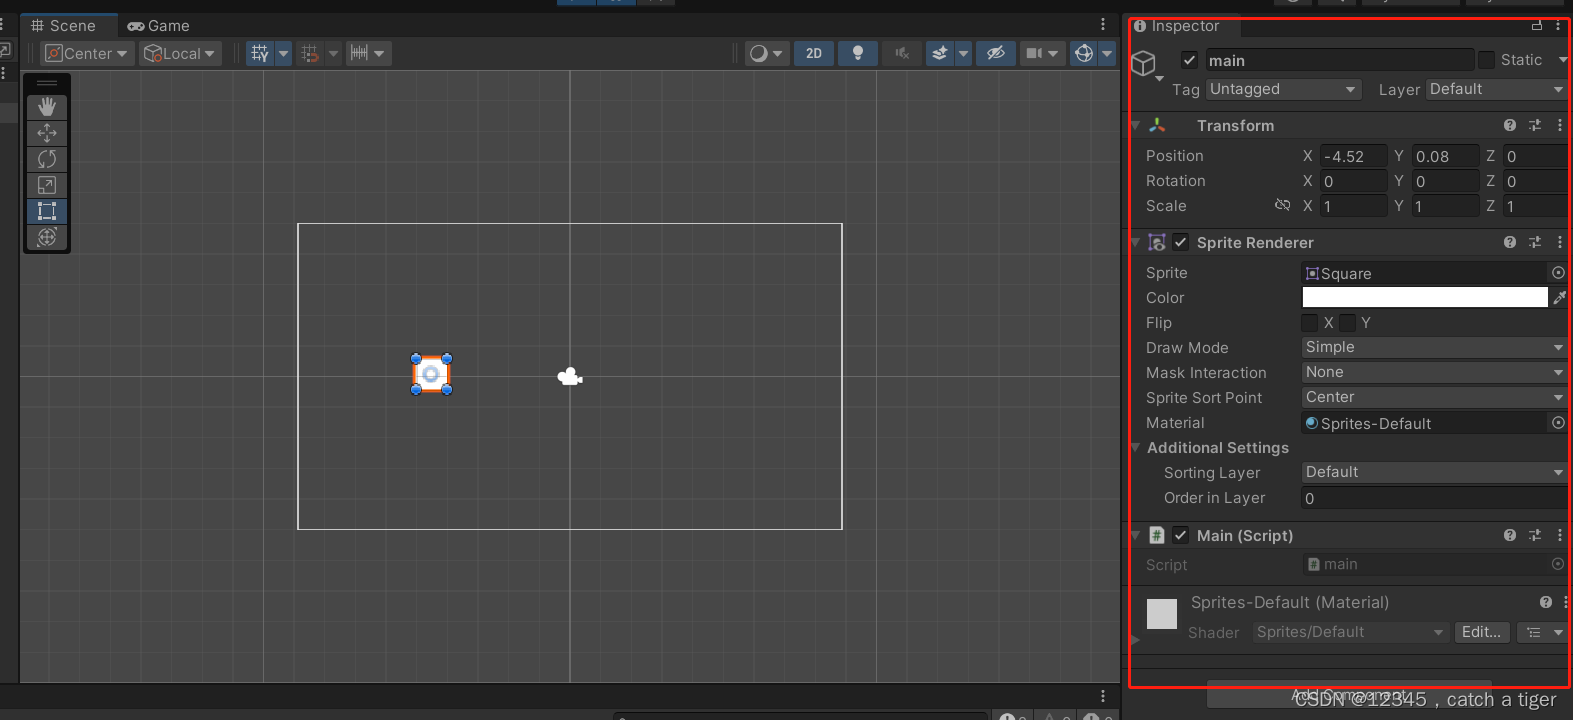
四,物体组件认识
4.1 一个物理有很多组件,点击物理,默认组件信息就会出来
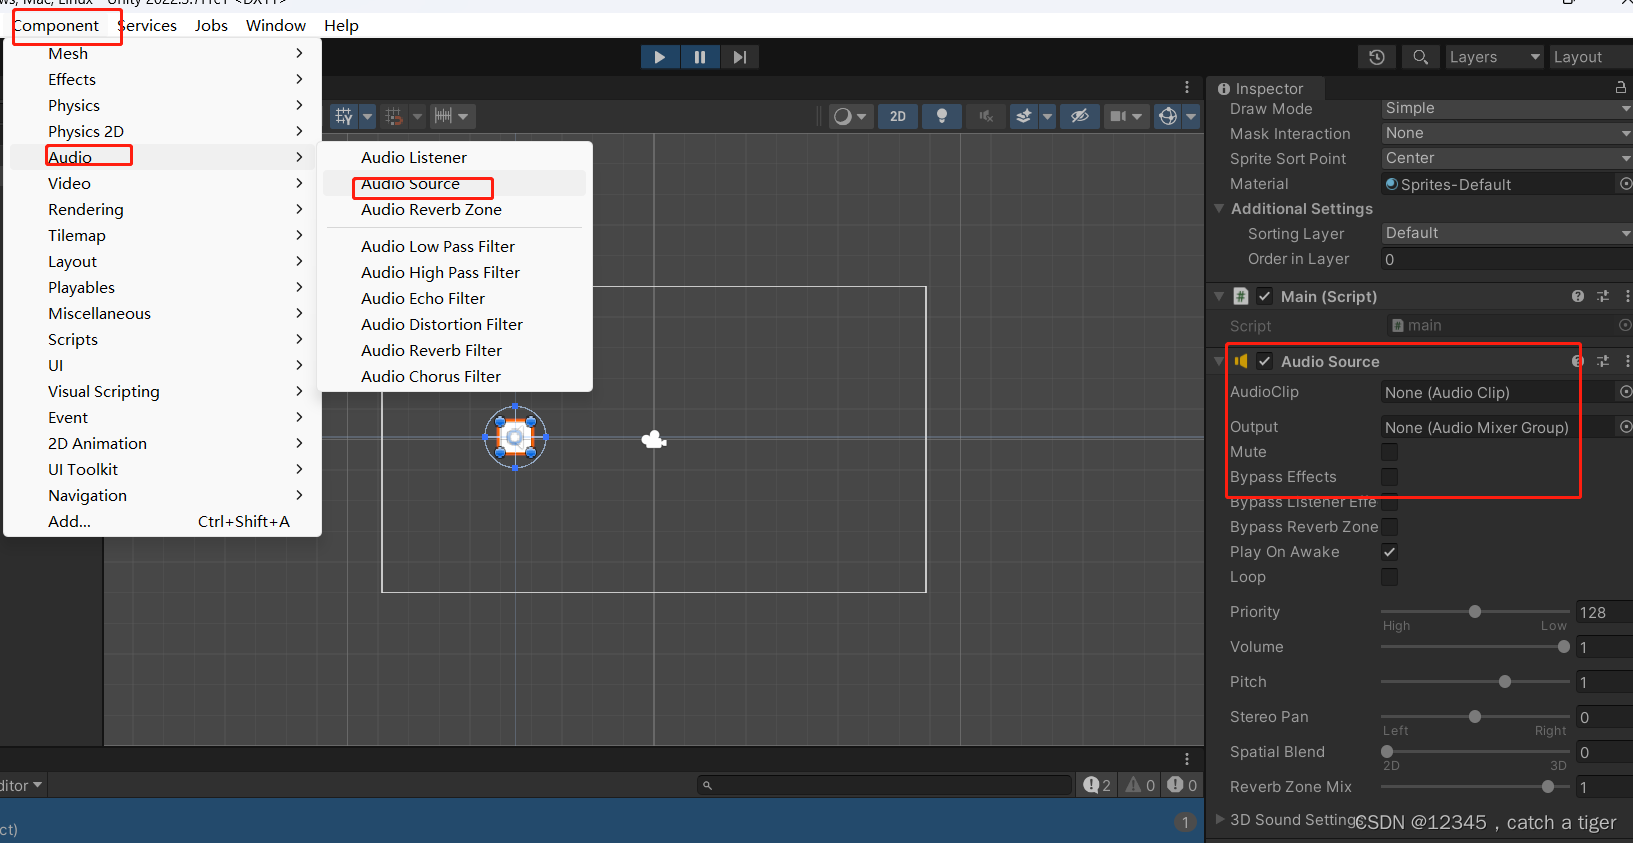
4.2 如下可以给物理新加组件信息,比如给物体新加声音组件
4.3 脚本关联物体后,也也属于物体的一个组件 ,可以在脚本中获取物体的其它组件和控制物体的组件

4.4 物体下面还可以创建多个物体,我们创建一个胶囊子物体,那胶囊就属于子组件
4.5 脚本获取基础组件和子组件,父组件。如下获取物体和组件实例:
using System.Collections;
using System.Collections.Generic;
using System.Diagnostics;
using UnityEngine;public class main : MonoBehaviour
{public GameObject Capsule;//胶囊组件public GameObject Prefab;//预设体// Start is called before the first frame updatevoid Start(){//拿到当前脚本所挂载的游戏物体//GameObject go = this.gameObject;//名称UnityEngine.Debug.Log(gameObject.name);//tagUnityEngine.Debug.Log(gameObject.tag);//layerUnityEngine.Debug.Log(gameObject.layer);//胶囊的名称UnityEngine.Debug.Log(Capsule.name);//胶囊当前真正的激活状态UnityEngine.Debug.Log(Capsule.activeInHierarchy);//胶囊当前自身激活状态UnityEngine.Debug.Log(Capsule.activeSelf);//获取Transform组件//Transform trans = this.transform;UnityEngine.Debug.Log(transform.position);//获取其他组件BoxCollider bc = GetComponent<BoxCollider>();//获取当前物体的子物体身上的某个组件GetComponentInChildren<CapsuleCollider>(bc);//获取当前物体的父物体身上的某个组件GetComponentInParent<BoxCollider>();//添加一个组件Capsule.AddComponent<AudioSource();//通过游戏物体的名称来获取游戏物体//GameObject test = GameObject.Find("Test");//通过游戏标签来获取游戏物体GameObject test = GameObject.FindWithTag("Enemy");test.SetActive(false);UnityEngine.Debug.Log(test.name);//通过预设体来实例化一个游戏物体GameObject go = Instantiate(Prefab, Vector3.zero, Quaternion.identity);//销毁Destroy(go);}// Update is called once per framevoid Update(){}
}
五 鼠标和触摸事件
5.1 鼠标事件
using System.Collections;
using System.Collections.Generic;
using System.Diagnostics;
using UnityEngine;
using UnityEngine.Windows;
using Input = UnityEngine.Input;public class main : MonoBehaviour
{void Start(){}// Update is called once per framevoid Update(){//鼠标的点击//按下鼠标 0左键 1右键 2滚轮if (Input.GetMouseButtonDown(0)){UnityEngine.Debug.Log("按下了鼠标左键");}//持续按下鼠标if (Input.GetMouseButton(0)) {UnityEngine.Debug.Log("持续按下鼠标左键");}//抬起鼠标if (Input.GetMouseButtonUp(0)) {UnityEngine.Debug.Log("抬起了鼠标左键");//按下键盘按键}if (Input.GetKeyDown(KeyCode.A)) {UnityEngine.Debug.Log("按下了A");}//持续按下按键if (Input.GetKey(KeyCode.A)) {UnityEngine.Debug.Log("持续按下A");}//抬起键盘按键if (Input.GetKeyUp("a")){UnityEngine.Debug.Log("松开了A");}}
}
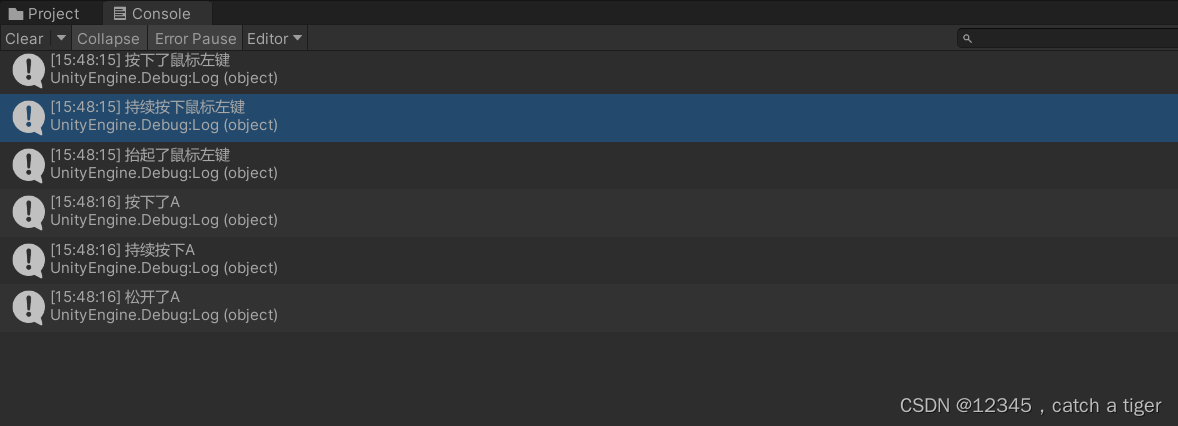
5.2 保存运行后可以看到控制台有对应的日志输出
5.3 手机单点,多点触控、
using UnityEngine;
using Input = UnityEngine.Input;public class main : MonoBehaviour
{void Start(){//开启多点触控Input.multiTouchEnabled = true;}// Update is called once per framevoid Update(){//判断单点触摸if (Input.touchCount == 1){//触摸对象Touch touch = Input.touches[0];//触摸位置UnityEngine.Debug.Log(touch.position);//触摸阶段switch (touch.phase){case UnityEngine.TouchPhase.Began:break;case UnityEngine.TouchPhase.Moved:break;case UnityEngine.TouchPhase.Stationary:break;case UnityEngine.TouchPhase.Ended:break;case UnityEngine.TouchPhase.Canceled:break;}}//判断单点触摸if (Input.touchCount == 2){//触摸对象1Touch touch0 = Input.touches[0];//触摸对象1Touch touch1 = Input.touches[1];}}
}
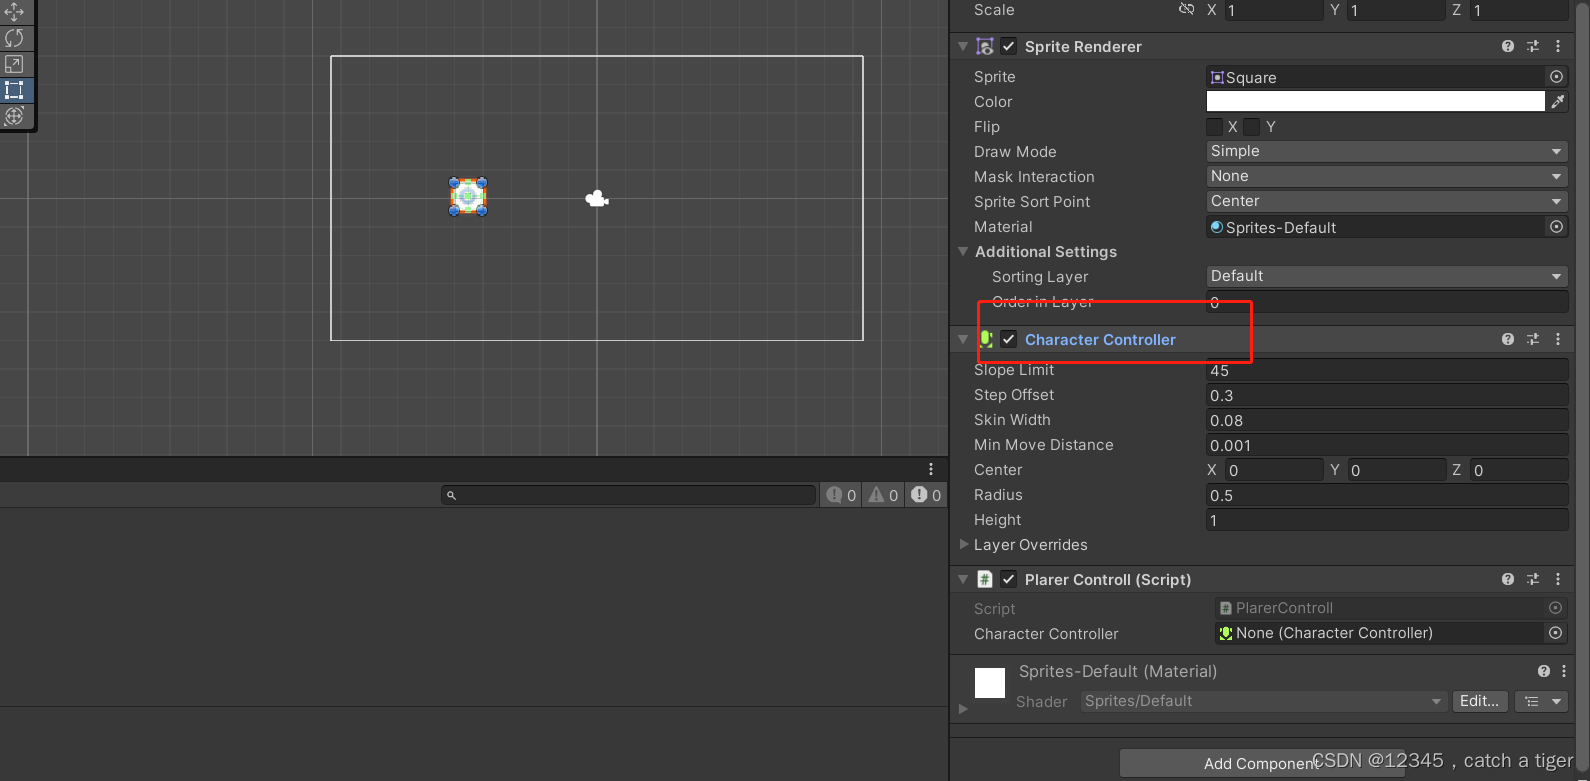
5.4 物体向量移动,添加物体控制组件
编写向量移动脚本
using System.Collections;
using System.Collections.Generic;
using UnityEngine;public class PlarerControll : MonoBehaviour
{public CharacterController characterController;// Start is called before the first frame updatevoid Start(){characterController = GetComponent<CharacterController>();}// Update is called once per framevoid Update(){//水平轴float horizontal = Input.GetAxis("Horizontal");//垂直轴float vertical = Input.GetAxis("Vertical");//创建成一个方向向量Vector2 dir = new Vector2(horizontal,vertical);Debug.DrawRay(transform.position, dir, Color.red);characterController.SimpleMove(dir);}
}
六 鼠标控制物体移动
6.1 2D用transform属性控制移动
using System.Collections;
using System.Collections.Generic;
using UnityEngine;public class PlarerControll : MonoBehaviour
{public CharacterController characterController;// Start is called before the first frame updatevoid Start(){characterController = GetComponent<CharacterController>();}// Update is called once per framevoid Update(){if (Input.GetMouseButton(0)){//目前的鼠标二维坐标转为三维坐标Vector2 curMousePos = new Vector2(Input.mousePosition.x, Input.mousePosition.y);//目前的鼠标三维坐标转为世界坐标curMousePos = Camera.main.ScreenToWorldPoint(curMousePos);transform.position = curMousePos ;}}
}
6.2 在携程里面控制物体移动
using System.Collections;
using System.Collections.Generic;
using UnityEngine;public class PlarerControll : MonoBehaviour
{// Start is called before the first frame updatevoid Start(){StartCoroutine(OnMouseDown());//在Start方法中调用StartCoroutine(要调用的协程方法)}// Update is called once per framevoid Update(){}//协程IEnumerator OnMouseDown(){//1. 得到物体的屏幕坐标Vector3 cubeScreenPos = Camera.main.WorldToScreenPoint(transform.position);//2. 计算偏移量//鼠标的三维坐标Vector3 mousePos = new Vector3(Input.mousePosition.x, Input.mousePosition.y, cubeScreenPos.z);//鼠标三维坐标转为世界坐标mousePos = Camera.main.ScreenToWorldPoint(mousePos);Vector3 offset = transform.position - mousePos;//3. 物体随着鼠标移动while (Input.GetMouseButton(0)){//目前的鼠标二维坐标转为三维坐标Vector3 curMousePos = new Vector3(Input.mousePosition.x, Input.mousePosition.y, cubeScreenPos.z);//目前的鼠标三维坐标转为世界坐标curMousePos = Camera.main.ScreenToWorldPoint(curMousePos);//物体世界位置transform.position = curMousePos + offset;yield return new WaitForFixedUpdate(); //这个很重要,循环执行}}
}
6.3 用Translate滑动鼠标移动
using System.Collections;
using System.Collections.Generic;
using UnityEngine;public class PlarerControll : MonoBehaviour
{// Start is called before the first frame updatevoid Start(){}// 定义了一个名为sizespeed的公共(public)浮点型(float)变量,初始值为1public float sizespeed = 1;// 定义了一个名为mouseSpeed的公共浮点型变量,初始值为10public float mouseSpeed = 10;  // 定义了一个名为lastMousePosition的私有(private)Vector3类型变量private Vector3 lastMousePosition;    // Update is called once per framevoid Update(){// 获取鼠标滚轮的输入值,并将其赋值给名为mouse的局部(local)浮点型变量float mouse = -Input.GetAxis("Mouse ScrollWheel");   // 鼠标中键按住拖动if (Input.GetMouseButton(0)){   // 获取当前鼠标位置和上一次鼠标位置之间的差值,并将其赋值给名为deltaMousePosition的局部Vector3类型变量Vector3 deltaMousePosition = Input.mousePosition - lastMousePosition;// 将摄像机的位置向左右和上下移动,移动的距离由鼠标的移动距离和鼠标速度决定transform.Translate(deltaMousePosition.x * mouseSpeed * Time.deltaTime, deltaMousePosition.y * mouseSpeed * Time.deltaTime, 0);    }// 将摄像机的位置向上或向下移动,移动的距离由鼠标滚轮的输入值和大小速度决定transform.Translate(new Vector3(0, mouse * sizespeed, 0) * Time.deltaTime, Space.World);// 将鼠标当前位置赋值给lastMousePosition变量,以便下一帧计算鼠标位置差值lastMousePosition = Input.mousePosition;    }
}
七 向量的认识
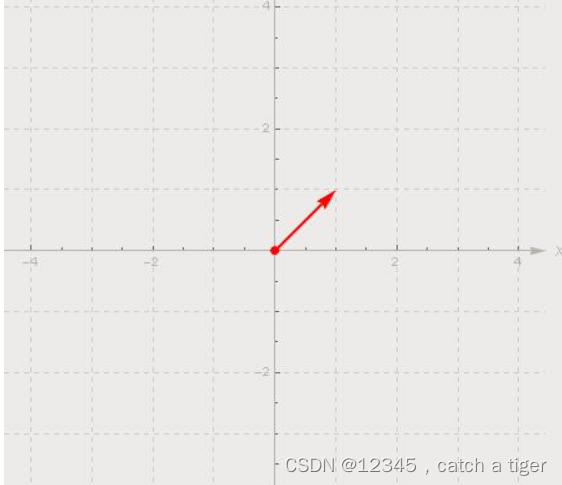
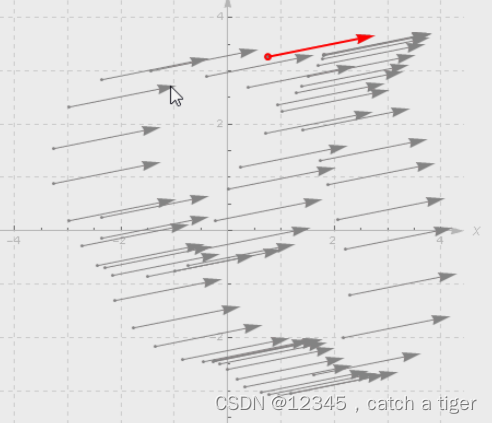
7.1 向量在游戏角色世界是非常重要的一个概念,上面大部分物体的移动都是通过向量Vector3
7.2 向量指一个同时具有大小和方向的量. 它通常画为一个带箭头的线段(如下图).线段的长度可以表示向量的大小,而向量的方向也就是箭头所指的方向.物理学中的位移、速度、力等都是矢量
7.3 只要向量的大小和方向相同, 即视为相等的向量, 如下图所示都是相同的向量.
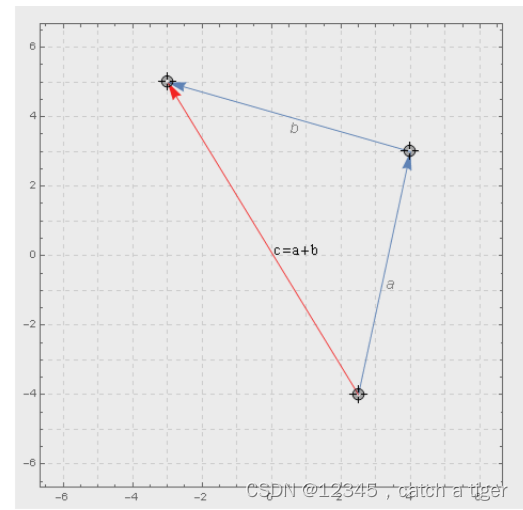
7.4 向量的加法可以用几种三种法则来解释, 比如下面的三角形法则

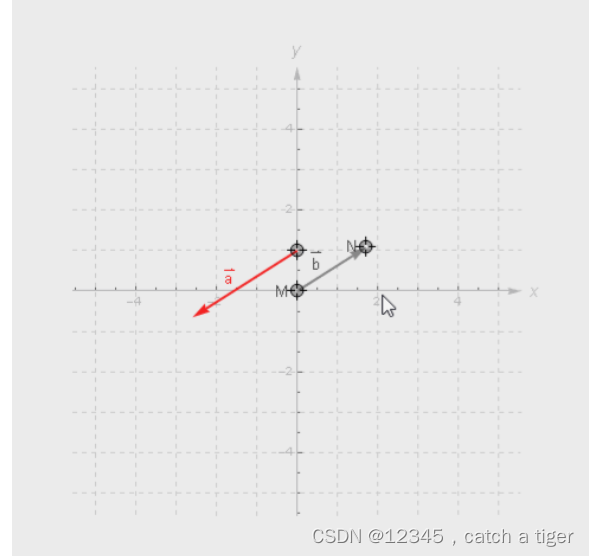
7.5 向量的减法也有类似运算法则, 三角形法则和平行四边形, 记得箭头总是由减数指向被减数:

7.6 向量 b 与一个标量(实数)相乘还是一个向量, 观察下面的当标量改变时候, 向量 a 的变化:

![[刷题记录]牛客面试笔刷TOP101](https://img-blog.csdnimg.cn/cb21798a927c4ed2a3b29b1d8b7951ba.png)