⼗⼋、Spring6集成MyBatis3.5
18.1 实现步骤
● 第⼀步:准备数据库表
○ 使⽤t_act表(账户表)
● 第⼆步:IDEA中创建⼀个模块,并引⼊依赖
○ spring-context
○ spring-jdbc
○ mysql驱动
○ mybatis
○ mybatis-spring: mybatis提供的与spring框架集成的依赖
○ 德鲁伊连接池
○ junit
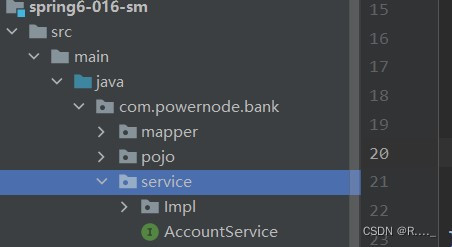
● 第三步:基于三层架构实现,所以提前创建好所有的包
○ com.powernode.bank.mapper
○ com.powernode.bank.service
○ com.powernode.bank.service.impl
○ com.powernode.bank.pojo
● 第四步:编写pojo
○ Account,属性私有化,提供公开的setter getter和toString。
● 第五步:编写mapper接⼝
○ AccountMapper接⼝,定义⽅法
● 第六步:编写mapper配置⽂件
○ 在配置⽂件中配置命名空间,以及每⼀个⽅法对应的sql。
● 第七步:编写service接⼝和service接⼝实现类
○ AccountService
○ AccountServiceImpl
● 第⼋步:编写jdbc.properties配置⽂件
○ 数据库连接池相关信息
● 第九步:编写mybatis-config.xml配置⽂件
○ 该⽂件可以没有,⼤部分的配置可以转移到spring配置⽂件中。
○ 如果遇到mybatis相关的系统级配置,还是需要这个⽂件。
● 第⼗步:编写spring.xml配置⽂件
○ 组件扫描
○ 引⼊外部的属性⽂件
○ 数据源
○ SqlSessionFactoryBean配置
■ 注⼊mybatis核⼼配置⽂件路径
■ 指定别名包
■ 注⼊数据源
○ Mapper扫描配置器
■ 指定扫描的包
○ 事务管理器DataSourceTransactionManager
■ 注⼊数据源
○ 启⽤事务注解
■ 注⼊事务管理器
● 第⼗⼀步:编写测试程序,并添加事务,进⾏测试
18.2 具体实现
● 第⼀步:准备数据库表
连接数据库的⼯具有很多,除了之前我们使⽤的navicat for mysql之外,也可以使⽤IDEA⼯具⾃带的 DataBase插件。可以根据下图提示⾃⾏配置:

● 第⼆步:IDEA中创建⼀个模块,并引⼊依赖
<packaging>jar</packaging><!--○ spring-context○ spring-jdbc○ mysql驱动○ mybatis○ mybatis-spring:mybatis提供的与spring框架集成的依赖○ 德鲁伊连接池○ junit--><dependencies><dependency><groupId>org.mybatis</groupId><artifactId>mybatis</artifactId><version>3.5.10</version></dependency><dependency><groupId>mysql</groupId><artifactId>mysql-connector-java</artifactId><version>8.0.31</version></dependency><dependency><groupId>junit</groupId><artifactId>junit</artifactId><version>4.12</version><scope>test</scope></dependency><dependency><groupId>org.springframework</groupId><artifactId>spring-context</artifactId><version>6.0.0</version></dependency><dependency><groupId>org.springframework</groupId><artifactId>spring-jdbc</artifactId><version>6.0.0</version></dependency><dependency><groupId>org.mybatis</groupId><artifactId>mybatis-spring</artifactId><version>2.0.7</version></dependency><dependency><groupId>com.alibaba</groupId><artifactId>druid</artifactId><version>1.2.13</version></dependency></dependencies>● 第三步:基于三层架构实现,所以提前创建好所有的包
● 第四步:编写pojo
public class Account {private String actno;private Double balance;public Account(){}public Account(String actno, Double balance) {this.actno = actno;this.balance = balance;}//get,set,toString方法
}
● 第五步:编写mapper接⼝
public interface AccountMapper {//该接口的实现类不需要写,是mybatis通过动态代理机制生成的实现类//这就是Dao,只要编写CRUD方法即可//新增用户int insert(Account account);//根据账号删除用户int deleteByActno(String actno);//更新用户int update(Account account);//根据账号查询用户Account selectByActno(String actno);//查询所有用户List<Account> selectAll();
}
● 第六步:编写mapper配置⽂件
⼀定要注意,按照下图提示创建这个⽬录。注意是斜杠不是点⼉。在resources⽬录下新建。并且要和 Mapper接⼝包对应上。

<?xml version="1.0" encoding="UTF-8" ?>
<!DOCTYPE mapperPUBLIC "-//mybatis.org//DTD Mapper 3.0//EN""http://mybatis.org/dtd/mybatis-3-mapper.dtd"><mapper namespace="com.powernode.bank.mapper.AccountMapper"><insert id="insert">insert into t_act values(#{actno},#{balance})</insert><delete id="deleteByActno">delete from t_act where actno=#{actno}</delete><update id="update">update t_act set balance=#{balance} where actno=#{actno}</update><select id="selectByActno" resultType="Account">select * from t_act where actno=#{actno}</select><select id="selectAll" resultType="Account">select * from t_act</select>
</mapper>
如果接⼝叫做AccountMapper,配置⽂件必须是AccountMapper.xml
● 第七步:编写service接⼝和service接⼝实现类
注意编写的service实现类纳⼊IoC容器管理:
AccountService接口:
public interface AccountService {//开户int save(Account act);//销毁int deleteByActno(String actno);//修改账户int modify(Account account);//查询账户Account getByActno(String actno);//获取所有账户List<Account> getAll();//转账void transfer(String fromActno,String toActno,double moeny);
}
AccountServiceImpl类:
@Service("accountService")
public class AccountServiceImpl implements AccountService {@Autowiredprivate AccountMapper accountMapper;@Overridepublic int save(Account act) {return accountMapper.insert(act);}@Overridepublic int deleteByActno(String actno) {return accountMapper.deleteByActno(actno);}@Overridepublic int modify(Account account) {return accountMapper.update(account);}@Overridepublic Account getByActno(String actno) {return accountMapper.selectByActno(actno);}@Overridepublic List<Account> getAll() {return accountMapper.selectAll();}@Overridepublic void transfer(String fromActno, String toActno, double money) {Account fromAct = accountMapper.selectByActno(fromActno);if (fromAct.getBalance()<money) {throw new  RuntimeException("账户余额不足");}Account toAct = accountMapper.selectByActno(toActno);//该内存fromAct.setBalance(fromAct.getBalance()-money);toAct.setBalance(toAct.getBalance()+money);//该数据库int count = accountMapper.update(fromAct);count += accountMapper.update(toAct);if(count!=2){throw new RuntimeException("转账失败!");}}
}
● 第⼋步:编写jdbc.properties配置⽂件
放在类的根路径下
jdbc.driver=com.mysql.cj.jdbc.Driver
jdbc.url=jdbc:mysql://localhost:3306/spring6
jdbc.username=root
jdbc.password=r38153
● 第九步:编写mybatis-config.xml配置⽂件
放在类的根路径下,只开启⽇志,其他配置到spring.xml中。
<?xml version="1.0" encoding="UTF-8" ?>
<!DOCTYPE configurationPUBLIC "-//mybatis.org//DTD Config 3.0//EN""http://mybatis.org/dtd/mybatis-3-config.dtd">
<configuration>
<!--帮助我们打印mybatis的日志信息,sql语句等--><settings><setting name="logImpl" value="STDOUT_LOGGING"/></settings>
</configuration>
● 第⼗步:编写spring.xml配置⽂件
注意:当你在spring.xml⽂件中直接写标签内容时,IDEA会⾃动给你添加命名空间
<?xml version="1.0" encoding="UTF-8"?>
<beans xmlns="http://www.springframework.org/schema/beans"xmlns:xsi="http://www.w3.org/2001/XMLSchema-instance"xmlns:tx="http://www.springframework.org/schema/tx"xmlns:context="http://www.springframework.org/schema/context"xsi:schemaLocation="http://www.springframework.org/schema/beans http://www.springframework.org/schema/beans/spring-beans.xsdhttp://www.springframework.org/schema/context http://www.springframework.org/schema/context/spring-context.xsdhttp://www.springframework.org/schema/tx http://www.springframework.org/schema/tx/spring-tx.xsd"><!--○ 组件扫描○ 引⼊外部的属性⽂件○ 数据源○ SqlSessionFactoryBean配置■ 注⼊mybatis核⼼配置⽂件路径■ 指定别名包■ 注⼊数据源○ Mapper扫描配置器■ 指定扫描的包○ 事务管理器DataSourceTransactionManager■ 注⼊数据源○ 启⽤事务注解■ 注⼊事务管理器--><!--组件扫描--><context:component-scan base-package="com.powernode.bank"/><!--引⼊外部的属性⽂件--><context:property-placeholder location="jdbc.properties"/><!--数据源--><bean id="dataSource" class="com.alibaba.druid.pool.DruidDataSource"><property name="driverClassName" value="${jdbc.driver}"/><property name="url" value="${jdbc.url}"/><property name="username" value="${jdbc.username}"/><property name="password" value="${jdbc.password}"/></bean><!--SqlSessionFactoryBean配置--><bean class="org.mybatis.spring.SqlSessionFactoryBean"><!--注⼊数据源--><property name="dataSource" ref="dataSource"/><!--注⼊mybatis核⼼配置⽂件路径--><property name="configLocation" value="mybatis-config.xml"/><!--指定别名包--><property name="typeAliasesPackage" value="com.powernode.bank.pojo"/></bean><!--Mapper扫描配置器--><bean class="org.mybatis.spring.mapper.MapperScannerConfigurer"><!--指定扫描的包--><property name="basePackage" value="com.powernode.bank.mapper"/></bean><!--事务管理器DataSourceTransactionManager--><bean id="txManager" class="org.springframework.jdbc.datasource.DataSourceTransactionManager"><!--注⼊数据源--><property name="dataSource" ref="dataSource"/></bean><!--开启事务注解,并注⼊事务管理器--><tx:annotation-driven transaction-manager="txManager"/>
</beans>
● 第⼗⼀步:编写测试程序,并添加事务,进⾏测试
public class SMTest {@Testpublic void testSM(){ApplicationContext applicationContext = new ClassPathXmlApplicationContext("spring.xml");AccountService accountService = applicationContext.getBean("accountService", AccountService.class);try{accountService.transfer("act-001","act-002",10000.0);}catch (Exception e){e.printStackTrace();}}
}
18.3 spring配置⽂件的import
spring配置⽂件有多个,并且可以在spring的核⼼配置⽂件中使⽤import进⾏引⼊,我们可以将组件扫描单独定义到⼀个配置⽂件中,如下
common.xml
<?xml version="1.0" encoding="UTF-8"?>
<beans xmlns="http://www.springframework.org/schema/beans"xmlns:xsi="http://www.w3.org/2001/XMLSchema-instance"xmlns:context="http://www.springframework.org/schema/context"xsi:schemaLocation="http://www.springframework.org/schema/beans http://www.springframework.org/schema/beans/spring-beans.xsd http://www.springframework.org/schema/context https://www.springframework.org/schema/context/spring-context.xsd"><context:component-scan base-package="com.powernode.bank"/>
</beans>
然后在核⼼配置⽂件中引⼊:
<!--组件扫描--><!-- <context:component-scan base-package="com.powernode.bank"/>--><!--在spring的核心配置文件中引入其他的子spring配置文件--><import resource="common.xml"/> 注意:在实际开发中,service单独配置到⼀个⽂件中,dao单独配置到⼀个⽂件中,然后在核⼼配置⽂件中引⼊。
⼗九、Spring中的⼋⼤模式
19.1 简单⼯⼚模式
BeanFactory的getBean()⽅法,通过唯⼀标识来获取Bean对象。是典型的简单⼯⼚模式(静态⼯⼚模式);
19.2 ⼯⼚⽅法模式
FactoryBean是典型的⼯⼚⽅法模式。在配置⽂件中通过factory-method属性来指定⼯⼚⽅法,该⽅法是⼀个实例⽅法。
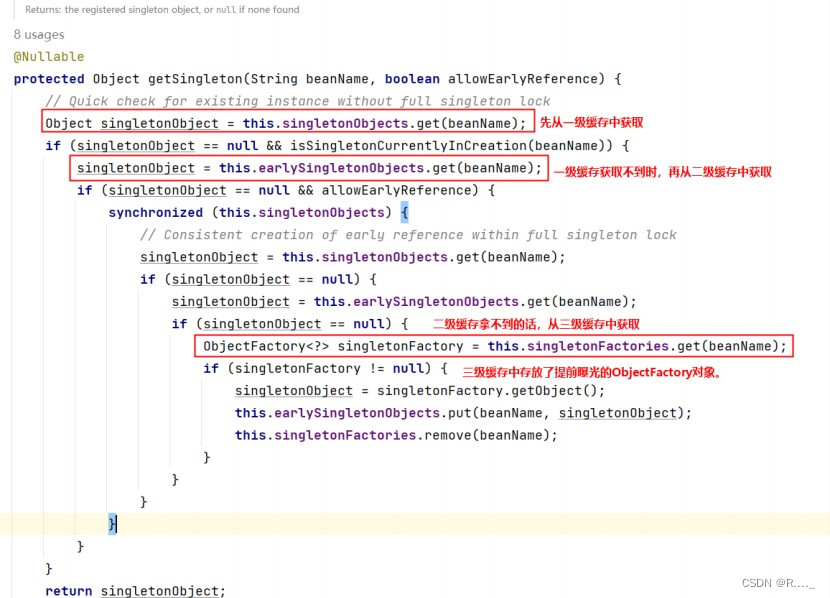
19.3 单例模式
Spring⽤的是双重判断加锁的单例模式。请看下⾯代码,我们之前讲解Bean的循环依赖的时候⻅过:
19.4 代理模式
Spring的AOP就是使⽤了动态代理实现的。
19.5 装饰器模式
JavaSE中的IO流是⾮常典型的装饰器模式。
Spring 中配置 DataSource 的时候,这些dataSource可能是各种不同类型的,⽐如不同的数据库:
Oracle、SQL Server、MySQL等,也可能是不同的数据源:⽐如apache 提供的
org.apache.commons.dbcp.BasicDataSource、spring提供的
org.springframework.jndi.JndiObjectFactoryBean等。
这时,能否在尽可能少修改原有类代码下的情况下,做到动态切换不同的数据源?此时就可以⽤到装饰者模式。
Spring根据每次请求的不同,将dataSource属性设置成不同的数据源,以到达切换数据源的⽬的。
Spring中类名中带有:Decorator和Wrapper单词的类,都是装饰器模式。
19.6 观察者模式
定义对象间的⼀对多的关系,当⼀个对象的状态发⽣改变时,所有依赖于它的对象都得到通知并⾃动更新。Spring中观察者模式⼀般⽤在listener的实现。
Spring中的事件编程模型就是观察者模式的实现。在Spring中定义了⼀个ApplicationListener接⼝,⽤来监听Application的事件,Application其实就是ApplicationContext,ApplicationContext内置了⼏个事件,其中⽐较容易理解的是:ContextRefreshedEvent、ContextStartedEvent、
ContextStoppedEvent、ContextClosedEvent
19.7 策略模式
策略模式是⾏为性模式,调⽤不同的⽅法,适应⾏为的变化 ,强调⽗类的调⽤⼦类的特性 。
getHandler是HandlerMapping接⼝中的唯⼀⽅法,⽤于根据请求找到匹配的处理器。
⽐如我们⾃⼰写了AccountDao接⼝,然后这个接⼝下有不同的实现类:AccountDaoForMySQL,
AccountDaoForOracle。对于service来说不需要关⼼底层具体的实现,只需要⾯向AccountDao接⼝调⽤,底层可以灵活切换实现,这就是策略模式。
19.8 模板⽅法模式
Spring中的JdbcTemplate类就是⼀个模板类。它就是⼀个模板⽅法设计模式的体现。在模板类的模板⽅法execute中编写核⼼算法,具体的实现步骤在⼦类中完成。