结合已学习过的vue3和TS完成的项目,便于患者对自己想要就诊的科室进行挂号,付款
一:项目简介
前端技术栈
Vue3
TS
vue-router
Element-ui
Axios
Pinia
项目架构
二:主要模块
1. axios二次封装
1.1 创建实例
//利用axios.create方法创建一个axios实例
const request = axios.create({baseURL: '/api', //请求基础路径设置timeout: 5000 //超时的时间设置,超出5s请求就是失败
})
1.2 请求拦截器
引入store仓库中的用户token,设置请求头携带token参数,后序请求需要验证token
//请求拦截器
request.interceptors.request.use(config => {//config:请求拦截器回调注入的对象(配置对象),配置对象的身上最重要的一件事情headers属性//可以通过请求头携带公共参数 -token//获取用户仓库let userStore = useUserStore()// console.log(userStore.userInfo)// token: 公共参数,用户登录了需要携带if (userStore.userInfo.token) {config.headers.token = userStore.userInfo.token}return config
})
1.3 响应拦截器
利用响应拦截器进行简化数据
当http网络错误时,设置提示信息
//响应拦截器
request.interceptors.response.use(response => {//响应拦截器成功的回调,一般会简化数据return response.data},error => {//处理http网络错误let status = error.response.statusswitch (status) {case 404://错误信息ElMessage({type: 'error',message: '请求失败路径出现问题'})breakcase 500 | 501 | 502 | 503 | 504 | 505://错误信息ElMessage({type: 'error',message: '服务器错误'})breakcase 401://错误信息ElMessage({type: 'error',message: '参数有误'})break}return Promise.reject(new Error(error.message))}
)
2. vite配置代理跨域
在跨域请求时,浏览器会采取同源策略来限制来自不同源的跨域请求,为了解决这个问题,通常可以采用代理服务器来处理该问题,使得请求在同源的环境下进行
vite服务器会将请求转发到指定的代理服务器,代理服务器再向目标请求地址发起请求
代理服务器接收到真正的响应后,再将其返回给vite服务器,最终返回给前端
//配置代理跨域server: {proxy: {'/api': {target: 'http:xxx.cn',changeOrigin: true}}}
3. 首页: 搜索栏

element-ui组件-自动补全输入框
<el-autocomplete@select="goDetail":trigger-on-focus="false"clearableplaceholder="请你输入医院名称"v-model="hosname":fetch-suggestions="fetchData"/>
//引入请求方法
import { reqHospitalInfo } from '@/api/home'
import type { HospitalInfo } from '@/api/home/type'
//创建路由器对象
let $router = useRouter()
//收集搜索的关键字(医院的名字)
let hosname = ref<string>('')//顶部组件的回调
const fetchData = async (keyword: string, cb: any) => {//当用户输入完关键字时 函数执行 发送请求获取需要展示的数据// console.log(123)let result: HospitalInfo = await reqHospitalInfo(keyword)// console.log(result)//该组件 需要的数据字段为 value 返回的数据字段为hosname 整理修改let showData = result.data.map(item => {return {value: item.hosname, //展示的是医院的编码hoscode: item.hoscode //存储医院的编码}})//给组件提供展示的数据cb(showData)
}//点击某一个推荐项
const goDetail = (item: any) => {//点击推荐项目进入医院详情页,将来需要携带query参数(医院的编码)// console.log(item)$router.push({ path: '/hospital/register', query: { hoscode: item.hoscode } })
}

- fetch-suggestions方法,需要两个参数,keyword是搜索框输入的参数,cb,callback回调函数,需要将给组件展示的数据传给回调函数
- 因此,调用根据输入的字段获取医院信息,使用map方法遍历返回的数据,再根据对应的字段将数据返回出来,作为showData,再将其传入回调

- select事件,当选中对应选项时触发,携带对应医院参数跳转到对应医院详情页
4. 首页: 根据等级和地区筛选
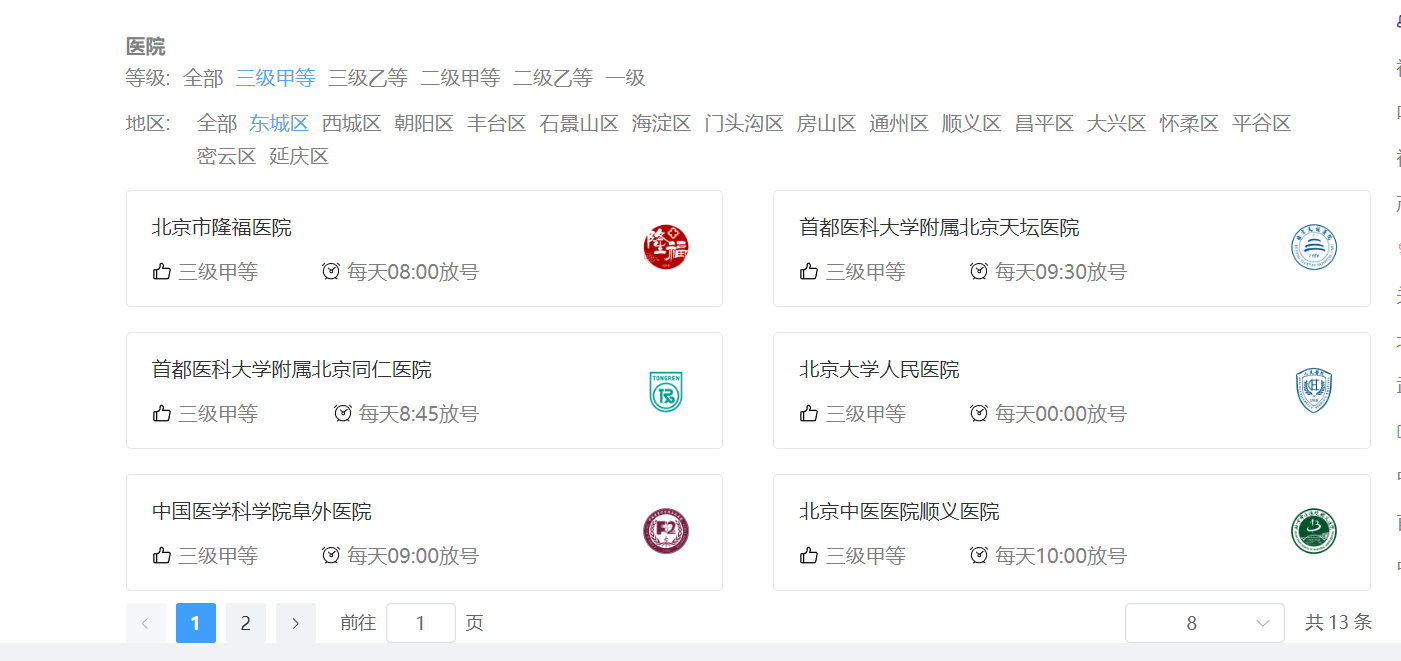
4.1 子组件:Level-医院等级
-
自定义事件向父组件传递等级参数
-
子组件通过defineEmits设置要发射给父组件需要使用的方法getLevel
-
使用defineEmits会返回一个方法,使用一个变量emits(变量名随意)去接收
-
在对应时机触发事件,并传入需要传递给父组件的参数
//点击等级的按钮回调
const changeLevel = (level: string) => {//高亮响应式数据存储leve数值activeFlag.value = level//触发自定义事件: 将医院的等级数值传递给父组件$emit('getLevel', level)
}let $emit = defineEmits(['getLevel'])
4.2 子组件:Region-地区
//点击不同区域按钮回调
const changeRegion = (region: string) => {regionFlag.value = region//触发自定义事件传值$emits('getRegion', region)
}let $emits = defineEmits(['getRegion'])
4.3 父组件:home-首页
- 当页面挂载时候,获取医院数据并展示
- 但当用户选中等级和地区时,需要重新根据对应的参数获取对应的医院数据
- 因此需要用到地区子组件和等级子组件传递来的对应参数
- 用到自定义事件接受两个子组件传递的参数
//子组件自定义事件:获取子组件传递的医院等级数据
const getLevel = (level: string) => {//更新存储医院等级数据hosType.value = level//更新完医院等级数据再重新发起请求getHospitalInfo()
}
//子组件自定义事件:获取子组件传递的地区数据
const getRegion = (region: string) => {//更新存储医院地区数据districtCode.value = region//更新完医院等级数据再重新发起请求getHospitalInfo()
}
5. 登录/退出
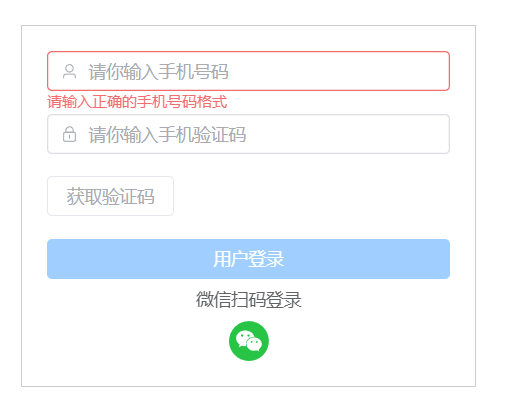
//用户登录
const login = async () => {//保证表单校验两项都复合条件await form.value.validate()try {//用户登录成功await userStore.userLogin(loginParam)//关闭对话框userStore.visiable = false//获取url的query参数let redirect = $route.query.redirectif (redirect) {$router.push(redirect as string)} else {$router.push('/home')}} catch (error) {ElMessage({type: 'error',message: (error as Error).message})}
}
- 仓库处理登录逻辑,并保存响应状态
//用户登录请求async userLogin(loginParam: any) {let result: UserLoginResponseData = await reqUserLogin(loginParam)// console.log(loginParam)// console.log(result)if (result.code === 200) {//存储name和tokenthis.userInfo = result.data//本地存储持久化存储用户信息SET_TOKEN(JSON.stringify(this.userInfo))return 'ok'} else {return Promise.reject(new Error(result.message))}},
//本地存储操作用户信息的方法
export const SET_TOKEN = (userInfo: string) => {localStorage.setItem('userInfo', userInfo)
}export const GET_TOKEN = () => {return localStorage.getItem('userInfo')
}export const REMOVE_TOKEN = () => {localStorage.removeItem('userInfo')
}- 封装操作用户相关信息持久化存储的相关方法

//退出登录loginOut() {//清空仓库的数据this.userInfo = { name: '', token: '' }//清空本地存储的数据REMOVE_TOKEN()}
- 退出登录,清空仓库的数据,清除本地存储数据
6. 挂号
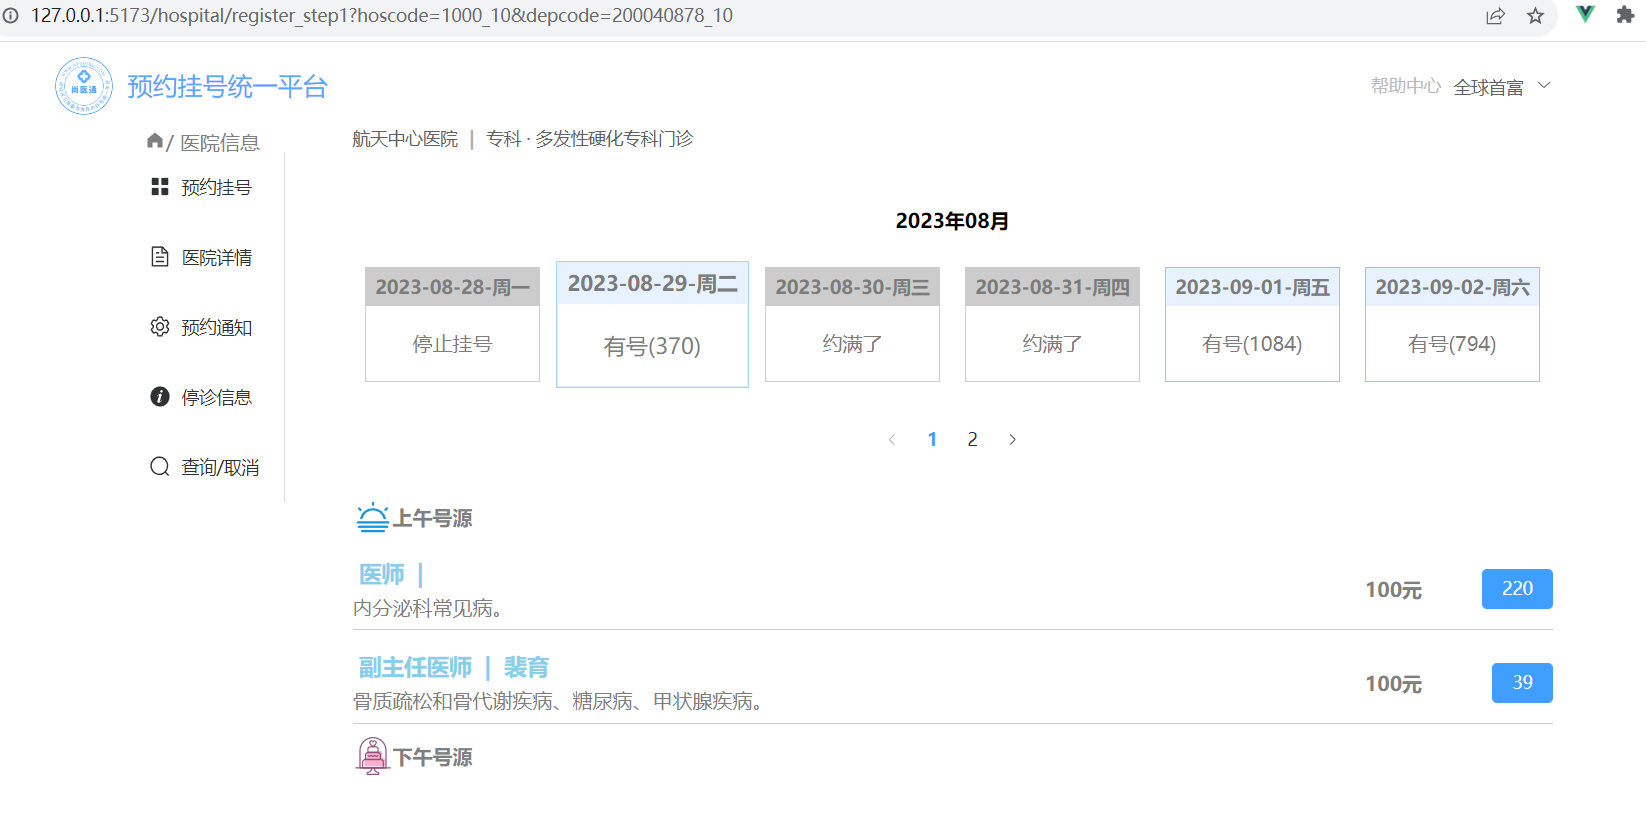
//点击对应日期获取对应数据存储
const changeTime = async (item: string) => {workTime.value = item//再调用获取医生数据请求getDoctorWorkData()
}
//获取当前日期下的医生信息和票价格请求
const getDoctorWorkData = async () => {//三个参数//医院编号let hoscode: string = $route.query.hoscode as string//科室编号let depcode: string = $route.query.depcode as string//工作日期let workDate: string = workTime.value.workDate//发请求存储数据let result: DoctorResponseData = await reqHospitalDoctor(hoscode, depcode, workDate)// console.log(result)if (result.code === 200) {docArr.value = result.data}
}
- workTime存储改日日期,通过点击对应日期,更新workTime的值,然后再次获取医生数据请求,就可以获取选中日期下的号源数据
7. 微信支付:Qrcode

- 每个订单有对应的订单id,通过对应的订单id获取唯一对应的订单二维码
- 根据服务器返回的二维码信息通过Qrcode.js生成二维码图片
- 调用qrcode的相关API库,传入对应的参数
- 保存生成的二维码图片地址
//打开二维码支付对话框
const openDialog = async () => {dialogVisible.value = true//获取支付需要使用二维码信息let result: QrCode = await reqQrcode($route.query.orderId as string)//更具服务器返回二维码信息生成二维码图片imgUrl.value = await QRCode.toDataURL(result.data.codeUrl)//设置定时器每间隔2s发起请求 查询订单是否支付timer.value = setInterval(async () => {let result: PayReslt = await reqQueryPayState($route.query.orderId as string)if (result.data === true) {//关闭对话框dialogVisible.value = false//提示信息ElMessage({type: 'success',message: '支付成功'})//清除定时器clearInterval(timer.value)//再次获取订单详情的数据getOrderInfo()}}, 2000)
}
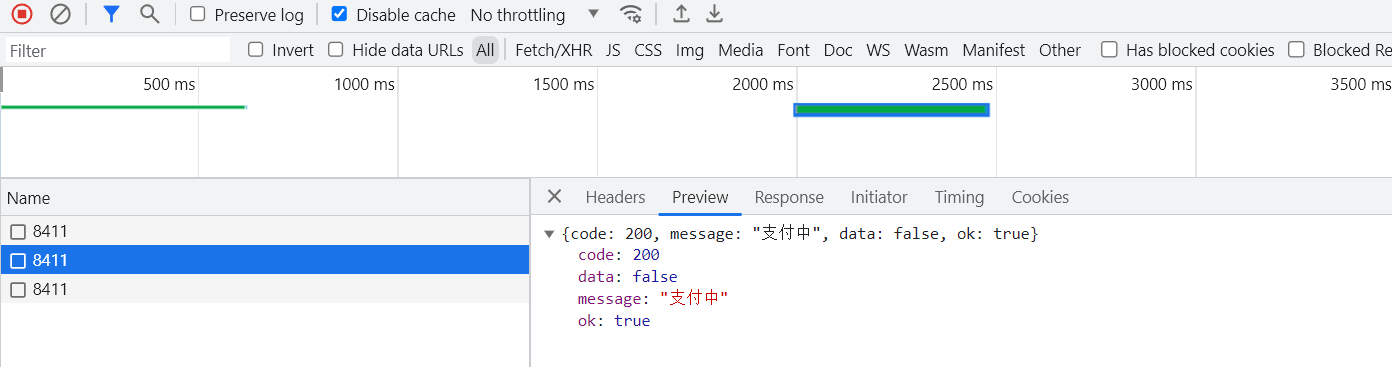
- 当打开支付页面时,就要开启定时器,每个两秒发一次请求用于询问订单是否支付
- 直到支付成功后清除定时器
8. 就诊人管理
8.1 级联选择器选择多级地址信息
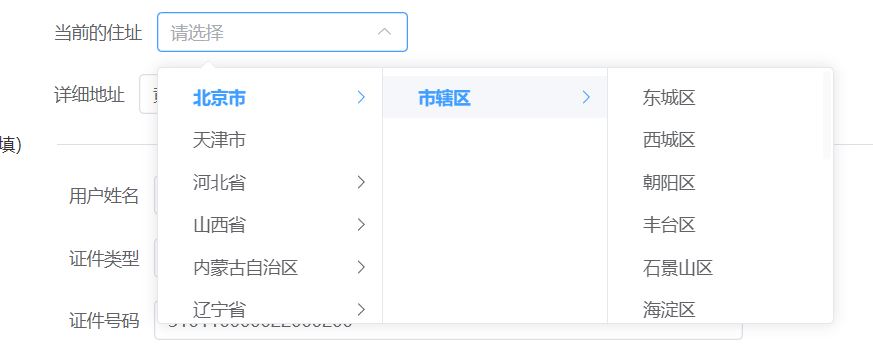
<el-cascader :props="props" v-model="userParams.addressSelected" />
//级联选择器地址信息方法
const props: CascaderProps = {lazy: true, //懒加载数据//加载级联选择器数据方法async lazyLoad(node: any, resolve: any) {let result: any = await reqCity(node.data.id || '86')//整理数据let showData = result.data.map((item: any) => {return {id: item.id,label: item.name,value: item.value,leaf: !item.hasChildren}})//注入组件需要展示的数据resolve(showData)}
}
- props是级联选择器内置配置参数进行设置的对象
- lazy属性设置为true,表示开启懒加载
- 定义一个lazyLoad方法,用于加载级联选择器的数据,接受两个参数node和resolve回调
- node表示当前选中的节点信息,resolve表示用于回调的函数
- 方法内部通过id获取城市信息,为一级省份
- 再使用map方法对城市数据进行整理,将id、name、value和是否有子级节点的信息映射到一个新的对象中,并存储在showData数组中
- 最后,调用resolve函数,将整理后的数据传入,以便组件进行展示
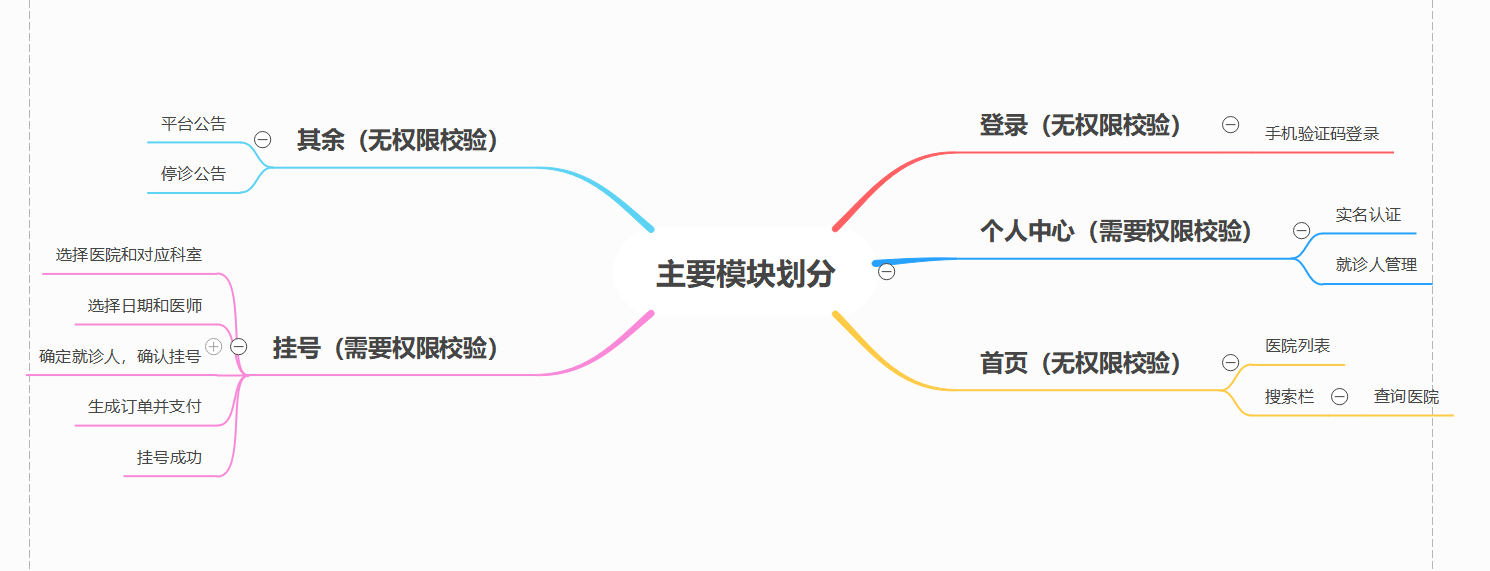
8.2 就诊人信息收集
[外链图片转存失败,源站可能有防盗链机制,建议将图片保存下来直接上传(img-rbXCrJoP-1693303620252)(C:/Users/Cai123/AppData/Roaming/Typora/typora-user-images/image-20230828184821995.png)]
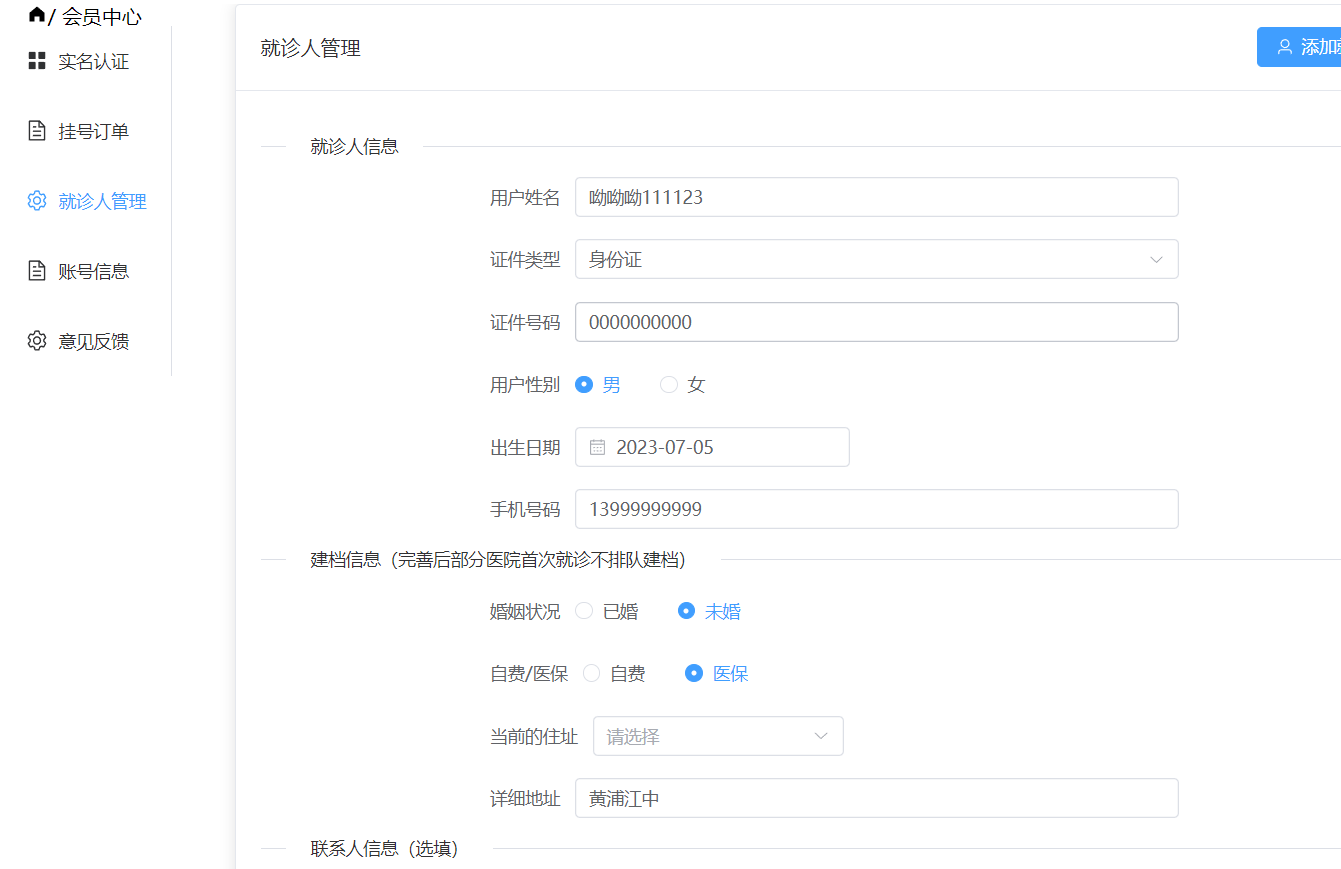
//watch监听数据
watch(() => userArr.value,() => {//如果是从预约挂号那里跳转过来 监听数据变化 根据id找到对应要修改的人if ($route.query.type === 'edit') {let user = userArr.value.find((item: any) => {return item.id == $route.query.id})//收集数据Object.assign(userParams, user)}}
)
-
Object.assign()方法用于将所有可枚举属性的值从一个或多个源对象复制到目标对象。它将返回目标对象。 -
当在选择就诊人信息时候,点击修改信息按钮,跳转到对应页面,要收集原先的数据信息
-
需要通过watch监听userArr,判断路径是否是从预约挂号跳转过来的
-
通过find方法从所有就诊人中找到对应选中修改的就诊人
-
将其信息通过object.assign方法进行收集并展示
9. 挂号订单
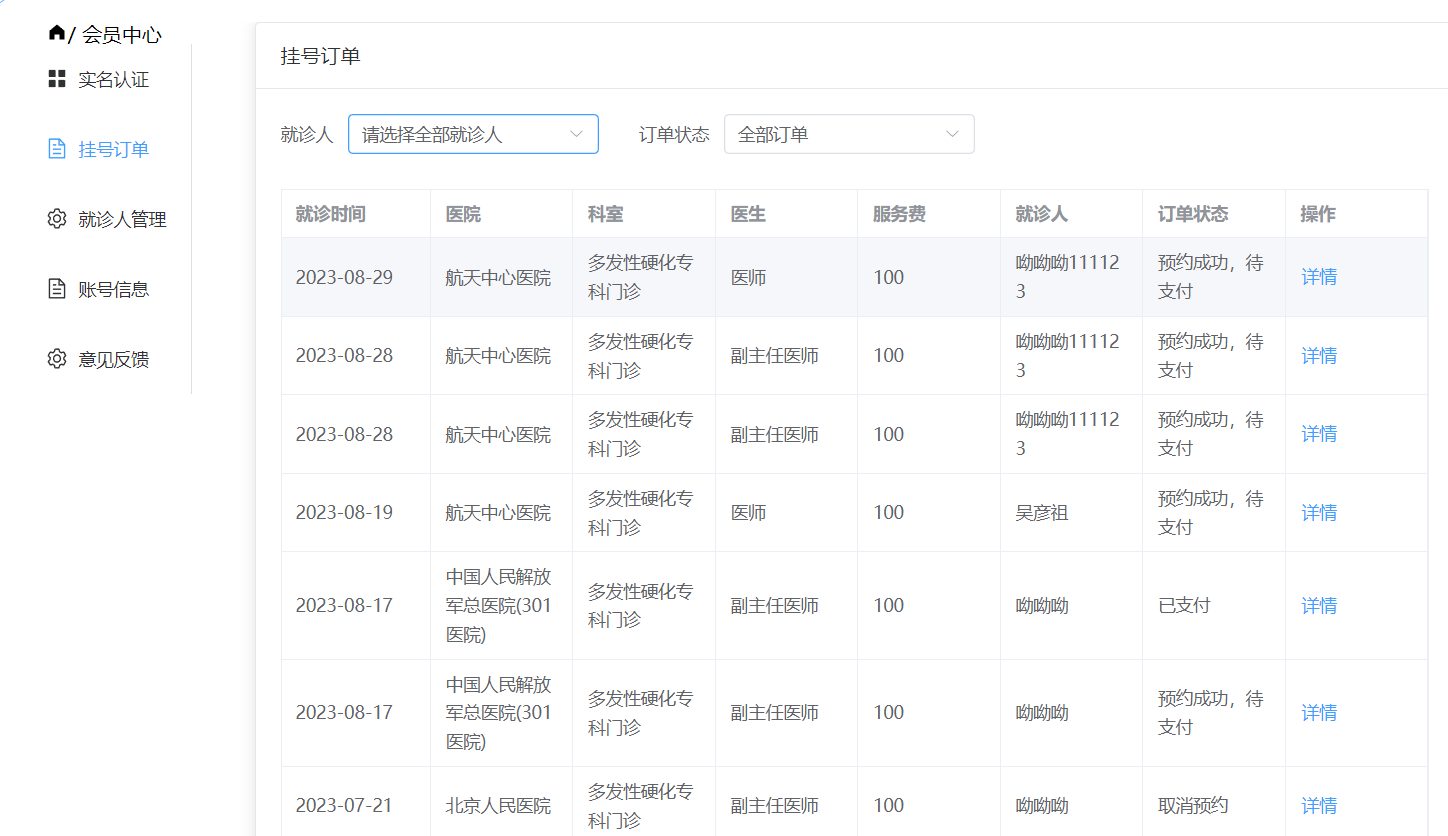
- 调用接口信息展示即可
10. 路由鉴权
//路由鉴权: 路由守卫
import router from './router'
//引入大仓库
import pinia from '@/store'
//引入进度条
//@ts-ignore
import Nprogress from 'nprogress'
//引入用户相关的仓库
import useUserStore from '@/store/modules/user'
let userStore = useUserStore(pinia)
//引入进度条样式
import 'nprogress/nprogress.css'
//进度条的加载小圆球不要
Nprogress.configure({ showSpinner: false })
//存储用户未登录可以访问路由得路径
let whiteList = ['/home','/hospital/register','/hospital/detail','/hospital/notice','/hospital/close','/hospital/search'
]//前置守卫
router.beforeEach((to, from, next) => {//访问路由组件的之前,进度条开始动Nprogress.start()//动态设置网页左上角的标题//@ts-ignoredocument.title = to.meta.title//判断用户是否登录-tokenlet token = userStore.userInfo.tokenif (token) {next()} else {//用户未登录if (whiteList.includes(to.path)) {next()} else {//登录组件userStore.visiable = truenext({ path: '/home', query: { redirect: to.fullPath } })}}
})//后置守卫
router.afterEach((to, from) => {//访问路由组件成功,进度条消失Nprogress.done()
})
三:规范代码格式和提交规范
- eslint
- prettier
- cz-git
3.1 prettier
module.exports = {singleQuote: true, // 使用单引号, 默认false(在jsx中配置无效, 默认都是双引号)semi: false, // 使用分号, 默认trueprintWidth: 120, //  每行超过多少字符自动换行arrowParens: 'avoid', // avoid 能省略括号的时候就省略 例如x => xbracketSpacing: true, // 对象中的空格 默认truetrailingComma: 'none', // all 包括函数对象等所有可选tabWidth: 4, // tab缩进大小,默认为2useTabs: false, // 使用tab缩进,默认falsehtmlWhitespaceSensitivity: 'ignore',// 对象大括号直接是否有空格,默认为true,效果:{ foo: bar }bracketSpacing: true
}
3.2 eslint
module.exports = {env: {browser: true,es2021: true,node: true},extends: ['eslint:recommended','plugin:vue/vue3-essential','plugin:@typescript-eslint/recommended','plugin:prettier/recommended' // 解决ESlint和Prettier冲突],overrides: [],// 配置支持 vue 和 tsparser: 'vue-eslint-parser',parserOptions: {ecmaVersion: 'latest',sourceType: 'module',parser: '@typescript-eslint/parser'},plugins: ['vue', '@typescript-eslint'],rules: {'@typescript-eslint/no-explicit-any': 'off', // 禁止使用该any类型。'@typescript-eslint/no-unused-vars': 'off', //禁止未使用的变量'vue/valid-template-root': 'off','vue/no-v-html': 'off','prefer-const': 'off','@typescript-eslint/ban-types': 'off','@typescript-eslint/no-empty-function': 'off','@typescript-eslint/ban-ts-comment': 'off','vue/multi-word-component-names': 'off',endOfLine: 'off', // 添加忽略换行格式的检查。'vue/require-default-prop': 'off' // props 需要设置默认值}
}
3.3 commitlintrc.js
// .commitlintrc.js
module.exports = {rules: {// @see: https://commitlint.js.org/#/reference-rules},prompt: {messages: {type: '选择你要提交的类型 :',scope: '选择一个提交范围(可选):',customScope: '请输入自定义的提交范围 :',subject: '填写简短精炼的变更描述 :\n',body: '填写更加详细的变更描述(可选)。使用 "|" 换行 :\n',breaking: '列举非兼容性重大的变更(可选)。使用 "|" 换行 :\n',footer: '列举关联issue (可选) 例如: #31, #I3244 :\n',confirmCommit: '是否提交或修改commit ?'},types: [{ value: 'feat', name: 'feat:        新增功能 | A new feature', emoji: '✨' },{ value: 'fix', name: 'fix:         修复缺陷 | A bug fix', emoji: '🐛' },{ value: 'docs', name: 'docs:        文档更新 | Documentation only changes', emoji: '📄' },{value: 'style',name: 'style:       代码格式 | Changes that do not affect the meaning of the code',emoji: '💄'},{value: 'refactor',name: 'refactor:    代码重构 | A code change that neither fixes a bug nor adds a feature',emoji: '♻️'},{ value: 'perf', name: 'perf:        性能提升 | A code change that improves performance', emoji: '⚡️' },{ value: 'test', name: 'test:        测试相关 | Adding missing tests or correcting existing tests', emoji: '✅' },{value: 'build',name: 'build:       构建相关 | Changes that affect the build system or external dependencies',emoji: '📦️'},{ value: 'ci', name: 'ci:          持续集成 | Changes to our CI configuration files and scripts', emoji: '🎡' },{ value: 'revert', name: 'revert:      回退代码 | Revert to a commit', emoji: '⏪️' },{value: 'chore',name: 'chore:       其他修改 | Other changes that do not modify src or test files',emoji: '🔨'}],useEmoji: true,// scope 类型(定义之后,可通过上下键选择)scopes: [['components', '组件相关'],['hooks', 'hook 相关'],['utils', 'utils 相关'],['element-ui', '对 element-ui 的调整'],['styles', '样式相关'],['deps', '项目依赖'],['auth', '对 auth 修改'],['other', '其他修改']].map(([value, description]) => {return {value,name: `${value.padEnd(30)} (${description})`}}),// 是否允许自定义填写 scope,在 scope 选择的时候,会有 empty 和 custom 可以选择。allowCustomScopes: true,// 跳过要询问的步骤skipQuestions: ['body', 'breaking', 'footer'],subjectLimit: 100, // subject 限制长度// 设置只有 type 选择了 feat 或 fix,才询问 breaking messageallowBreakingChanges: ['feat', 'fix'],issuePrefixs: [// 如果使用 gitee 作为开发管理{ value: 'link', name: 'link:     链接 ISSUES 进行中' },{ value: 'comment', name: 'comment: 评论 ISSUES' },{ value: 'closed', name: 'closed:   标记 ISSUES 已完成' }]}
}