一、路由
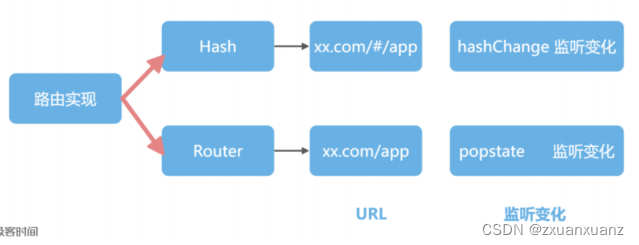
(1)通过 URL 区分路由的机制上,有两种实现方式:
- hash 模式:通过 URL 中 # 后面的内容做区分,我们称之为 hash-router;
- history 模式:在这种方式下,路由看起来和正常的 URL 完全一致
(2)这两个不同的原理,在 vue-router 中对应两个函数,分别是 createWebHashHistory 和createWebHistory。
二、实现原理

(1)hash模式
后来hash 值的变化并不会导致浏览器页面的刷新,只是会触发 hashchange 事件。在代码中,通过对 hashchange 事件的监听,可以在fn 函数内部进行动态地页面切换。
window.addEventListener('hashchange',fn)(2) history模式
2014 年之后,因为 HTML5 标准发布,浏览器多了两个 API:pushState 和 replaceState。通过这两个 API ,我们可以改变 URL 地址,并且浏览器不会向后端发送请求,同时还会触发 popstate 事件。通过这两个 API 和 popstate 事件,我们就能用另外一种方式实现前端路由
window.addEventListener('popstate', fn)三、手写迷你vue-router
(1) 用 Router 类去管理路由。
(2)使用createWebHashHistory 来返回 hash 模式相关的监听代码,以及返回当前 URL 和监听hashchange 事件的方法。
(3)通过 Router 类的 install 方法注册了 Router 的实例,并对外暴露 createRouter 方法去创建 Router 实例。
(4)最后,暴露了useRouter方法,去获取路由实例。
import { ref, inject } from "vue";
import RouterLink from "./RouterLink.vue";
import RouterView from "./RouterView.vue";
const ROUTER_KEY = "__router__";function createRouter(options) {return new Router(options);
}
function userRouter() {return inject(ROUTER_KEY);
}function createWebHashHistory() {function bindEvents(fn) {window.addEventListener("hashchange", fn);}return {bindEvents,url: window.location.hash.slice(1) || "/",};
}class Router {constructor(options) {this.history = options.history;this.routes = options.routes;this.current = ref(this.history.url);this.history.bindEvents(() => {this.current.value = window.location.hash.slice(1);});}install(app) {app.provide(ROUTER_KEY, this);app.component("router-link", RouterLink);app.component("router-view", RouterView);}
}export { createRouter, createWebHashHistory, userRouter };
(5)使用
import { createRouter, createWebHashHistory } from "./grouter/index";
import About from "../pages/about.vue";
import Count from "../components/Count.vue";
const routes = [{path: "/",name: "Home",component: Count,},{path: "/about",name: "About",component: About,},
];
const router = createRouter({history: createWebHashHistory(),routes,
});
(6)内置组件 router-view
1、在 createRouter 创建的 Router 实例上,current 返回当前的路由地址,并且使用 ref 包裹成响应式的数据。
2、router-view 组件的功能,就是 current 发生变化的时候,去匹配 current 地址对应的组件,然后动态渲染到 router-view 就可以了。
3、首先使用 useRouter 获取当前路由的实例;然后通过当前的路由,也就是router.current.value 的值,在用户路由配置 route 中计算出匹配的组件。
4、 最后通过计算属性返回 comp 变量,在 template 内部使用 component 组件动态渲染
<template><component :is="comp"></component>
</template>
<script setup>
import { computed } from "vue";
import { userRouter } from "../grouter/index";let router = userRouter();
const comp = computed(() => {const route = router.routes.find((route) => route.path === router.current.value);return route ? route.component : null;
});
</script>
(7) 内置组件 router-link
template 渲染一个 a 标签,把 a 标签的 href 属性前面加了个一个 #, 就实现了 hash 的修改。
<template><a :href="'#' + $props.to"><slot></slot></a>
</template>
<script setup>
let props = defineProps({to: { type: String, required: true },
});
</script>
(8)注册 router-link 和 router-view 这两个组件
import {ref,inject} from 'vue'
import RouterLink from './RouterLink.vue'
import RouterView from './RouterView.vue'
class Router{//....install(app){app.provide(ROUTER_KEY,this)app.component("router-link",RouterLink)app.component("router-view",RouterView)}
}


