一、简介
官网:MediaPipe | Google for Developers![]() https://developers.google.cn/mediapipe
https://developers.google.cn/mediapipe
Mediapipe 是2012年起开始公司内部使用,2019年google的一个开源项目,可以提供开源的、跨平台的常用机器学习(machine learning)方案。Mediapipe实际上是一个集成的机器学习视觉算法的工具库,包含了人脸检测、人脸关键点、手势识别、头像分割和姿态识别等各种模型。
- Github开源项目地址: GitHub - google/mediapipe: Cross-platform, customizable ML solutions for live and streaming media.
- 一些模型的web体验地址(用到电脑摄像头):
人脸检测:https://code.mediapipe.dev/codepen/face_detection人脸关键点:https://code.mediapipe.dev/codepen/face_mesh手势识别:https://code.mediapipe.dev/codepen/hands姿态识别:https://code.mediapipe.dev/codepen/pose自拍头像分割:https://code.mediapipe.dev/codepen/selfie_segmentation
二、安装
2.1安装OpenCV
pip install opencv-contrib-python -i https://pypi.tuna.tsinghua.edu.cn/simple

2.2安装Mediapipe
pip install mediapipe -i https://pypi.tuna.tsinghua.edu.cn/simple
2.3原理
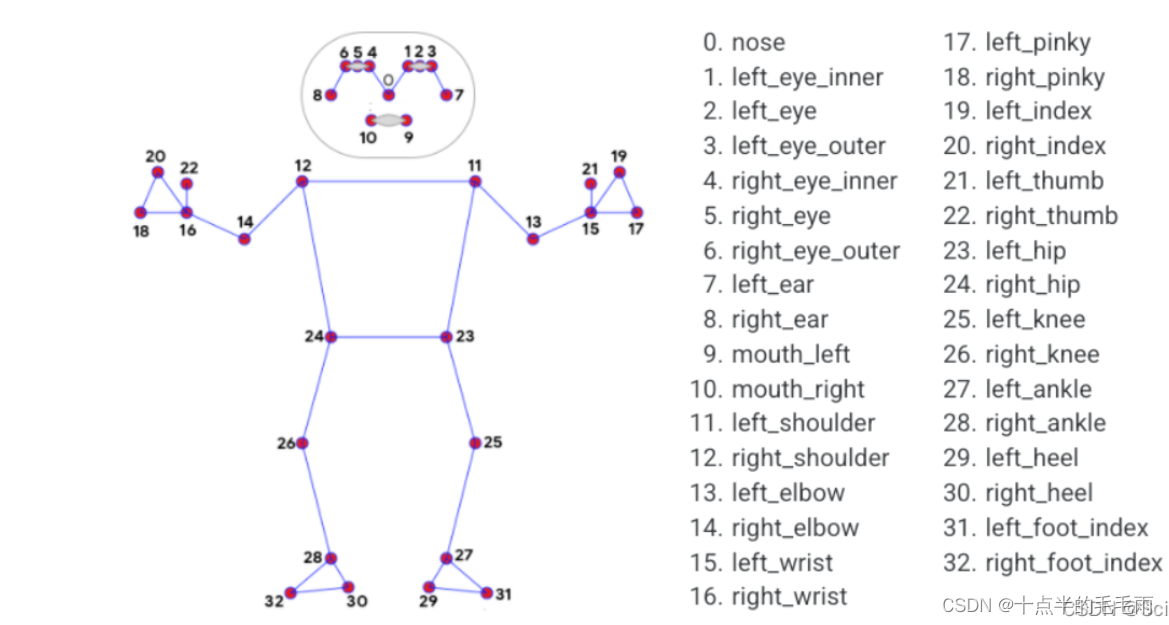
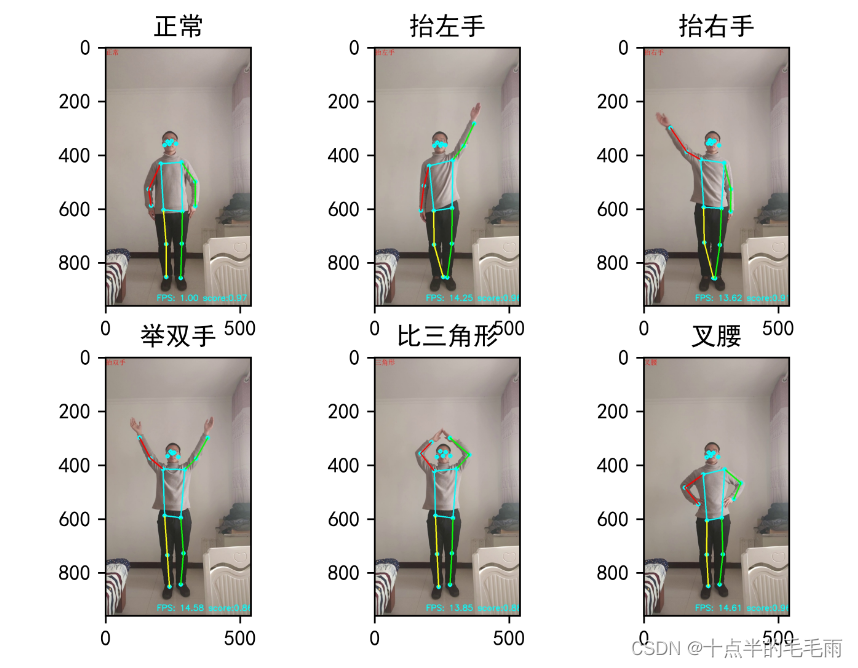
将Mediapipe用于行为检测是比较复杂的一件事;如果这样做,那么行为检测的精度就完全取决于Mediapipe关键点的检测精度。于是可以根据下图中人的关节夹角来对人的位姿进行检测。
先看一下效果图:
2.4夹角计算
已知两点A(x1,y1),B(x2,y2),则向量AB==(x2-x1,y2-y1)
即向量AB为B点坐标减A点坐标。
假设两个向量a=(x1,y1),b=(x2,y2),两个向量之间的夹角为θ,根据向量数量积的运算规则,可以很方便地用坐标值表示夹角的余弦值:

2.5姿势界标
随便取一个点,比如32:
32 x: 0.506013035774231
y: 3.0955116748809814
z: 0.06963550299406052
visibility: 9.286402200814337e-05
x和y:这些界标坐标分别通过图像的宽度和高度归一化为[0.0,1.0]。
z:通过将臀部中点处的深度作为原点来表示界标深度,并且z值越小,界标与摄影机越近。z的大小几乎与x的大小相同。
可见性:[0.0,1.0]中的值,指示界标在图像中可见的可能性。
三、参数设置
Pose:
def __init__(self,static_image_mode=False,#如果设置为false,则解决方案将输入图像视为视频流。它将尝试在第一张图像中检测最突出的人,并在成功检测后进一步定位姿势和其他地标。在随后的图像中,它只是简单地跟踪那些地标,而不会调用另一个检测,直到它失去跟踪,以减少计算和延迟。如果设置为true,则人物检测会运行每个输入图像,非常适合处理一批静态的、可能不相关的图像。默认为false.model_complexity=1,#姿势地标模型的复杂度:0,1或2。地标准确性以及推理延迟通常随模型复杂性而增加。默认为1.smooth_landmarks=True,#如果设置为true,解决方案过滤器会在不同的输入图像之间设置地标以减少抖动,但如果static_image_mode也设置为,则忽略true。默认为true.enable_segmentation=False,#如果设置为true,除了姿势、面部和手部地标之外,该解决方案还会生成分割掩码。默认为false.smooth_segmentation=True,#如果设置为true,该解决方案会过滤不同输入图像的分割掩码以减少抖动。如果enable_segmentation为false或static_image_mode为 ,则忽略true。默认为true.min_detection_confidence=0.5,#[0.0, 1.0]来自人员检测模型的最小置信值 ( ),用于将检测视为成功。默认为0.5.min_tracking_confidence=0.5):#[0.0, 1.0]来自地标跟踪模型的最小置信值(将其设置为更高的值可以提高解决方案的稳健性,但代价是更高的延迟。如果static_image_mode是true,则忽略,其中人员检测仅在每个图像上运行。默认为0.5. void cv::putText(cv::Mat& img, // 待绘制的图像const string& text, // 待绘制的文字cv::Point origin, // 文本框的左下角int fontFace, // 字体 (如cv::FONT_HERSHEY_PLAIN)double fontScale, // 尺寸因子,值越大文字越大cv::Scalar color, // 线条的颜色(RGB)int thickness = 1, // 线条宽度int lineType = 8, // 线型(4邻域或8邻域,默认8邻域)bool bottomLeftOrigin = false // true='origin at lower left');四、向量的夹角
def np_pi(arr):"""三个坐标A B C ,B为关联[A 0,0 0,1B 1,0 1,1C 2,0 2,1]:param arr::return:"""b_a = np.array([arr[0][0] - arr[1][0], arr[0][1] - arr[1][1]])# print('向量1:{},{}'.format(b_a[0], b_a[1]))b_c = np.array([arr[2][0] - arr[1][0], arr[2][1] - arr[1][1]])# print('向量2:{},{}'.format(b_c[0], b_c[0]))cos_angle = np.dot(b_a, b_c) / (np.linalg.norm(b_a) * np.linalg.norm(b_c))# 弧度angle = np.arccos(cos_angle)# 角度angle = angle * 180 / np.pi# print('夹角为:',angle , '度')return angle五、实现
例子:仰卧起坐
import cv2
import mediapipe as mp
import numpy as npdef np_pi(arr):"""三个坐标A B  C ,B为关联[A 0,0  0,1B 1,0  1,1C 2,0  2,1]:param arr::return:"""b_a = np.array([arr[0][0] - arr[1][0], arr[0][1] - arr[1][1]])# print('向量1:{},{}'.format(b_a[0], b_a[1]))b_c = np.array([arr[2][0] - arr[1][0], arr[2][1] - arr[1][1]])# print('向量2:{},{}'.format(b_c[0], b_c[0]))cos_angle = np.dot(b_a, b_c) / (np.linalg.norm(b_a) * np.linalg.norm(b_c))# 弧度angle = np.arccos(cos_angle)# 角度angle = angle * 180 / np.pi# print('夹角为:',angle , '度')return angleif __name__ == '__main__':# 获取视频对象,0为摄像头,也可以写入视频路径capture = cv2.VideoCapture(0)mpPose = mp.solutions.pose  # 姿态识别pose_mode = mpPose.Pose(min_detection_confidence=0.5, min_tracking_confidence=0.5)  # 模式参数设置mpDraw = mp.solutions.drawing_utils  # 绘图biaoji = 0i = 0# mpPose.POSE_CONNECTIONSPOSE_CONNECTIONS = frozenset([(11, 23), (23, 25), (12, 24), (24, 26)])# results.pose_landmarkswhile True:# sucess是布尔型,读取帧正确返回True;img是每一帧的图像(BGR存储格式)sucess, frame = capture.read()# BGR-通常用于图像处理应用程序,顺序为蓝色、绿色和红色。# RGB-通常用于图像编辑和显示应用程序,顺序为红色、绿色和蓝色。# frame = cv2.cvtColor(frame, cv2.COLOR_BGR2RGB)#frame = cv2.flip(frame,1  # 1:水平镜像,-1:垂直镜像 =0,垂直翻转图像)# 输出图像,第一个为窗口名字# imshow = cv2.imshow('PC Camera', frame)results = pose_mode.process(frame)landmarks = results.pose_landmarksif results.pose_landmarks:# 右 11-23-25point23_11 = []point23_25 = []# 左 12-24-26point24_12 = []point24_26 = []landmarks = []z_11 = 0z_12 = 0point29 = []point30 = []for id, lm in enumerate(results.pose_landmarks.landmark):# print(id, lm)h, w, c = frame.shape# 转换成像素点坐标cx, cy = int(lm.x * w), int(lm.y * h)# cv2.circle(frame, (cx, cy), 0, (255, 0, 0), -1)  # 骨连接处if id in [23, 25]:point23_25.append([cx, cy])elif id in [11]:point23_11.append([cx, cy])z_11 = lm.zelif id in [24, 26]:point24_26.append([cx, cy])elif id in [12]:point24_12.append([cx, cy])z_12 = lm.zelif id in [29]:point29.append([cx, cy])elif id in [30]:point30.append([cx, cy])mpDraw.draw_landmarks(frame, landmarks, POSE_CONNECTIONS)# 判断远近# 11-12# 左肩 11, 左脚跟 29if (z_12 > z_11):cv2.line(frame, (point23_25[0][0], point23_25[0][1]), (point23_25[1][0], point23_25[1][1]), (0, 0, 255),5)cv2.line(frame, (point23_25[0][0], point23_25[0][1]), (point23_11[0][0], point23_11[0][1]), (0, 0, 255),5)array = np.array([[point23_25[1][0], point23_25[1][1]],  # 25[point23_25[0][0], point23_25[0][1]],  # 23[point23_11[0][0], point23_11[0][1]]  # 11])pi_left = np_pi(array)  # 腰-腿的夹角np_array = np.array([[0, 0], [point23_11[0][0], point23_11[0][1]], [point23_25[0][0], point23_25[0][1]]])pi_flag_left = np_pi(np_array)if (pi_flag_left < 60):if biaoji == 1:i += 1biaoji = 0cv2.putText(frame, "count:{}".format(i), (10, 50), cv2.FONT_HERSHEY_PLAIN, 3, (0, 0, 255), 3)else:biaoji = 1cv2.putText(frame, "count:{}".format(i), (10, 450), cv2.FONT_HERSHEY_PLAIN, 3, (0, 0, 255), 3)# "姿态识别".encode("gbk").decode('UTF-8', errors='ignore')# cv2.namedWindow("Pose", cv2.WINDOW_NORMAL)cv2.imshow('Pose', frame)# 等待5秒显示图像,若过程中按“Esc”(key=27)退出c = cv2.waitKey(5) & 0xffif c == 27:# 释放所有窗口cv2.destroyAllWindows()break
