一 实验需求
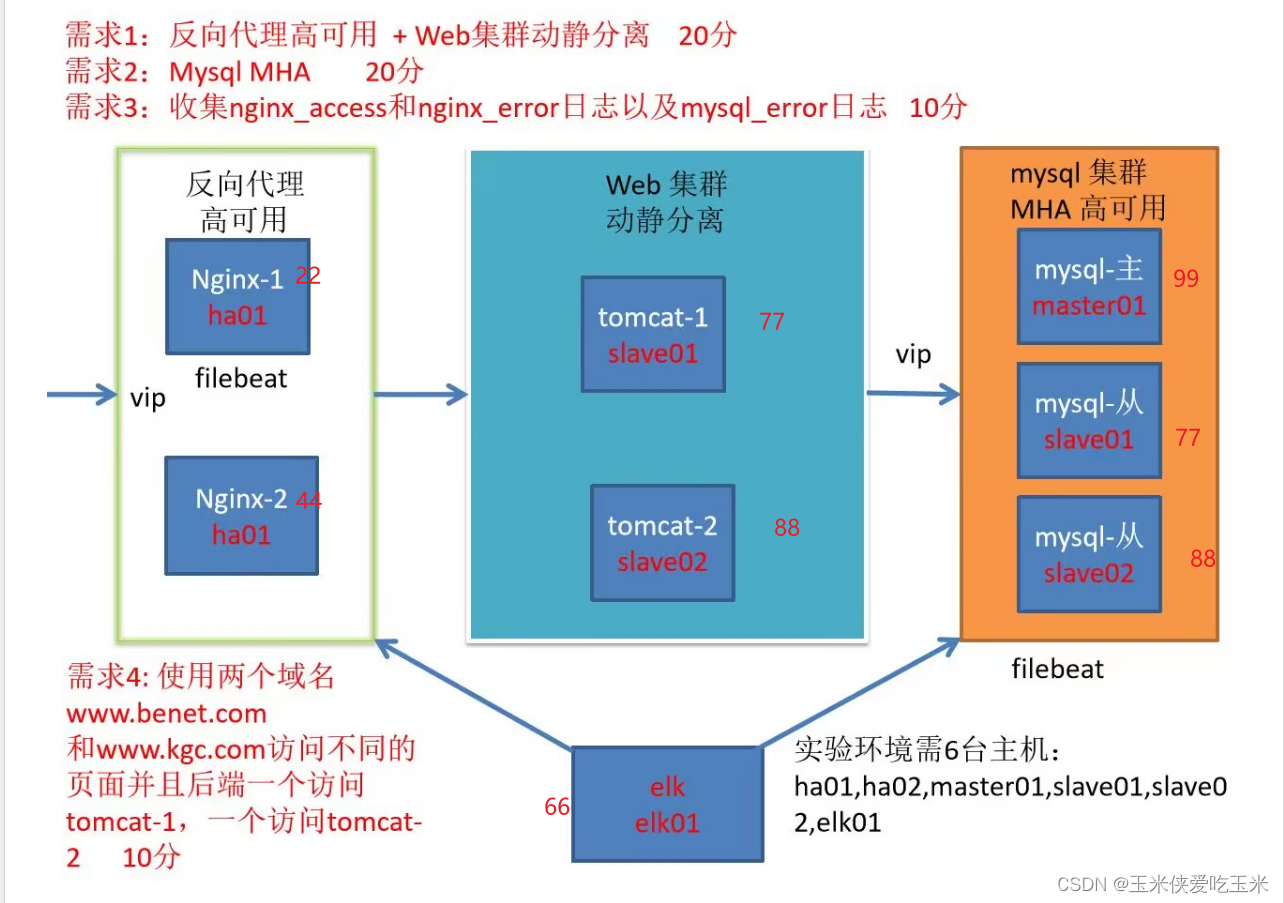
二 实验环境
22 机器: 做nginx 反向代理 做静态资源服务器
装 nginx keepalived filebeat
44机器: 做22 机器的备胎
装nginx keepalived
99机器:做mysql的主
装mysqld 装node 装filebeat
77机器:做mysql从 做tomcat动态资源服务器
装mysqld node tomcat
88机器: 做mysql从 做tomcat 动态资源服务器
装mysqld node1 tomcat
66 机器: 做elk 节点服务器 且做mha 的manager 节点
装logstash es es-head kibana manager
三 实验步骤
1,先做nginx的反向代理 和不同域名指向
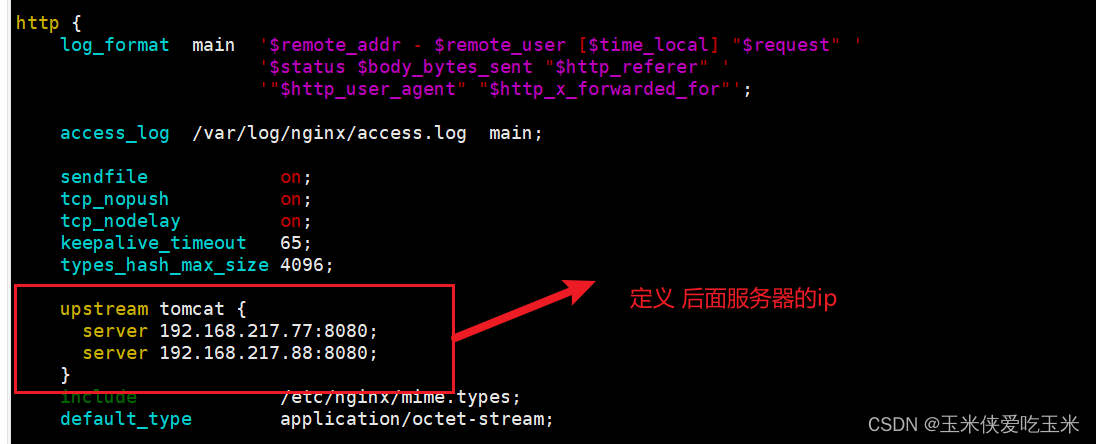
1.1(22,44)nginx 配置文件如下:
http {log_format main '$remote_addr - $remote_user [$time_local] "$request" ''$status $body_bytes_sent "$http_referer" ''"$http_user_agent" "$http_x_forwarded_for"';access_log /var/log/nginx/access.log main;sendfile on;tcp_nopush on;tcp_nodelay on;keepalive_timeout 65;types_hash_max_size 4096;upstream tomcat {server 192.168.217.77:8080;server 192.168.217.88:8080;}include /etc/nginx/mime.types;default_type application/octet-stream;# Load modular configuration files from the /etc/nginx/conf.d directory.# See http://nginx.org/en/docs/ngx_core_module.html#include# for more information.include /etc/nginx/conf.d/*.conf;server {listen 80;listen [::]:80;server_name _;root /usr/share/nginx/html;location ~*\.jsp$ {proxy_pass http://tomcat;}location ~* \.(jpg|jpeg|png|gif|bmp|html)$ {root /usr/share/nginx/html/;}
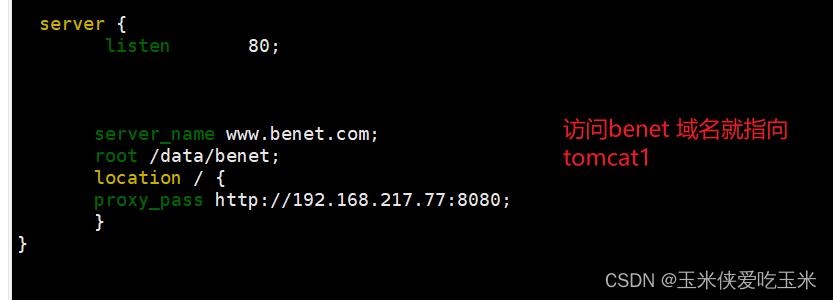
}server {listen 80;server_name www.benet.com;root /data/benet;location / {proxy_pass http://192.168.217.77:8080;}
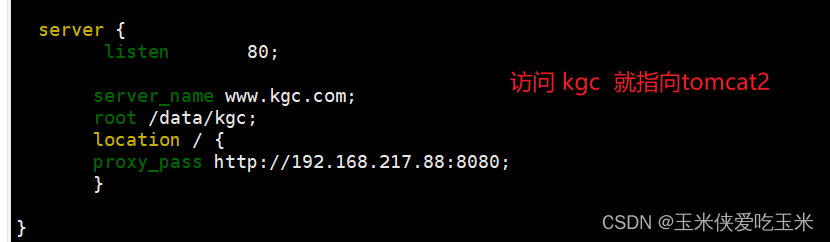
}server {listen 80;server_name www.kgc.com;root /data/kgc;location / {proxy_pass http://192.168.217.88:8080;}}# Load configuration files for the default server block.include /etc/nginx/default.d/*.conf;server {listen 80;error_page 404 /404.html;location = /404.html {}error_page 500 502 503 504 /50x.html;location = /50x.html {}}1.2 解释

1.3 实验效果
访问nginx 以.jsp 结尾 会以轮询方式访问 后面的tomcat


访问 nginx 以.png 结尾 会在本地找
访问 benet 域名 会指向tomcat1 (记得本机做域名映射)

访问kgc 域名 会指向 tomcat 2

2, 做nginx 的高可用
2.1 keepalive 配置文件如下 (这是主)
备改 router_id LVS_02 state BACKUP priority 80
! Configuration File for keepalivedglobal_defs {notification_email {acassen@firewall.locfailover@firewall.locsysadmin@firewall.loc}notification_email_from Alexandre.Cassen@firewall.locsmtp_server 127.0.0.1smtp_connect_timeout 30router_id LVS_01vrrp_skip_check_adv_addrvrrp_garp_interval 0vrrp_gna_interval 0
}vrrp_script check_down {script "/etc/keepalived/ng.sh"interval 1weight -30fall 3rise 2timeout 2
}vrrp_instance VI_1 {state MASTERinterface ens33virtual_router_id 51priority 100advert_int 1authentication {auth_type PASSauth_pass 1111}virtual_ipaddress {192.168.217.188}track_script {check_down
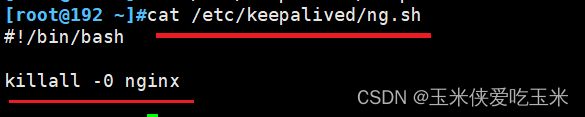
}}2.2 (22,44机器)写检测nginx 是否活着的脚本(注意路径)
2.3 实验效果
虚拟ip 188 会飘在 22 机器上(主)

当手动制造 22 机器故障 systemctl stop nginx 虚拟ip 会飘到44机器上
证明:若主出现故障 从会顶上来

3, 做mysql 主从复制与读写分离 mha做高可用
前篇已详细概述,本篇暂不赘述
4,做filebeat 收集nginx 的正确错误日志
4.1 (22机器)filebeat 的配置文件
#=========================== Filebeat inputs =============================filebeat.inputs:# Each - is an input. Most options can be set at the input level, so
# you can use different inputs for various configurations.
# Below are the input specific configurations.- type: logenabled: truepaths:- /var/log/nginx/access.logtags: ["access"]- type: logenabled: truepaths:- /var/log/nginx/error.logtags: ["error"]
#----------------------------- Logstash output --------------------------------
output.logstash:# The Logstash hostshosts: ["192.168.217.66:5044"]# Optional SSL. By default is off.# List of root certificates for HTTPS server verifications#ssl.certificate_authorities: ["/etc/pki/root/ca.pem"]# Certificate for SSL client authentication#ssl.certificate: "/etc/pki/client/cert.pem"# Client Certificate Key#ssl.key: "/etc/pki/client/cert.key"
4.2 (66机器)logstash 配置文件
input {beats {port => "5044"}
}
output {if "access" in [tags] {elasticsearch {hosts => ["192.168.217.66:9200"]index => "nginx-access-%{+YYYY.MM.dd}"}}if "error" in [tags] {elasticsearch {hosts => ["192.168.217.66:9200"]index => "nginx-error-%{+YYYY.MM.dd}"}}stdout {codec => rubydebug}
}
4.3 (66机器)elasticsearch主配置文件
[root@node ~]#grep -v "^#" /etc/elasticsearch/elasticsearch.yml
cluster.name: my-elk-cluster
node.name: node
path.data: /data/elk_data
path.logs: /var/log/elasticsearch/
bootstrap.memory_lock: false
network.host: 0.0.0.0
http.port: 9200
discovery.zen.ping.unicast.hosts: ["node"]http.cors.enabled: true                         #开启跨域访问支持,默认为 false
http.cors.allow-origin: "*"                     #指定跨域访问允许的域名地址为所
4.4 (66机器)kibana 配置文件
[root@node ~]#grep -v "^#" /etc/kibana/kibana.yml
server.port: 5601server.host: "0.0.0.0"elasticsearch.url: "http://192.168.217.66:9200"kibana.index: ".kibana"
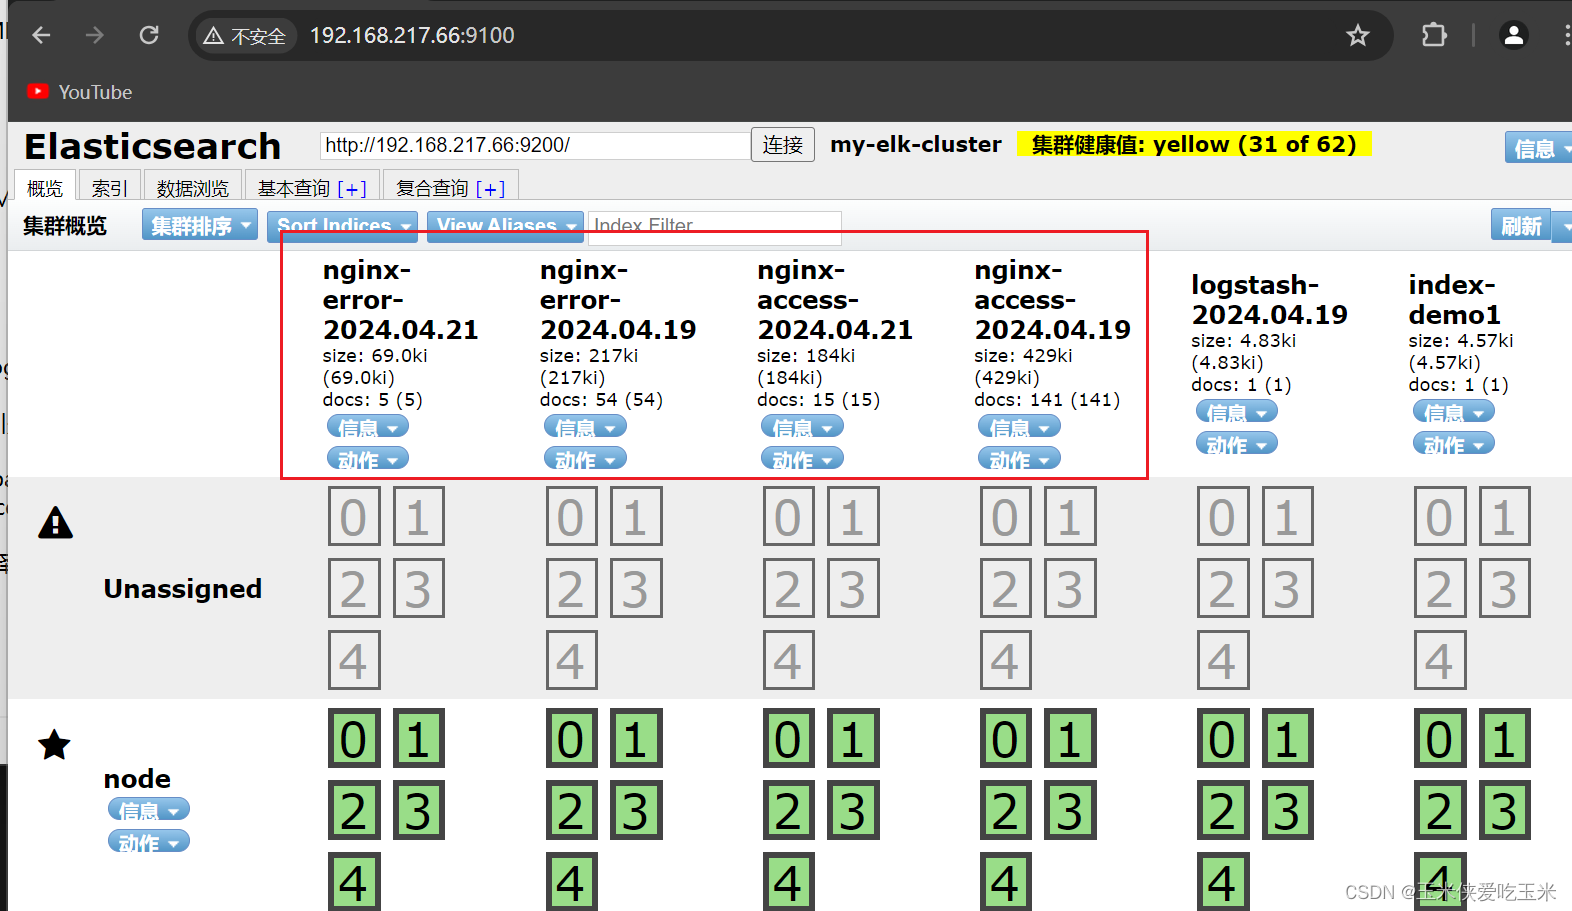
4.5 实验效果
5, filebeat 收集mysql 的错误日志
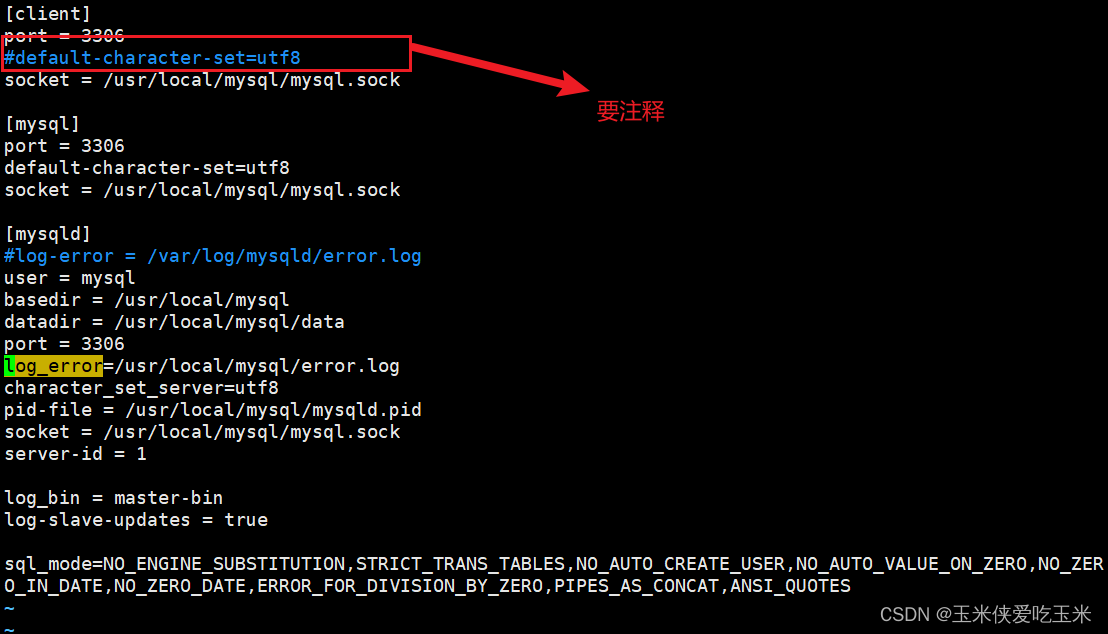
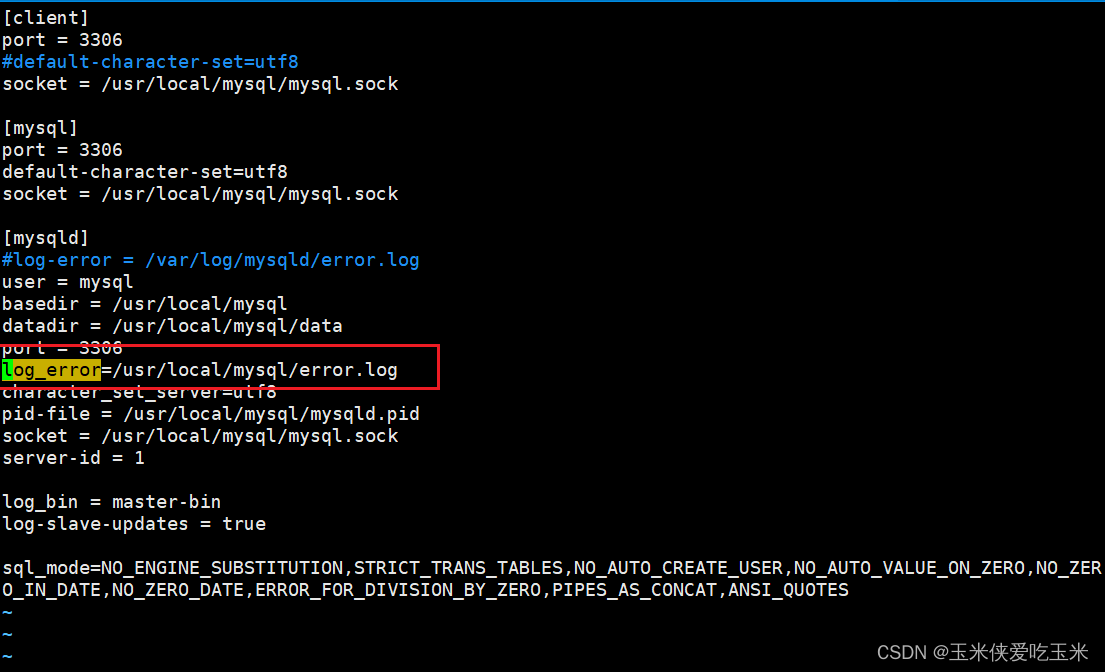
5.1 (99机器)mysql 配置文件添加 错误日志路径
[client]
port = 3306
#default-character-set=utf8
socket = /usr/local/mysql/mysql.sock[mysql]
port = 3306
default-character-set=utf8
socket = /usr/local/mysql/mysql.sock[mysqld]
#log-error = /var/log/mysqld/error.log
user = mysql
basedir = /usr/local/mysql
datadir = /usr/local/mysql/data
port = 3306
log_error=/usr/local/mysql/error.log
character_set_server=utf8
pid-file = /usr/local/mysql/mysqld.pid
socket = /usr/local/mysql/mysql.sock
server-id = 1log_bin = master-bin
log-slave-updates = truesql_mode=NO_ENGINE_SUBSTITUTION,STRICT_TRANS_TABLES,NO_AUTO_CREATE_USER,NO_AUTO_VALUE_ON_ZERO,NO_ZERO_IN_DATE,NO_ZERO_DATE,ERROR_FOR_DIVISION_BY_ZERO,PIPES_AS_CONCAT,ANSI_QUOTES
~
~
5.2 (99机器) filebeat 的配置文件
#=========================== Filebeat inputs =============================filebeat.inputs:# Each - is an input. Most options can be set at the input level, so
# you can use different inputs for various configurations.
# Below are the input specific configurations.- type: log# Change to true to enable this input configuration.enabled: true# Paths that should be crawled and fetched. Glob based paths.paths:- /usr/local/mysql/error.logtags: ["error"]fields:           #可以使用 fields 配置选项设置一些参数字段添加到 output 中service_name: filebeatlog_type: logservice_id: 192.168.217.99
#----------------------------- Logstash output --------------------------------
output.logstash:# The Logstash hostshosts: ["192.168.217.66:5044"]5.3 (66 机器)写logstash 配置文件
input {beats {port => "5044"}
}
output {elasticsearch {hosts => ["192.168.217.66:9200"]index => "%{[fields][service_name]}-%{+YYYY.MM.dd}"}stdout {codec => rubydebug}
}
5.4 实验结果

四 报错总结
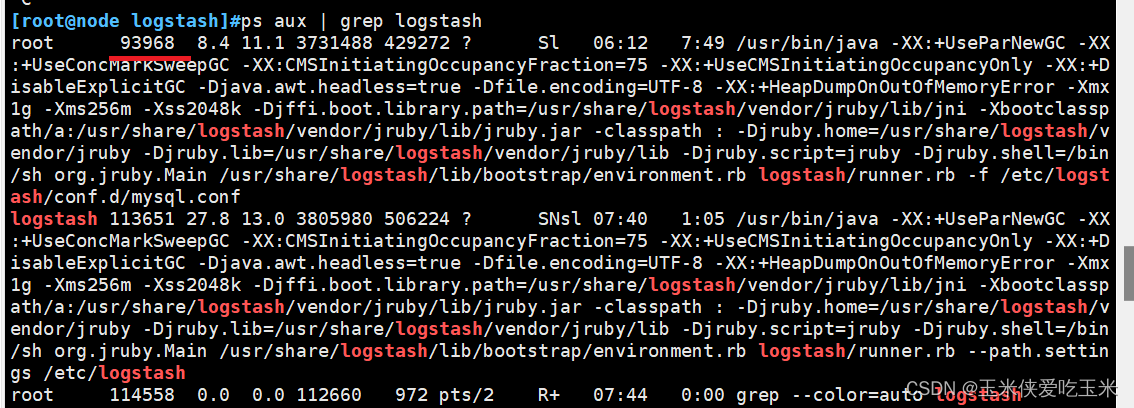
1,logstash 配置文件占用报错
[root@node logstash]#/usr/share/logstash/bin/logstash -f /etc/logstash/conf.d/mysql.conf ERROR StatusLogger No log4j2 configuration file found. Using default configuration: logging only errors to the console.
WARNING: Could not find logstash.yml which is typically located in $LS_HOME/config or /etc/logstash. You can specify the path using --path.settings. Continuing using the defaults
Could not find log4j2 configuration at path //usr/share/logstash/config/log4j2.properties. Using default config which logs to console
07:40:53.541 [LogStash::Runner] FATAL logstash.runner - Logstash could not be started because there is already another instance using the configured data directory.  If you wish to run multiple instances, you must change the "path.data" setting.

解决方法:
找到主进程 kill-9 93968
2,filebeat 起不来, 配置文件报错
软件启动不来 看 /var/log/messages
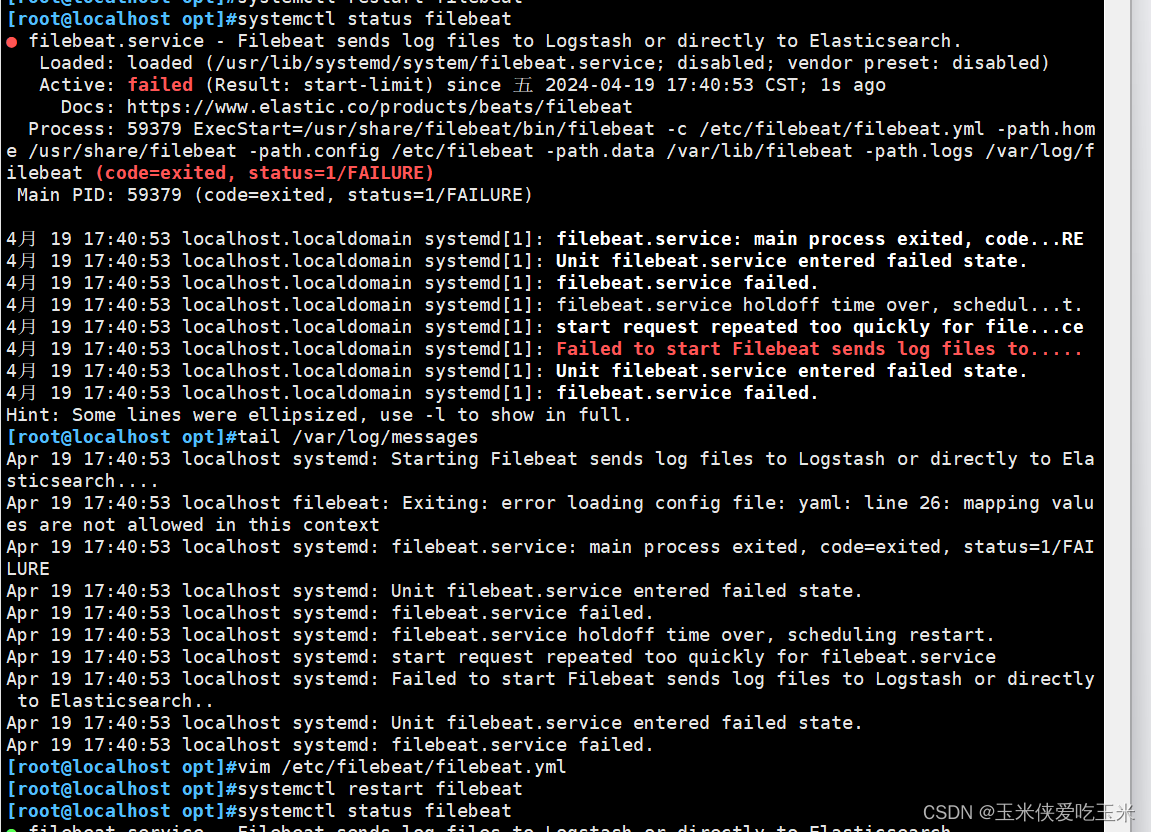
filebeat 的配置文件确保所有键值对的值正确缩进,遵循YAML的缩进规则(通常使用空格,且同一层级的元素应保持相同数量的空格)。说人话就是注意空格
3,manager 节点上测试 mysql 主从连接情况 MySQL Replication Health is not OK
masterha_check_repl -conf=/etc/masterha/app1.cnf
解决方法:
4, mysql 配置文件 加不了错误日志路径
解决方法:编译安装的mysql 环境变量如下
所以日志也要放在该路径下
echo 'PATH=/usr/local/mysql/bin:/usr/local/mysql/lib:$PATH' >> /etc/profile
echo 'export PATH' >> /etc/profile
source /etc/profile
5, 做mha 时 manager 节点报错
manager 节点也要 先装node
6,做mysql 的elfk 时一直出不来
注意数据流向 ip 是否写错