目录
1. playbook的组成
2. 剧本示例test1
2.1 剧本制作
2.2 准备http.conf
2.3 运行剧本
2.4 查看webserbers服务器
3. 剧本示例test2--定义、引用变量
3.1 剧本制作
3.2 运行剧本
3.3 查看dbservers服务器
3.4 修改剧本中的变量设定
3.5 在命令行定义变量运行剧本
3.6 查看dbservers服务器
4. 剧本示例test3--指定远程主机sudo切换用户
5. 剧本示例test4--when条件判断
6. 剧本示例test5--迭代
7. Template模块
7.1 准备template模板文件
7.2 修改主机清单文件
7.3 编写playbook
7.4 执行playbook
7.5 制作测试网页
7.6 访问测试
8.1 编写脚本
1. playbook的组成
playbooks 本身由以下各部分组成
(1)Tasks:任务,即通过 task 调用 ansible 的模板将多个操作组织在一个 playbook 中运行
(2)Variables:变量
(3)Templates:模板
(4)Handlers:处理器,当changed状态条件满足时,(notify)触发执行的操作
(5)Roles:角色
2. 剧本示例test1
2.1 剧本制作
[root@ansible ansible]# vim test1.yaml---
##yaml文件以---开头,以表明这是一个yaml文件,可省略
- name: first test
##定义一个play的名称,可省略gather_facts: false
##设置不进行facts信息收集,这可以加快执行速度,可省略hosts: webservers
##指定要执行任务的被管理主机组,如多个主机组用冒号分隔remote_user: root
##指定被管理主机上执行任务的用户tasks:
##定义任务列表,任务列表中的各任务按次序逐个在hosts中指定的主机上执行- name: test connection
##自定义任务名称ping:
##使用 module: [options] 格式来定义一个任务- name: disable selinuxcommand: '/sbin/setenforce 0'
##command模块和shell模块无需使用key=value格式ignore_errors: True
##如执行命令的返回值不为0,就会报错,tasks停止,可使用ignore_errors忽略失败的任务- name: disable firewalldservice: name=firewalld state=stopped
##使用 module: options 格式来定义任务,option使用key=value格式- name: install httpdyum: name=httpd state=latest- name: install configuration file for httpdcopy: src=/root/ansible/httpd.conf dest=/etc/httpd/conf/httpd.conf
##这里需要一个事先准备好的/opt/httpd.conf文件notify: "restart httpd"
##如以上操作后为changed的状态时,会通过notify指定的名称触发对应名称的handlers操作- name: start httpd serviceservice: enabled=true name=httpd state=startedhandlers:
##handlers中定义的就是任务,此处handlers中的任务使用的是service模块- name: restart httpd
##notify和handlers中任务的名称必须一致service: name=httpd state=restarted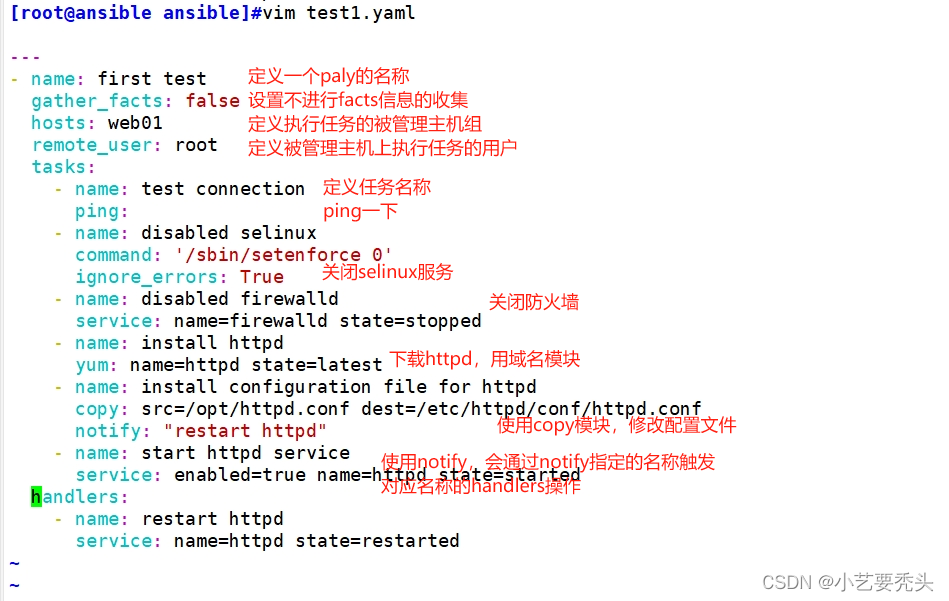
Ansible在执行完某个任务之后并不会立即去执行对应的handler,而是在当前play中所有普通任务都执行完后再去执行handler,这样的好处是可以多次触发notify,但最后只执行一次对应的handler,从而避免多次重启。
2.2 准备http.conf
[root@ansible ansible]# vim httpd.conf#42行,指定端口
Listen 8080
#95行,指定域名
ServerName www.test.com:8080
2.3 运行剧本
//运行playbook
ansible-playbook test1.yaml
//补充参数:
-k(–ask-pass):用来交互输入ssh密码
-K(-ask-become-pass):用来交互输入sudo密码
-u:指定用户
ansible-playbook test1.yaml --syntax-check    #检查yaml文件的语法是否正确
ansible-playbook test1.yaml --list-task       #检查tasks任务
ansible-playbook test1.yaml --list-hosts      #检查生效的主机
ansible-playbook test1.yaml --start-at-task='install httpd'     #指定从某个task开始运行
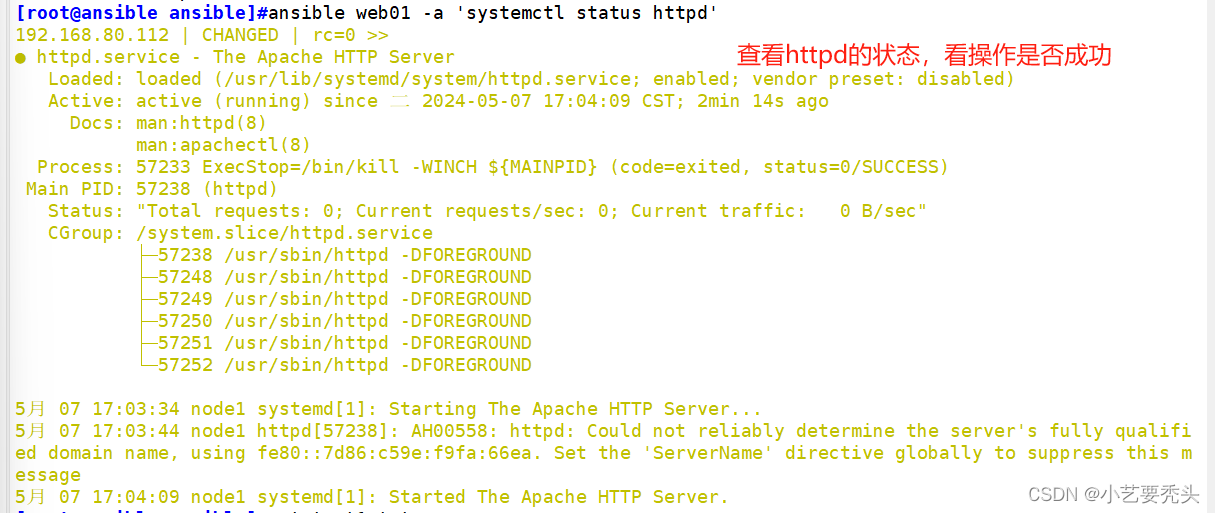
2.4 查看webserbers服务器
[root@ansible ansible]# ansible webservers -m shell -a 'netstat -natp | grep httpd'
3. 剧本示例test2--定义、引用变量
3.1 剧本制作
[root@ansible ansible]# vim test2.yaml---
- name: second testhosts: dbserversremote_user: rootvars:
#定义变量- groupname: mysql
#格式为 key: value- username: nginxtasks:- name: create groupgroup: name={{groupname}} system=yes gid=306
#使用 {{key}} 引用变量的值- name: create useruser: name={{username}} uid=306 group={{groupname}} - name: copy filecopy: content="{{ansible_default_ipv4}}" dest=/opt/vars.txt
#在setup模块中可以获取facts变量信息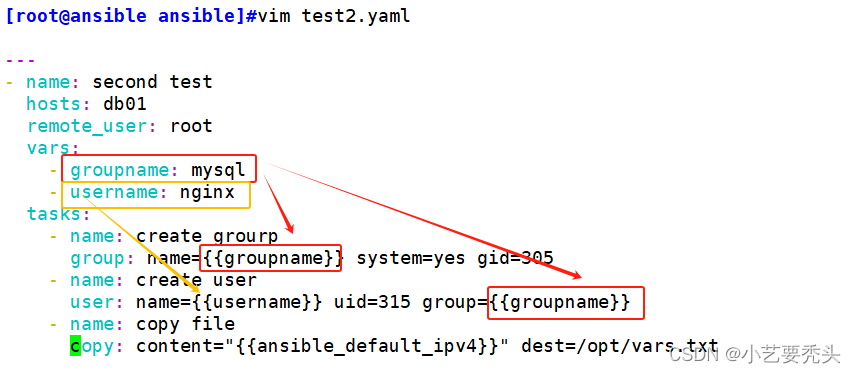
3.2 运行剧本
[root@ansible ansible]# ansible-playbook test2.yaml3.3 查看dbservers服务器
[root@ansible ansible]# ansible dbservers -a 'grep "mysql" /etc/group'[root@ansible ansible]# ansible dbservers -a 'grep "nginx" /etc/passwd'[root@ansible ansible]# ansible dbservers -a 'cat /opt/vars.txt'

3.4 修改剧本中的变量设定
删除dbservers中的mysql组和nginx用户以及/opt/var.txt
[root@ansible ansible]# ansible dbservers -a 'userdel -r nginx'[root@ansible ansible]# ansible dbservers -a 'groupdel mysql'[root@ansible ansible]# ansible dbservers -a 'rm -rf /opt/vars.txt'
确认用户、组以及文件已删除
[root@ansible ansible]# ansible dbservers -a 'grep "nginx" /etc/passwd'[root@ansible ansible]# ansible dbservers -a 'grep "mysql" /etc/group'[root@ansible ansible]# ansible dbservers -a 'cat /opt/vars.txt'

删除/注释“- username: nginx”变量
[root@ansible ansible]# vim test2.yaml---
- name: second testhosts: dbserversremote_user: rootvars:- groupname: mysql
#   - username: nginx
#删除或注释username变量tasks:- name: create groupgroup: name={{groupname}} system=yes gid=306- name: create useruser: name={{username}} uid=306 group={{groupname}} - name: copy filecopy: content="{{ansible_default_ipv4}}" dest=/opt/vars.txt
3.5 在命令行定义变量运行剧本
[root@ansible ansible]# ansible-playbook test2.yaml -e "username=nginx"3.6 查看dbservers服务器
[root@ansible ansible]# ansible dbservers -a 'grep "nginx" /etc/passwd'[root@ansible ansible]# ansible dbservers -a 'grep "mysql" /etc/group'[root@ansible ansible]# ansible dbservers -a 'cat /opt/vars.txt'

4. 剧本示例test3--指定远程主机sudo切换用户
[root@ansible ansible]# vim test3.yaml---
- hosts: dbserversremote_user: zhangsan            become: yes
#2.6版本以后的参数,之前是sudo,意思为切换用户运行become_user: root
#指定sudo用户为root 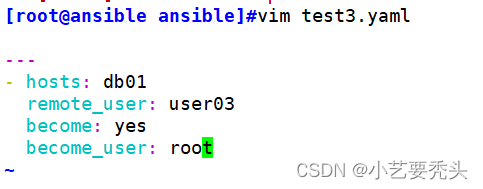
执行playbook时:ansible-playbook test1.yml -K <密码>

5. 剧本示例test4--when条件判断
在Ansible中,提供的唯一一个通用的条件判断是when指令,当when指令的值为true时,则该任务执行,否则不执行该任务。 when一个比较常见的应用场景是实现跳过某个主机不执行任务或者只有满足条件的主机执行任务
[root@ansible ansible]# vim test4.yaml---
- hosts: allremote_user: roottasks:- name: shutdown hostcommand: /sbin/shutdown -r nowwhen: ansible_default_ipv4.address == "192.168.80.112"
#when指令中的变量名不需要手动加上{{}}
#或者使用
# when: inventory_hostname == "<主机名>" 
执行
[root@ansible ansible]# ansible-playbook test4.yaml 
执行后,仅有指定主机重启,执行ping模块查看
[root@ansible ansible]# ansible  all -m ping
192.168.122.11 | SUCCESS => {"ansible_facts": {"discovered_interpreter_python": "/usr/bin/python"}, "changed": false, "ping": "pong"
}
192.168.122.12 | UNREACHABLE! => {"changed": false, "msg": "Failed to connect to the host via ssh: ssh: connect to host 192.168.122.12 port 22: Connection timed out", "unreachable": true
}
6. 剧本示例test5--迭代
Ansible提供了很多种循环结构,一般都命名为with_items,作用等同于 loop 循环。
[root@ansible ansible]# vim test5.yaml---
- name: test5hosts: allgather_facts: falsetasks:- name: create directoriesfile:path: "{{item}}"state: directorywith_items:
#等同于 loop:- /test/test1- /test/test2- name: add usersuser: name={{item.name}} state=present groups={{item.groups}}with_items:- name: test1groups: test- name: test2groups: root
#或使用以下格式
#      with_items:
#        - {name:'test1', groups:'test'}
#        - {name:'test2', groups:'root'}
执行
[root@ansible ansible]# ansible-playbook test5.yaml 查看验证
[root@ansible ansible]# ansible all -a "ls -l /test/"

7. Template模块
Jinja是基于Python的模块引擎。Template类是Jinja的一个重要组件,可以看做是一个编译过的模板文件,用来产生目标文本,传递Python的变量给模板去替换模板中的标记。
7.1 准备template模板文件
先准备一个以.j2为后缀的template模板文件,设置引用的变量 模板文件使用test1曾用的httpd.conf配置文件
[root@ansible ansible]# cp httpd.conf httpd.conf.j2
[root@ansible ansible]# vim httpd.conf.j2 ##42行,修改
Listen {{http_port}}
##95行,修改
ServerName {{server_name}}
##119行,修改
DocumentRoot "{{root_dir}}"
##124行,修改
<Directory "{{root_dir}}">
7.2 修改主机清单文件
修改主机清单文件,使用主机变量定义一个变量名相同,而值不同的变量
[root@ansible ansible]# vim /etc/ansible/hosts [webservers]
192.168.122.11 http_port=192.168.122.11:80 server_name=www.test1.com:80 root_dir=/etc/httpd/htdocs[dbservers]
192.168.122.12 http_port=192.168.122.12:80 server_name=www.test2.com:80 root_dir=/etc/httpd/htdocs
7.3 编写playbook
[root@ansible ansible]# vim test6.yaml---
- hosts: allremote_user: rootvars:- package: httpd- service: httpdtasks:- name: install httpd packageyum: name={{package}} state=latest- name: install configure filetemplate: src=/opt/httpd.conf.j2 dest=/etc/httpd/conf/httpd.conf
#使用template模板notify:- restart httpd- name: create root dirfile: path=/etc/httpd/htdocs state=directory- name: start httpd serverservice: name={{service}} enabled=true state=startedhandlers:- name: restart httpdservice: name={{service}} state=restarted
7.4 执行playbook
[root@ansible ansible]# ansible-playbook test6.yaml 7.5 制作测试网页
[root@ansible ansible]# ansible 192.168.80.112 -m shell -a "echo 'this is test1 template test' > /etc/httpd/htdocs/index.html"
192.168.122.11 | CHANGED | rc=0 >>[root@ansible ansible]# ansible 192.168.122.12 -m shell -a "echo 'this is test2 template test' > /etc/httpd/htdocs/index.html"
192.168.122.12 | CHANGED | rc=0 >>
7.6 访问测试
[root@ansible ansible]# curl 192.168.122.11
this is test1 template test
[root@ansible ansible]# curl 192.168.122.12
this is test2 template test
[root@ansible ansible]# echo '192.168.122.11 www.test1.com' >> /etc/hosts
[root@ansible ansible]# echo '192.168.122.11 www.test2.com' >> /etc/hosts
[root@ansible ansible]# curl www.test1.com
this is test1 template test
[root@ansible ansible]# curl www.test2.com
this is test2 template test
8. tags模块
可以在一个playbook中为某个或某些任务定义“标签”,在执行此playbook时通过ansible-playbook命令使用--tags选项能实现仅运行指定的tasks。 playbook还提供了一个特殊的tags为always。作用就是当使用always当tags的task时,无论执行哪一个tags时,定义有always的tags都会执行。
8.1 编写脚本
[root@ansible ansible]# vim test7.yaml---
- hosts: webserversremote_user: roottasks:- name: mkdir directoryfile: path=/opt/test/ state=directorytags:- always- name: touch filefile: path=/opt/test/testhost state=touchtags:- test1- all- name: copy hosts filecopy: src=/etc/hosts dest=/opt/test/hoststags:- test2- all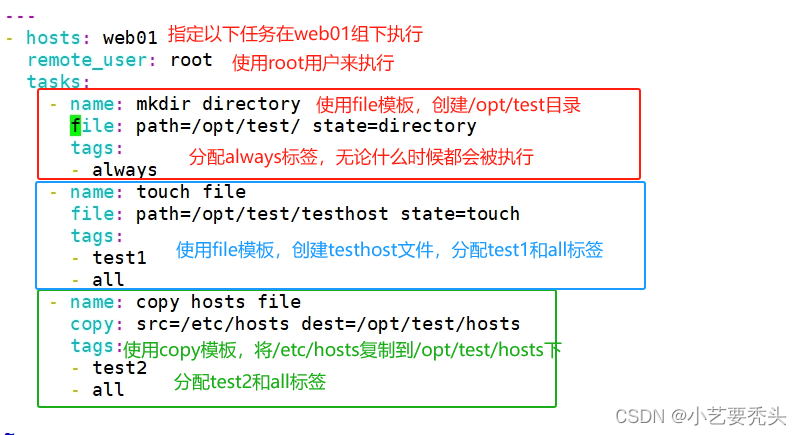
8.2 执行tags="test1"
[root@ansible ansible]# ansible-playbook test7.yaml --tags="test1"验证
[root@ansible ansible]# ansible webservers -a "ls -l /opt/test/"
192.168.122.11 | CHANGED | rc=0 >>
总用量 0
-rw-r--r-- 1 root root 0 10月 25 12:14 testhost
8.3 执行tags="test2"
删除文件夹
[root@ansible ansible]# ansible webservers -m file -a "path=/opt/test/ state=absent"
192.168.122.11 | CHANGED => {"ansible_facts": {"discovered_interpreter_python": "/usr/bin/python"}, "changed": true, "path": "/opt/test/", "state": "absent"
}
[root@ansible ansible]# ansible webservers -a "ls -l /opt/test/"
192.168.122.11 | FAILED | rc=2 >>
ls: 无法访问/opt/test/: 没有那个文件或目录non-zero return code
执行tags="test2"
[root@ansible ansible]# ansible-playbook test7.yaml --tags="test2"
验证
[root@ansible ansible]# ansible webservers -a "ls -l /opt/test/"
192.168.122.11 | CHANGED | rc=0 >>
总用量 4
-rw-r--r-- 1 root root 233 10月 25 12:24 hosts
8.4 执行tags="all"
删除文件夹
[root@ansible ansible]# ansible webservers -m file -a "path=/opt/test/ state=absent"
192.168.122.11 | CHANGED => {"ansible_facts": {"discovered_interpreter_python": "/usr/bin/python"}, "changed": true, "path": "/opt/test/", "state": "absent"
}
[root@ansible ansible]# ansible webservers -a "ls -l /opt/test/"
192.168.122.11 | FAILED | rc=2 >>
ls: 无法访问/opt/test/: 没有那个文件或目录non-zero return code 
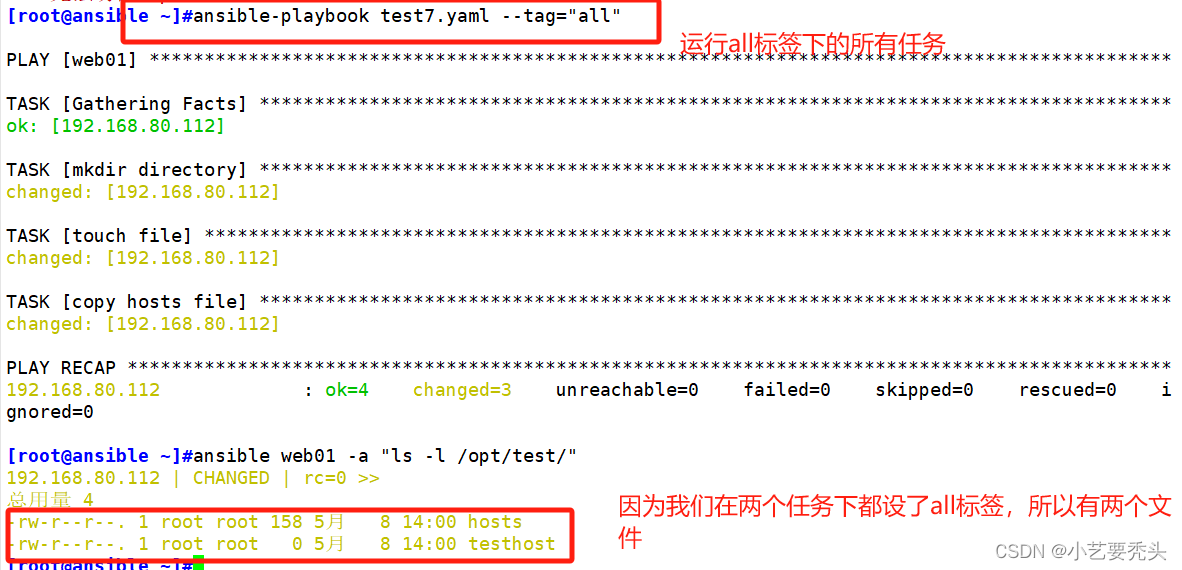
执行tags="all"
[root@ansible ansible]# ansible-playbook test7.yaml --tags="all"验证
[root@ansible ansible]# ansible webservers -a "ls -l /opt/test/"
192.168.122.11 | CHANGED | rc=0 >>
总用量 4
-rw-r--r-- 1 root root 233 10月 25 12:27 hosts
-rw-r--r-- 1 root root   0 10月 25 12:27 testhost