目录
前言
一、playbooks 剧本概述
1、playbooks 剧本概念
2、playbooks 剧本组成部分
3、playbooks 剧本特点与优势
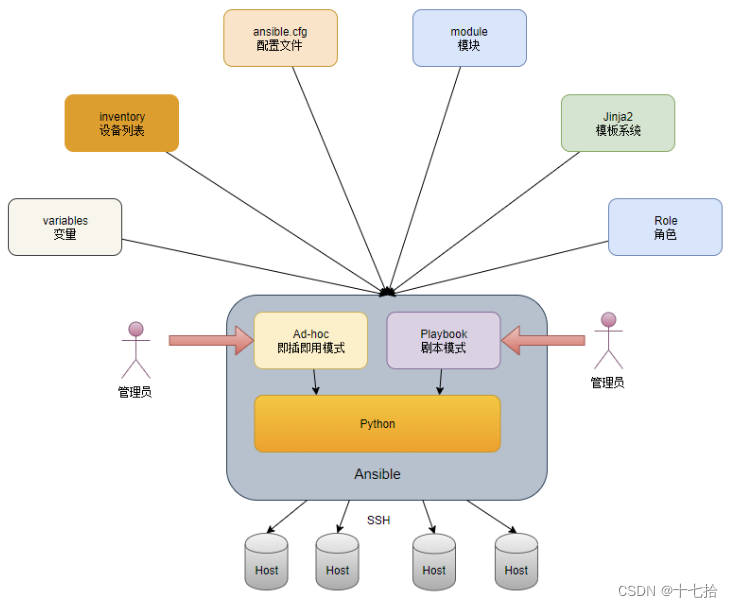
ansible-playbook%20%E5%91%BD%E4%BB%A4-toc" style="margin-left:0px;">二、ansible-playbook 命令
三、playbooks 剧本简单实例
1、编写 apache 的 yum 安装部署脚本
2、编写 nginx 的 yum 安装部署剧本
四、playbooks 定义、引用变量
1、使用vars关键字定义变量并直接使用
2、 引用 fact 信息中的变量
五、指定远程主机sudo切换用户
六、when 条件判断
1、编写 when 判断 shutdown 关机剧本
2、编写 when 判断来关闭 httpd 服务
七、迭代
1、批量迭代创建目录
2、批量迭代创建文件
3、批量迭代创建组和用户
八、Templates 模块
九、Tags 模块
2、使用 always 标签
十、Roles 模块
1、Roles 模块概述
ansible%20%E8%A7%92%E8%89%B2%E6%A6%82%E5%BF%B5-toc" style="margin-left:80px;">1.1 ansible 角色概念
1.2 Roles 模块概念
1.3 Roles 目录结构
2、在 playbook 中使用 roles 的步骤
3、使用 Roles 模块远程搭建 LNMP 架构
3.1 任务要求
3.2 创建 roles 工作目录
3.3 修改 inventory 主机清单
3.4 nginx 模块配置
3.5 mysql 模块配置
3.6 php 模块配置
3.7 编写 site.yml 文件
3.8 执行 site.yml 剧本
3.9 访问测试网页
前言
在 Ansible 中,Playbooks(剧本)是用来定义一系列任务的文件,可以实现自动化部署、配置和管理服务器等操作
本文主要介绍 playbooks 剧本的组成以及编写
一、playbooks 剧本概述
1、playbooks 剧本概念
playbook 是 一个不同于使用 Ansible 命令行执行方式的模式,其功能更强大灵活。简单来说,playbook 是一个非常简单的配置管理和多主机部署系统,不同于任何已经存在的模式,可作为一个适合部署复杂应用程序的基础
Playbook 可以定制配置,可以按照指定的操作步骤有序执行,支持同步和异步方式。我们完成一个任务,例如安装部署一个httpd服务,我们需要多个模块(一个模块也可以称之为 task)提供功能来完成
而 playbook 就是组织多个 task 的容器,他的实质就是一个文件,有着特定的组织格式,它采用的语法格式是 YAML(Yet Another Markup Language)
2、playbooks 剧本组成部分
- Tasks:任务,即通过 task 调用 ansible 的模板将多个操作组织在一个 playbook 中运行
- Variables:变量,变量用来存储数据,可以在playbook中被引用。这些变量可以是全局的,也可以是针对特定主机或主机组的。使用变量可以使playbook更加灵活和可重用
- Templates:模板,一种用来生成配置文件或者其他文本文件的机制。在Ansible中,你可以使用Jinja2模板引擎来创建模板文件。这些模板文件中可以包含变量、条件语句、循环等,使得你可以根据不同的情况生成不同的文本内容
- Handlers:处理器,是一种特殊类型的任务,它们仅在特定条件下触发。通常用于在一组任务执行完成后执行诸如重启服务之类的操作。当changes状态条件满足时,(notify)触发执行的操作
- Roles:角色,一种用来组织playbooks中任务的结构化方式。一个role包含了一组相关的任务、变量、handlers、文件等内容,可以使得playbooks更加模块化、可重用和易于维护
3、playbooks 剧本特点与优势
- 声明式:用户只需描述期望的系统状态,而非具体的操作步骤,Ansible 负责确定如何达到这一状态
- 幂等性:Playbook 设计为可重复执行,即使在系统已处于预期状态时,再次运行也不会产生副作用
- 可读性强:YAML 格式和简洁的结构使得Playbook易于编写和维护
- 模块丰富:Ansible 提供了大量的模块,覆盖了从系统配置到云资源管理的广泛需求
- 跨平台:支持多种操作系统和环境,适配不同的自动化需求
ansible-playbook%20%E5%91%BD%E4%BB%A4">二、ansible-playbook 命令
ansible-playbook [options] playbook.yml
#playbook.yml 是要运行的剧本文件名,options 是可选参数
| 参数 | 说明 |
|---|---|
-i | 指定 inventory 文件的路径,用于指定要管理的主机列表 |
| -k(–ask-pass) | 用来交互输入ssh密码 |
| -K(-ask-become-pass) | 用来交互输入sudo(普通用户)密码 |
| -u | 指定用户 |
-l | 指定要运行剧本的主机或主机组 |
-e | 指定额外的变量,可以在剧本中使用 |
-t | 指定要运行的标签,只运行带有指定标签的任务 |
| --C | 会执行完整的 Playbook,但是所有 task 中的行为都不会在远程被管理节点服务器上执行,所有的操作都是模拟 |
--diff | 在执行任务之前,显示将要更改的文件的差异 |
--syntax-check | 检查yaml文件的语法是否正确 |
| --step | 执行 tasks 中的任务,需要手动确认是否往下执行 |
--list-tasks | 列出剧本中的所有任务 |
| --list-hosts | 检查生效的主机 |
| --start-at-task | 指定从某个task开始运行,如--start-at-task='install httpd' |
除了这些常用的参数之外,还有很多其他的参数可以使用,可以通过运行 ansible-playbook --help 命令来查看所有可用的参数
三、playbooks 剧本简单实例
playbook 中运用的模块就是 ansible 中的模块,就像 docker-compose 一样将 docker 操作容器的指令归纳为一个 yaml 文件,开启运行 yaml 中的指令模块就能按照预设计的方向去完成
前提:在主机清单文件里定义被控端ip
vim /etc/ansible/hosts[webs]
172.16.12.12[dbs]
172.16.12.13
1、编写 apache 的 yum 安装部署脚本
(1)创建工作目录
mkdir -p /mnt/httpd
cd /mnt/httpd
(2)准备 httpd.html 文件,上传至控制端的/mnt/httpd/目录下

(3)编写 playbook 剧本
vim httpd_install.yml---
- name: first playgather_facts: falsehosts: dbsremote_user: roottasks:- name: test connectionping:- name: disable firewalldservice: name=firewalld state=stopped- name: install httpdyum: name=httpd state=latest- name: Create a web fileshell: 'echo hello httpd service > /var/www/html/index.html'- name: install configuration file for httpdcopy: src=/mnt/httpd/httpd.conf dest=/etc/httpd/conf/httpd.confnotify: "restart httpd"- name: start httpd serviceservice: enabled=true name=httpd state=startedhandlers:- name: restart httpdservice: name=httpd state=restarted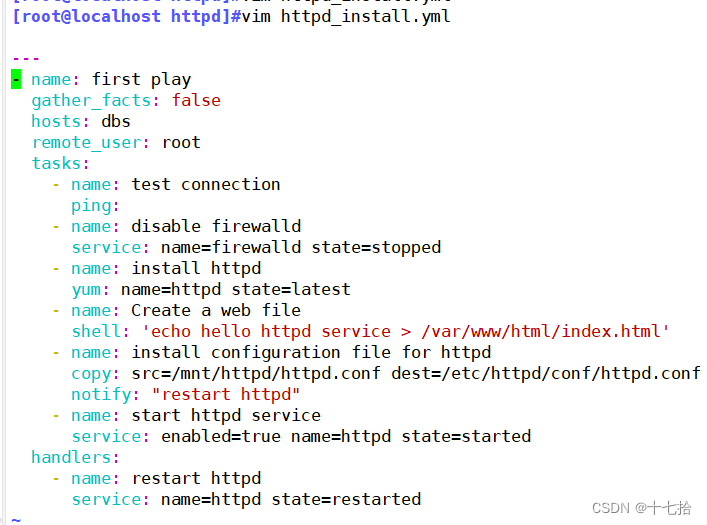
#详细解释
---     #yaml文件以---开头,以表明这是一个yaml文件,可省略
- name: first play     #定义一个play的名称,可省略gather_facts: false  #设置不进行facts信息收集,这可以加快执行速度,可省略hosts: dbs           #指定要执行任务的被管理主机组,如多个主机组用冒号分隔remote_user: root    #指定被管理主机上执行任务的用户tasks:               #定义任务列表,任务列表中的各任务按次序逐个在hosts中指定的主机上执行- name: test connection    #自定义任务名称ping:             #使用 module: [options] 格式来定义一个任务- name: disable selinuxcommand: '/sbin/setenforce 0'  #command模块和shell模块无需使用key=value格式ignore_errors: True
#如执行命令的返回值不为0,就会报错,tasks停止,可使用ignore_errors忽略失败的任务- name: disable firewalldservice: name=firewalld state=stopped
#使用 module: options 格式来定义任务,option使用key=value格式- name: install httpdyum: name=httpd state=latest- name: Create a web fileshell: 'echo hello httpd service > /var/www/html/index.html'- name: install configuration file for httpdcopy: src=/mnt/httpd/httpd.conf dest=/etc/httpd/conf/httpd.conf
#这里需要一个事先准备好的/mnt/httpd/httpd.conf文件notify: "restart httpd"
#如以上操作后为changed的状态时,会通过notify指定的名称触发对应名称的handlers操作- name: start httpd serviceservice: enabled=true name=httpd state=startedhandlers:     #handlers中定义的就是任务,此处handlers中的任务使用的是service模块- name: restart httpd    #notify和handlers中任务的名称必须一致service: name=httpd state=restarted
#Ansible在执行完某个任务之后并不会立即去执行对应的handler,而是在当前play中所有普通任务都执行完后再去执行handler,这样的好处是可以多次触发notify,但最后只执行一次对应的handler,从而避免多次重启。
(4)检测 playbook 剧本
ansible-playbook httpd_install.yml --syntax-check  #检查yml文件的语法是否正确
ansible-playbook httpd_install.yml --list-task     #列出task任务
ansible-playbook httpd_install.yml --list-hosts    #检测生效的主机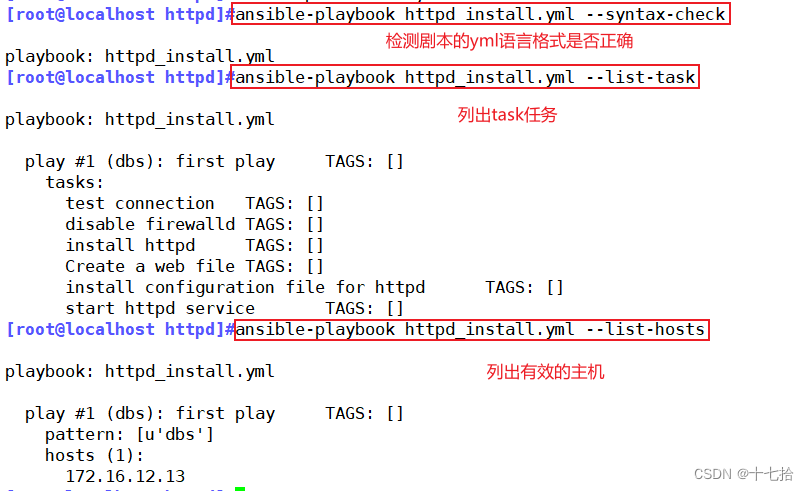
(5)执行 playbook 剧本
ansible-playbook httpd_install.yml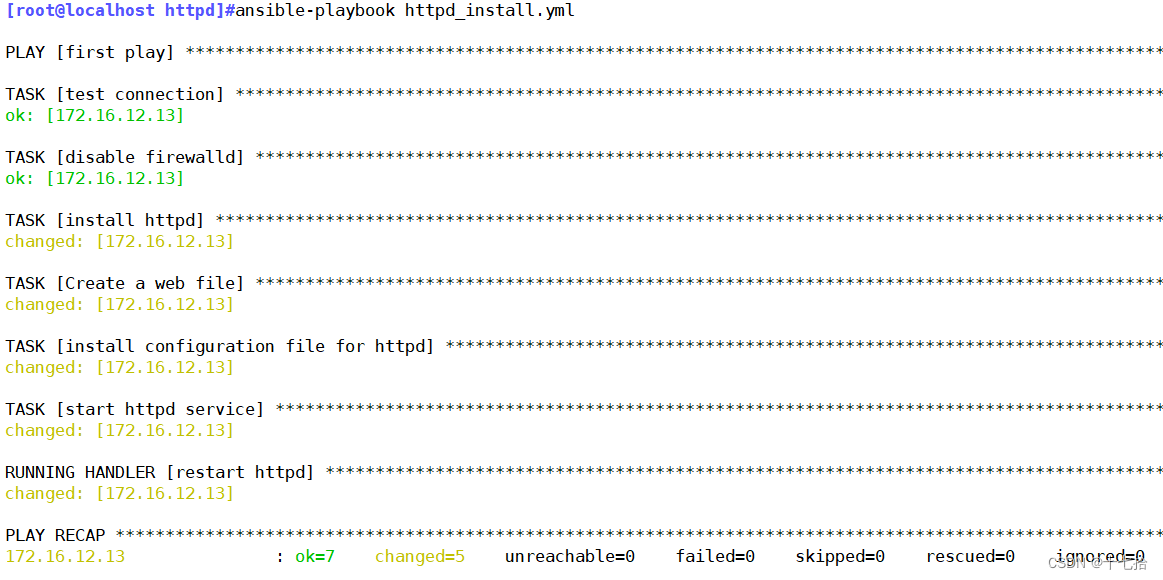
(6) 浏览器测试访问被控端网页,判断apache服务是否安装成功

2、编写 nginx 的 yum 安装部署剧本
剧本编写实现的需求:对 Ansible 管理的所有的 webs 组的成员,yum 安装最新版本的 nginx 服务软件,并进行相应环境的调整,确保 webs 的 nginx 服务能够正常运行并设置开机自启
(1)创建工作目录
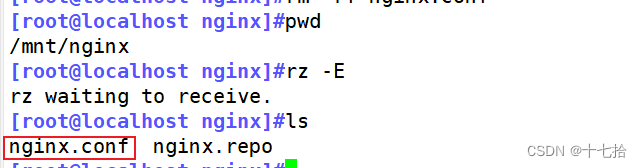
mkdir -p /mnt/nginx
cd /mnt/nginx
(2)准备nginx主配置文件,上传至控制端的/mnt/nginx/目录下
(3)编写 playbook 剧本
vim nginx_install.yml---
- name: second playgather_facts: falsehosts: websremote_user: roottasks:- name: test connectionping:- name: disable selinuxcommand: '/sbin/setenforce 0'ignore_errors: True- name: disable firewalldservice: name=firewalld state=stopped- name: install repoyum: name=epel-release.noarch state=latest- name: install nginxyum: name=nginx state=latest- name: Create a web fileshell: 'echo hello nginx service > /usr/share/nginx/html/index.html'- name: install configuration file for nginxcopy: src=/mnt/nginx/nginx.conf dest=/etc/nginx/nginx.confnotify: "restart nginx"- name: start nginx serviceservice: enabled=true name=nginx state=startedhandlers:- name: restart nginxservice: name=nginx state=restarted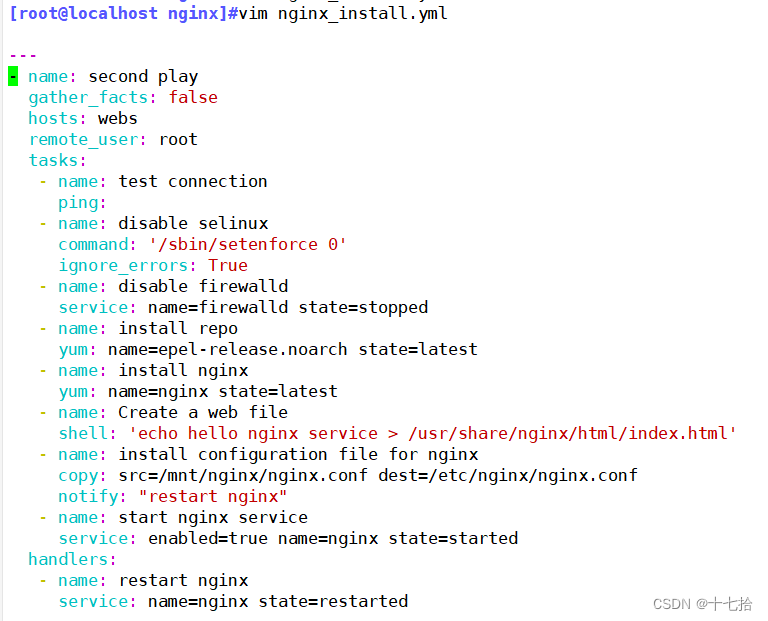
(4)检测 playbook 剧本
ansible-playbook nginx_install.yml --syntax-check  #检查yaml文件的语法是否正确
ansible-playbook nginx_install.yml --list-task     #列出task任务
ansible-playbook nginx_install.yml --list-hosts    #检测生效的主机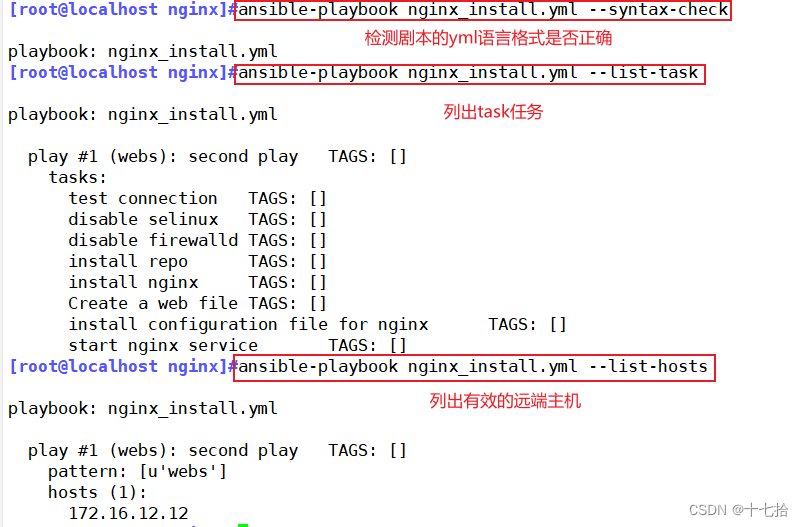
(6)执行 playbook 剧本
ansible-playbook nginx_install.yml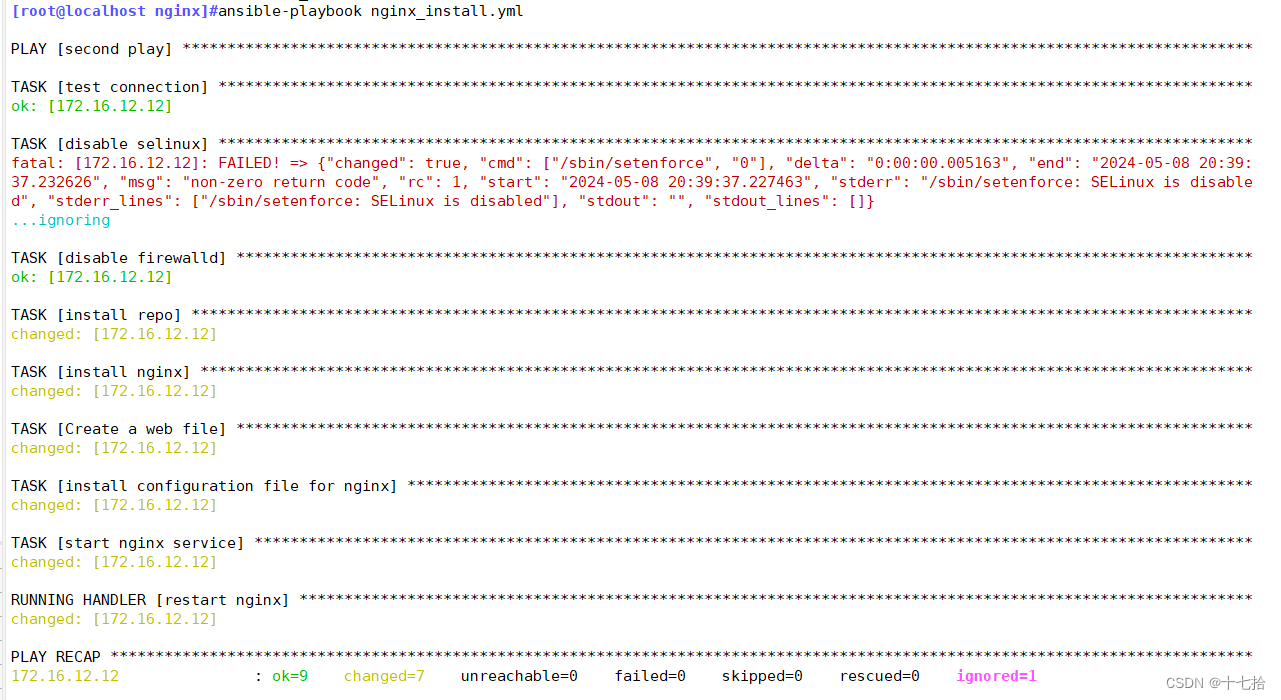
(7) 浏览器测试访问被控端网页,判断nginx服务是否安装成功

四、playbooks 定义、引用变量
引用变量是在playbook中使用变量的概念。变量可以用来存储数据,如主机列表、文件路径、配置参数等。在playbook中,可以定义变量并在需要的地方引用它们,以便在不同的任务中重复使用相同的值或根据需要动态地更改值
1、使用vars关键字定义变量并直接使用
在yaml文件中,我们可以在初始配置的模块中用var去定义变量的存在,变量的格式为 key:value ,以此来确定该变量在剧本中的存在
案例一:
#编写 playbook 脚本,并在其中定义和引用变量
vim test1.yml
---
- name: first playhosts: dbsremote_user: rootvars:foldername: data   #定义变量filename: 123.txt  #格式为 key: valuetasks:- name: mkdir a data folderfile: path=/{{foldername}} state=directory  #使用 {{key}} 引用变量的值- name: touch a test filefile: path=/{{foldername}}/{{filename}} state=touch#检测剧本yaml格式是否正确
ansible-playbook test1.yml --syntax-check
#执行剧本
ansible-playbook test1.yml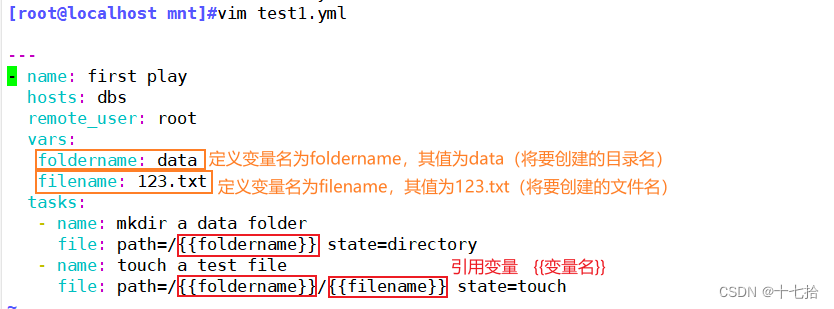

测试:查看被控端是否成功建立了/data目录并在其下创建了123.txt文件

案例二:
#编写 playbook 脚本,并在其中定义和引用变量
vim test2.yml
---
- name: second playhosts: dbsremote_user: rootvars:                 - groupname: mysql   - username: mysql-01tasks:- name: create groupgroup: name={{groupname}} system=yes gid=300    - name: create useruser: name={{username}} uid=300 group={{groupname}} #检测剧本yaml格式是否正确
ansible-playbook test2.yml --syntax-check
#执行剧本时,可在命令行里定义变量
ansible-playbook test2.yml -e "username=mysql-02"
#检测命令行中定义的变量值mysql-01生效,还是剧本中定义的变量值mysql-02生效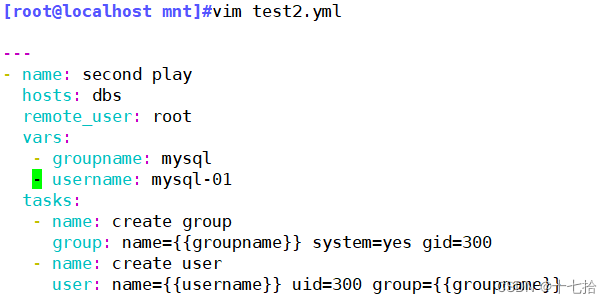
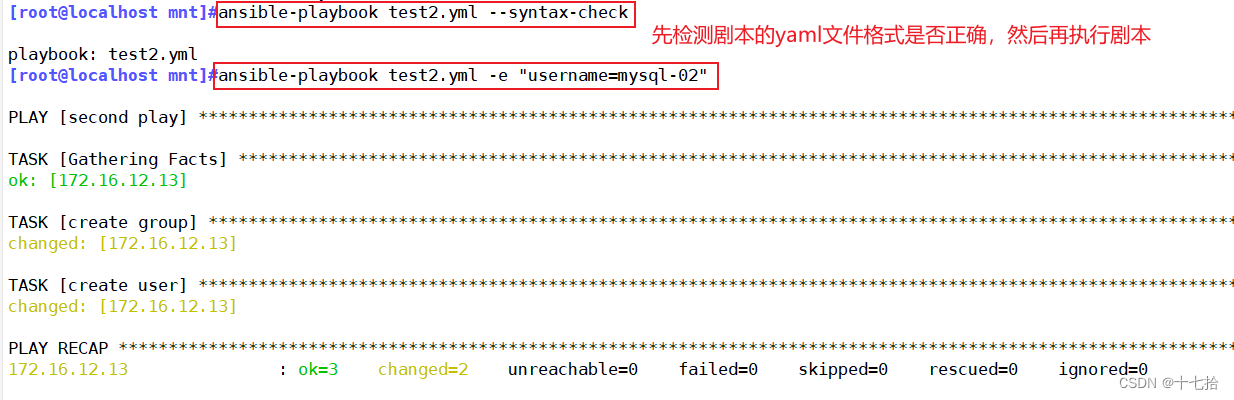
测试: 查看是生成mysql-01用户还是生成mysql-02用户
ansible dbs -a "tail /etc/passwd"
结论: 最终生成mysql-01用户,即命令行中定义的变量值先生效,而剧本中定义的变量值无效
查看用户组是否创建成功
ansible dbs -a "tail /etc/group"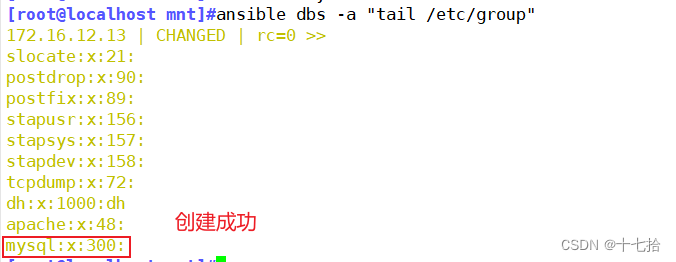
2、 引用 fact 信息中的变量
首先我们知道 使用 ansible 组 -m setup 可以收集该组中所有的节点信息 ,
所以 setup 中 fact 信息,有时候会剧本编写中需要,而 fact 的信息也是可以通过变量的方式进行调用
vim test3.yml
---
- name: third playhosts: dbsremote_user: roottasks:- name: get datedebug: msg={{ansible_date_time.weekday}}
#该任务使用debug模块,主要用于调式目的,输出指定的信息.
#这里的输出内容是 ansible_date_time 这个事实变量中的weekday属性表示当前日期是星期几- name: get ipcopy: content="{{ansible_default_ipv4}}" dest=/opt/vars.txt
#该任务使用copy模块,将ansible_default_ipv4变量值(被控端的IP地址等信息)输出到/opt/vars.txt文件中#检测剧本yaml格式是否正确
ansible-playbook test3.yml --syntax-check
#执行剧本
ansible-playbook test3.yml
#查看被控端指定的文件中有无IP地址等信息
ansible dbs -a "cat /opt/vars.txt"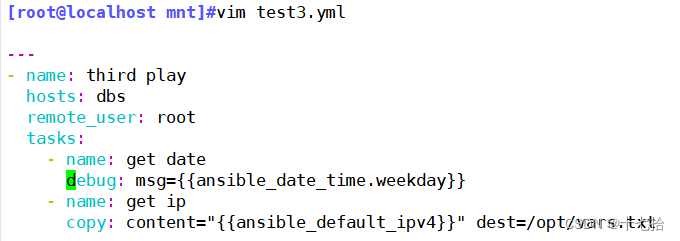

![]()
五、指定远程主机sudo切换用户
(1)远程被控端必须要有下面的剧本中指定的用户
ansible webs -a "id dh"
(2) 编写 playbook 剧本
vim sudochange.yml
---
- hosts: websremote_user: dh      #2.6版本以后的参数,之前是sudo,意思为切换用户运行become: yes          #指定sudo用户为rootbecome_user: root
(3) 在playbook文件中设置sudo提权,还需要在对应的主机上实现sudo提权
#在被控端进行添加
vim /etc/sudoers
dh      ALL=(ALL)      NOPASSWD: ALL
#允许用户 dh 在任何主机上以任何用户的身份执行任何命令,即允许 dh用户 以超级用户的权限执行命令,且允许 dh 用户 在执行特定命令时无需输入密码
报错:
当没有在被控端给 dh用户 sudo权限时,直接使用ansible-playbook sudochange.yml -K 执行脚本,会报以下错误
fatal: [172.16.12.12]: FAILED! => f"ansible facts": {}, "changed": false, "failed modules": {"setup": {"ansible facts": {"discovered_interpreter_python": "/usr/bin/python"}, "failed": true, "module stderr": "shared connection to 172.16.12.15 closed.\r\n","module_stdout":"\r\n我们信任您已经从系统管理员那里了解了日常注意事项。\r\n总结起来无外乎这三点:\r\n\r\n     #1)尊重别人的隐私。\r\n    #2)输入前要先考虑(后果和风险)。\r\n #3)权力越大,责任越大。\r\n\r\n\r\ndh 不在 sudoers 文件中。此事将被报告。\r\n","msg"
"MODULE FAILURE\nSee stdout/stderr for the exact error", "rc": 1}}, "msg": "The following modules failed to execute: setup\n"}
(4)配置免密登录
#ssh登录到远程管理节点
ssh dh@172.16.12.12#将本地主机上的SSH公钥复制到远程主机
sshpass -p '123' ssh-copy-id dh@172.16.12.12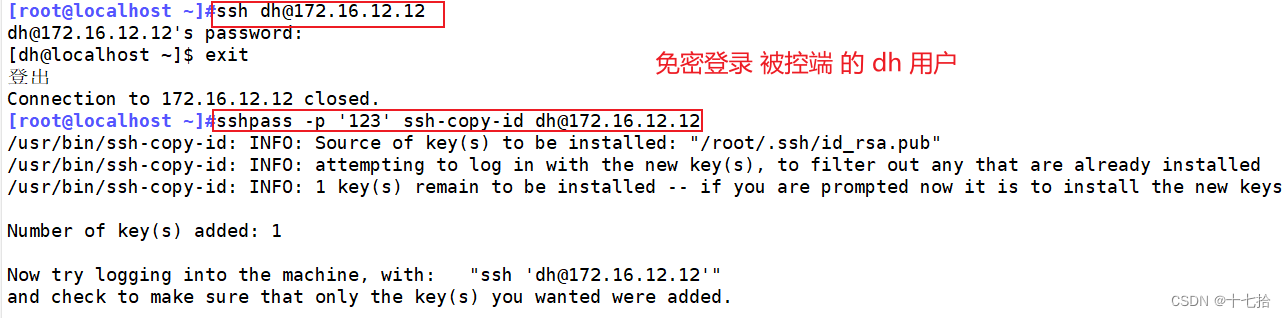
报错:
当没有进行免密登录时,直接使用ansible-playbook sudochange.yml -K 执行脚本,会报以下错误:
fatal: [172.16.12.12]: UNREACHABLE! => {"changed": false, "msg": "Failed to connect to the host via ssh: Permission denied (publickey,gssapi-keyex,gssapi-with-mic,password).", "unreachable": true}
(5) 测试被控端能否联通
ansible-playbook sudochange.yml -K
(6)在剧本中添加 task 任务
vim sudochange.yml
---
- hosts: websremote_user: dhbecome: yesbecome_user: roottasks:- name: touch filefile: path=/opt/abc.txt state=touch- name: change priviliegesfile: owner=dh group=dh mode=644 path=/opt/abc.txt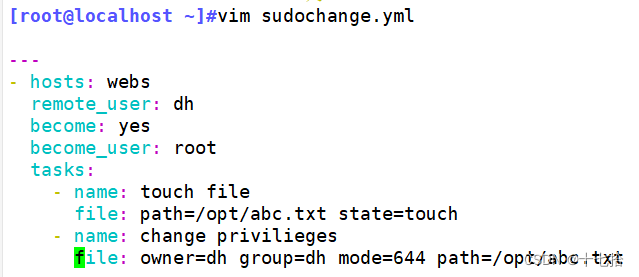
(7)执行剧本
#检测剧本yaml格式是否正确
ansible-playbook sudochange.yml --syntax-check
#执行剧本
ansible-playbook sudochange.yml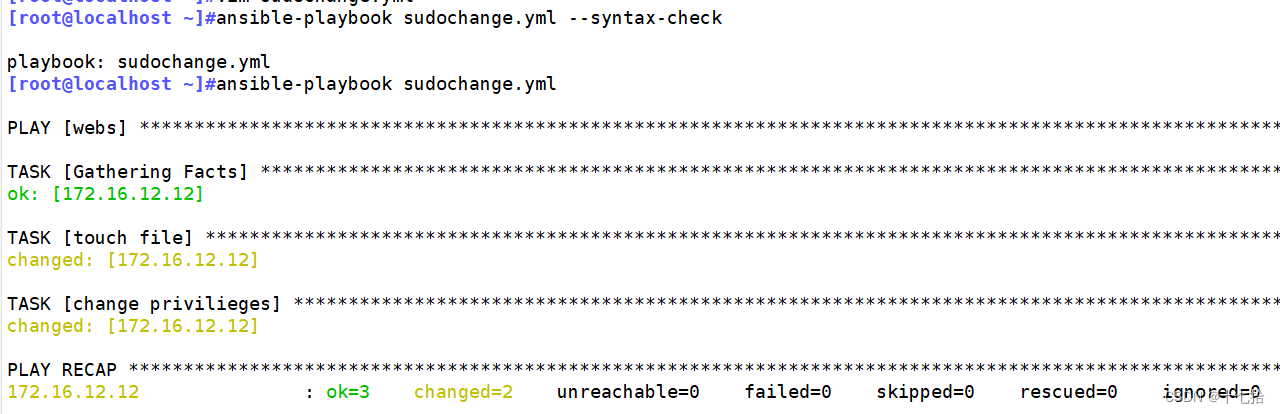
(8)测试
ansible webs -a "ls -l /opt/"
六、when 条件判断
在 Ansible 中,提供的唯一一个通用的条件判断是 when 指令,当 when 指令的值为 true 时,则该任务执行,否则不执行该任务
when 是一个比较常见的应用场景是实现跳过某个主机不执行任务或者只有满足条件的主机执行任务
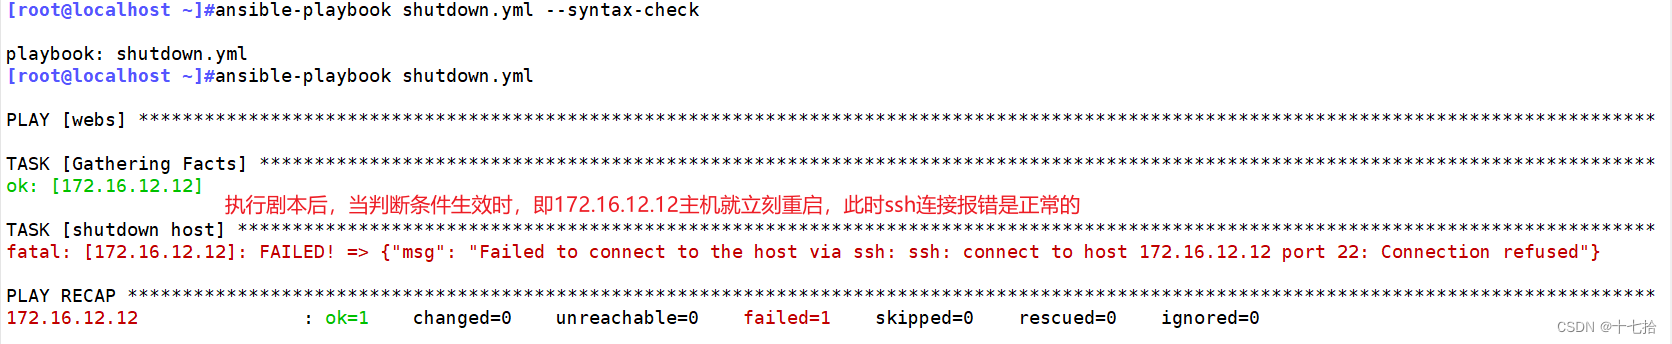
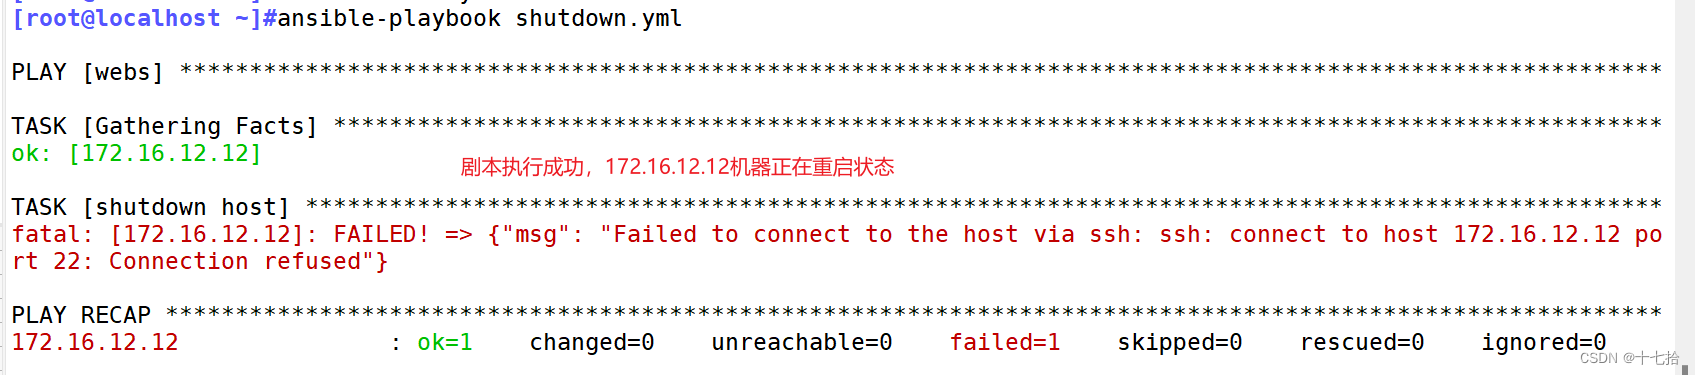
1、编写 when 判断 shutdown 关机剧本
当 when判断条件 值为true时:
vim shutdown.yml
- hosts: webstasks:- name: shutdown hostcommand: /usr/sbin/shutdown -r nowwhen: ansible_default_ipv4.address == "172.16.12.12"
或者:when: inventory_hostname == "主机名"
# when指令中的变量名不需要手动加上 {{}}#检测剧本yaml格式是否正确
ansible-playbook shutdown.yml --syntax-check
#执行剧本
ansible-playbook shutdown.yml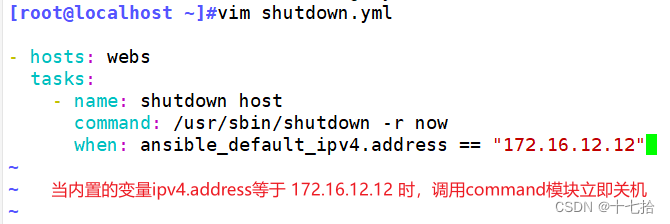
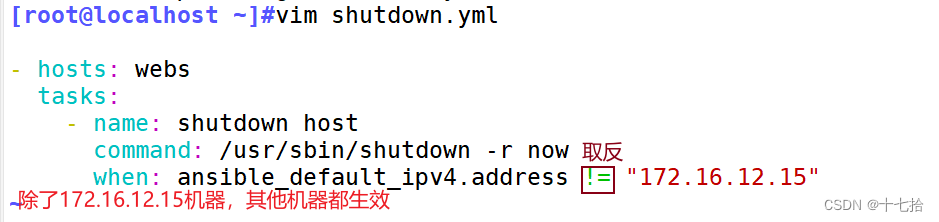
当 when判断条件 值为false时:
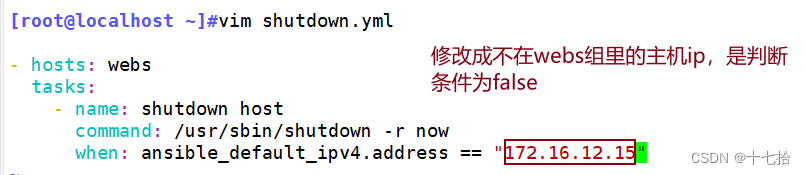
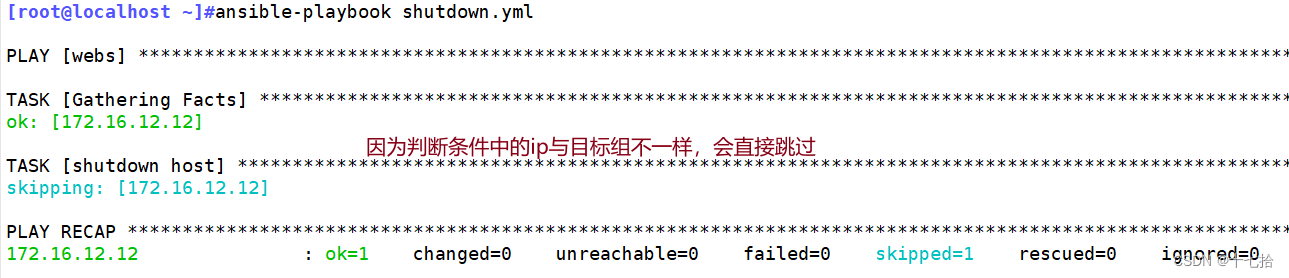
当 when 条件可以通过 !=(不等于条件来进行判断)
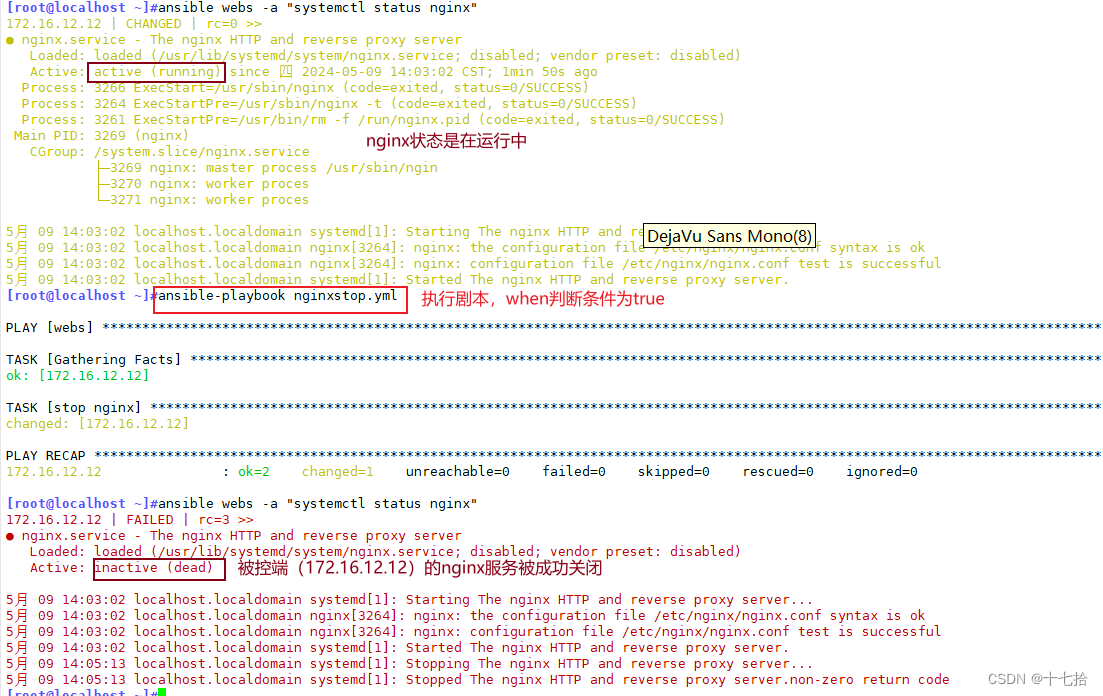
2、编写 when 判断来关闭 httpd 服务
vim nginxstop.yml
- hosts: webstasks:- name: stop nginxservice: name=nginx state=stoppedwhen: ansible_default_ipv4.address == "172.16.12.12"
#当内置的变量ipv4.address等于172.16.12.12时调用service模块关闭httpd服务#执行剧本
ansible-playbook stophttpd.yml
#查看被控端nginx服务状态
ansible webs -a "systemctl status nginx"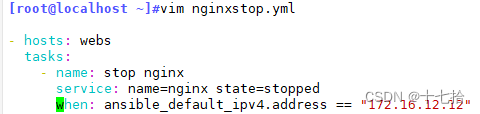
七、迭代
在Ansible的Playbooks剧本中,迭代(Iteration)是一种非常有用的概念,可以让你对多个主机或变量执行相同的任务或操作
Ansible 提供了很多种循环结构,一般都命名为 with_items,作用等同于 loop 循环
loop 是一种用于循环执行任务的结构,它允许在 playbook 中遍历一个列表,并对每个元素执行相同的任务
1、批量迭代创建目录
vim mkdto.yml
---
- name: first playhosts: websgather_facts: falsetasks:- name: create directoriesfile:path: "{{item}}"state: directorywith_items:- /opt/baidu/- /opt/google/- /mnt/nanjing/- /mnt/suzhou/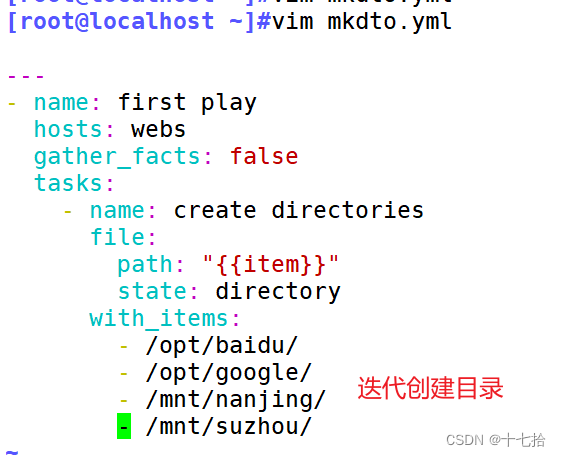
#检测剧本yaml格式是否正确
ansible-playbook mkdto.yml --syntax-check
#执行剧本
ansible-playbook mkdto.yml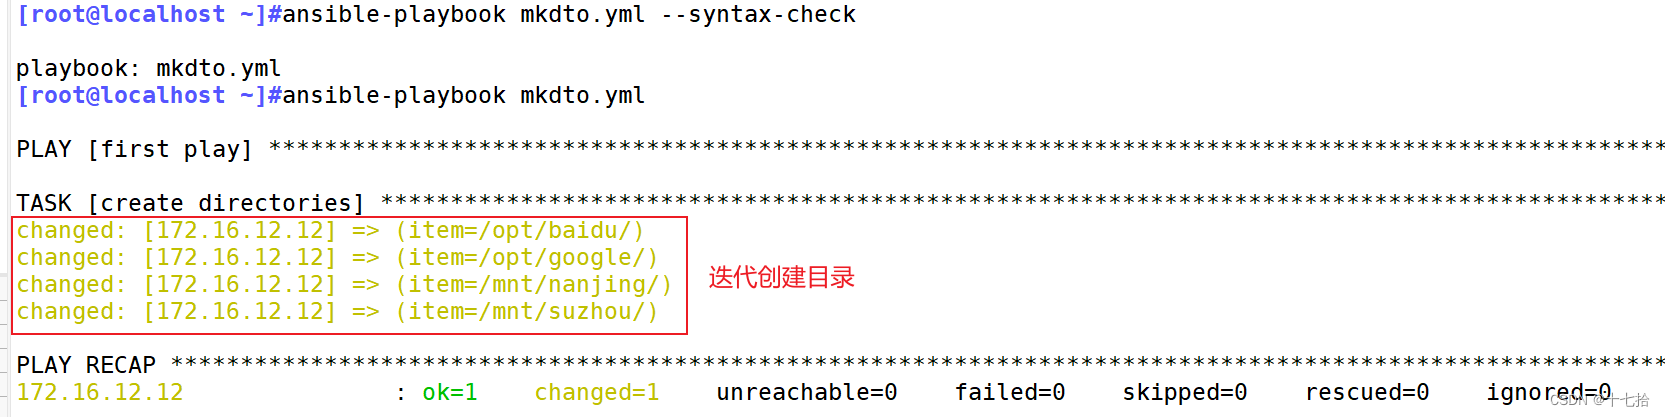
#查看测试
ansible webs -a "tree /opt/"
ansible webs -a "tree /mnt/"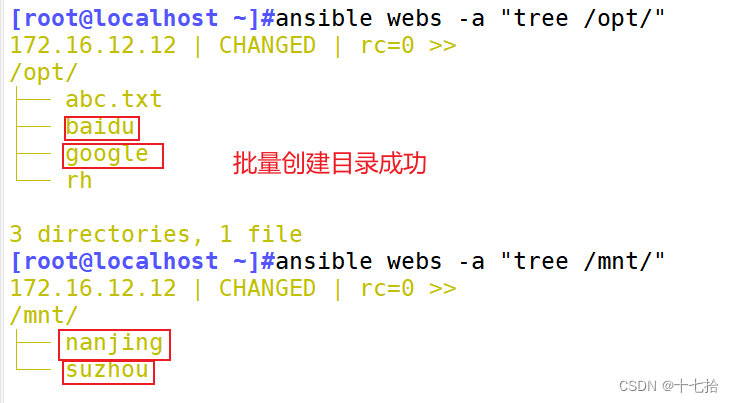
2、批量迭代创建文件
vim touch.yml
---
- name: second playhosts: websgather_facts: falsetasks:- name: create filesfile:path: "{{item}}"state: touchwith_items:- /opt/baidu/123.txt- /opt/google/456.txt- /mnt/nanjing/abc.txt- /mnt/suzhou/def.txt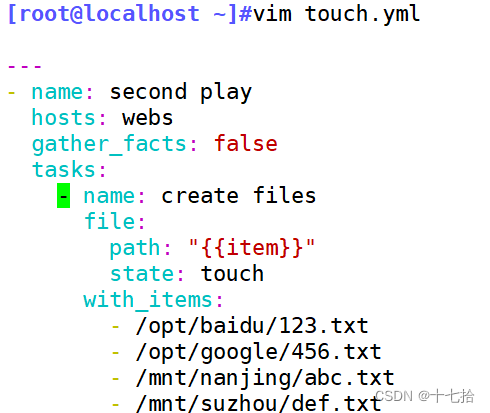
#检测剧本yaml格式是否正确
ansible-playbook touch.yml --syntax-check
#执行剧本
ansible-playbook touch.yml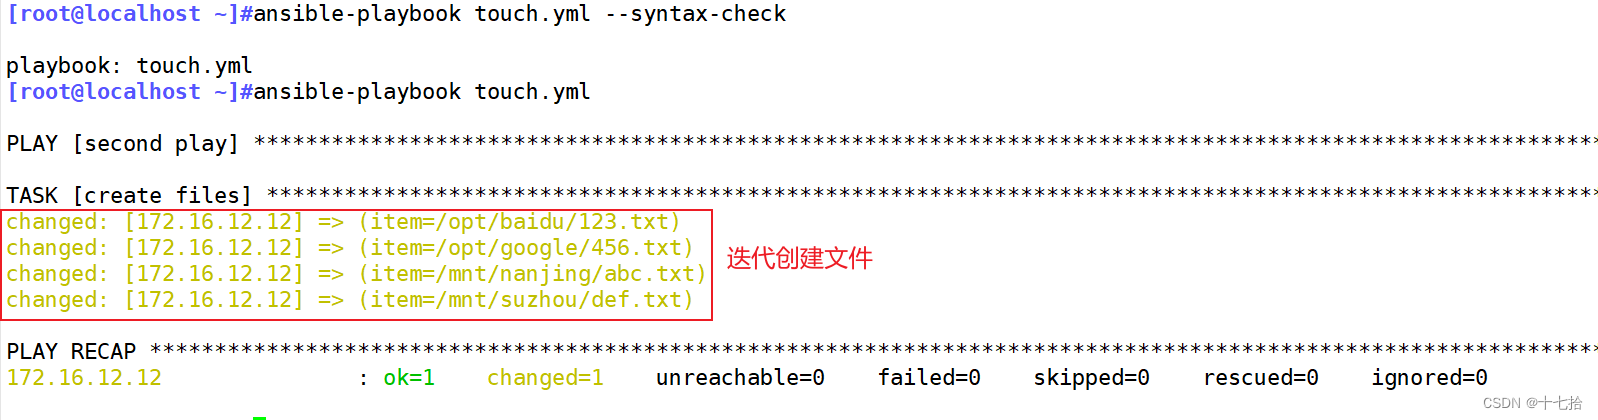
#查看测试
ansible webs -a "ls /opt/baidu/"
ansible webs -a "ls /opt/google/"
ansible webs -a "ls /mnt/nanjing/"
ansible webs -a "ls /mnt/suzhou/"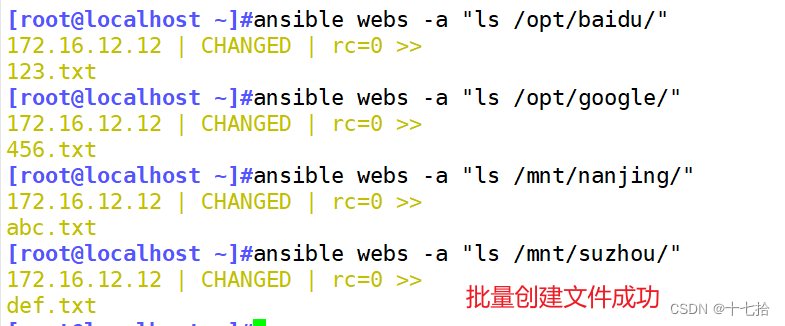
3、批量迭代创建组和用户
vim user.yml
---
- name: third playhosts: websgather_facts: falsetasks: - name: add groupsgroup: name={{item}} system=yeswith_items:- test1- test2- test3- name: add usersuser: name={{item.name}} state=present groups={{item.groups}}with_items:- name: gugugroups: test1- name: mumugroups: test2- name: kukugroups: test3
或者with_items:- {name:'gugu', groups:'wheel'}- {name:'mumu', groups:'root'}- {name:'kuku', groups:'root'}
#检测剧本yaml格式是否正确
ansible-playbook user.yml --syntax-check
#执行剧本
ansible-playbook user.yml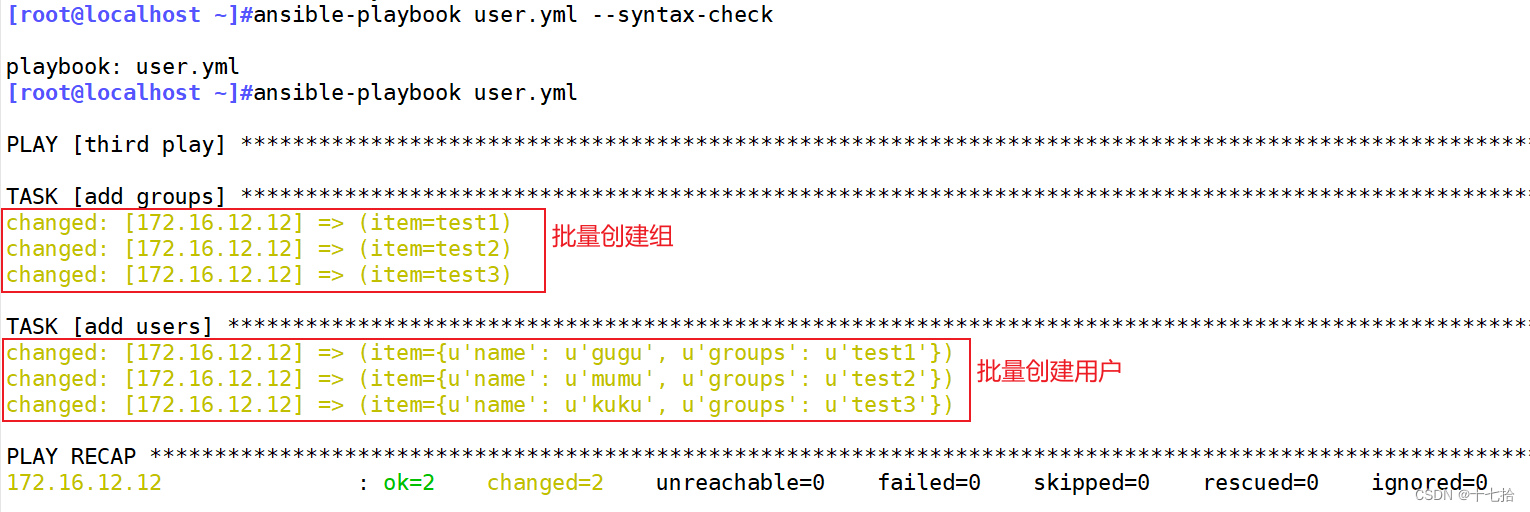
#测试查看
ansible webs -a "tail /etc/passwd"
ansible webs -a "id gugu"
ansible webs -a "id mumu"
ansible webs -a "id kuku"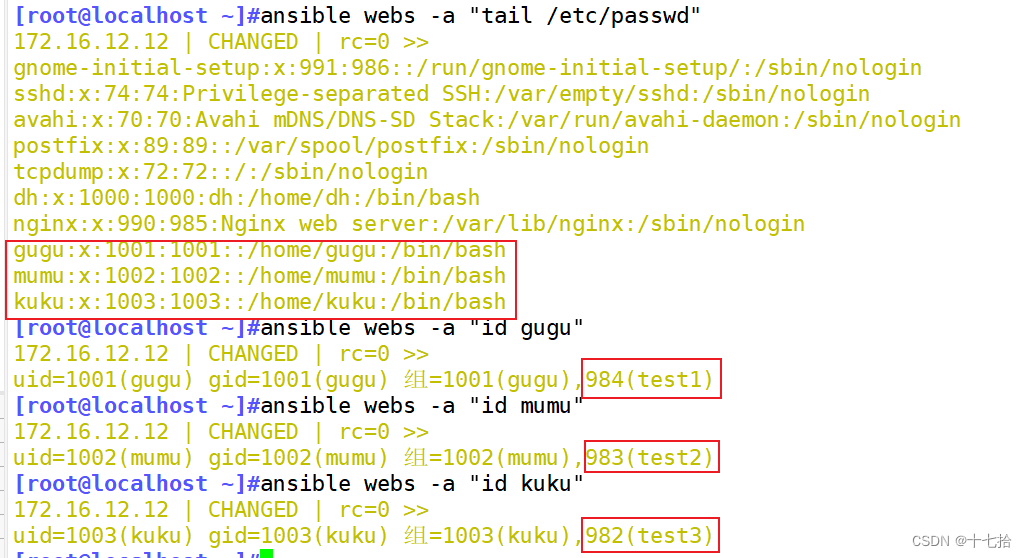
八、Templates 模块
Templates 模块用于根据模板文件创建配置文件或任何其他文本文件。使用模板文件,可以在其中包含变量、条件语句和循环,使得配置文件可以根据不同的情况动态生成
- Jinja 是基于 Python 的模板引擎
- Template 类是 Jinja 的一个重要组件,可以看作是一个编译过的模板文件,用来产生目标文本,传递 Python 的变量给模板去替换模板中的标记
- 一定要以.j2 为后缀的 template 模板文件
在Playbook中使用 Templates 模块时,一般会按照以下步骤进行操作:
-
创建模板文件:在Ansible控制节点上创建一个模板文件,这个文件可以是一个普通的文本文件,其中可以包含一些特殊的标记,用来表示变量、条件语句和循环等
-
使用模板文件:在Playbook中使用 Templates 模块,指定模板文件的路径和目标文件的路径。Ansible会根据模板文件中的内容和传递给模板的变量,生成最终的配置文件
-
传递变量:可以通过在Playbook中定义变量,并将这些变量传递给 Templates 模块,从而在模板文件中使用这些变量
templates是ansible的一个模块,其功能是根据模板文件动态生成配置文件,templates文件必须存放于templates目录下,且命名为".j2"结尾,yaml/yml文件需要和templates目录平级,这样我们在yml文件中调用模板的时候,就不需要写模板文件的路径,否则需要描述模板文件的路径,因为template模块会自动去找templates目录下的模板文件
要求:使用 template 模块配置相关变量,通过 playbook 安装 nginx
(1)先准备一个以 .j2 为后缀的 template 模板文件,设置引用的变量
mkdir /opt/nginx
cd /opt/nginx
#在此目录下上传 nginx.conf 配置文件,如果没有nginx相关的配置文件,可以先yum安装一个nginx服务,取其配置文件
mv nginx.conf nginx.conf.j2
vim /opt/nginx/nginx.conf.j2
listen       {{nginx_port}};            #36行,修改
server_name  {{server_name}};			#37行,修改
root   "{{root_dir}}";                  #44行,修改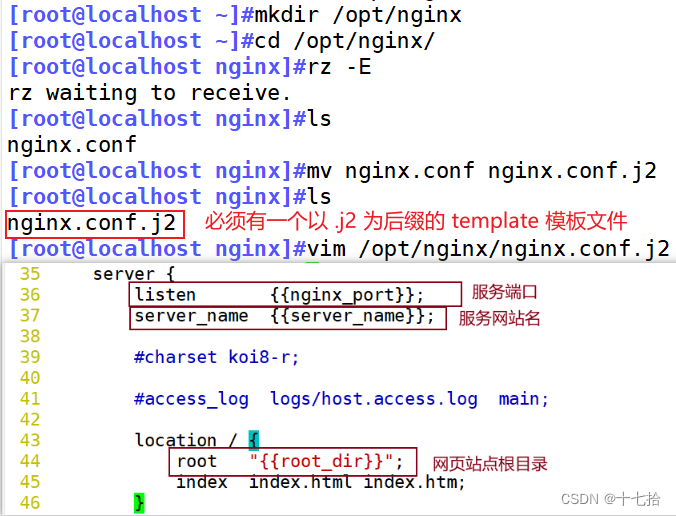
(2)修改主机清单文件,使用主机变量定义一个变量名相同,而值不同的变量
[root@control yml]# vim /etc/ansible/hosts
[nginx01]
172.16.12.12 nginx_port=80 server_name=www.dh.com root_dir=/mnt/nginx/html/[nginx02]
172.16.12.13 nginx_port=81 server_name=www.xz.com root_dir=/mnt/nginx/html/
(3)准备 index.html 网页文件
echo "<h1>welcome to china</h1>" > /opt/nginx/index.html
cat /opt/nginx/index.html
(4)编写 playbook 剧本
vim /opt/nginx/nginx.yml
---
- hosts: nginx01,nginx02vars:- {package: nginx, service: nginx}tasks:- name: install repoyum: name=epel-release.noarch state=latest- name: install packageyum: name={{package}} state=latest- name: copy configure j2template: src=/opt/nginx/nginx.conf.j2 dest=/etc/nginx/nginx.confnotify: restart nginx- name: copy html filecopy: src=/opt/nginx/index.html dest=/mnt/nginx/html/ mode=644notify: restart nginx- name: start nginx serverservice: name={{service}} enabled=true state=startedhandlers:- name: restart nginxservice: name={{service}} state=restarted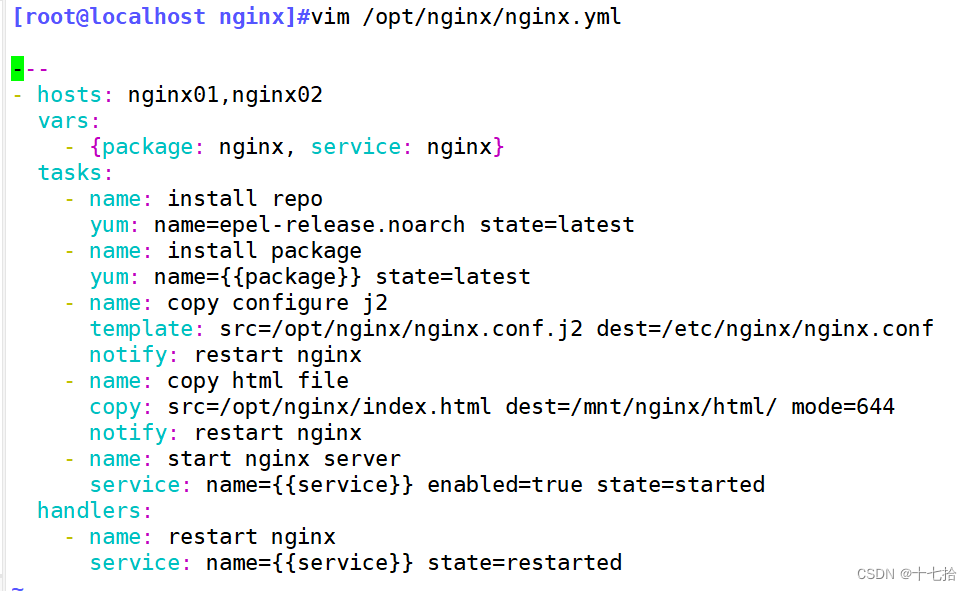
(5)执行 playbook 剧本
#检测剧本yaml格式是否正确
ansible-playbook nginx.yml --syntax-check
#执行剧本
ansible-playbook nginx.yml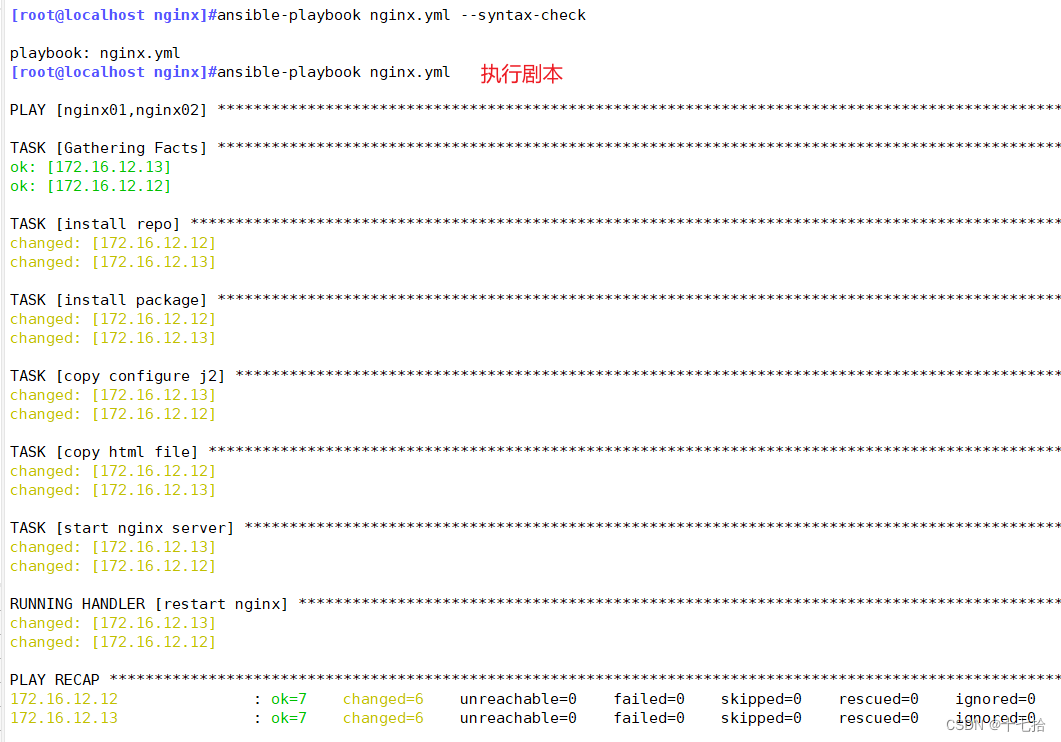
(6)本地配置/etc/hosts文件
Linux端:
echo "172.16.12.12 www.dh.com" > /etc/hosts
echo "172.16.12.13 www.xz.com" > /etc/hostswindows端:
hosts文件路径:C:\Windows\System32\drivers\etc
需要添加:172.16.12.12 www.dh.com172.16.12.13 www.dh.com
(7)浏览器测试nginx页面,能访问成功,说明nginx服务搭建成功
浏览器访问:
www.dh.com
www.xz.com:81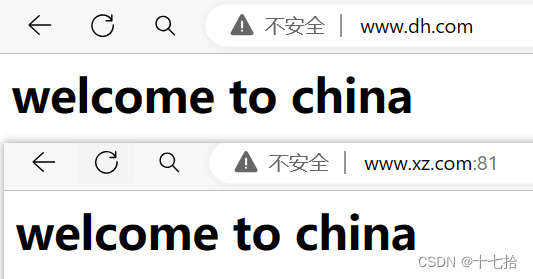
(8)查看被控端此时的 nginx.conf 配置文件
ansible all -m shell -a 'cat /etc/nginx/nginx.conf| grep -i "listen"'
ansible all -m shell -a 'cat /etc/nginx/nginx.conf| grep -i "server_name"'
ansible all -m shell -a 'cat /etc/nginx/nginx.conf| grep -i "root"'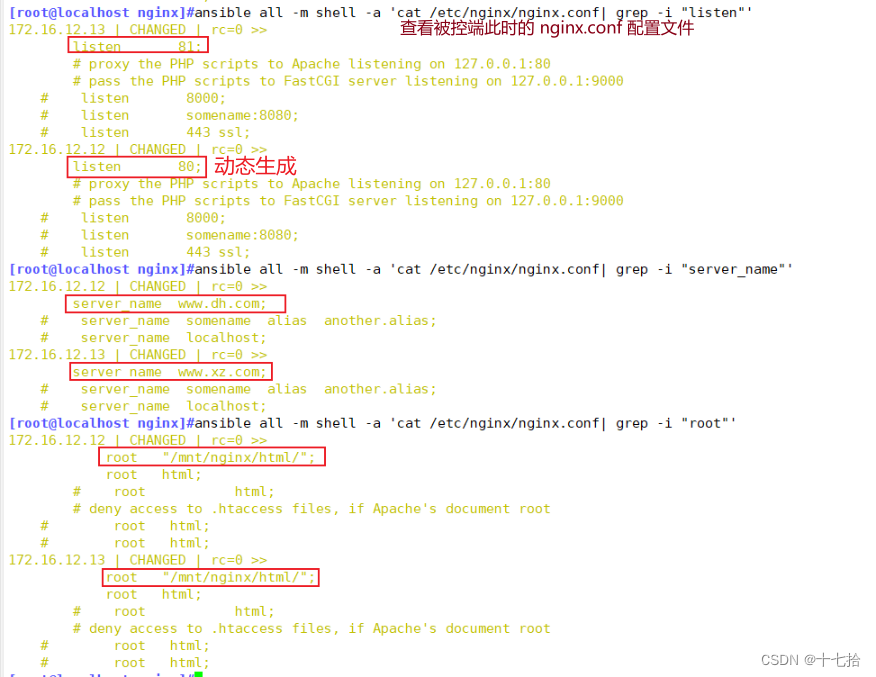
九、Tags 模块
可以在一个 playbook 中为某个或某些任务定义“标签”,在执行此 playbook 时通过 ansible-playbook 命令使用 --tags 选项能实现仅运行指定的 tasks。playbook 还提供了一个特殊的 tags 为 always。作用就是当 tasks 中的 tags 为 always 时,无论执行哪一个 tags 时,定义有 always 的 tags 都会执行。且执行顺序从上往下
是一种标记任务或一系列的任务的功能,通过任务或一个命令的任务列表上定义标记,可以在运行 playbook 时去选择你需要执行的任务或列表
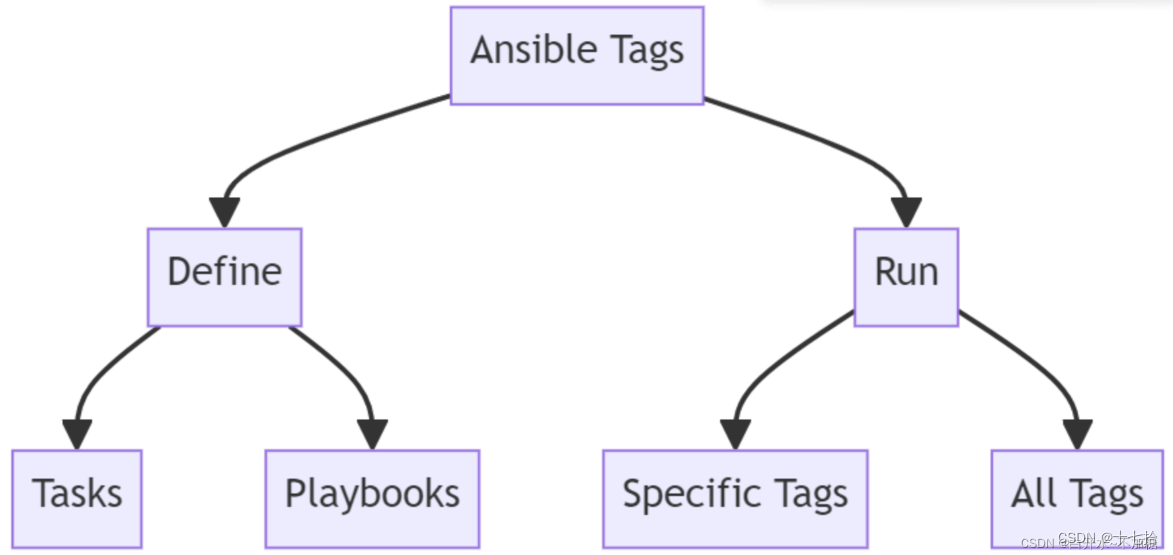
1、自定义 tags 标签
vim tags.yml
---
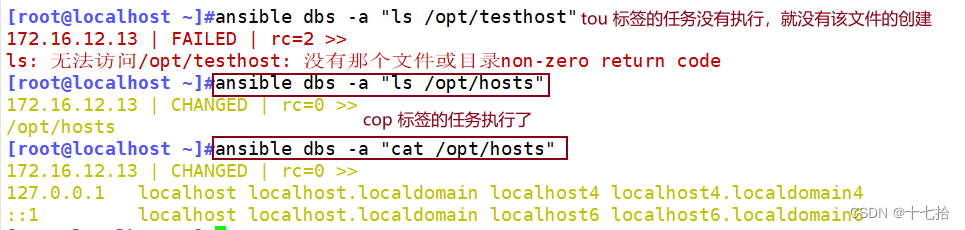
- hosts: dbsremote_user: roottasks:- name: touch filefile: path=/opt/testhost state=touchtags:- tou #可自定义- name: Copy hosts filecopy: src=/etc/hosts dest=/opt/hoststags:- cop
执行单个标签:
#检测剧本yaml格式是否正确
ansible-playbook tags.yml --syntax-check
#执行剧本,只执行 cop 标签
ansible-playbook tags.yml --tags="cop"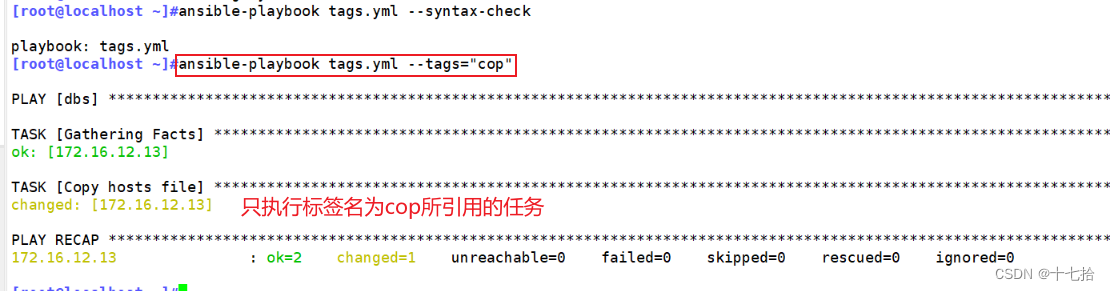
执行多个标签:
#先删除被控端的/opt/hosts文件
ansible dbs -m file -a "path=/opt/hosts state=absent"#执行剧本,指定执行 cop和tou 标签
ansible-playbook tags.yml --tags "cop","tou"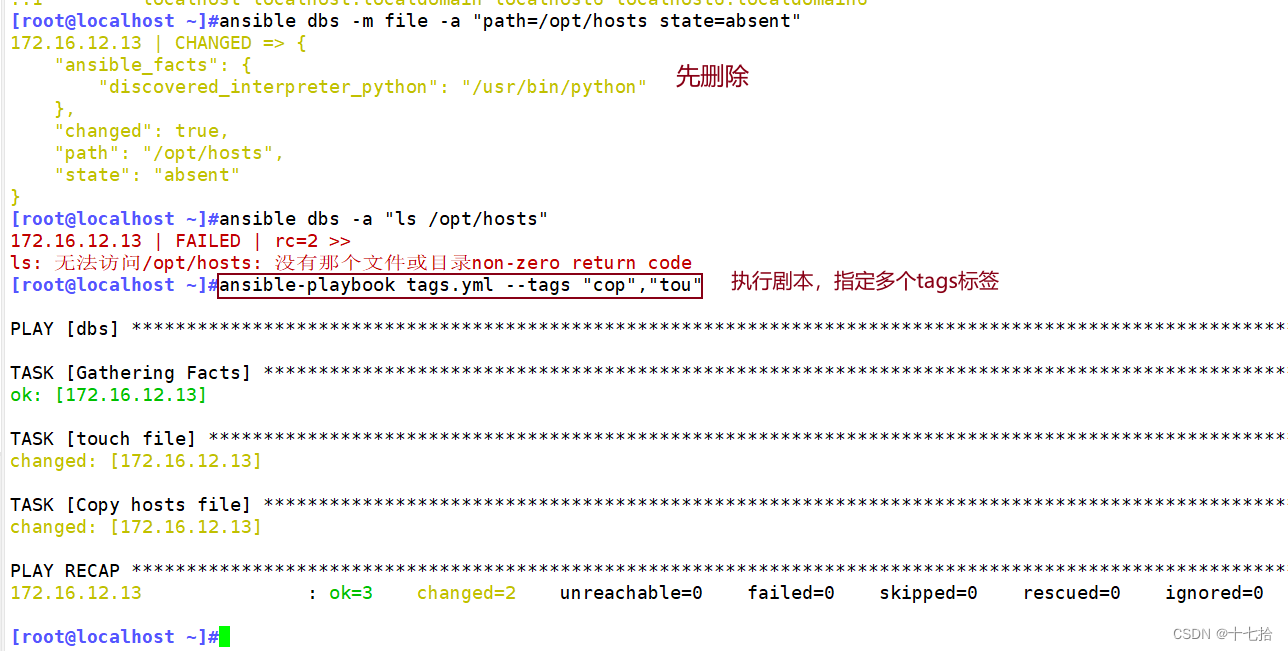

2、使用 always 标签
vim tags.yml
---
- hosts: dbsremote_user: roottasks:- name: touch filefile: path=/opt/testhost state=touchtags:- tou   #可自定义- name: Copy hosts filecopy: src=/etc/hosts dest=/opt/hoststags:- cop- name: mkdir directoryfile: path=/data/aa state=directorytags:- always  #表示始终要运行的代码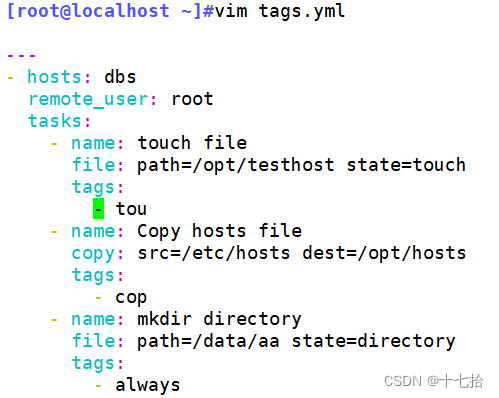
#先删除被控端的/opt/hosts文件和/opt/testhost文件
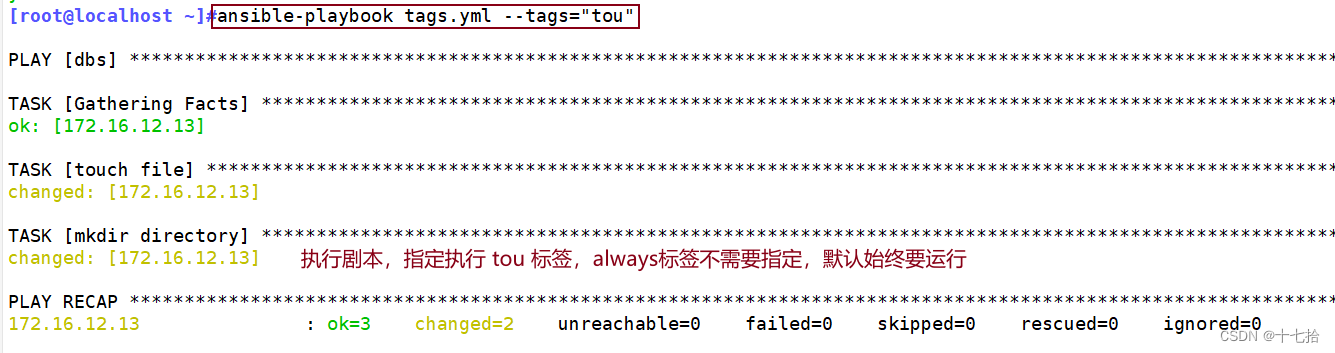
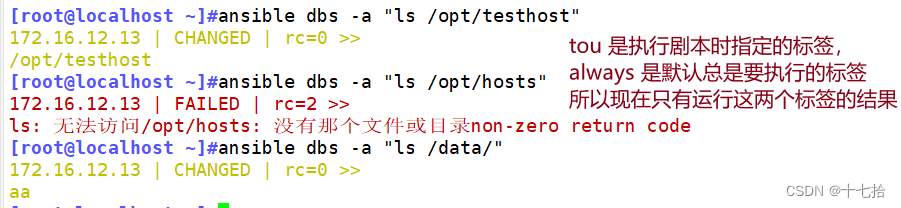
ansible dbs -m file -a "path=/opt/hosts state=absent"#执行剧本,指定执行 tou 标签,always标签不需要指定,默认始终要运行
ansible-playbook tags.yml --tags="tou"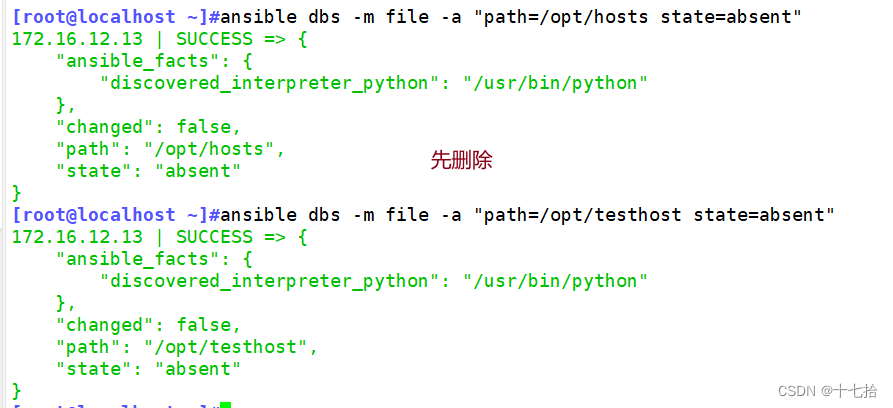
十、Roles 模块
1、Roles 模块概述
ansible%20%E8%A7%92%E8%89%B2%E6%A6%82%E5%BF%B5" style="background-color:transparent;">1.1 ansible 角色概念
数据中心有各种不同类型的主机。如web服务器、数据库服务器,基于开发环境的服务器。随着时间的推移,具有处理所有这些情况的任务和人员的Ansible playbook将变得庞大而复杂
- 角色允许将复杂的剧本组织成独立的、更小的剧本和文件
- 角色提供了一种从外部文件加载任务、处理程序和变量的方法
- 角色也可关联和引用静态的文件和模板
- 角色可以编写成满足普通用途需求,并且能被重复利用
- 定义角色的文件具有特定的名称,并以严格的目录结构进行组织
1.2 Roles 模块概念
在 Ansible 中,Roles 模块是一种组织和重用任务、处理程序和变量的方法。Roles 允许你将任务、handlers、变量等相关内容组织成一个可重用的单元。这有助于使剧本更加模块化和易于维护
Ansible为了层次化、结构化地组织Playbook,使用了角色(roles),roles可以根据层次型结构自动装载变量文件、task以及handlers等。简单来讲,roles就是通过分别将变量、文件、任务、模块及处理器放置于单独的目录中,并可以便捷地include它们
roles一般用于基于主机构建服务的场景中,但也可以用于构建守护进程等场景中
1.3 Roles 目录结构
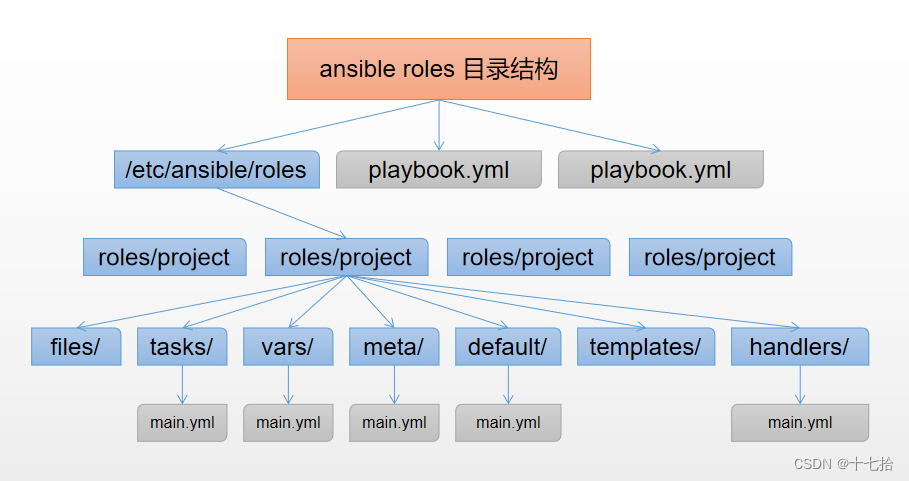
Roles 内各目录含义解释:
- files:用来存放由 copy 模块或 script 模块调用的文件
- templates:用来存放 jinjia2 模板,template 模块会自动在此目录中寻找 jinjia2 模板文件
- tasks:此目录应当包含一个 main.yml 文件,用于定义此角色的任务列表,此文件可以使用 include 包含其它的位于此目录的 task 文件
- handlers:此目录应当包含一个 main.yml 文件,用于定义此角色中触发条件时执行的动作
- vars:此目录应当包含一个 main.yml 文件,用于定义此角色用到的变量
- defaults:此目录应当包含一个 main.yml 文件,用于为当前角色设定默认变量
- meta:此目录应当包含一个 main.yml 文件,用于定义此角色的特殊设定及其依赖关系
2、在 playbook 中使用 roles 的步骤
(1)创建以 roles 命名的目录
mkdir /etc/ansible/roles/ -p #yum装完默认就有(2)创建全局变量目录(可选)
mkdir /etc/ansible/group_vars/ -p
touch /etc/ansible/group_vars/all     #文件名自己定义,引用的时候注意
(3) 在 roles 目录中分别创建以各角色名称命令的目录,如 nginx、mysql
mkdir /etc/ansible/roles/nginx
mkdir /etc/ansible/roles/mysql
(4)在每个角色命令的目录中分别创建files、handlers、tasks、templates、meta、defaults和vars目录,用不到的目录可以创建为空目录,也可以不创建
mkdir /etc/ansible/roles/nginx/{files,templates,tasks,handlers,vars,defaults,meta}
mkdir /etc/ansible/roles/mysql/{files,templates,tasks,handlers,vars,defaults,meta}
(5)在每个角色的 handlers、tasks、meta、defaults、vars 目录下创建 main.yml 文件,千万不能自定义文件名
touch /etc/ansible/roles/nginx/{defaults,vars,tasks,meta,handlers}/main.yml
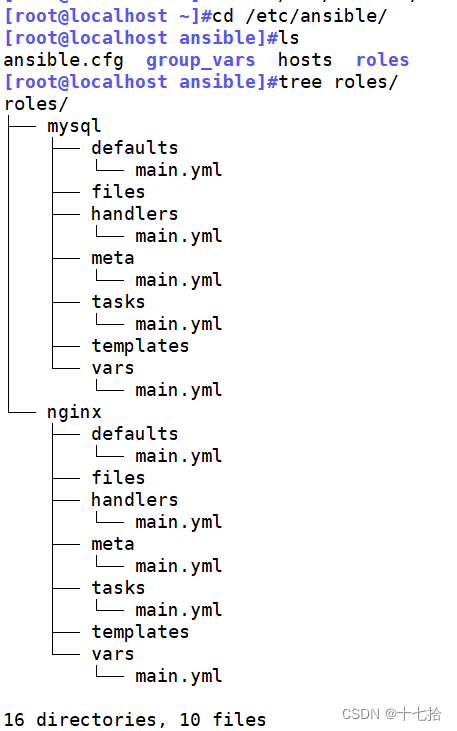
touch /etc/ansible/roles/mysql/{defaults,vars,tasks,meta,handlers}/main.ymltree命令查看 roles 工作目录:
(6)修改 site.yml 文件,针对不同主机去调用不同的角色
vim /etc/ansible/site.yml
---
- hosts: websremote_user: rootroles:- nginx
- hosts: dbsremote_user: rootroles:- mysql
(7)运行 ansible-playbook
cd /etc/ansible
ansible-playbook site.yml
3、使用 Roles 模块远程搭建 LNMP 架构
3.1 任务要求
使用 ansible 的 Roles 模块远程搭建 LNMP(Linux+Nginx+Mysql+Php) 架构,其中Nginx、Mysql、Php服务需 yum 安装
| 主机 | IP | 系统 | yum 安装 |
|---|---|---|---|
| ansible-control 管理节点 | 172.16.12.10 | centos 7 | epel-release.noarch、ansible |
| nginx 服务器 | 172.16.12.12 | centos 7 | epel-release.noarch、nginx、nfs-utils |
| mysql 服务器 | 172.16.12.13 | centos 7 | mariadb、mariadb-server |
| php 服务器 | 172.16.12.15 | centos 7 | php、php-fpm |
(1)关闭所有设备的防火墙和核心防护
systemctl stop firewalld
setenforce 0
(2)修改四台设备的主机名,方便区分
[root@localhost ~]#hostnamectl set-hostname control
[root@localhost ~]#bash[root@localhost ~]#hostnamectl set-hostname nginx
[root@localhost ~]#bash[root@localhost ~]#hostnamectl set-hostname mysql
[root@localhost ~]#bash[root@localhost ~]#hostnamectl set-hostname php
[root@localhost ~]#bash
3.2 创建 roles 工作目录
#已存在的工作目录可不创建
mkdir /etc/ansible/roles/nginx/{files,templates,tasks,handlers,vars,defaults,meta} -p
mkdir /etc/ansible/roles/mysql/{files,templates,tasks,handlers,vars,defaults,meta} -p
mkdir /etc/ansible/roles/php/{files,templates,tasks,handlers,vars,defaults,meta} -ptouch /etc/ansible/roles/nginx/{defaults,vars,tasks,meta,handlers}/main.yml
touch /etc/ansible/roles/mysql/{defaults,vars,tasks,meta,handlers}/main.yml
touch /etc/ansible/roles/php/{defaults,vars,tasks,meta,handlers}/main.yml
3.3 修改 inventory 主机清单
vim /etc/ansible/hosts[nginx_server]
172.16.12.12[mysql_server]
172.16.12.13[php_server]
172.16.12.15
3.4 nginx 模块配置
(1)编写 nginx 任务剧本
vim /etc/ansible/roles/nginx/tasks/main.yml ---
- name: create groupgroup: name=php system=yes
- name: create useruser: name=php system=yes group=php
- name: create nginx_yumcopy: src=/etc/ansible/roles/nginx/files/nginx.repo dest=/etc/yum.repos.d/nginx.repo
- name: install nginxyum: name={{pkg}} state=latest
- name: modify configuration filecopy: src=/etc/ansible/roles/nginx/files/default.conf dest=/etc/nginx/conf.d/default.conf
- name: start nginxservice: enabled=true name={{svc}} state=started
- name: create php_test webcopy: src=/etc/ansible/roles/nginx/files/index.php dest=/usr/share/nginx/html/index.php
- name: create mysql_test webcopy: src=/etc/ansible/roles/nginx/files/mysql.php dest=/usr/share/nginx/html/mysql.php
- name: install nfsyum: name=nfs-utils state=present
- name: nfs_sharecopy: content="/usr/share/nginx/html/ 172.16.12.0/24(rw)" dest=/etc/exports
- name: start nfsservice: name=nfs state=restarted enabled=yes
(2)定义 nginx 角色变量
定义变量:可以定义在全局变量中,也可以定义在 roles 角色变量中,一般定义在角色变量中
vim /etc/ansible/roles/nginx/vars/main.ymlpkg: nginx
svc: nginx
(3)准备 nginx.repo 文件
vim /etc/ansible/roles/nginx/files/nginx.repo[nginx-stable]
name=nginx stable repo
baseurl=http://nginx.org/packages/centos/7/$basearch/
gpgcheck=0
enabled=1
(4)准备 nginx 配置文件 default.conf
#取消location ~ .php$域的注释, 修改fastcgi_pass为php的IP和端口,修改fastcgi_param为SCRIPT_FILENAME /usr/share/nginx/html$fastcgi_script_name;egrep -v ^' '*# /etc/ansible/roles/nginx/files/default.conf | grep -v '^$'
server {listen       80;server_name  localhost;location / {root   /usr/share/nginx/html;index  index.html index.htm;}error_page   500 502 503 504  /50x.html;location = /50x.html {root   /usr/share/nginx/html;}location ~ \.php$ {root           html;fastcgi_pass   172.16.12.15:9000;fastcgi_index  index.php;fastcgi_param  SCRIPT_FILENAME  /usr/share/nginx/html$fastcgi_script_name;include        fastcgi_params;}
}
(5) 准备测试网页
index.php(用于测试php与nginx的连接)
vim /etc/ansible/roles/nginx/files/index.php<?php
phpinfo();
?>
mysql.php(用于测试php与mysql的连接)
vim /etc/ansible/roles/nginx/files/mysql.php<?php
$link=mysqli_connect('172.16.12.13','root','Admin@123');
if($link) echo "<h1>Success!!</h1>";
else echo "Fail!!";
?>
3.5 mysql 模块配置
(1)编写 mysql 任务剧本
vim /etc/ansible/roles/mysql/tasks/main.yml ---
- name: install mysqlyum: name={{pkg}} state=latest
- name: start mysqlservice: enabled=true name={{svc}} state=started
- name: change passwdshell: mysqladmin -u root -p password 'Admin@123'ignore_errors: yes
- name: grant pribilegescommand: mysql -uroot -p"Admin@123" -e 'grant all privileges on *.* to root@"%" identified by "Admin@123" with grant option;'
- name: flush privilegescommand: mysql -uroot -p"Admin@123" -e 'flush privileges;'
- name: install nfsyum: name=nfs-utils state=present
- name: nfs_sharecopy: content="/var/lib/mysql/ 172.16.12.0/24(rw)" dest=/etc/exports
- name: start nfsservice: name=nfs state=restarted enabled=yes
(2) 定义 nginx 角色变量
vim /etc/ansible/roles/mysql/vars/main.ymlpkg:- mariadb- mariadb-server
svc: mariadb
3.6 php 模块配置
(1)编写 php 任务剧本
vim /etc/ansible/roles/php/tasks/main.yml ---
- name: get epel download sourcecommand: rpm -Uvh https://dl.fedoraproject.org/pub/epel/epel-release-latest-7.noarch.rpm
- name: get webtatic download sourcecommand: rpm -Uvh https://mirror.webtatic.com/yum/el7/webtatic-release.rpm
- name: install php7.2command: yum -y install php72w php72w-cli php72w-common php72w-devel php72w-embedded php72w-gd php72w-mbstring php72w-pdo php72w-xml php72w-fpm php72w-mysqlnd php72w-opcache php72w-redis
- name: modify www.confcopy: src=/etc/ansible/roles/php/files/www.conf dest=/etc/php-fpm.d/www.conf
- name: modify php.inicopy: src=/etc/ansible/roles/php/files/php.ini dest=/etc/php.ini
- name: create nginx directoryfile: path=/usr/share/nginx/html/ state=directory mode=777 recurse=yes
- name: create mysql directoryfile: path=/var/lib/mysql/ state=directory mode=777 recurse=yes
- name: mount nginxmount: src=172.16.12.12:/usr/share/nginx/html/ path=/usr/share/nginx/html/ fstype=nfs state=mounted
- name: mounnt mysqlmount: src=172.16.12.13:/var/lib/mysql/ path=/var/lib/mysql/ fstype=nfs state=mounted
- name: start phpservice: name=php-fpm enabled=true state=started
(2) 准备 www.conf 文件并修改
第22行,修改listen监听IP和端口为0.0.0.0:9000
第48行,修改listen.allowed_clients = 172.16.12.12(设置为nginx的IP地址)
egrep -v "^;|^$" /etc/ansible/roles/php/files/www.conf[www]
user = php
group = php
listen = 0.0.0.0:9000
listen.allowed_clients = 172.16.12.12
pm = dynamic
pm.max_children = 50
pm.start_servers = 5
pm.min_spare_servers = 5
pm.max_spare_servers = 35
slowlog = /var/log/php-fpm/www-slow.log
php_admin_value[error_log] = /var/log/php-fpm/www-error.log
php_admin_flag[log_errors] = on
php_value[session.save_handler] = files
php_value[session.save_path]    = /var/lib/php/session
php_value[soap.wsdl_cache_dir]  = /var/lib/php/wsdlcache
(3) 准备 php.ini 文件并修改
939行,修改date.timezone = Asia/Shanghai
1170行,修改mysqli.default_socket = /var/lib/mysql/mysql.sock
egrep -v "^;|^$" /etc/ansible/roles/php/files/php.ini [PHP]
engine = On
short_open_tag = Off
precision = 14
output_buffering = 4096
zlib.output_compression = Off
implicit_flush = Off
unserialize_callback_func =
serialize_precision = 17
disable_functions =
disable_classes =
zend.enable_gc = On
expose_php = On
max_execution_time = 30
max_input_time = 60
memory_limit = 128M
error_reporting = E_ALL & ~E_DEPRECATED & ~E_STRICT
display_errors = Off
display_startup_errors = Off
log_errors = On
log_errors_max_len = 1024
ignore_repeated_errors = Off
ignore_repeated_source = Off
report_memleaks = On
track_errors = Off
html_errors = On
variables_order = "GPCS"
request_order = "GP"
register_argc_argv = Off
auto_globals_jit = On
post_max_size = 8M
auto_prepend_file =
auto_append_file =
default_mimetype = "text/html"
default_charset = "UTF-8"
doc_root =
user_dir =
enable_dl = Off
file_uploads = On
upload_max_filesize = 2M
max_file_uploads = 20
allow_url_fopen = On
allow_url_include = Off
default_socket_timeout = 60
[CLI Server]
cli_server.color = On
[Date]
date.timezone = Asia/Shanghai
[filter]
[iconv]
[intl]
[sqlite]
[sqlite3]
[Pcre]
[Pdo]
[Pdo_mysql]
pdo_mysql.cache_size = 2000
pdo_mysql.default_socket=
[Phar]
[mail function]
sendmail_path = /usr/sbin/sendmail -t -i
mail.add_x_header = On
[SQL]
sql.safe_mode = Off
[ODBC]
odbc.allow_persistent = On
odbc.check_persistent = On
odbc.max_persistent = -1
odbc.max_links = -1
odbc.defaultlrl = 4096
odbc.defaultbinmode = 1
[Interbase]
ibase.allow_persistent = 1
ibase.max_persistent = -1
ibase.max_links = -1
ibase.timestampformat = "%Y-%m-%d %H:%M:%S"
ibase.dateformat = "%Y-%m-%d"
ibase.timeformat = "%H:%M:%S"
[MySQLi]
mysqli.max_persistent = -1
mysqli.allow_persistent = On
mysqli.max_links = -1
mysqli.cache_size = 2000
mysqli.default_port = 3306
mysqli.default_socket = /var/lib/mysql/mysql.sock
mysqli.default_host =
mysqli.default_user =
mysqli.default_pw =
mysqli.reconnect = Off
[mysqlnd]
mysqlnd.collect_statistics = On
mysqlnd.collect_memory_statistics = Off
[OCI8]
[PostgreSQL]
pgsql.allow_persistent = On
pgsql.auto_reset_persistent = Off
pgsql.max_persistent = -1
pgsql.max_links = -1
pgsql.ignore_notice = 0
pgsql.log_notice = 0
[bcmath]
bcmath.scale = 0
[browscap]
[Session]
session.save_handler = files
session.use_strict_mode = 0
session.use_cookies = 1
session.use_only_cookies = 1
session.name = PHPSESSID
session.auto_start = 0
session.cookie_lifetime = 0
session.cookie_path = /
session.cookie_domain =
session.cookie_httponly =
session.serialize_handler = php
session.gc_probability = 1
session.gc_divisor = 1000
session.gc_maxlifetime = 1440
session.referer_check =
session.cache_limiter = nocache
session.cache_expire = 180
session.use_trans_sid = 0
session.hash_function = 0
session.hash_bits_per_character = 5
url_rewriter.tags = "a=href,area=href,frame=src,input=src,form=fakeentry"
[Assertion]
zend.assertions = -1
[mbstring]
[gd]
[exif]
[Tidy]
tidy.clean_output = Off
[soap]
soap.wsdl_cache_enabled=1
soap.wsdl_cache_dir="/tmp"
soap.wsdl_cache_ttl=86400
soap.wsdl_cache_limit = 5
[sysvshm]
[ldap]
ldap.max_links = -1
[mcrypt]
[dba]
[curl]
[openssl]
(4) 准备 php-fpm 文件并修改
egrep -v "^;" php-fpm.conf | egrep -v "^$"[global]
pid = run/php-fpm.pid
include=/usr/local/php/etc/php-fpm.d/*.conf
3.7 编写 site.yml 文件
针对不用主机去调用不同的角色
vim /etc/ansible/site.yml- hosts: nginx_serverroles:- nginx
- hosts: mysql_serverroles:- mysql
- hosts: php_serverroles:- php
3.8 执行 site.yml 剧本
cd /etc/ansible
ansible-playbook site.yml
3.9 访问测试网页
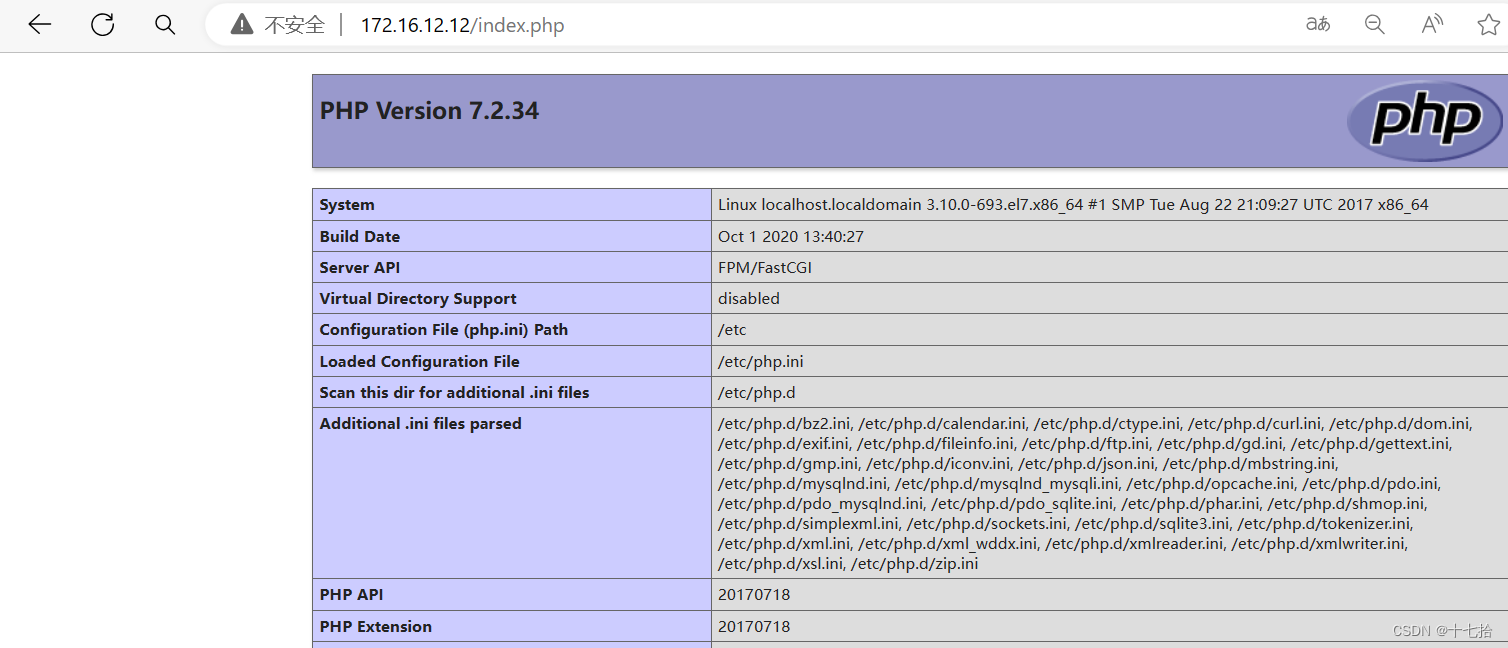
访问172.16.12.12/index.php,测试php与nginx的连接
访问172.16.12.12/mysql.php,测试php与mysql的连接