今日主要分享如何运用vue、nodejs、mysql及ant design构建表格数据查询功能,这也是众多项目开发者关注的问题。最关键在于前端与后端的协作,后端数据则通过nodejs编写。尽管涉及多项技术,看似复杂,但实际操作却并非困难。当然,首要条件是熟悉并掌握各项技术。以下为详细步骤:
一、vue3+ant design画前端页面
利用vue3和ant design来实现表格,在使用ant design组件之前首先要安装此组件,具体的安装步骤请详见我的博客中的《Vue3+Ant Design表格排序》这篇文章,这里就不再过多详述。
(1)<template>部分
<template><div class="user-tab"><!-- 查询、重置 --><a-row justify="end" style="padding-top: 10px; padding-right: 15px"><a-col :span="1.5"><p class="user-admin">用户账号</p></a-col><a-col :span="4"><a-input v-model:value="submitForm.adminNick" placeholder="请输入账号" style="width: 200px" /></a-col><a-col :span="1"></a-col><a-col :span="1.5"><a-button type="primary" style="margin-right: 10px" size="middle" @click="search">查询</a-button></a-col><a-col :span="1.5"><a-button type="primary" size="middle" @click="resetSearch">重置</a-button></a-col></a-row><!-- 表格 --><div class="tab-body"><a-table:columns="columns"bordered:data-source="dataSource":pagination="pagination":loading="tableLoading"rowKey="id":scroll="{ y: 'calc(100vh - 380px - 10px)', x: 200 }"><template #index="{ index }">{{ index + 1 }}</template><template #picture="{ record }"><img style="width: 100px; heigth: 100px" :src="record.picture" /></template></a-table></div></div>
</template>(2)<script>部分,注意:目前是还未进行获取数据的方式,后续有数据的详见下文
const submitForm = ref({adminNick: '',
})
//表格头部
const columns = [{title: '序号',dataIndex: 'index',key: 'id',width: 200,// ellipsis: true,slots: {customRender: 'index'},fixed: 'left',align: 'center'},{title: '用户账号',width: 200,dataIndex: 'adminName',key: 'name',align: 'center',fixed: 'left'},{title: '密码',width: 200,dataIndex: 'adminPwd',key: 'pwd',align: 'center'// fixed: 'left',},{title: '昵称',width: 200,dataIndex: 'adminNick',key: 'nick',align: 'center'},{title: '头像',width: 200,dataIndex: 'picture',key: 'pic',align: 'center',slots: { customRender: 'picture' }},{title: '手机号',width: 200,dataIndex: 'phoneNumber',key: 'number',align: 'center'}
]
const dataSource = ref([])
//表格分页情况
const pagination = {total: 0,current: 1,pageSize: 10, //每页中显示10条数据showSizeChanger: true,pageSizeOptions: ['10', '20', '50', '100'], //每页中显示的数据showTotal: total => `共有 ${total} 条数据` //分页中显示总的数据
}
//查询
const search = () => {}
//重置
const resetSearch = () => {}二、利用数据库新建表
在数据库中新建一个名为user_list的表,并在其中插入几条数据。

三、nodejs写查询数据
对于nodejs如何使用、如何在项目中安装这里也不再多说,之前文章也都有详细的介绍,有不懂的可以查看我之前写过的文章。
(1)安装数据库
在项目中打开server文件夹,使用npm安装mysql
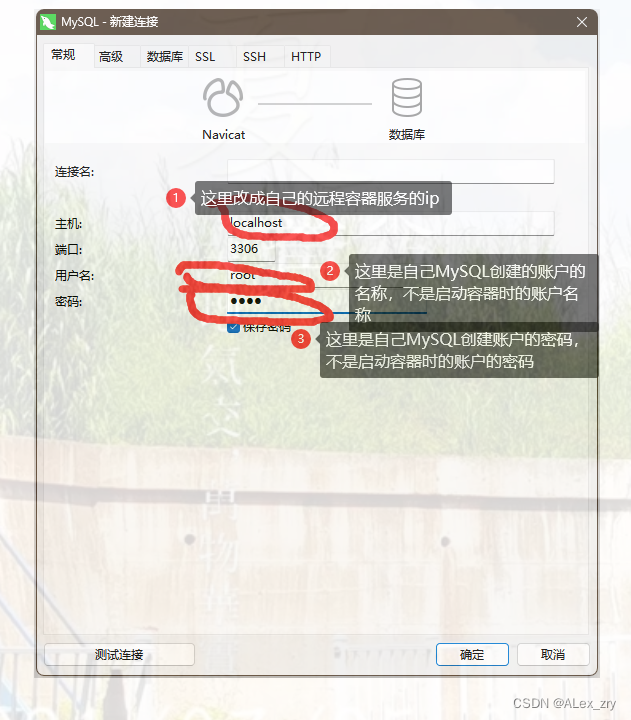
npm i mysql(2)连接数据库
在server文件夹下新建一个名为db的文件夹,在其下新建一个名为sql.js的文件,然后写下面内容,
var mysql= require('mysql');
var connection = mysql.createConnection({host     : 'localhost',user     : 'root',password : '',//自己mysql的密码database : ''//自己在mysql建的数据库名
});
module.exports=connection;接着在需要用到数据库的地方引入该文件即可。
(3)查询数据书写
操作完以上内容后,就可以在routes文件夹下的文件中写查询数据了
var express = require('express');
var router = express.Router();
//连接数据库
var connection=require('../db/sql.js');
//条件查找
router.get('/api/user/searchUserList/', (req, res) => {const name = req.query.name;// console.log(req.query,'shuju ')// console.log(name,'name')const sqlStr = "select * from user_list where nickName=?";connection.query(sqlStr, name,(err, results) => {if (err){console.log(err,'错误信息提示:')return res.json({code: 404,message: '数据不存在',affextedRows: 0});}res.json({code: 200,message: results,affextedRows: results.affextedRows});})
})
(4)获取数据
获取数据前,因为对axios进行了二次封装,所以需要在api文件夹中先获取数据地址,如下:
import { get, post} from "@/utils/http.js";
//查询用户信息数据
export const searchUserList = (params) => get('/api/user/searchUserList/',params);
接下来就可以在使用的组件中来获取了
<script setup>
import { searchUserList} from '@/api/userManage.js'
//查询
const search = () => {const reqparams = { name: submitForm.value.adminNick }searchUserData(reqparams)
}
//重置
const resetSearch = () => {submitForm.value.adminNick = ''getUserData()
}
//查询用户信息
const searchUserData = params => {return new Promise((resolve, reject) => {searchUserList(params).then(res => {if (res.code === 200 && res.message) {console.log(res, 'shuju')dataSource.value = []const tablist = res.message// console.log(tablist,'messss')tablist.map((item, index) => {// console.log(item,'数据')dataSource.value.push({index: index + 1,adminName: item.userName,adminPwd: item.userPwd,adminNick: item.nickName,picture: item.imgUrl,phoneNumber: item.phone})})}resolve(res.message)}).catch(error => {reject(error)})})
}
</script>
四、详细代码
最后附上详细代码
<template><div class="user-tab"><!-- 查询、重置 --><a-row justify="end" style="padding-top: 10px; padding-right: 15px"><a-col :span="1.5"><p class="user-admin">用户账号</p></a-col><a-col :span="4"><a-input v-model:value="submitForm.adminNick" placeholder="请输入账号" style="width: 200px" /></a-col><a-col :span="1"></a-col><a-col :span="1.5"><a-button type="primary" style="margin-right: 10px" size="middle" @click="search">查询</a-button></a-col><a-col :span="1.5"><a-button type="primary" size="middle" @click="resetSearch">重置</a-button></a-col></a-row><!-- 表格 --><div class="tab-body"><a-table:columns="columns"bordered:data-source="dataSource":pagination="pagination":loading="tableLoading"rowKey="id":scroll="{ y: 'calc(100vh - 380px - 10px)', x: 200 }"><template #index="{ index }">{{ index + 1 }}</template><template #picture="{ record }"><img style="width: 100px; heigth: 100px" :src="record.picture" /></template></a-table></div></div>
</template>
<script setup>
import { searchUserList} from '@/api/userManage.js'
const submitForm = ref({adminNick: '',
})
//查询
const search = () => {const reqparams = { name: submitForm.value.adminNick }searchUserData(reqparams)
}
//重置
const resetSearch = () => {submitForm.value.adminNick = ''getUserData()
}
//表格头部
const columns = [{title: '序号',dataIndex: 'index',key: 'id',width: 200,// ellipsis: true,slots: {customRender: 'index'},fixed: 'left',align: 'center'},{title: '用户账号',width: 200,dataIndex: 'adminName',key: 'name',align: 'center',fixed: 'left'},{title: '密码',width: 200,dataIndex: 'adminPwd',key: 'pwd',align: 'center'// fixed: 'left',},{title: '昵称',width: 200,dataIndex: 'adminNick',key: 'nick',align: 'center'},{title: '头像',width: 200,dataIndex: 'picture',key: 'pic',align: 'center',slots: { customRender: 'picture' }},{title: '手机号',width: 200,dataIndex: 'phoneNumber',key: 'number',align: 'center'}
]
const dataSource = ref([])
//表格分页情况
const pagination = {total: 0,current: 1,pageSize: 10, //每页中显示10条数据showSizeChanger: true,pageSizeOptions: ['10', '20', '50', '100'], //每页中显示的数据showTotal: total => `共有 ${total} 条数据` //分页中显示总的数据
}
//查询用户信息
const searchUserData = params => {return new Promise((resolve, reject) => {searchUserList(params).then(res => {if (res.code === 200 && res.message) {console.log(res, 'shuju')dataSource.value = []const tablist = res.message// console.log(tablist,'messss')tablist.map((item, index) => {// console.log(item,'数据')dataSource.value.push({index: index + 1,adminName: item.userName,adminPwd: item.userPwd,adminNick: item.nickName,picture: item.imgUrl,phoneNumber: item.phone})})}resolve(res.message)}).catch(error => {reject(error)})})
}
</script>
<style lang="less" scoped>
.user-tab {.user-admin {padding-right: 1vw;padding-top: 0.5vw;}::v-deep .ant-row {align-items: center;}::v-deep .ant-btn {line-height: 1vw;}.tab-body {// height: 300px; /* 设置表格的高度 */// height: calc(100% - );::v-deep(.ant-table-tbody tr:nth-child(2n+1)) {background: #deeafb;}::v-deep .ant-table-wrapper {height: calc(100% - 70px);}::v-deep .ant-table {font-size: 16px !important;line-height: 2.6vw;}::v-deep .ant-table-cell {vertical-align: middle;}::v-deep .ant-table-thead > tr > th {background: #deeafb;font-size: 18px;color: #383838;font-weight: 600;}::v-deep .ant-pagination.mini .ant-pagination-total-text {flex: 1;}}.tab-modal {.icon-jiahao {font-size: 30px;text-align: center;}.footButton {margin-top: 20px;display: flex;justify-content: center;justify-content: end;align-items: center;/* padding: px 0; */text-align: center;}}
}
::v-deep .ant-btn {line-height: 1vw;
}
</style>
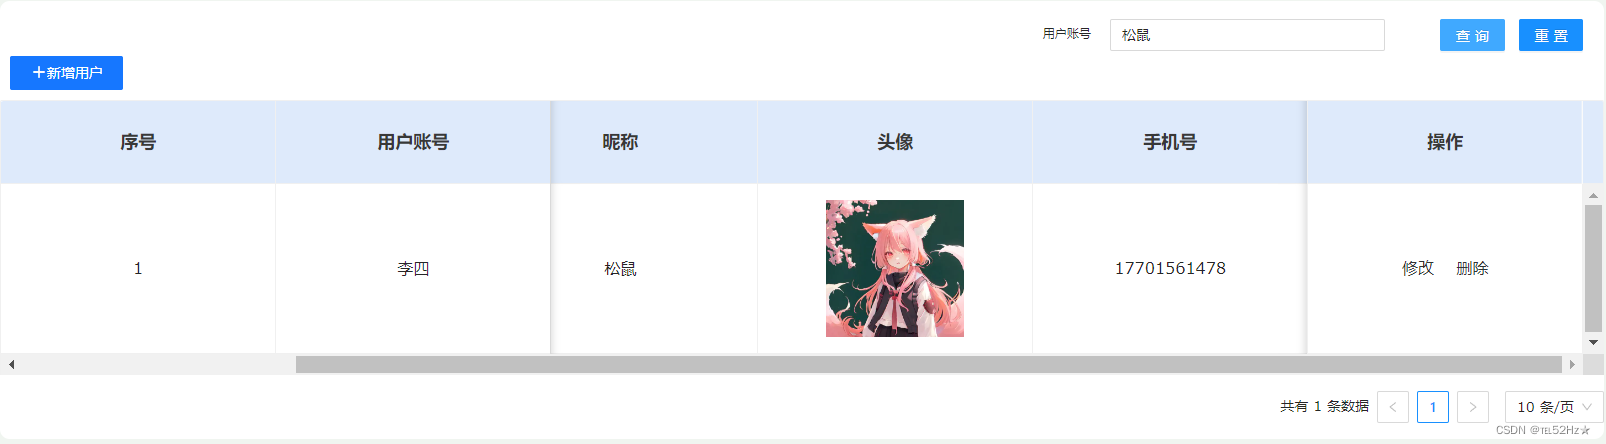
五、结果展示