本文是vue3+Elementplus+ts框架编写的简单可拖拽绘制案例。
1.效果图:
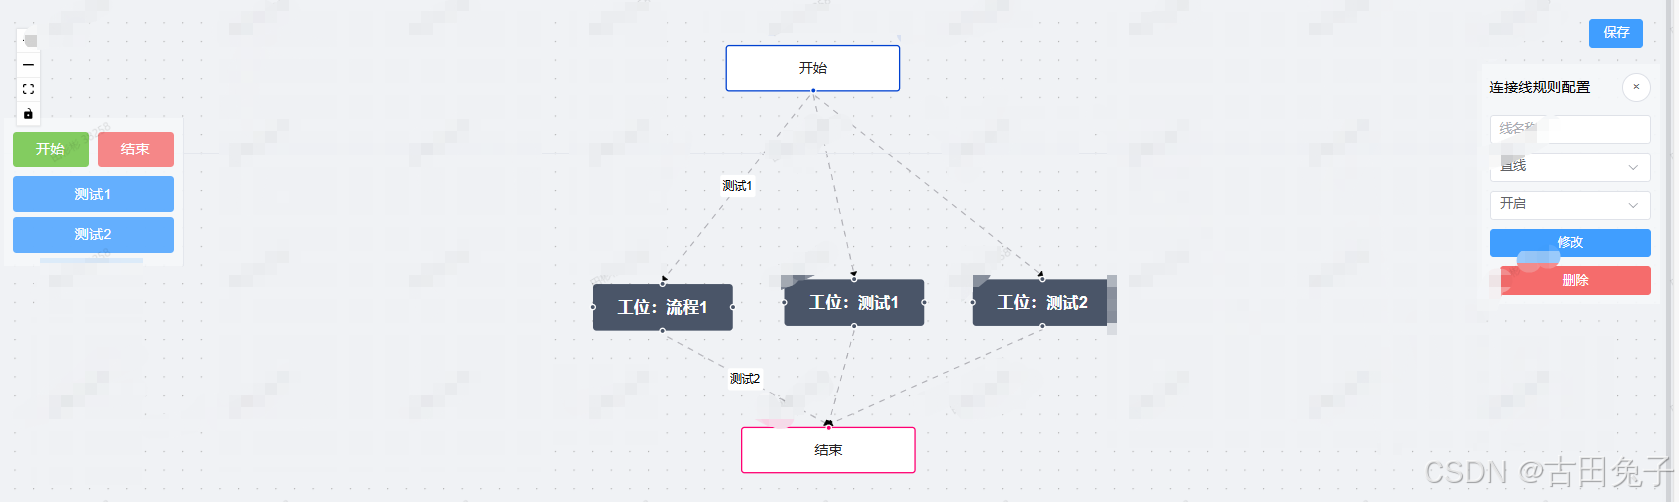
2.Index.vue主代码:
<script lang="ts" setup>
import { ref, markRaw } from "vue";
import {VueFlow,useVueFlow,MarkerType,type Node,type Edge
} from "@vue-flow/core";
import { Background } from "@vue-flow/background";
import { Controls } from "@vue-flow/controls";
import { MiniMap } from "@vue-flow/minimap";
import "@vue-flow/core/dist/style.css";
import "@vue-flow/core/dist/theme-default.css";
import CustomNode from "./components/CusInfoNode.vue";
import {ElMessageBox,ElNotification,ElButton,ElRow,ElCol,ElScrollbar,ElInput,ElSelect,ElOption
} from "element-plus";const {onInit,onNodeDragStop,onConnect,addEdges,getNodes,getEdges,setEdges,setNodes,screenToFlowCoordinate,onNodesInitialized,updateNode,addNodes
} = useVueFlow();const defaultEdgeOptions = {type: "smoothstep", // 默认边类型animated: true, // 是否启用动画markerEnd: {type: MarkerType.ArrowClosed, // 默认箭头样式color: "black"}
};// 节点
const nodes = ref<Node[]>([{id: "5",type: "input",data: { label: "开始" },position: { x: 235, y: 100 },class: "round-start"},{id: "6",type: "custom", // 使用自定义类型data: { label: "工位:流程1" },position: { x: 200, y: 200 },class: "light"},{id: "7",type: "output",data: { label: "结束" },position: { x: 235, y: 300 },class: "round-stop"}
]);const nodeTypes = ref({custom: markRaw(CustomNode) // 注册自定义节点类型
});// 线
const edges = ref<Edge[]>([{id: "e4-5",type: "straight",source: "5",target: "6",sourceHandle: "top-6",label: "测试1",markerEnd: {type: MarkerType.ArrowClosed, // 使用闭合箭头color: "black"}},{id: "e4-6",type: "straight",source: "6",target: "7",sourceHandle: "bottom-6",label: "测试2",markerEnd: {type: MarkerType.ArrowClosed, // 使用闭合箭头color: "black"}}
]);onInit(vueFlowInstance => {vueFlowInstance.fitView();
});onNodeDragStop(({ event, nodes, node }) => {console.log("Node Drag Stop", { event, nodes, node });
});onConnect(connection => {addEdges(connection);
});const pointsList = ref([{ name: "测试1" }, { name: "测试2" }]);
const updateState = ref("");
const selectedEdge = ref<{id: string;type?: string;label?: string;animated?: boolean;
}>({ id: "", type: undefined, label: undefined, animated: undefined });const onEdgeClick = ({ event, edge }) => {selectedEdge.value = edge; // 选中边updateState.value = "edge";console.log("选中的边:", selectedEdge.value);
};function updateEdge() {// 获取当前所有的边const allEdges = getEdges.value;// 切换边类型:根据当前类型来切换const newType =selectedEdge.value.type === "smoothstep" ? null : "smoothstep";// 更新选中边的类型setEdges([...allEdges.filter(e => e.id !== selectedEdge.value.id), // 移除旧的边{...selectedEdge.value,type: selectedEdge.value.type,label: selectedEdge.value.label} as Edge // 更新边的类型]);
}function removeEdge() {ElMessageBox.confirm("是否要删除该连线?", "删除连线", {confirmButtonText: "确定",cancelButtonText: "取消",type: "warning"}).then(() => {const allEdges = getEdges.value;setEdges(allEdges.filter(e => e.id !== selectedEdge.value.id));ElNotification({type: "success",message: "连线删除成功"});updateState.value = null;selectedEdge.value = { id: "", type: undefined, label: undefined };});
}const selectedNode = ref<{id: string;data: { label: string };type: string;position: { x: number; y: number };class: string;
}>({id: "",data: { label: "" },type: "",position: { x: 0, y: 0 },class: ""
});const onNodeClick = ({ event, node }) => {selectedNode.value = node; // 更新选中的节点updateState.value = "node";console.log("选中的节点:", node);
};function removeNode() {ElMessageBox.confirm("是否要删除该点位?", "删除点位", {confirmButtonText: "确定",cancelButtonText: "取消",type: "warning"}).then(() => {const allNodes = getNodes.value;setNodes(allNodes.filter(e => e.id !== selectedNode.value.id));const allEdges = getEdges.value;setEdges(allEdges.filter(e =>e.source !== selectedNode.value.id &&e.target !== selectedNode.value.id));ElNotification({type: "success",message: "点位删除成功"});updateState.value = null;selectedNode.value = {id: "",data: { label: "" },type: "",position: { x: 0, y: 0 },class: ""};});
}const dragItem = ref<Node>(null);// 拖拽开始时设置拖拽的元素
function onDragStart(event, state) {dragItem.value = {id: `node-${Date.now()}`, // 动态生成唯一 iddata: {label:state === "开始" ? "开始" : state === "结束" ? "结束" : "工位:" + state},type: state === "开始" ? "input" : state === "结束" ? "output" : "custom",position: { x: event.clientX, y: event.clientY },class:state === "开始"? "round-start": state === "结束"? "round-stop": "light"};
}// 拖拽结束时清除状态
function onDragEnd() {dragItem.value = null;
}// 拖拽目标画布区域时允许放置
function onDragOver(event) {console.log("onDragOver事件:", event);event.preventDefault();
}function onDrop(event) {console.log("onDrop事件:", event);const position = screenToFlowCoordinate({x: event.clientX,y: event.clientY});const newNode = {...dragItem.value,position};const { off } = onNodesInitialized(() => {updateNode(dragItem.value?.id, node => ({position: {x: node.position.x - node.dimensions.width / 2,y: node.position.y - node.dimensions.height / 2}}));off();});// 更新节点数据dragItem.value = null;addNodes(newNode); //这里是画布上增加updateNodeData(newNode); //更新后端数据console.log("新节点:", newNode);console.log("新节点后List", nodes.value);
}const saveFlow = () => {console.log("保存数据nodes:", nodes.value);console.log("保存数据edges", edges.value);
};function updateNodeData(node: Node) {//更新后端数据console.log("更新后端数据:", node);nodes.value.push(node);
}
</script><template><div class="flow-container"><VueFlow:nodes="nodes":edges="edges":default-viewport="{ zoom: 1 }":min-zoom="0.2":max-zoom="4"@node-click="onNodeClick"@edge-click="onEdgeClick"@drop="onDrop"@dragover="onDragOver":node-types="nodeTypes":default-edge-options="defaultEdgeOptions":connect-on-click="true"><Background pattern-color="#aaa" :gap="16" /><MiniMap /></VueFlow><div class="top-container"><Controls class="controls" /><div class="save-btn"><ElButton type="primary" class="mr-2" @click="saveFlow">保存</ElButton></div></div><div class="left-panel"><div class="drag-items"><ElRow :gutter="10"><ElCol :span="12"><divclass="drag-item start-node"draggable="true"@dragstart="onDragStart($event, '开始')"@dragend="onDragEnd"><span>开始</span></div></ElCol><ElCol :span="12"><divclass="drag-item end-node"draggable="true"@dragstart="onDragStart($event, '结束')"@dragend="onDragEnd"><span>结束</span></div></ElCol></ElRow><ElScrollbar height="75%"><divclass="drag-item custom-node"draggable="true"@dragstart="onDragStart($event, item.name)"@dragend="onDragEnd"v-for="(item, index) in pointsList":key="index"><span>{{ item.name }}</span></div></ElScrollbar></div></div><div class="right-panel" v-if="updateState"><div class="panel-header"><span>{{updateState === "edge" ? "连接线规则配置" : "点位规则配置"}}</span><ElButton circle class="close-btn" @click="updateState = ''">×</ElButton></div><div class="panel-content" v-if="updateState === 'edge'"><ElInput v-model="selectedEdge.label" placeholder="线名称" clearable /><ElSelect v-model="selectedEdge.type" placeholder="线类型"><ElOption label="折线" value="smoothstep" /><ElOption label="曲线" value="default" /><ElOption label="直线" value="straight" /></ElSelect><ElSelect v-model="selectedEdge.animated" placeholder="线动画"><ElOption label="开启" :value="true" /><ElOption label="关闭" :value="false" /></ElSelect><ElButton type="primary" @click="updateEdge">修改</ElButton><ElButton type="danger" @click="removeEdge">删除</ElButton></div><div class="panel-content" v-else><ElInputv-model="selectedNode.data.label"placeholder="点位名称"clearable/><ElButton type="danger" @click="removeNode">删除</ElButton></div></div></div>
</template><style scoped>
.flow-container {position: relative;height: 100vh;
}.top-container {position: absolute;top: 0;width: 100%;display: flex;justify-content: space-between;padding: 10px;border-bottom: 1px solid #e4e7ed;
}.left-panel {position: absolute;left: 0;top: 120px;width: 200px;padding: 10px;background: rgba(245, 247, 250, 0.9);border-right: 1px solid #e4e7ed;
}.right-panel {position: absolute;right: 0;top: 60px;width: 200px;padding: 10px;background: rgba(245, 247, 250, 0.9);border-left: 1px solid #e4e7ed;
}.drag-item {padding: 8px;margin: 5px 0;border-radius: 4px;text-align: center;cursor: move;
}.start-node {background-color: rgba(103, 194, 58, 0.8);color: white;
}.end-node {background-color: rgba(245, 108, 108, 0.8);color: white;
}.custom-node {background-color: rgba(64, 158, 255, 0.8);color: white;
}.panel-header {display: flex;justify-content: space-between;align-items: center;margin-bottom: 15px;
}.panel-content {display: grid;gap: 10px;
}.controls {position: relative;top: -4px;left: -10px;
}
</style>
3. CusInfoNode.vue自定义客户Node
<script setup lang="ts">
import { defineProps } from "vue";
import { Handle, Position } from "@vue-flow/core";defineProps({id: String,data: Object
});
</script><template><div class="custom-node"><div class="node-header">{{ data.label }}</div><!-- Handle 定义 --><Handletype="source":position="Position.Top":id="'top-' + id":style="{ background: '#4a5568' }"/><Handletype="source":position="Position.Left":id="'left-' + id":style="{ background: '#4a5568' }"/><Handletype="source":position="Position.Right":id="'right-' + id":style="{ background: '#4a5568' }"/><Handletype="source":position="Position.Bottom":id="'bottom-' + id":style="{ background: '#4a5568' }"/></div>
</template><style scoped>
.custom-node {width: 120px;height: 40px;border-radius: 3px;background-color: #4a5568;color: white;position: relative;display: flex;justify-content: center;align-items: center;
}.node-header {font-size: 14px;font-weight: bold;
}
</style>