目录
1 SpringBoot自动化配置原理
01-SpringBoot2高级-starter依赖管理机制
02-SpringBoot2高级-自动化配置初体验
03-SpringBoot2高级-底层原理-@Configuration配置注解
04-SpringBoot2高级-底层原理-@Import注解使用1
05-SpringBoot2高级-底层原理-@Import注解使用2
06-SpringBoot2高级-底层原理-@Conditional衍生条件装配
07-SpringBoot2高级-底层原理-@ConfigurationProperties配置绑定
08-SpringBoot2高级-自动化配置原理-@SpringBootApplication入口分析
09-SpringBoot2高级-自动化配置原理-@EnableAutoConfiguration自动配置注解
10-SpringBoot2高级-自动化配置原理-按条件开启自动配置类和配置项
11-SpringBoot2高级-自动化配置原理-debug全流程
12-SpringBoot2高级-自动化配置原理-总结
2 SpringBoot健康监控
13-SpringBoot2高级-监控-健康监控服务
14-SpringBoot2高级-监控-Admin可视化
理解SpringBoot自动化配置源码
理解SpringBoot健康监控
1 SpringBoot自动化配置原理
01-SpringBoot2高级-starter依赖管理机制
**目的:**通过依赖能了解SpringBoot管理了哪些starter
讲解:
- 通过依赖
spring-boot-dependencies搜索starter-发现非常多的官方starter,并且已经帮助我们管理好了版本。 - 项目中使用直接引入对应的
starter即可,这个场景下需要的依赖就会自动导入到项目中,简化了繁琐的依赖。如果需要修改版本可以有两种方式:
- 重写maven属性
- 使用Maven依赖管理的就近原则
3.引入 starter 不仅仅是帮助我们管理了依赖,还帮我做了很多的默认的配置信息,简化了大量的配置,使用更加的简单。
4.所有的场景启动器的底层都依赖 spring-boot-starter
<dependency><groupId>org.springframework.boot</groupId><artifactId>spring-boot-starter</artifactId><version>2.3.10.RELEASE</version><scope>compile</scope></dependency>
小结:
-
引入官方starter依赖默认都可以不写版本
-
如果配置满足您当前开发需要,则默认配置即可
02-SpringBoot2高级-自动化配置初体验
**目的:**以web MVC自动化配置原理为例讲解,能够理解web MVC自动化配置加入了哪些依赖,做了哪些默认配置。
讲解:
回忆一下:SpringMVC博文中,我们在 SSM整合时;
springmvc配置类:
1、扫描controller层
2、静态资源控制
3、…
servlet容器配置类:
1、扫描springmvc配置类
2、扫描spring配置类
3、设置哪些请求交给springmvc处理
4、POST请求乱码过滤器
部署还需要单独的tomcat
也就是说:我们现在需要在开发业务代码前,就必须要准备好这些环境,否则无法完成业务代码,这就是我们现在的问题。
让这些问题成为过去,现在我们就探索一下SpringBoot是如何帮助我们完成强大而又简单自动化配置的。
引入 web 开发场景启动器依赖:
<!--web开发的起步依赖   场景启动器依赖-->
<dependency><groupId>org.springframework.boot</groupId><artifactId>spring-boot-starter-web</artifactId></dependency>
帮助我们做了以下自动化配置:
-
依赖版本和依赖什么jar都不需要开发者关注
-
自动化配置
- 自动配好SpringMVC
- 引入SpringMVC全套组件
- 自动配好SpringMVC常用组件(三大组件,文件上传等)
- 自动配好Web常见功能,如:字符编码问题,静态资源管理
- 自动配好Tomcat
小结:
- 有了SpringBoot以后,让开发人员重点关注业务本身,而不是环境上,提升了开发效率。
03-SpringBoot2高级-底层原理-@Configuration配置注解
**目的:**掌握@Configuration注解的作用及新特性
讲解:
1、@Configuration注解的作用是替代原始 spring配置文件 功能
演示:
1)编写配置类
package com.itheima.sh.config;import com.itheima.sh.pojo.User;
import org.springframework.context.annotation.Bean;
import org.springframework.context.annotation.Configuration;/*** 1、@Configuration 替代 spring配置文件(配置bean)* 2、组件源码中包含 @Component 注解,当前类也会注册到 IOC 容器,默认类名小写* 3、默认都是单例的*/
@Configuration
public class MyConfig {@Bean   // 默认方法名称作为容器中的namepublic User getUser() {return new User();}
}
2)在引导类编写代码测试:
@SpringBootApplication
@MapperScan(basePackages = "com.itheima.sh.mapper")
public class DataApplication {public static void main(String[] args) {ConfigurableApplicationContext applicationContext = SpringApplication.run(DataApplication.class, args);// 根据name获取容器中的beanUser user1 = applicationContext.getBean("getUser", User.class);User user2 = applicationContext.getBean("getUser", User.class);System.out.println(user1 == user2);MyConfig myConfig1 = applicationContext.getBean("myConfig", MyConfig.class);MyConfig myConfig2 = applicationContext.getBean("myConfig", MyConfig.class);System.out.println(myConfig1 == myConfig2);// 注意:如果 MYConfig配置类没有按照规范编写,则容器中bean 的name为 类名}
}
SpringBoot 提供一个注解和当前注解功能一样:
@SpringBootConfiguration
2、proxyBeanMethods:代理bean的方法属性(since spring 5.2以后)

功能:
-
proxyBeanMethods = true:Full模式,保证每个@Bean方法被调用多少次返回的组件都是单实例的
-
proxyBeanMethods = false:Lite模式,每个@Bean方法被调用多少次返回的组件都是新创建的
演示:
-
默认 proxyBeanMethods=true,springBoot会检查这个组件是否在容器中有,有则直接引用
// 默认 proxyBeanMethods=true springBoot会检查这个组件是否在容器中有,有则直接引用
User user3 = myConfig1.getUser();
System.out.println(user1 == user3); // true -
修改 proxyBeanMethods=false,则每调用一次Spring就会创建一个新的Bean对象

在执行结果则为 false, 证明两次获取的bean不是同一个bean。
小结:
-
组件依赖必须使用Full模式默认。
-
Full模式每次都会检查bean,效率较Lite模式慢
04-SpringBoot2高级-底层原理-@Import注解使用1
**目的:**能够理解@Import注解作用及4种使用方式
讲解:
作用:使用@Import导入的类会被Spring加载到IOC容器中
@Import提供4种用法:
-
导入Bean
-
导入配置类
-
导入 ImportSelector 实现类。一般用于加载配置文件中的类
-
导入 ImportBeanDefinitionRegistrar 实现类
实现:
1、导入Bean
package com.itheima.sh;import com.itheima.sh.pojo.User;
import org.mybatis.spring.annotation.MapperScan;
import org.springframework.boot.SpringApplication;
import org.springframework.boot.autoconfigure.SpringBootApplication;
import org.springframework.context.ConfigurableApplicationContext;
import org.springframework.context.annotation.Import;import java.util.Map;@SpringBootApplication
@Import(User.class)
//会自动执行当前类的构造方法创建对象,存到IOC容器, bean名称为:类的全路径public class DataApplication {public static void main(String[] args) {ConfigurableApplicationContext applicationContext = SpringApplication.run(DataApplication.class, args);Map<String, User> map = applicationContext.getBeansOfType(User.class);System.out.println(map);User user1 = applicationContext.getBean("com.itheima.sh.pojo.User", User.class);System.out.println(user1);}
}
2、导入配置类
package com.itheima.sh;import com.itheima.sh.config.MyConfig;
import com.itheima.sh.pojo.User;
import org.mybatis.spring.annotation.MapperScan;
import org.springframework.boot.SpringApplication;
import org.springframework.boot.autoconfigure.SpringBootApplication;
import org.springframework.context.ConfigurableApplicationContext;
import org.springframework.context.annotation.Import;import java.util.Map;@SpringBootApplication
@MapperScan(basePackages = "com.itheima.sh.mapper")
//@Import(User.class)
//1、会自动执行当前类的构造方法创建对象,存到IOC容器, bean名称为:类的全路径@Import(MyConfig.class)
//2、创建MyConfig bean,并且类中有 带有@Bean注解方法,创建对象存到IOC容器,bean名称为:默认方法名称
public class DataApplication {public static void main(String[] args) {ConfigurableApplicationContext applicationContext = SpringApplication.run(DataApplication.class, args);//{getUser=com.itheima.sh.pojo.User@1b4a3a1}Map<String, User> map = applicationContext.getBeansOfType(User.class);System.out.println(map);User user1 = applicationContext.getBean("getUser", User.class);System.out.println(user1);Map<String, MyConfig> config = applicationContext.getBeansOfType(MyConfig.class);//{com.itheima.sh.config.MyConfig=com.itheima.sh.config.MyConfig@7e848aea}System.out.println(config);}
}
05-SpringBoot2高级-底层原理-@Import注解使用2
目的:讲解@Import注解使用另外两种使用方式
步骤:
-
导入 ImportSelector 实现类。一般用于加载配置文件中的类
-
导入 ImportBeanDefinitionRegistrar 实现类
实现:
导入 ImportSelector 实现类。一般用于加载配置文件中的类
1、编写 ImportSelector 实现类,MyImportSelector
2、引导类导入
package com.itheima.sh;import com.itheima.sh.config.MyImportSelector;
import com.itheima.sh.pojo.User;
import org.mybatis.spring.annotation.MapperScan;
import org.springframework.boot.SpringApplication;
import org.springframework.boot.autoconfigure.SpringBootApplication;
import org.springframework.context.ConfigurableApplicationContext;
import org.springframework.context.annotation.Import;import java.util.Map;@SpringBootApplication
@MapperScan(basePackages = "com.itheima.sh.mapper")
//@Import(User.class)
//1、会自动执行当前类的构造方法创建对象,存到IOC容器, bean名称为:类的全路径//@Import(MyConfig.class)
//2、创建MyConfig bean,并且类中有 带有@Bean注解方法,创建对象存到IOC容器,bean名称为:默认方法名称@Import(MyImportSelector.class)
//3、创建MyConfig bean 名称为:类名全路径,创建带有@Bean注解方法实例,名称为:方法名称
public class DataApplication {public static void main(String[] args) {ConfigurableApplicationContext applicationContext = SpringApplication.run(DataApplication.class, args);Map<String, MyConfig> map = applicationContext.getBeansOfType(MyConfig.class);//{com.itheima.sh.config.MyConfig=com.itheima.sh.config.MyConfig@44384b4a}System.out.println(map);Map<String, User> userMap = applicationContext.getBeansOfType(User.class);//{getUser=com.itheima.sh.pojo.User@5cc3e49b}System.out.println(userMap);}
}
导入 ImportBeanDefinitionRegistrar 实现类
1、编写 ImportBeanDefinitionRegistrar 实现类,MyImportBeanDefinitionRegistrar
package com.itheima.sh.config;import com.itheima.sh.pojo.User;
import org.springframework.beans.factory.support.AbstractBeanDefinition;
import org.springframework.beans.factory.support.BeanDefinitionBuilder;
import org.springframework.beans.factory.support.BeanDefinitionRegistry;
import org.springframework.context.annotation.ImportBeanDefinitionRegistrar;
import org.springframework.core.type.AnnotationMetadata;public class MyImportBeanDefinitionRegistrar implements ImportBeanDefinitionRegistrar {/*** @param importingClassMetadata 导入类的元注解信息* @param registry Bean注册表*/@Overridepublic void registerBeanDefinitions(AnnotationMetadata importingClassMetadata, BeanDefinitionRegistry registry) {AbstractBeanDefinition beanDefinition = BeanDefinitionBuilder.rootBeanDefinition(User.class).getBeanDefinition();registry.registerBeanDefinition("user", beanDefinition);}
}
2、引导类测试
package com.itheima.sh;import com.itheima.sh.config.MyImportBeanDefinitionRegistrar;
import com.itheima.sh.pojo.User;
import org.mybatis.spring.annotation.MapperScan;
import org.springframework.boot.SpringApplication;
import org.springframework.boot.autoconfigure.SpringBootApplication;
import org.springframework.context.ConfigurableApplicationContext;
import org.springframework.context.annotation.Import;import java.util.Map;@SpringBootApplication
@MapperScan(basePackages = "com.itheima.sh.mapper")//@Import(User.class)
//1、会自动执行当前类的构造方法创建对象,存到IOC容器, bean名称为:类的全路径//@Import(MyConfig.class)
//2、创建MyConfig bean,并且类中有 带有@Bean注解方法,创建对象存到IOC容器,bean名称为:默认方法名称//@Import(MyImportSelector.class)
//3、创建MyConfig bean 名称为:类名全路径,创建带有@Bean注解方法实例,名称为:方法名称@Import(MyImportBeanDefinitionRegistrar.class)
//4、创建Bean,名称:在registerBeanDefinition中定义
public class DataApplication {public static void main(String[] args) {ConfigurableApplicationContext applicationContext = SpringApplication.run(DataApplication.class, args);Map<String, User> userMap = applicationContext.getBeansOfType(User.class);//{user=com.itheima.sh.pojo.User@23c7cb18}System.out.println(userMap);}
}
小结:
-
讲解当前小节的目的主要是为源码准备
-
还有我们也可以知道创建Bean对象,还可以使用
@Import四种方式
06-SpringBoot2高级-底层原理-@Conditional衍生条件装配
**目的:**理解@Conditional衍生条件装配的作用
讲解:
作用:条件装配,满足Conditional指定的条件,则进行组件注入,初始化Bean对象到IOC容器
。

演示:
在RedisConfig类中添加注释:
方法中定义:

类上定义:
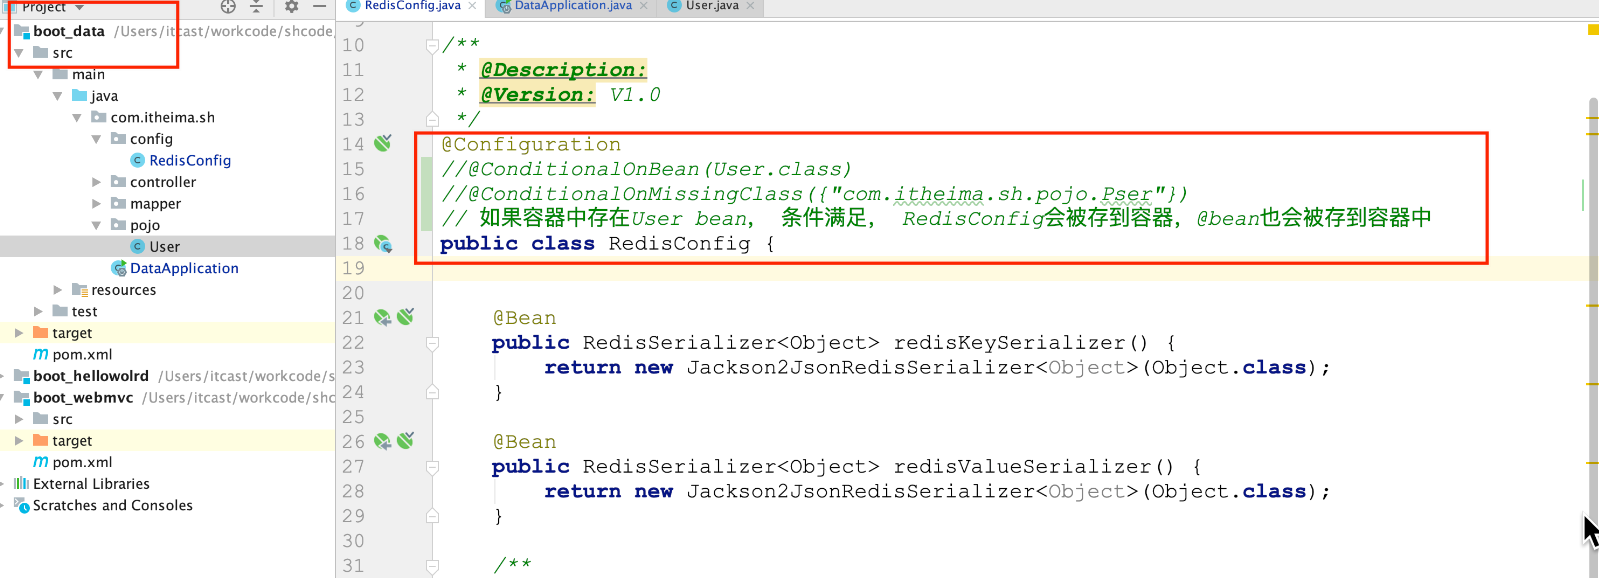
注意:也可以添加到 类上, 满足条件则类及类中的对象生效。
小结:
- @ConditionalOnXXX 注解存在的意义是:满足条件当前类或者Bean才有效,按需导入。
07-SpringBoot2高级-底层原理-@ConfigurationProperties配置绑定
目的:
回顾 @ConfigurationProperties配置绑定 存在的目的是:获取配置属性或者是配置文件指定前缀的属性信息,并且初始化Bean对象到 IOC 容器。
由此我们可以想:将来的配置我们可以放在配置文件中,通过这个注解来读取并封装成对象

08-SpringBoot2高级-自动化配置原理-@SpringBootApplication入口分析
目的:能够理解SpringBoot自动化配置流程中@SpringBootApplication是一个组合注解,及每一个注解的作用能够知道作用。
讲解:
1、SpringBoot是一个组合注解

2、@SpringBootConfiguration注解作用
-
@SpringBootConfiguration是对@Configuration注解的包装,proxyBeanMethods 默认配置 true, full模式(单例Bean)
-
标识是一个配置类,所以 引导类也是配置类
3、@ComponentScan注解作用
- 组件扫描,默认扫描的规则 引导类所在的包及其子包所有带注解的类
问题:
-
在引导类中配置 @Bean 注解可以吗?
-
为什么Controller、service类添加完注解后,不需要添加扫描包?
09-SpringBoot2高级-自动化配置原理-@EnableAutoConfiguration自动配置注解
目的:理解@EnableAutoConfiguration自动化配置核心实现注解
讲解:
1、@EnableAutoConfiguration是一个组合注解

2、@AutoConfigurationPackage注解作用
作用:利用Registrar给容器中导入一系列组件

点击 Registrar 进入到源码的 register 方法,添加 断点,测试

通过 debug 程序发现,默认情况下 将引导类的所有包及其子包的组件导入进来
3、@Import(AutoConfigurationImportSelector.class)注解作用
作用:是利用**selectImports**方法中的 getAutoConfigurationEntry 方法给容器中批量导入相关组件
调用流程分析:
-
调用**
AutoConfigurationImportSelector**类中的selectImports方法 -
调用
List<String> configurations = getCandidateConfigurations(annotationMetadata, attributes)获取到所有需要导入到容器中的配置类 -
利用工厂加载
Map<String, List<String>> loadSpringFactories(@Nullable ClassLoader classLoader)得到所有的组件 -
从META-INF/spring.factories位置来加载一个文件。 默认扫描我们当前系统里面所有META-INF/spring.factories位置的文件

spring-boot-autoconfigure-2.3.4.RELEASE.jar包里面也有META-INF/spring.factories

通过这个配置文件加载的自动配置:当前版本(2.3.10)是有127个默认的自动化配置

小结:
- 自动化配置默认加载的配置文件在哪?
10-SpringBoot2高级-自动化配置原理-按条件开启自动配置类和配置项
目的:
-
能够理解所有的自动化配置虽然会全部加载,底层有大量的@ConditionalOnXXX,有很多自动配置类并不能完全开启。
-
如果配置生效了,则会加载默认的属性配置类,实现默认的对应场景的自动化配置
讲解:
1、以上通过 META-INF/spring.factories 配置文件找到所有的自动化配置类,但 是不是全部的生效的呢?很显然是不可能全部都生效的。
2、以 JdbcTemplateAutoConfiguration 为例讲解, 进入到 JdbcTemplateAutoConfiguration 自动化配置类。
//配置类,Lite模式
@Configuration(proxyBeanMethods = false)
//存在 DataSource、JdbcTemplate 类时再加载当前类
@ConditionalOnClass({DataSource.class, JdbcTemplate.class })//容器中只有一个指定的Bean,或者这个Bean是首选Bean 加载当前类
@ConditionalOnSingleCandidate(DataSource.class)//在配置类 DataSourceAutoConfiguration 之后执行
@AutoConfigureAfter(DataSourceAutoConfiguration.class)//如果条件满足:开始加载自动化配置的属性值 JdbcProperties
@EnableConfigurationProperties(JdbcProperties.class)@Import({JdbcTemplateConfiguration.class, NamedParameterJdbcTemplateConfiguration.class })
public class JdbcTemplateAutoConfiguration {}
3、JdbcProperties,用于加载默认的配置,如果配置文件配置了该属性,则配置文件就生效。

4、通过@Import导入JdbcTemplateConfiguration
//配置类,Lite模式
@Configuration(proxyBeanMethods = false)
//没有JdbcOperations类型的bean时加载当前类,而 JdbcTemplate 是 JdbcOperations 接口实现类
@ConditionalOnMissingBean(JdbcOperations.class)
class JdbcTemplateConfiguration {@Bean@PrimaryJdbcTemplate jdbcTemplate(DataSource dataSource, JdbcProperties properties) {JdbcTemplate jdbcTemplate = new JdbcTemplate(dataSource);JdbcProperties.Template template = properties.getTemplate();jdbcTemplate.setFetchSize(template.getFetchSize());jdbcTemplate.setMaxRows(template.getMaxRows());if (template.getQueryTimeout() != null) {jdbcTemplate.setQueryTimeout((int) template.getQueryTimeout().getSeconds());}return jdbcTemplate;}}
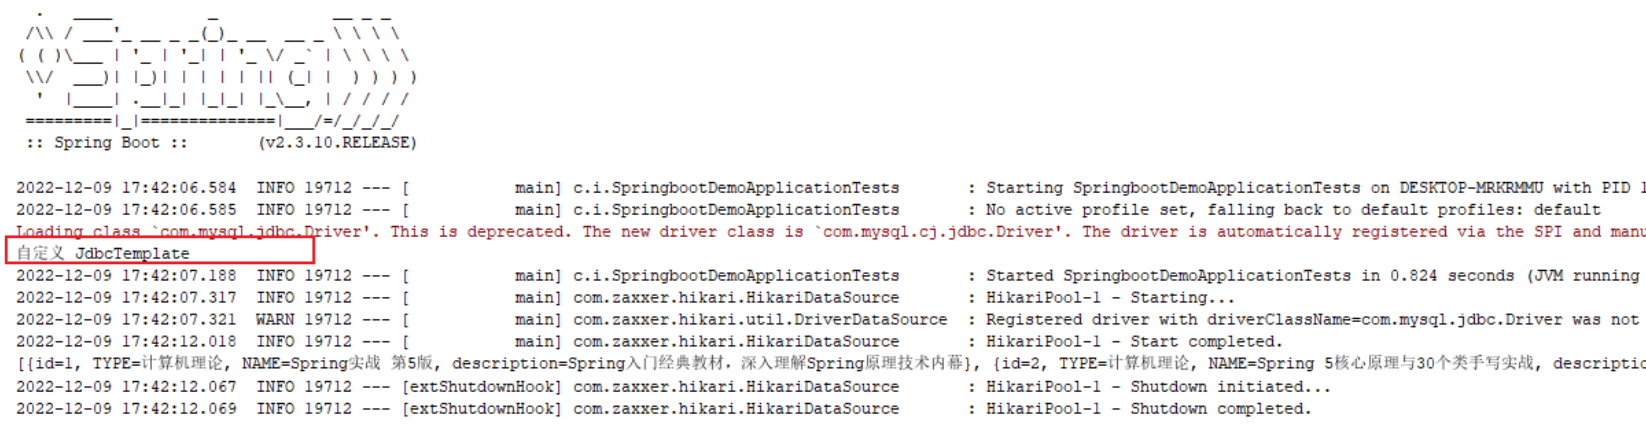
验证:我们可以在我们自己的项目里面创建一个 JdbcTemplate Bean,看容器创建的Bean执行的是哪一个方法。
@Configuration
public class MyConfig {@Beanpublic JdbcTemplate jdbcTemplate(DataSource dataSource){JdbcTemplate jdbcTemplate = new JdbcTemplate(dataSource);System.out.println("自定义 JdbcTemplate");return jdbcTemplate;}
}
结果:保证容器中只有一个 Bean 实例
问题:
- 这些不用的 starter 的依赖,能不能导入到我们工程里面? 为什么?
11-SpringBoot2高级-自动化配置原理-debug全流程
目的:能够理解整个SpringBoot启动的完成自动化配置及属性加载的全过程
12-SpringBoot2高级-自动化配置原理-总结
SpringBoot自动化配置流程总结:
-
程序启动找到自动化配置包下
META-INF/spring.factories的EnableAutoConfiguration -
SpringBoot先加载所有的自动配置类 xxxxxAutoConfiguration
-
每个自动配置类按照条件进行生效。
-
生效的配置类就会给容器中装配很多组件
-
只要容器中有这些组件,相当于这些功能就有了
-
定制化配置
- 用户直接自己@Bean替换底层的组件
- 用户去看这个组件是获取的配置文件什么值就去修改。

开发人员使用步骤总结:
-
引入场景依赖
-
查看自动配置了哪些(选做)
- 自己分析,引入场景对应的自动配置一般都生效了
- 配置文件中debug=true开启自动配置报告。Negative(不生效)Positive(生效)
-
自己分析是否需要修改
-
参照文档修改配置项,xxxxProperties绑定了配置文件的哪些。
- 自定义加入或者替换组件,@Bean、@Component等
2 SpringBoot健康监控
13-SpringBoot2高级-监控-健康监控服务
**目的:能够理解健康监控actuator**的作用
讲解:
每一个微服务在云上部署以后,我们都需要对其进行监控、追踪、审计、控制等。SpringBoot就抽取了Actuator场景,使得我们每个微服务快速引用即可获得生产级别的应用监控、审计等功能。
实现:
1、引入依赖
<dependency><groupId>org.springframework.boot</groupId><artifactId>spring-boot-starter-actuator</artifactId></dependency>
2、启动项目,访问 http://localhost:80/actuator

3、暴露所有监控信息为HTTP
management:endpoints:enabled-by-default: true #暴露所有端点信息web:exposure:include: '*' #以web方式暴露endpoint:health:enabled: true # 开启健康检查详细信息show-details: always
访问 http://localhost:80/actuator 会发现内容多了,里面的地址分别都可以访问,记录的是对应的健康监测的信息。
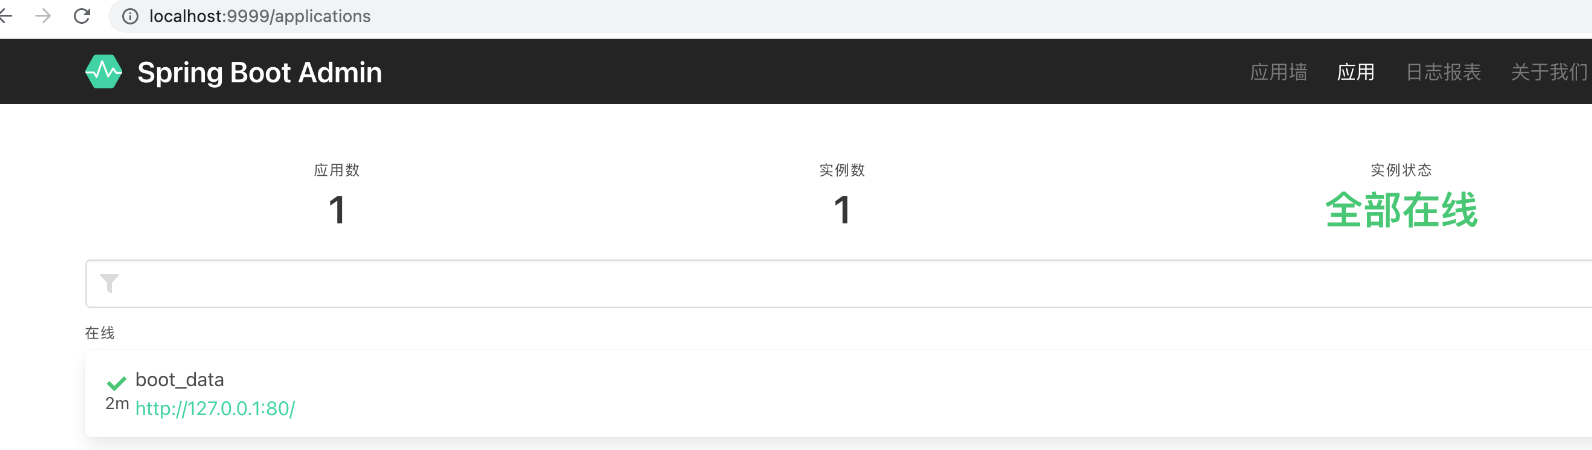
14-SpringBoot2高级-监控-Admin可视化
目的:能够搭建 可视化监控平台
讲解:
SpringBoot Admin 有两个角色,客户端(Client)和服务端(Server)。
Spring Boot Admin为注册的应用程序提供以下功能:
显示健康状况
显示详细信息,例如
- JVM和内存指标
- micrometer.io指标
- 数据源指标
- 缓存指标
显示内部信息
关注并下载日志文件
查看JVM系统和环境属性
查看Spring Boot配置属性
支持Spring Cloud的可发布/ env-和// refresh-endpoint
轻松的日志级别管理
与JMX-beans交互
查看线程转储
查看http-traces
查看审核事件
查看http端点
查看预定的任务
查看和删除活动会话(使用spring-session)
查看Flyway / Liquibase数据库迁移
下载heapdump
状态更改通知(通过电子邮件,Slack,Hipchat等)
状态更改的事件日志(非持久性)
快速入门:Spring Boot Admin Reference Guide
实现:
以下为创建服务端和客户端工程步骤:
搭建Server端:
1、创建 admin_server 模块,引入依赖
<parent><groupId>org.springframework.boot</groupId><artifactId>spring-boot-starter-parent</artifactId><version>2.3.10.RELEASE</version><relativePath/> <!-- lookup parent from repository -->
</parent><dependencies><dependency><groupId>de.codecentric</groupId><artifactId>spring-boot-admin-starter-server</artifactId><version>2.3.1</version></dependency><dependency><groupId>org.springframework.boot</groupId><artifactId>spring-boot-starter-web</artifactId></dependency></dependencies>
2、开启注解支持
package com.itheima.sh;import de.codecentric.boot.admin.server.config.EnableAdminServer;
import org.springframework.boot.SpringApplication;
import org.springframework.boot.autoconfigure.SpringBootApplication;@SpringBootApplication
@EnableAdminServer
public class AdminApplication {public static void main(String[] args) {SpringApplication.run(AdminApplication.class, args);}
}
注意端口修改为:9999
搭建Client端:
1、在任意服务里面引入依赖
<dependency><groupId>de.codecentric</groupId><artifactId>spring-boot-admin-starter-client</artifactId><version>2.3.1</version></dependency>
2、配置文件
  # 执行admin.server地址
spring:   boot:admin:client:url: http://localhost:9999  # admin 服务地址instance:prefer-ip: true   # 显示IPapplication:name: boot_data  # 项目名称management:endpoints:enabled-by-default: true #暴露所有端点信息web:exposure:include: '*'  #以web方式暴露endpoint:health:enabled: true   # 开启健康检查详细信息show-details: always
3、启动服务,访问admin Server http://localhost:9999/