目录
?
前言
一、SpringBoot简介
1. 入门案例
1.1 入门案例开发步骤
1.2 基于SpringBoot官网创建项目
1.3 SpringBoot项目快速启动
2. SpringBoot概述
问题导入
2.1 起步依赖
2.2 默认配置
二、基础配置
1. 配置文件格式
问题导入
1.1 修改服务器端口
1.2 自动提示功能消失解决方案
1.3 SpringBoot配置文件加载顺序(了解)
2. yaml
问题导入
2.1 yaml语法规则
2.2 yaml数组数据
2.3 yaml数据读取
3. 多环境开发配置
问题导入
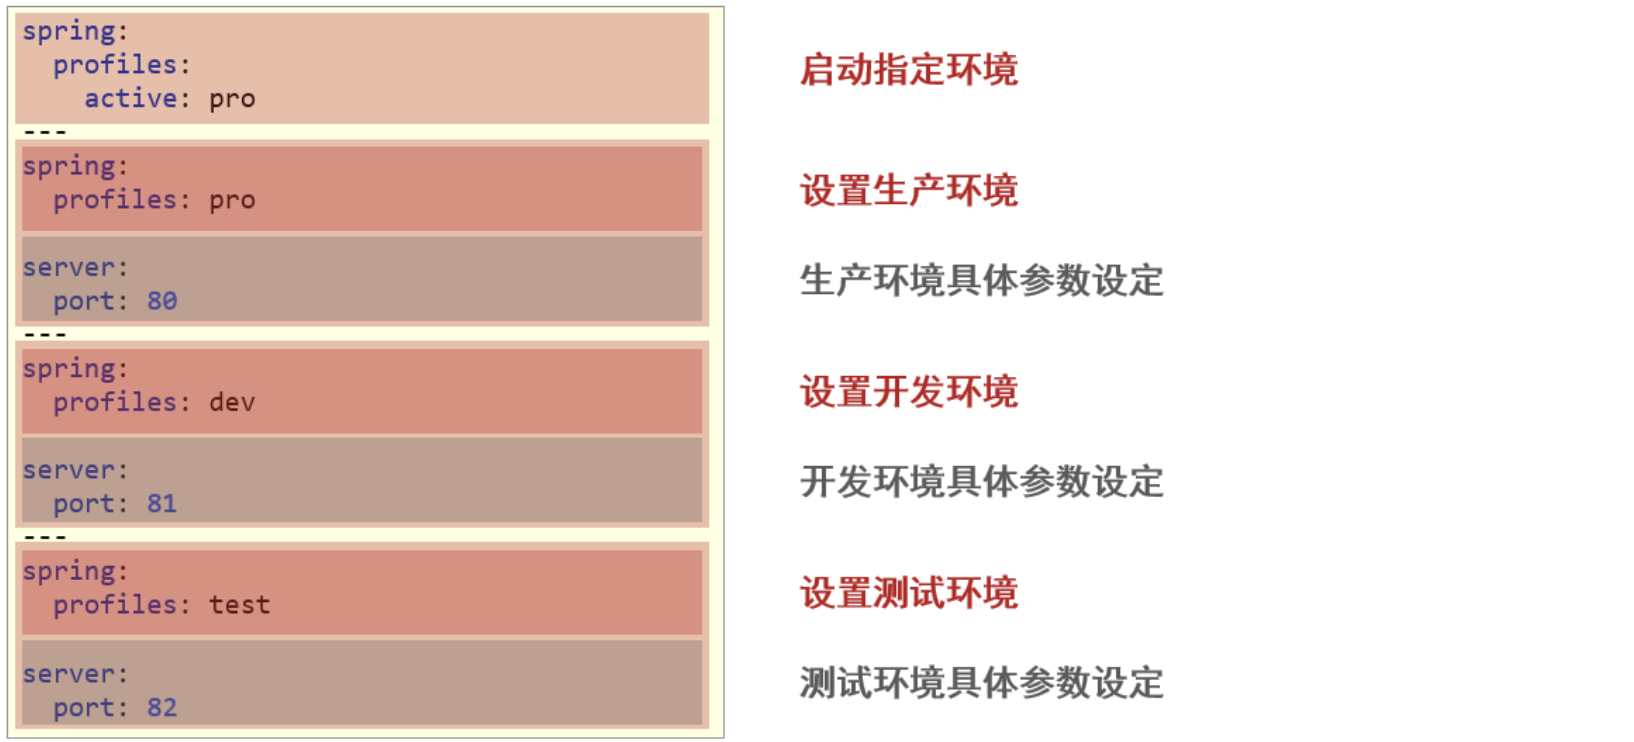
3.1 多环境启动配置
3.2 多环境启动命令格式
3.3 多环境开发控制
4. 配置文件分类
问题导入
三、整合第三方技术
1. 整合JUnit
问题导入
1.1 Spring整合JUnit(复习)
1.2 SpringBoot整合JUnit
2. 基于SpringBoot实现SSM整合
问题导入
2.1 Spring整合MyBatis(复习)
2.2 SpringBoot整合MyBatis
2.3 案例-SpringBoot实现ssm整合

前言
在现代软件开发中,应用程序往往需要在不同的环境中运行,比如开发环境、测试环境和生产环境。每个环境可能有不同的配置需求,如数据库连接、服务器端口、安全设置等。手动管理和切换这些配置不仅耗时,而且容易出错。Spring Boot通过其强大的多环境配置支持,极大地简化了这一过程,使得开发者可以更加专注于业务逻辑的实现,而不是繁琐的配置管理。
Spring Boot的设计理念之一就是“约定优于配置”,它通过一系列的默认配置和自动配置机制,减少了开发者的配置工作量。特别是在多环境配置方面,Spring Boot提供了一套简单而强大的机制,使得开发者可以轻松地管理和切换不同环境下的配置。
一、SpringBoot简介
1. 入门案例
SpringBoot是由Pivotal团队提供的全新框架,其设计目的是用来简化Spring应用的初始搭建以及开发过程
原生开发SpringMVC程序过程
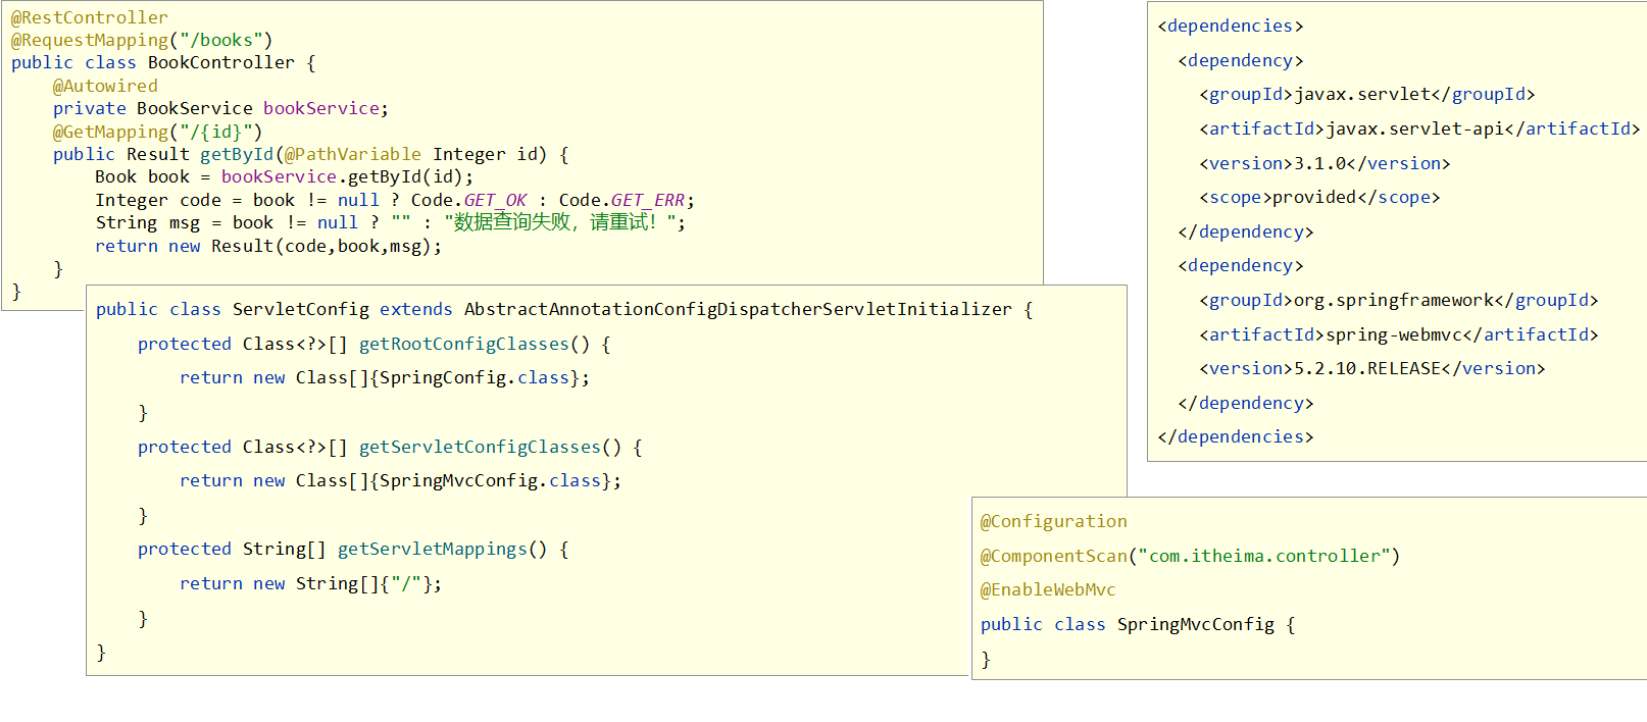
1.1 入门案例开发步骤
手动创建方式:
①:新建maven项目
②:引入依赖
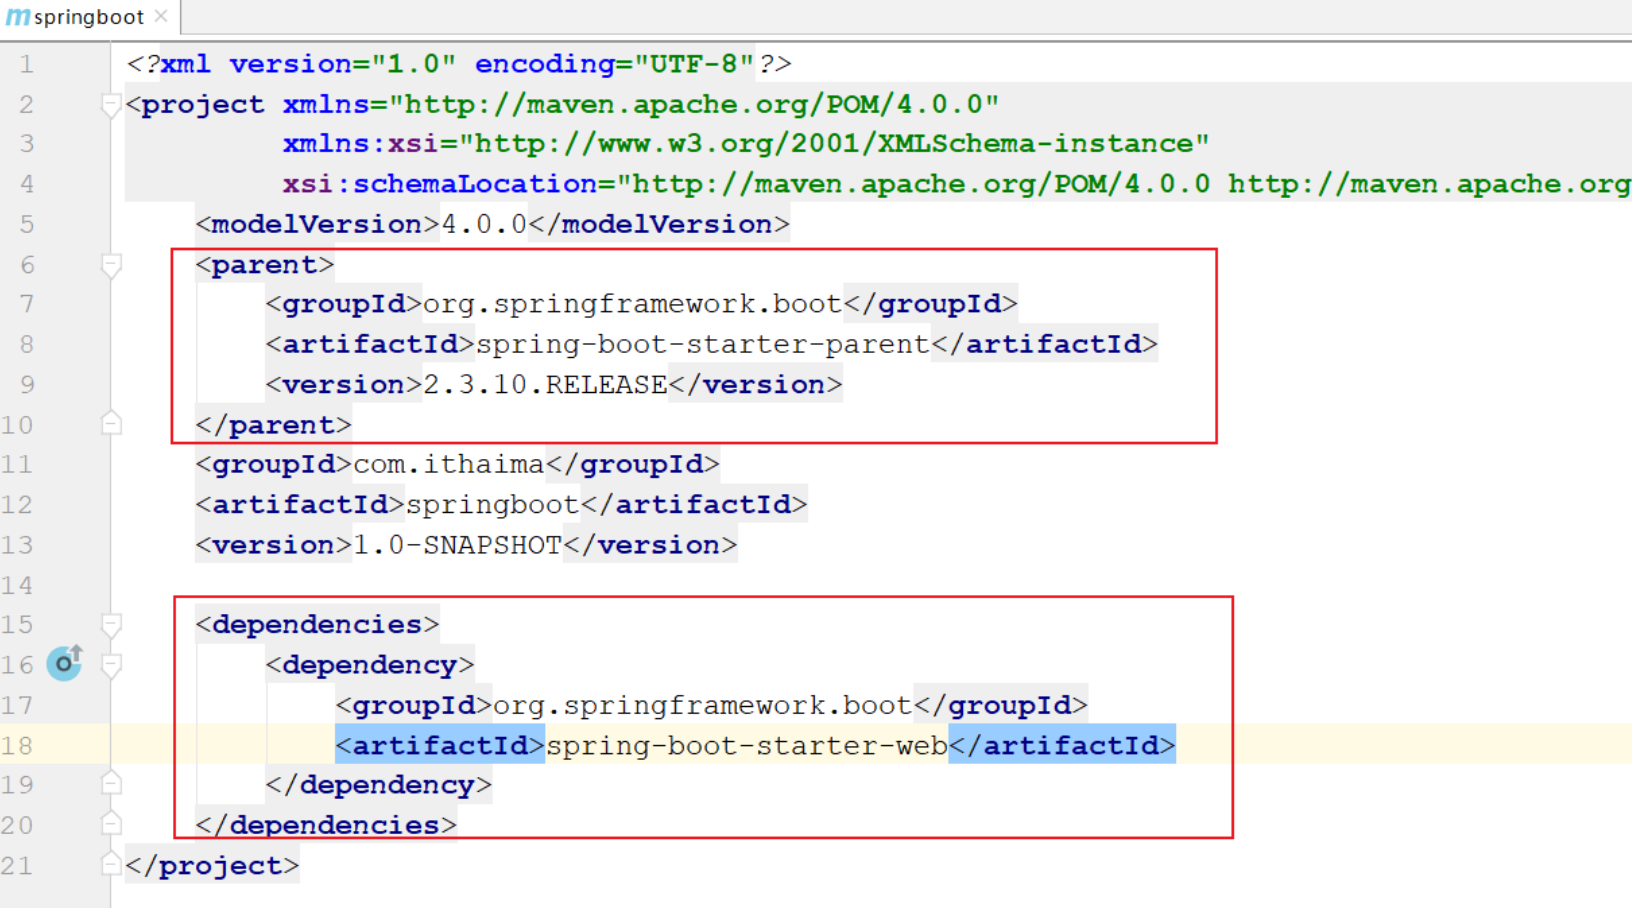
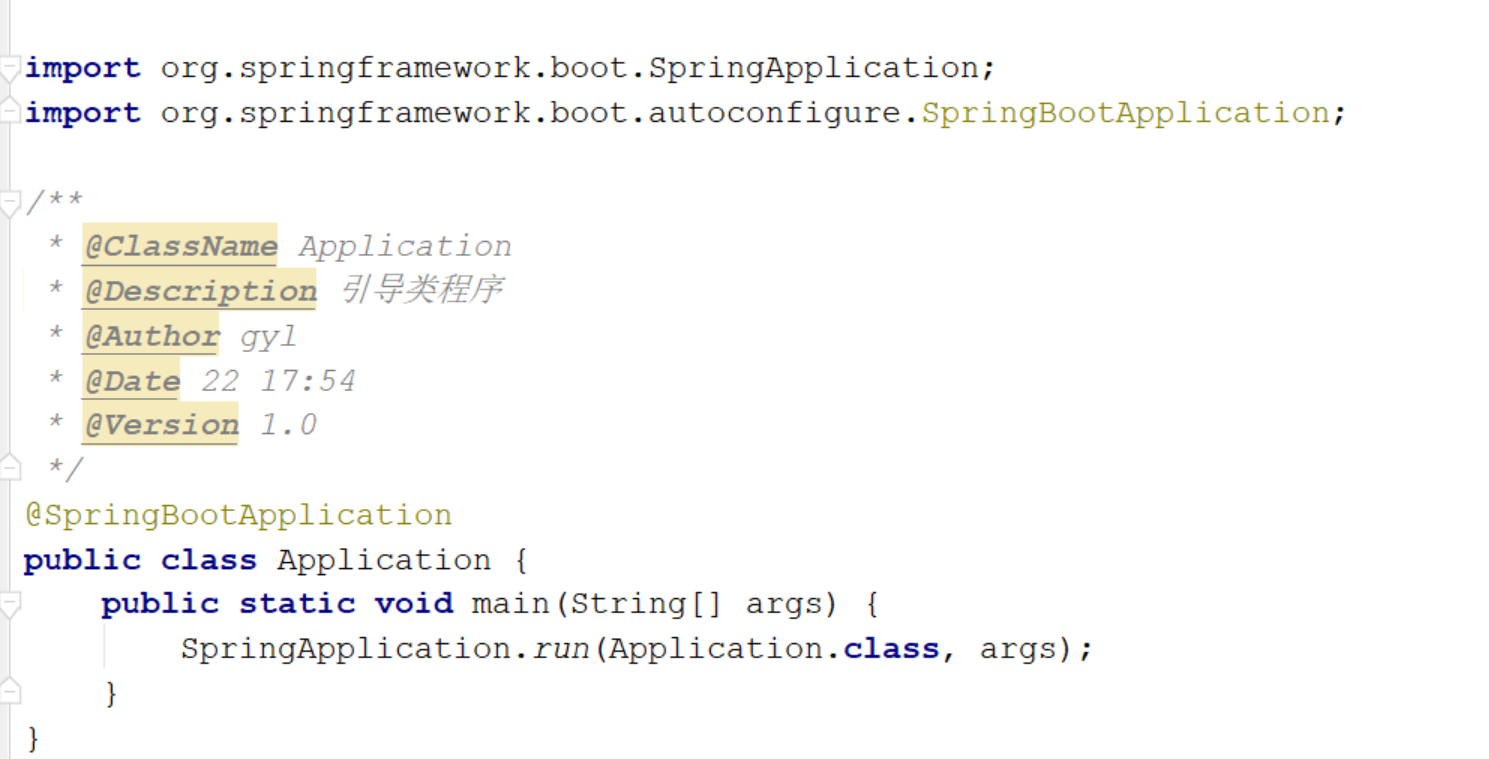
③:创建引导类
③:开发控制器类
@RestController
@RequestMapping("/books")
public class BookController {@GetMapping("/{id}")public String getById(@PathVariable Integer id) {System.out.println("id ==> " + id);return "hello , spring boot! ";}
}
④:运行自动生成的Application类
SpringBoot脚手架方式:
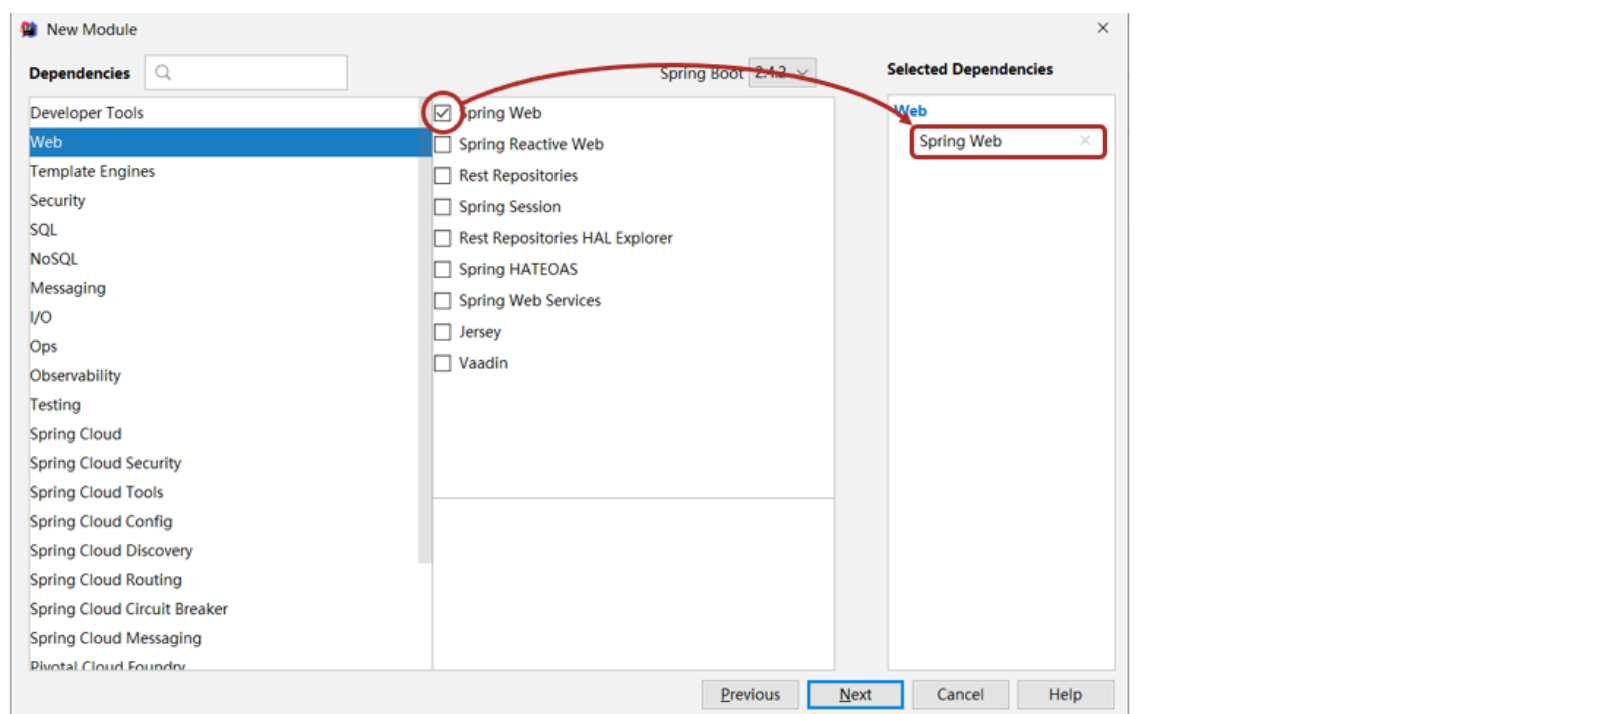
①:创建新模块,选择Spring初始化,并配置模块相关基础信息
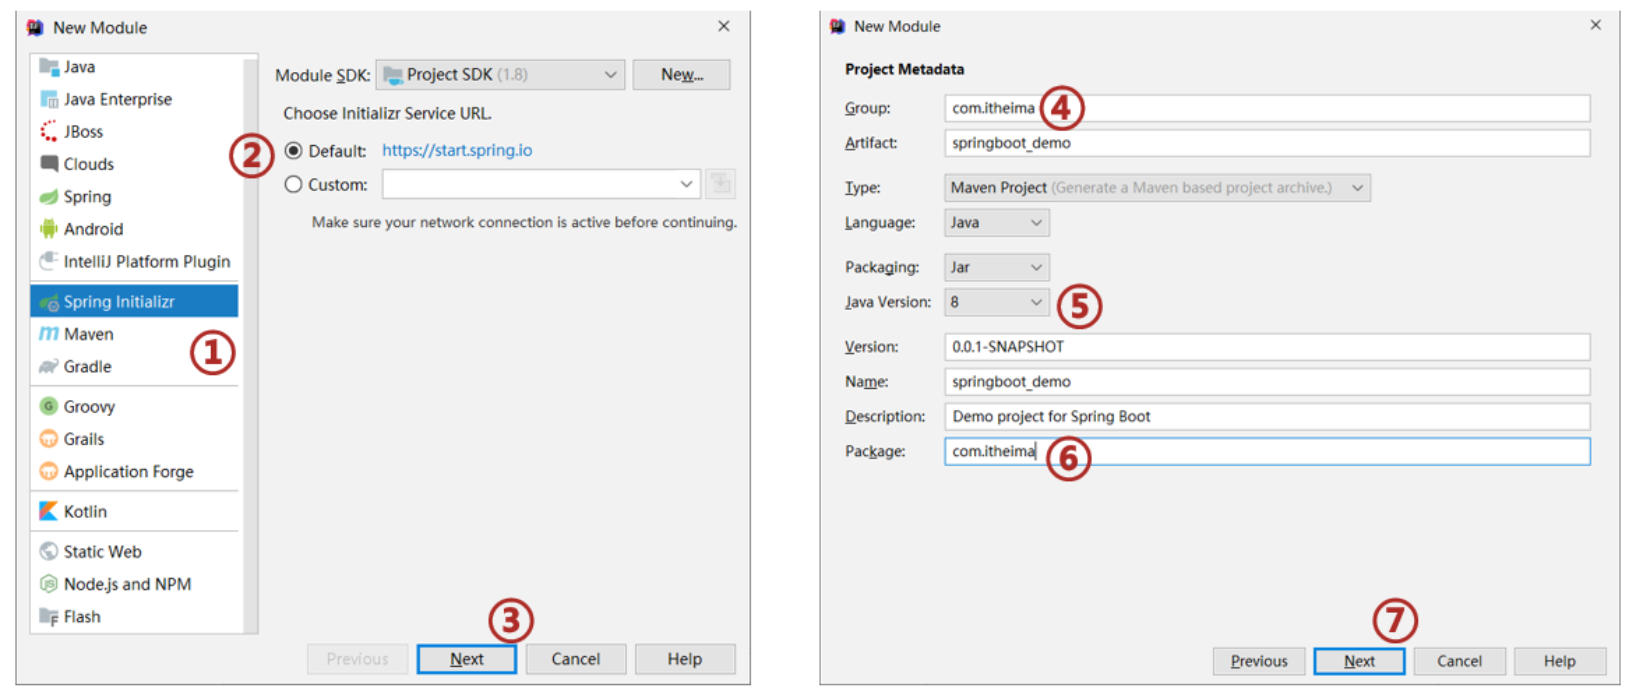
②:选择当前模块需要使用的技术集
③:开发控制器类
@RestController
@RequestMapping("/books")
public class BookController {@GetMapping("/{id}")public String getById(@PathVariable Integer id) {System.out.println("id ==> " + id);return "hello , spring boot! ";}
}
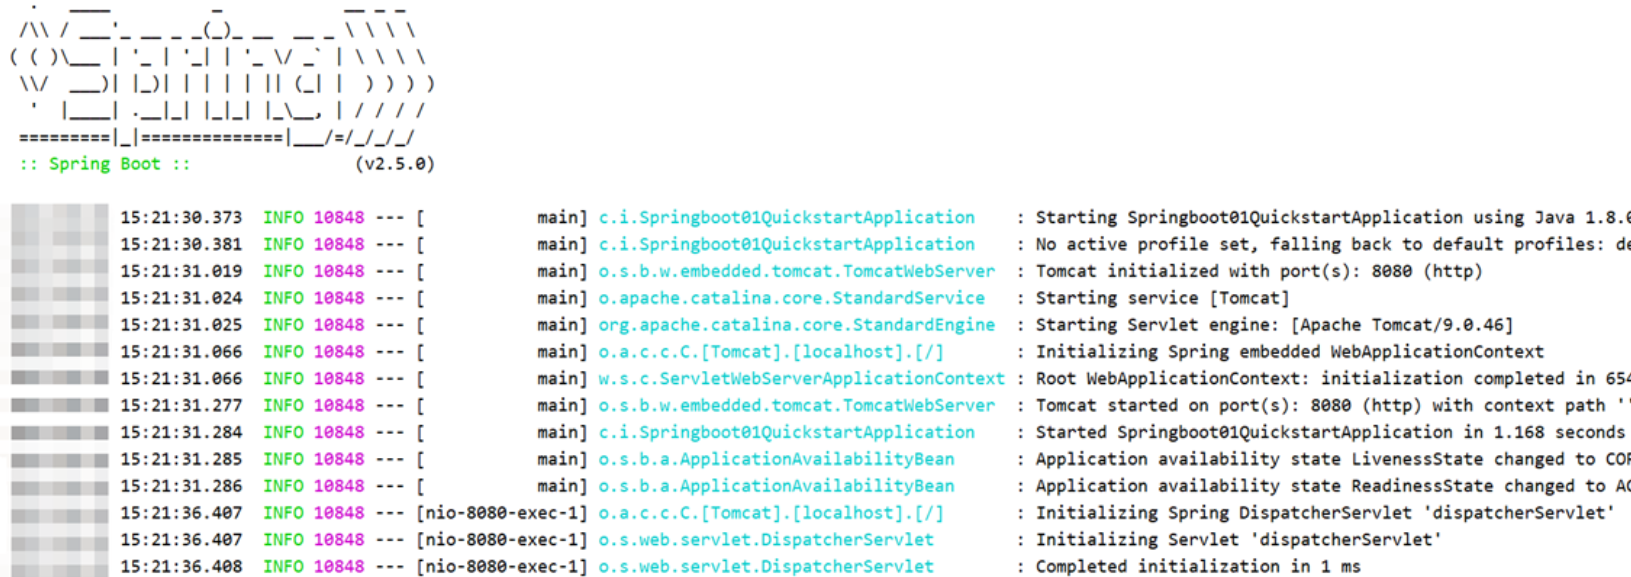
④:运行自动生成的Application类
-
最简SpringBoot程序所包含的基础文件
<?xml version="1.0" encoding="UTF-8"?>
4.0.0<parent><groupId>org.springframework.boot</groupId><artifactId>spring-boot-starter-parent</artifactId><version>2.5.0</version></parent><groupId>com.itheima</groupId><artifactId>springboot-01-quickstart</artifactId><version>0.0.1-SNAPSHOT</version><dependencies><dependency><groupId>org.springframework.boot</groupId><artifactId>spring-boot-starter-web</artifactId></dependency></dependencies>@SpringBootApplication
public class Application {
public static void main(String[] args) {
SpringApplication.run(Application.class, args);
}
} -
Spring程序与SpringBoot程序对比

注意事项:
基于idea开发SpringBoot程序需要确保联网且能够加载到程序框架结构
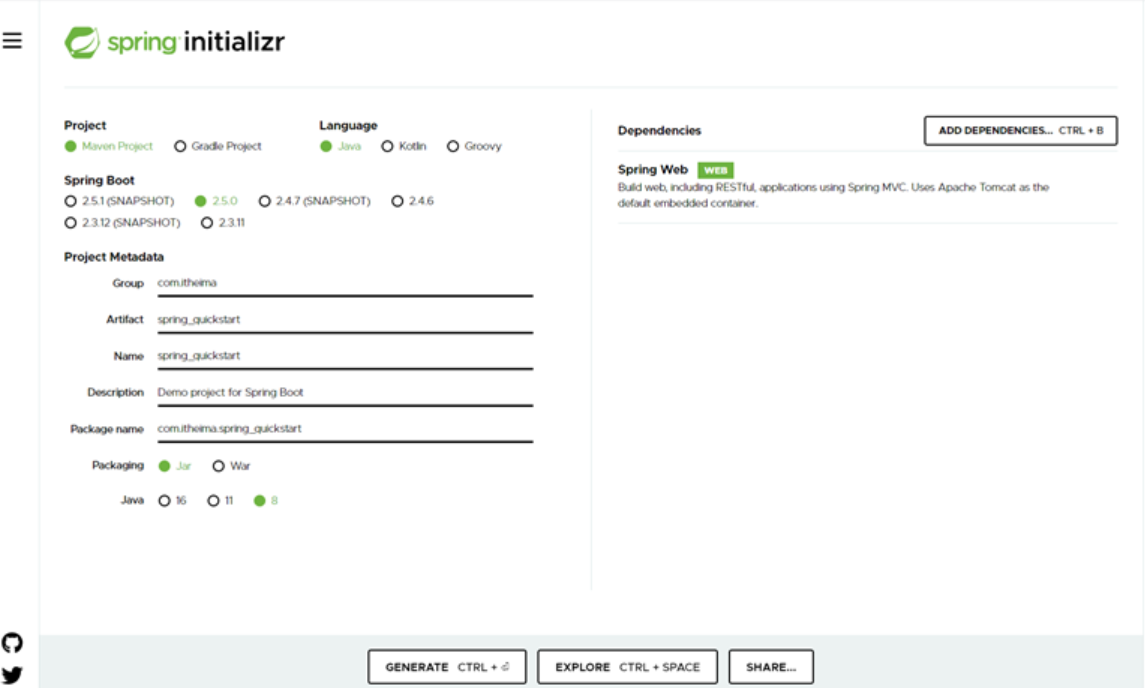
1.2 基于SpringBoot官网创建项目
1.3 SpringBoot项目快速启动
① 对SpringBoot项目打包(执行Maven构建指令package)
② 执行启动指令
java -jar springboot_01_quickstart.jar # 项目的名称根据实际情况修改
注意事项:
jar支持命令行启动需要依赖maven插件支持,请确认打包时是否具有SpringBoot对应的maven插件。
<build><plugins><plugin><groupId>org.springframework.boot</groupId><artifactId>spring-boot-maven-plugin</artifactId></plugin></plugins></build>
2. SpringBoot概述
问题导入
-
入门案例中没有引入spring-webmvc等依赖包,没有配置Tomcat服务器,为什么能正常启动?
-
我们没有配置端口号,为什么端口是8080?
2.1 起步依赖
-
starter
-
- SpringBoot中常见项目名称,定义了当前项目使用的所有项目坐标,以达到减少依赖配置的目的
4.0.0<parent><groupId>org.springframework.boot</groupId><artifactId>spring-boot-starter-parent</artifactId><version>2.5.0</version></parent><groupId>com.itheima</groupId><artifactId>springboot-01-quickstart</artifactId><version>0.0.1-SNAPSHOT</version><dependencies><dependency><groupId>org.springframework.boot</groupId><artifactId>spring-boot-starter-web</artifactId></dependency></dependencies>
4.0.0<groupId>org.springframework.boot</groupId><artifactId>spring-boot-dependencies</artifactId><version>2.5.0</version><packaging>pom</packaging><properties><servlet-api.version>4.0.1</servlet-api.version> ... </properties> -
parent
- 所有SpringBoot项目要继承的项目,定义了若干个坐标版本号(依赖管理,而非依赖),以达到减少依赖冲突的目的
- spring-boot-starter-parent(2.5.0)与 spring-boot-starter-parent(2.4.6)共计57处坐标版本不同
4.0.0<parent><groupId>org.springframework.boot</groupId><artifactId>spring-boot-dependencies</artifactId><version>2.5.0</version></parent><artifactId>spring-boot-starter-parent</artifactId><packaging>pom</packaging> ... -
实际开发
- 使用任意坐标时,仅书写GAV中的G和A,V由SpringBoot提供
- 如发生坐标错误,再指定version(要小心版本冲突)
javax.servlet<artifactId>junit</artifactId><version>${junit.version}</version>
<?xml version="1.0" encoding="UTF-8"?><artifactId>javax.servlet-api</artifactId><version>${servlet-api.version}</version>
org.springframework.boot<artifactId>spring-boot-starter-parent</artifactId><version>2.5.0</version></parent><dependencies><dependency><groupId>org.springframework.boot</groupId><artifactId>spring-boot-starter-web</artifactId></dependency><dependency><groupId>org.springframework.boot</groupId><artifactId>spring-boot-starter-test</artifactId><scope>test</scope></dependency></dependencies>
2.2 默认配置
tomcat默认配置了端口号为8080

二、基础配置
1. 配置文件格式
问题导入
框架常见的配置文件有哪几种形式?
1.1 修改服务器端口
http://localhost:8080/books/1 >>> http://localhost/books/1
SpringBoot提供了多种属性配置方式
-
application.properties
server.port=80
-
application.yml
server:
port: 81 -
application.yaml
server:
port: 82
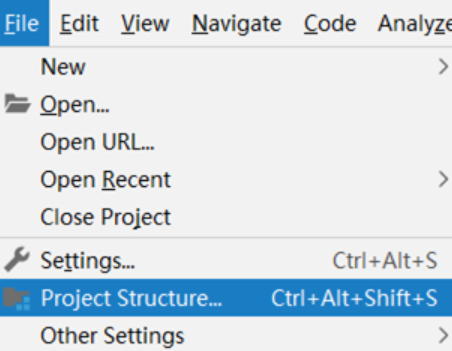
1.2 自动提示功能消失解决方案
操作步骤:
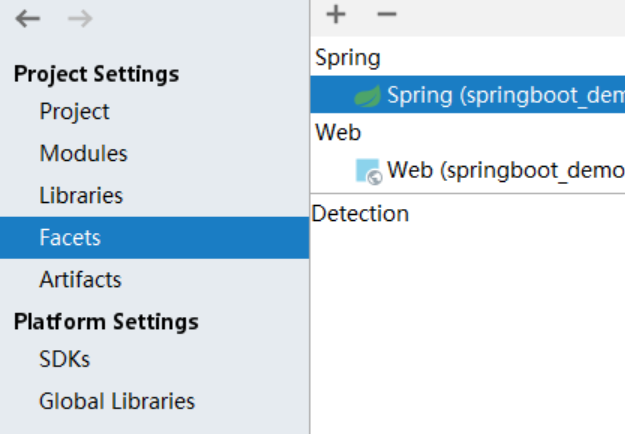
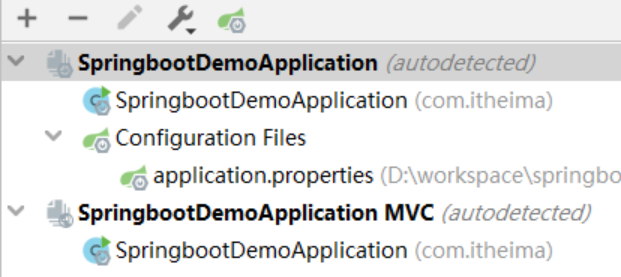
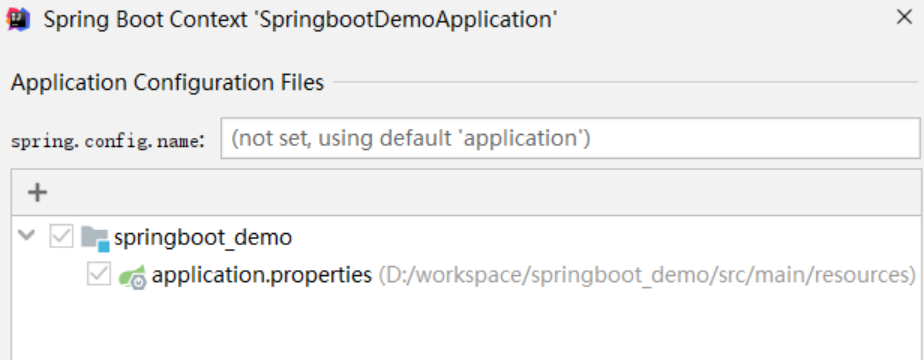
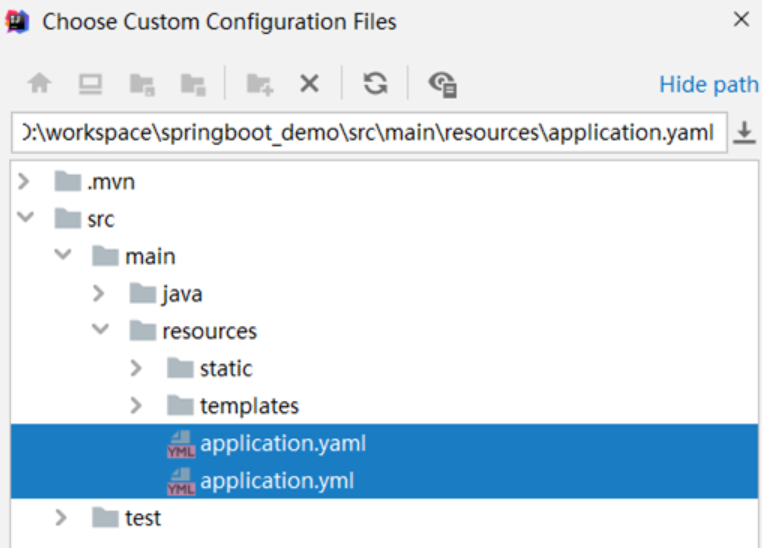
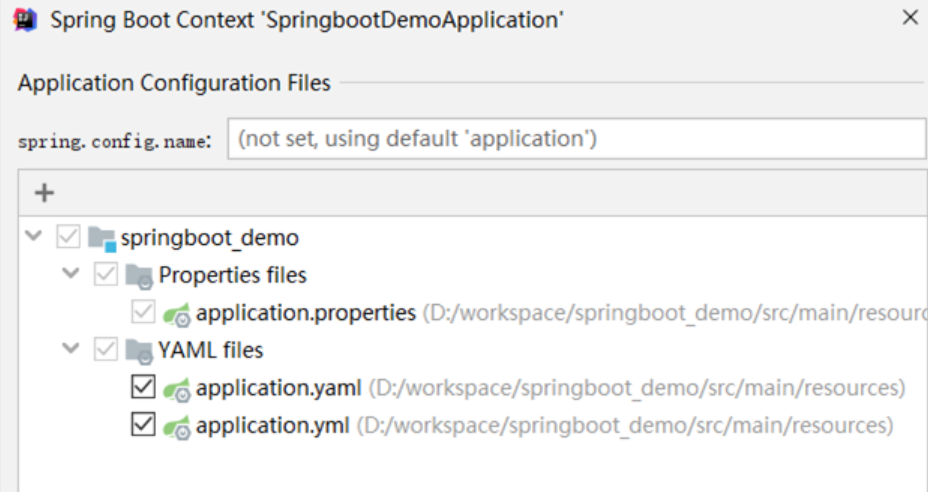
1.3 SpringBoot配置文件加载顺序(了解)
- application.properties > application.yml > application.yaml
注意事项:
-
SpringBoot核心配置文件名为application
-
SpringBoot内置属性过多,且所有属性集中在一起修改,在使用时,通过提示键+关键字修改属性
2. yaml
问题导入
什么是yaml,和properties有什么区别?
-
YAML(YAML Ain’t Markup Language),一种数据序列化格式
-
优点:
- 容易阅读
- 容易与脚本语言交互
- 以数据为核心,重数据轻格式
-
YAML文件扩展名
- .yml(主流)
- .yaml
2.1 yaml语法规则
-
大小写敏感
-
属性层级关系使用多行描述,每行结尾使用冒号结束
-
使用缩进表示层级关系,同层级左侧对齐,只允许使用空格(不允许使用Tab键)
-
属性值前面添加空格(属性名与属性值之间使用冒号+空格作为分隔)
-
#表示注释
-
核心规则:数据前面要加空格与冒号隔开
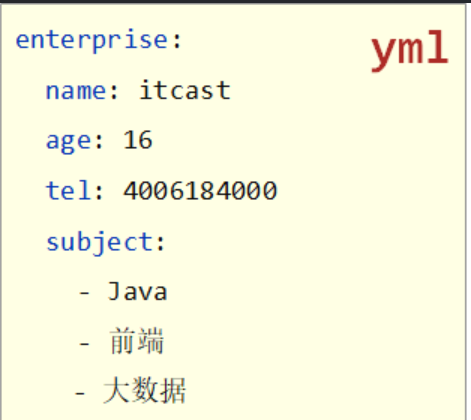
2.2 yaml数组数据
- 数组数据在数据书写位置的下方使用减号作为数据开始符号,每行书写一个数据,减号与数据间空格分隔
2.3 yaml数据读取
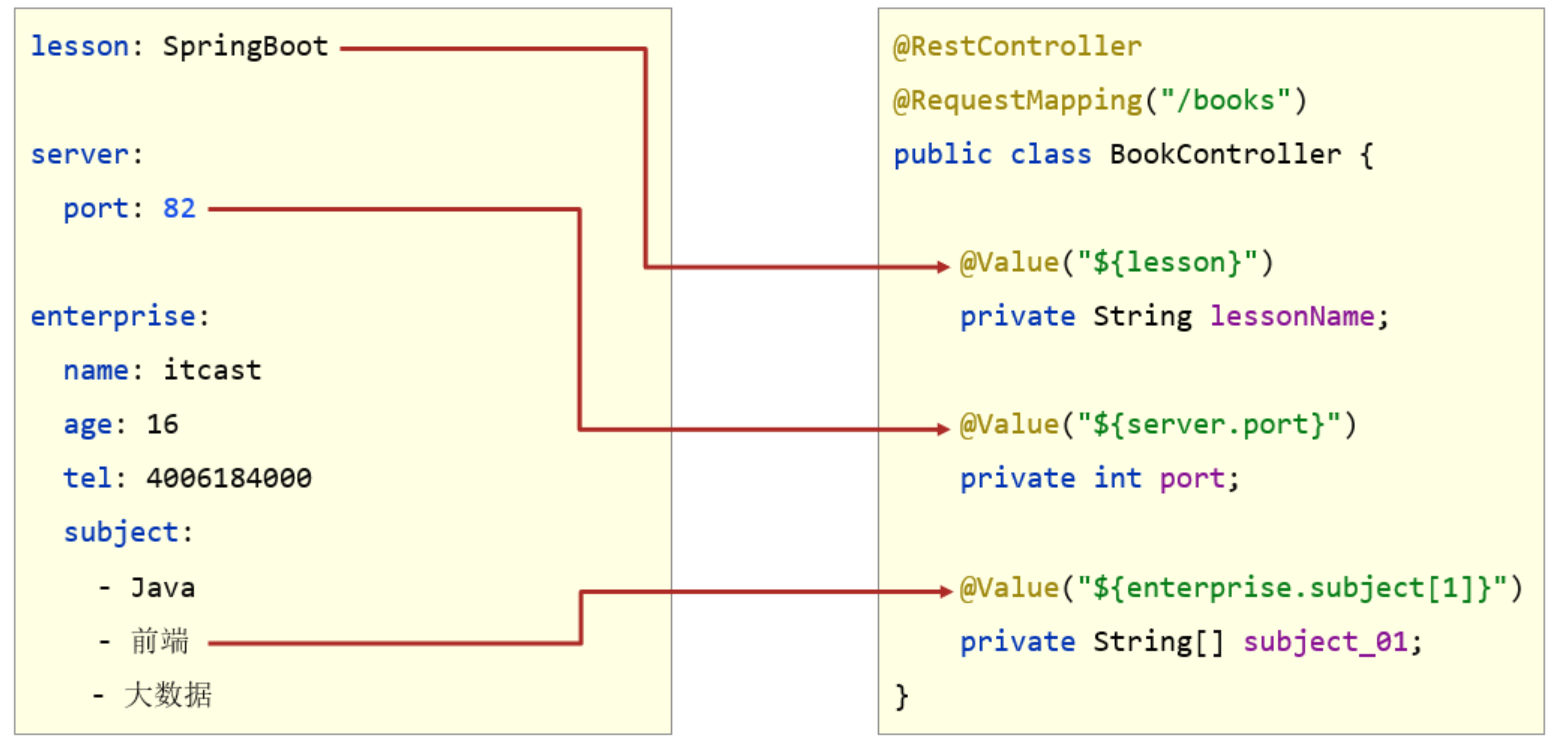
- 使用@Value读取单个数据,属性名引用方式:${一级属性名.二级属性名……}
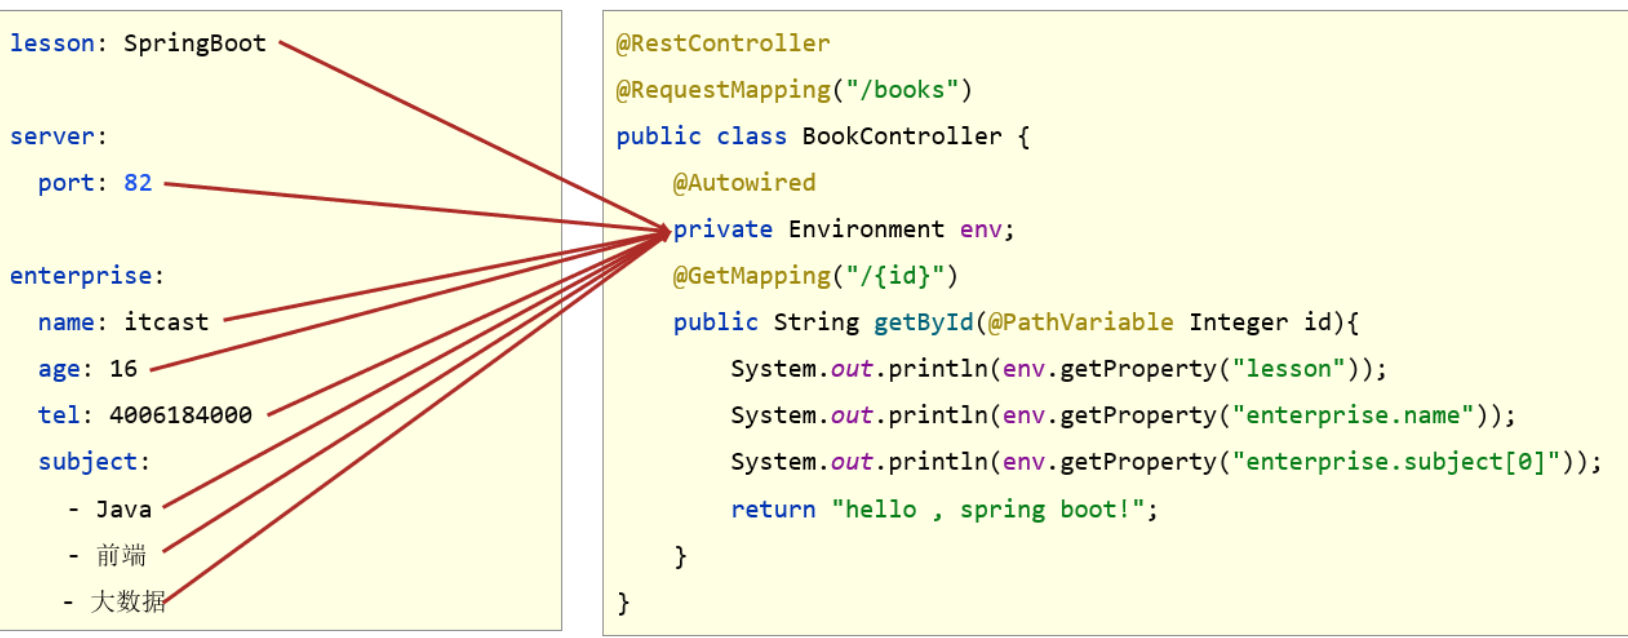
- 封装全部数据到Environment对象
-
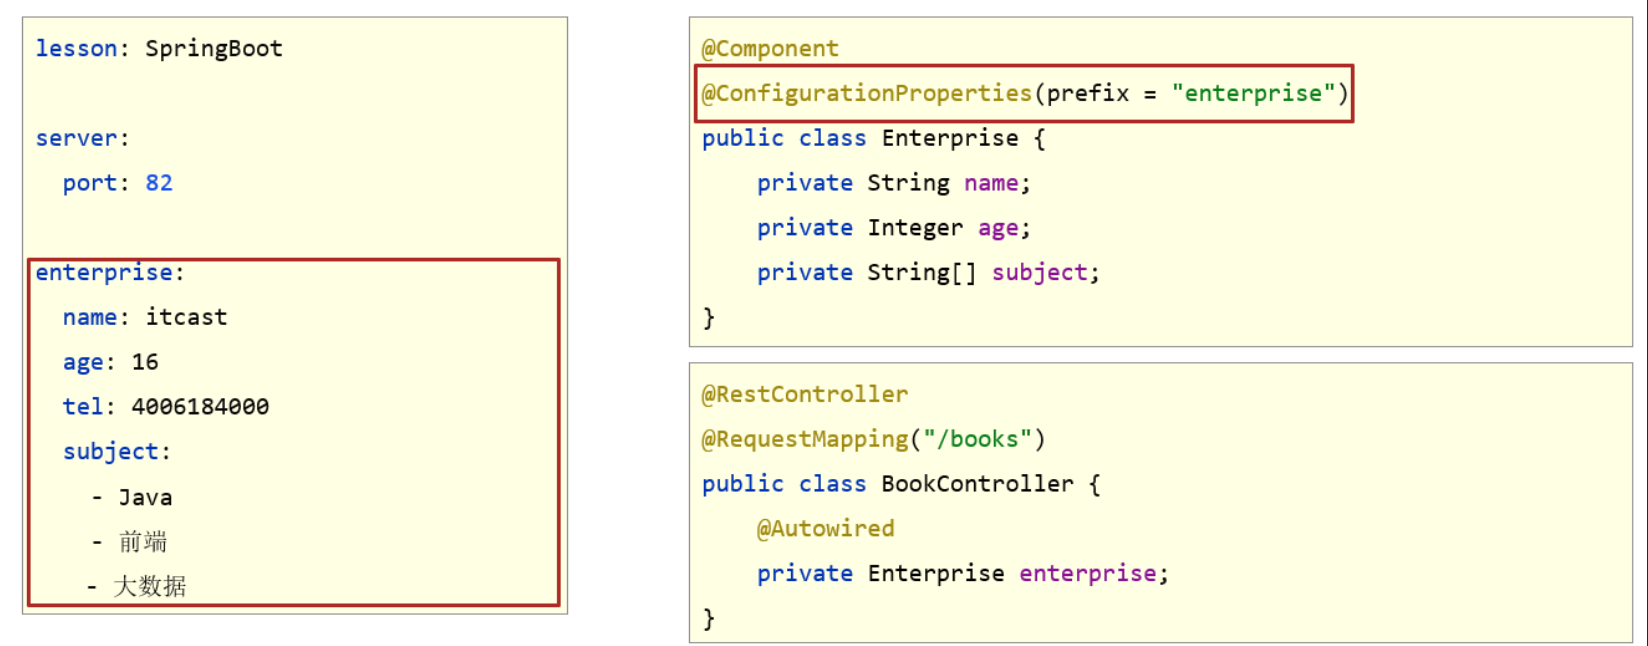
自定义对象封装指定数据【常用】
public class Enterprise {
private String name;
private Integer age;
private String tel;
private String[] subject;
//自行添加getter、setter、toString()等方法
}
- 自定义对象封装数据警告解决方案

<dependency><groupId>org.springframework.boot</groupId><artifactId>spring-boot-configuration-processor</artifactId><optional>true</optional></dependency>
3. 多环境开发配置
问题导入
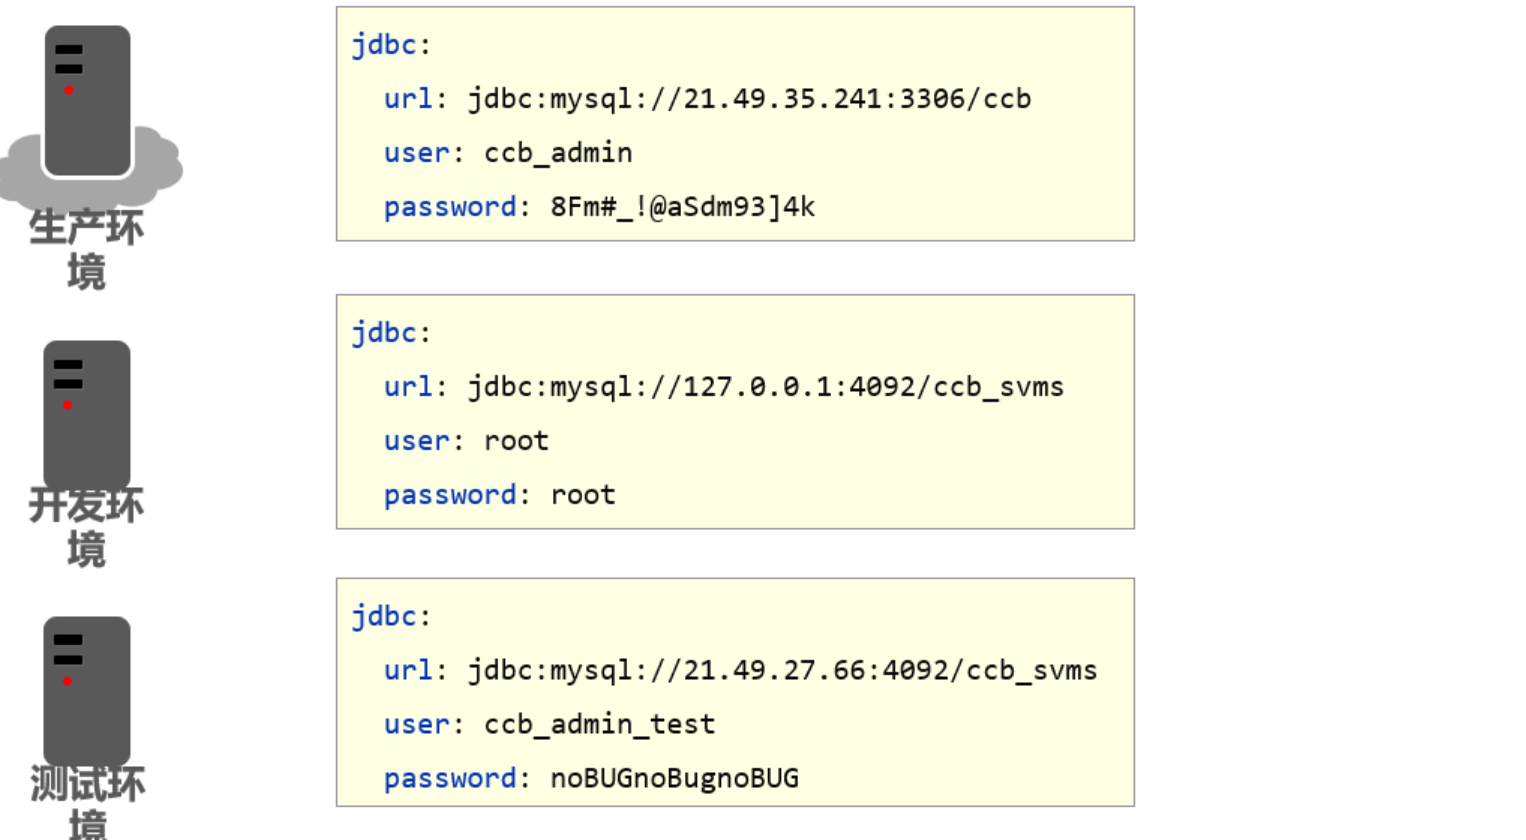
在实际开发中,项目的开发环境、测试环境、生产环境的配置信息是否会一致?如何快速切换?
3.1 多环境启动配置
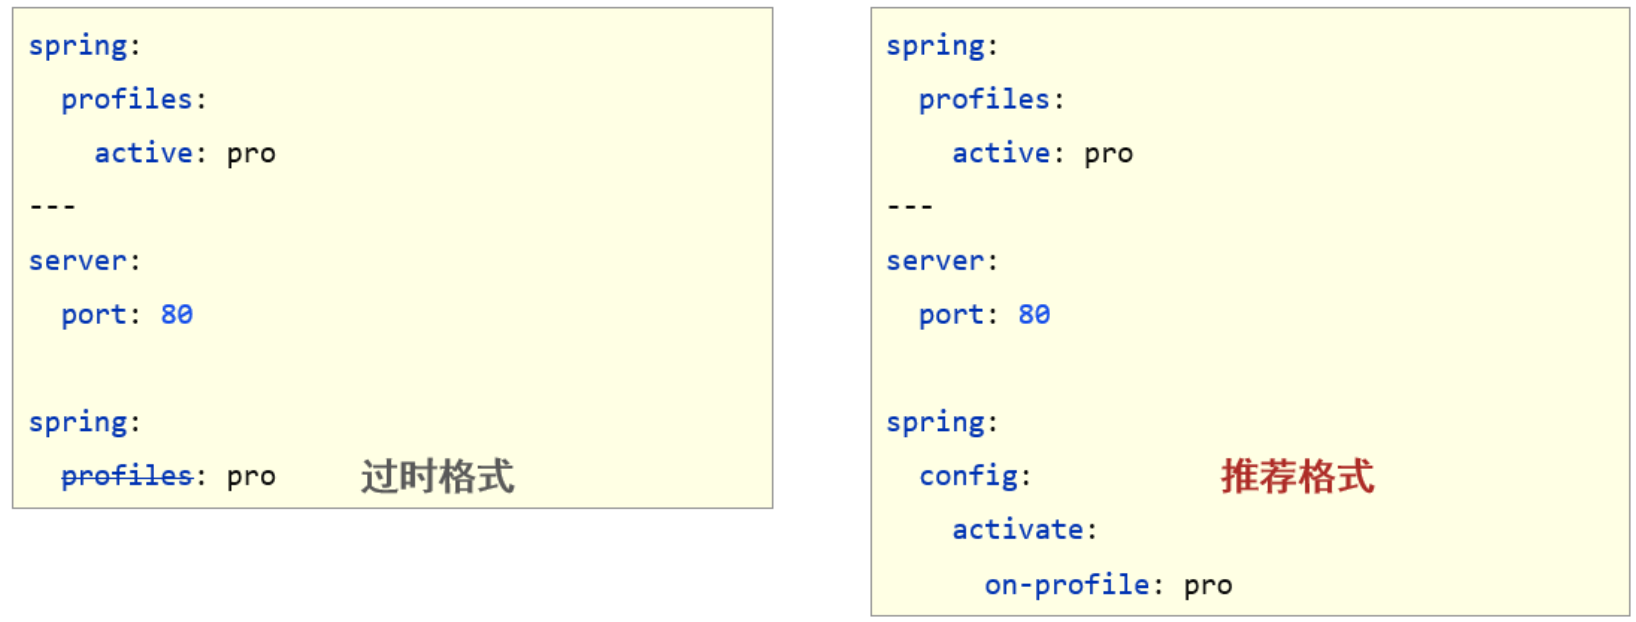
- yaml文件多环境启动
-
properties文件多环境启动
#主启动配置文件 application.properties
spring.profiles.active=pro#环境分类配置文件 application-pro.properties
server.port=80#环境分类配置文件 application-dev.properties
server.port=81#环境分类配置文件application-test.properties
server.port=82
3.2 多环境启动命令格式
-
带参数启动SpringBoot
java –jar springboot.jar --spring.profiles.active=test
java –jar springboot.jar --server.port=88
java –jar springboot.jar --server.port=88 --spring.profiles.active=test -
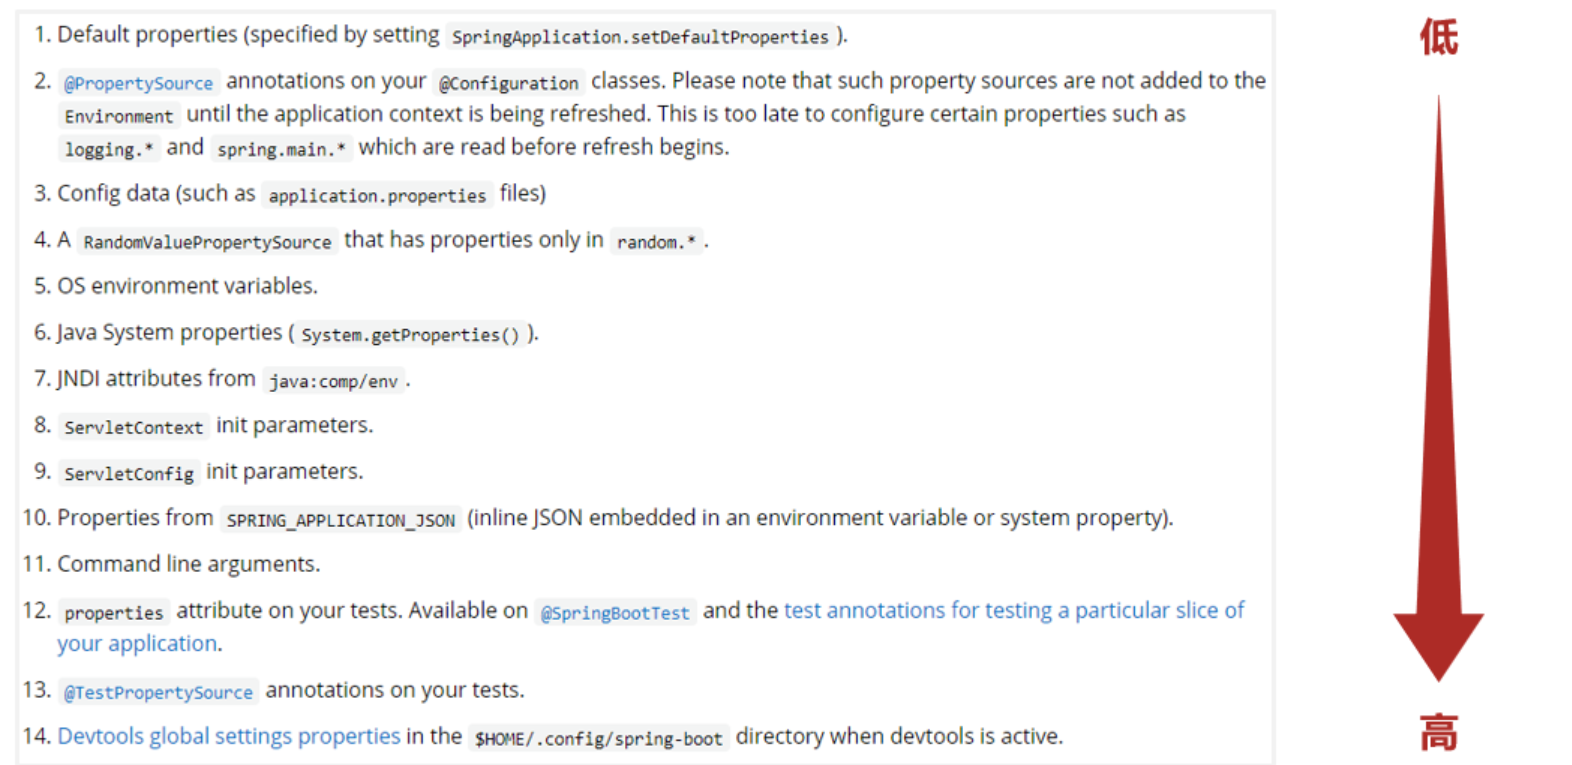
参数加载优先顺序
-
- 参看文档:https://docs.spring.io/spring-boot/docs/current/reference/html/spring-boot-features.html#boot-features-external-config
3.3 多环境开发控制
Maven与SpringBoot多环境兼容(步骤)
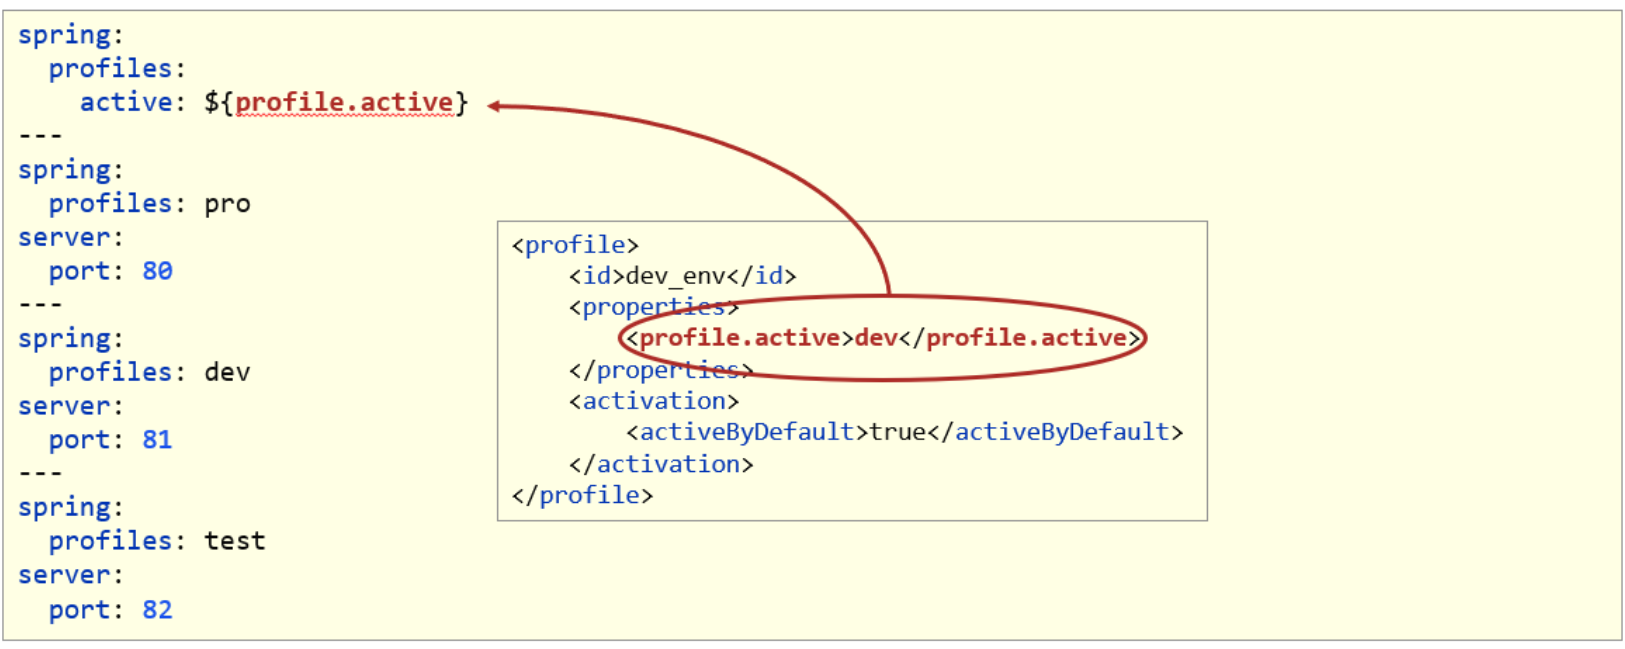
①:Maven中设置多环境属性
<profiles><profile><id>dev_env</id><properties><profile.active>dev</profile.active></properties><activation><activeByDefault>true</activeByDefault></activation></profile><profile><id>pro_env</id><properties><profile.active>pro</profile.active></properties></profile><profile><id>test_env</id><properties><profile.active>test</profile.active></properties></profile></profiles>
②:SpringBoot中引用Maven属性
③:执行Maven打包指令
- Maven指令执行完毕后,生成了对应的包,其中类参与编译,但是配置文件并没有编译,而是复制到包中

- 解决思路:对于源码中非java类的操作要求加载Maven对应的属性,解析${}占位符
④:对资源文件开启对默认占位符的解析
<build><plugins><plugin><artifactId>maven-resources-plugin</artifactId><configuration><encoding>utf-8</encoding><useDefaultDelimiters>true</useDefaultDelimiters></configuration></plugin></plugins></build>
- Maven打包加载到属性,打包顺利通过

4. 配置文件分类
问题导入
SpringBoot的配置文件可以放在项目的哪些地方?

java –jar springboot.jar --spring.profiles.active=test --server.port=85 --server.servlet.context-path=/heima --server.tomcat.connection-timeout=-1 ... ...
-
SpringBoot中4级配置文件
-
1级: file :config/application.yml 【最高】
-
2级: file :application.yml
-
3级:classpath:config/application.yml
-
4级:classpath:application.yml 【最低】
-
作用:
-
- 1级与2级留做系统打包后设置通用属性
- 3级与4级用于系统开发阶段设置通用属性
三、整合第三方技术
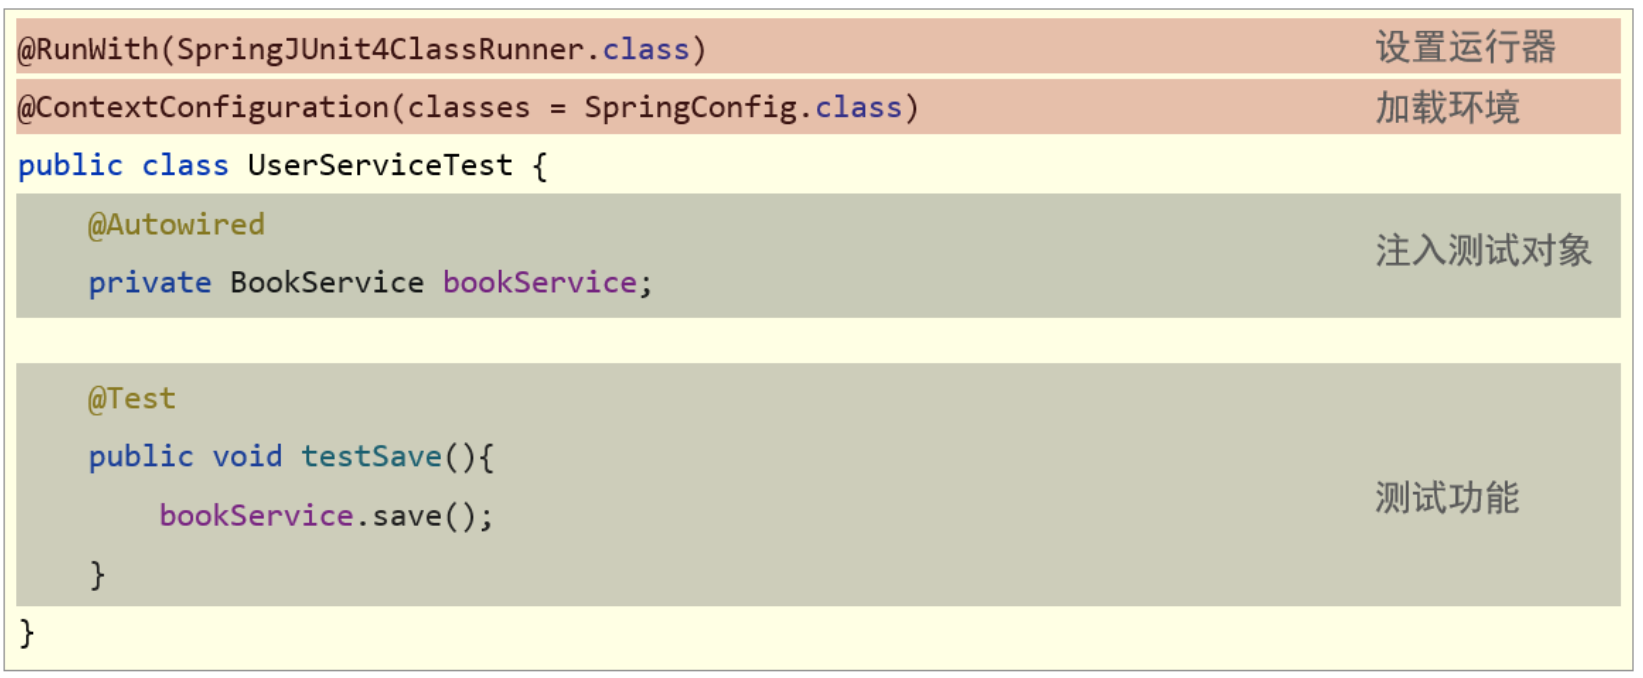
1. 整合JUnit
问题导入
回忆一下Spring整合JUnit的步骤?
1.1 Spring整合JUnit(复习)
1.2 SpringBoot整合JUnit
【第一步】添加整合junit起步依赖(可以直接勾选)
<dependency><groupId>org.springframework.boot</groupId><artifactId>spring-boot-starter-test</artifactId><scope>test</scope></dependency>
【第二步】编写测试类,默认自动生成了一个
@SpringBootTest
class Springboot07JunitApplicationTests {@Autowiredprivate BookService bookService;@Testpublic void testSave() {bookService.save();}
}
2. 基于SpringBoot实现SSM整合
问题导入
回忆一下Spring整合MyBatis的核心思想?
2.1 Spring整合MyBatis(复习)
-
SpringConfig
-
- 导入JdbcConfig
-
- 导入MyBatisConfig
@Configuration
@ComponentScan(“com.itheima”)
@PropertySource(“classpath:jdbc.properties”)
@Import({JdbcConfig.class, MyBatisConfig.class})
public class SpringConfig {}
-
JDBCConfig
-
- 定义数据源(加载properties配置项:driver、url、username、password)
#jdbc.properties
jdbc.driver=com.mysql.jdbc.Driver
jdbc.url=jdbc:mysql://localhost:3306/spring_db
jdbc.username=root
jdbc.password=itheimapublic class JdbcConfig {
@Value(“ j d b c . d r i v e r " ) p r i v a t e S t r i n g d r i v e r ; @ V a l u e ( " {jdbc.driver}") private String driver; @Value(" jdbc.driver")privateStringdriver;@Value("{jdbc.url}”)
private String url;
@Value(“ j d b c . u s e r n a m e " ) p r i v a t e S t r i n g u s e r N a m e ; @ V a l u e ( " {jdbc.username}") private String userName; @Value(" jdbc.username")privateStringuserName;@Value("{jdbc.password}”)
private String password;@Bean public DataSource getDataSource() {DruidDataSource ds = new DruidDataSource();ds.setDriverClassName(driver);ds.setUrl(url);ds.setUsername(userName);ds.setPassword(password);return ds; }}
-
MyBatisConfig
- 定义SqlSessionFactoryBean
- 定义映射配置
@Bean
public SqlSessionFactoryBean getSqlSessionFactoryBean(DataSource dataSource) {
SqlSessionFactoryBean ssfb = new SqlSessionFactoryBean();
ssfb.setTypeAliasesPackage(“com.itheima.domain”);
ssfb.setDataSource(dataSource);
return ssfb;
}@Bean
public MapperScannerConfigurer getMapperScannerConfigurer() {
MapperScannerConfigurer msc = new MapperScannerConfigurer();
msc.setBasePackage(“com.itheima.dao”);
return msc;
}
2.2 SpringBoot整合MyBatis
-
SpringBoot整合Spring(不存在)
-
SpringBoot整合SpringMVC(不存在)
-
SpringBoot整合MyBatis(主要)
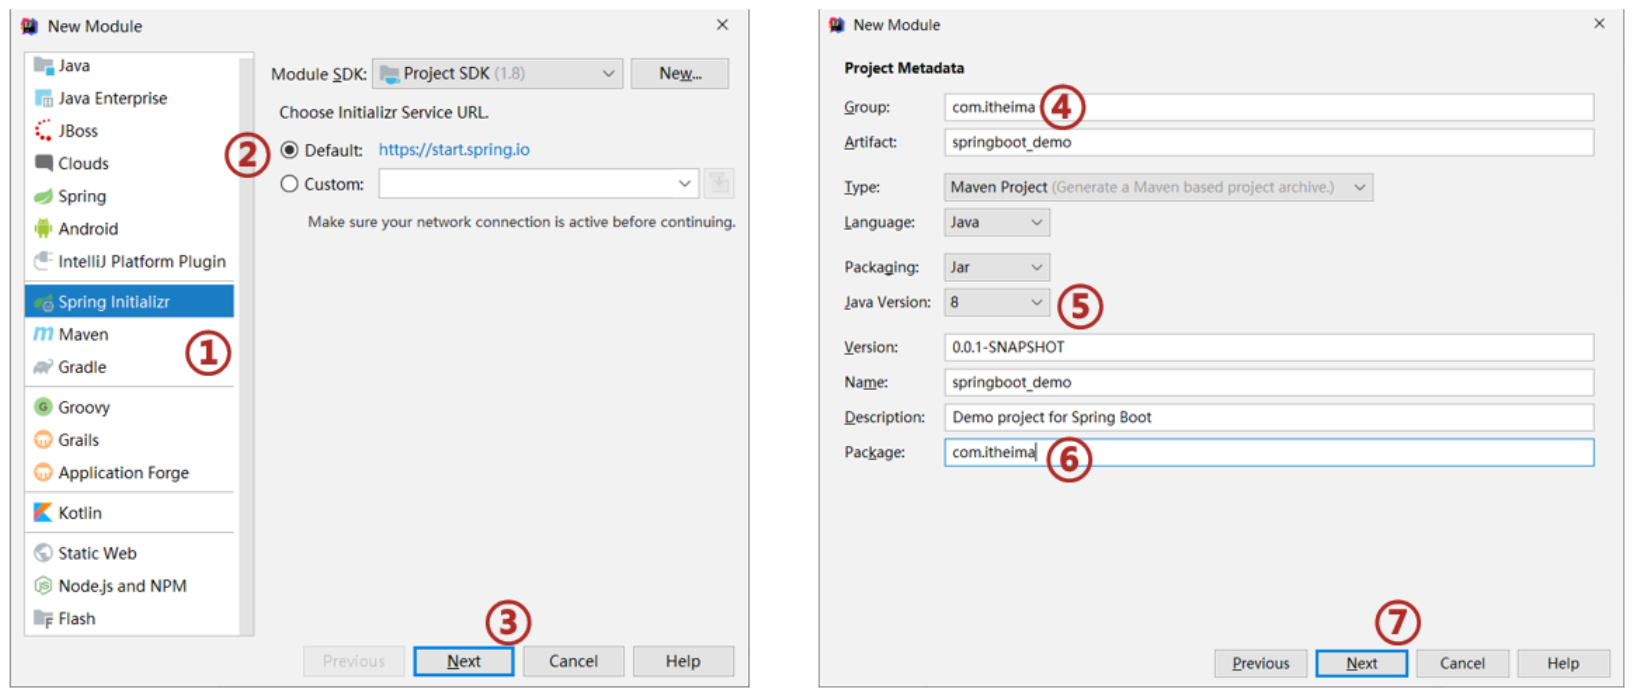
①:创建新模块,选择Spring初始化,并配置模块相关基础信息
②:选择当前模块需要使用的技术集(MyBatis、MySQL)
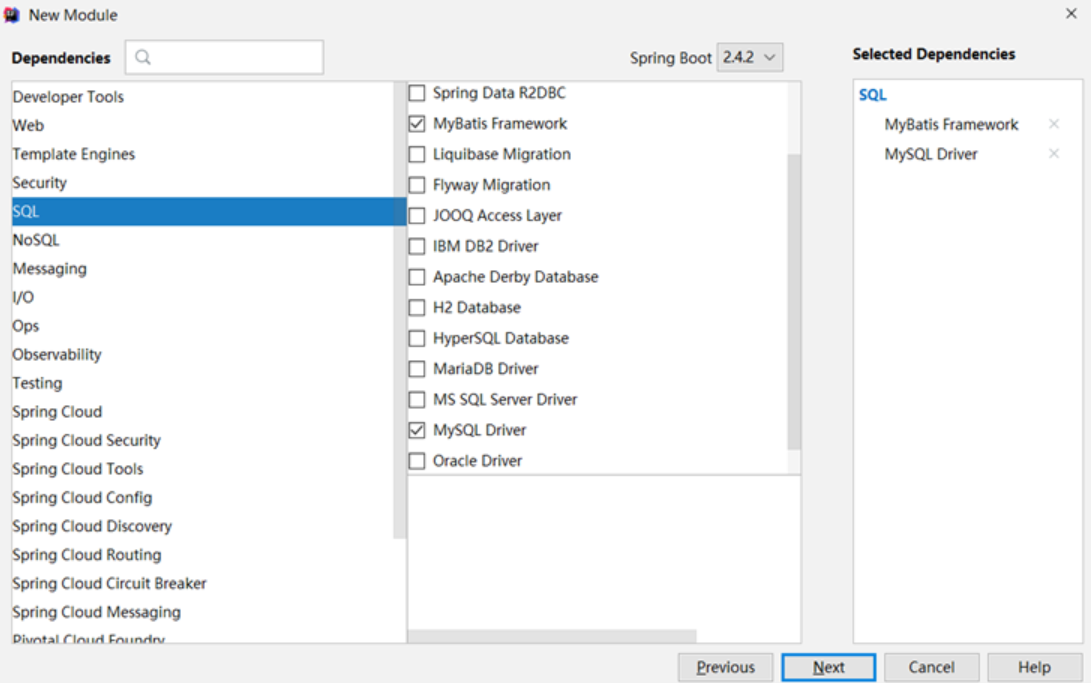
③:设置数据源参数
spring:datasource:driver-class-name: com.mysql.cj.jdbc.Driverurl: jdbc:mysql://localhost:3306/ssm_db?serverTimezone=UTCusername: rootpassword: roottype: com.alibaba.druid.pool.DruidDataSource
注意事项:
-
SpringBoot版本低于2.4.3(不含),Mysql驱动版本大于8.0时,需要在url连接串中配置时区,或在MySQL数据库端配置时区解决此问题
jdbc:mysql://localhost:3306/ssm_db?serverTimezone=UTC
④:定义数据层接口与映射配置
@Mapper
public interface UserDao {@Select("select * from tbl_book where id=#{id}")Book getById(Integer id);
}
⑤:测试类中注入dao接口,测试功能
@SpringBootTest
class Springboot08MybatisApplicationTests {@Autowiredprivate BookDao bookDao;@Testpublic void testGetById() {Book book = bookDao.getById(1);System.out.println(book);}
}
2.3 案例-SpringBoot实现ssm整合
【第一步】创建SpringBoot工程,添加druid依赖
<!-- todo 1 添加druid连接池依赖-->
<dependency><groupId>com.alibaba</groupId><artifactId>druid</artifactId><version>1.2.6</version></dependency>
【第二步】复制springmvc_ssm各种资源(主java类、页面、测试类)
【第三步】删除config包中的所有配置,在BookDao接口上加@Mapper注解
//todo 3 在BookDao接口上加@Mapper注解,让SpringBoot给接口创建代理对象
@Mapper
public interface BookDao {//...
}
【第四步】将application.properties修改成application.yml,配置端口号和连接参数
server:port: 80
# todo 4 配置数据库连接参数
spring:datasource:driver-class-name: com.mysql.cj.jdbc.Driverurl: jdbc:mysql://localhost:3306/ssm_dbusername: rootpassword: roottype: com.alibaba.druid.pool.DruidDataSource
【第五步】修改BookServiceTest配置类,进行配置
// todo 5 修改单元测试类,添加@SpringBootTest主键,修复@Test注解导包
@SpringBootTest
public class BookServiceTest {@Autowiredprivate BookService bookService;@Testpublic void testGetById(){Book book = bookService.getById(2); //传递参数1会抛出异常System.out.println(book);}@Testpublic void testGetAll(){List<Book> all = bookService.getAll();System.out.println(all);}
}
【第六步】在static目录中提供index.html页面,跳转到"pages/books.html"
<script>location.href="pages/books.html"
</script>
最后:运行引导类即可访问


