大语言模型(LLM)为基于文本的对话提供了强大的能力。那么,能否进一步扩展,将其转化为语音对话的形式呢?本文将展示如何使用 Whisper 语音识别和 llama.cpp 构建一个 Web 端语音聊天机器人。
系统概览

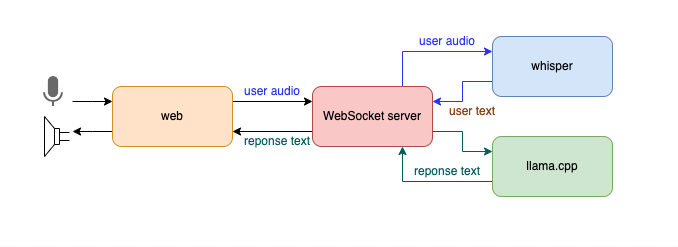
如上图所示,系统的工作流程如下:
- 用户通过语音输入。
- 语音识别,转换为文本。
- 文本通过大语言模型(
LLM)生成文本响应。 - 最后,文本转语音播放结果。
系统实现
端侧的具体形态(如 web 端、桌面端、手机端)直接影响了第一步用户语言的输入,以及最后一步响应结果的语音播放。
在本文中,我们选择使用 Web 端作为示例,利用浏览器本身的语言采集和语音播放功能,来实现用户与系统的互动。
下图展示了系统架构:

用户通过 Web 端与系统交互,语音数据通过 WebSocket 传输到后端服务,后端服务使用 Whisper 将语音转换为文本,接着通过 llama.cpp 调用 LLM 生成文本响应,最后,文本响应通过 WebSocket 发送回前端,并利用浏览器的语音播放功能将其朗读出来。
Web 端
Web 端的实现主要依赖 HTML5 和 JavaScript。我们使用浏览器的 Web API 进行语音采集和语音播放。以下是简化的 Web 端代码示例:
<!DOCTYPE html>
<html lang="en">
<head><meta charset="UTF-8"><meta name="viewport" content="width=device-width, initial-scale=1.0"><title>Voice Chat AI</title><style>#loading { display: none; font-weight: bold; color: blue }#response { white-space: pre-wrap; }</style>
</head>
<body><h1>Voice Chat AI</h1><button id="start">Start Recording</button><button id="stop" disabled>Stop Recording</button><p id="loading">Loading...</p><p>AI Response: <span id="response"></span></p><script>let audioContext, mediaRecorder;const startButton = document.getElementById("start");const stopButton = document.getElementById("stop");const responseElement = document.getElementById("response");const loadingElement = document.getElementById("loading");let socket = new WebSocket("ws://localhost:8765/ws");socket.onmessage = (event) => {const data = JSON.parse(event.data);const inputText = data.input || "No input detected";responseElement.textContent += `\nUser said: ${inputText}`;const aiResponse = data.response || "No response from AI";responseElement.textContent += `\nAI says: ${aiResponse}\n`;loadingElement.style.display = "none";const utterance = new SpeechSynthesisUtterance(aiResponse);speechSynthesis.speak(utterance);};socket.onerror = (error) => {console.error("WebSocket error:", error);loadingElement.style.display = "none";};startButton.addEventListener("click", async () => {audioContext = new (window.AudioContext || window.webkitAudioContext)();const stream = await navigator.mediaDevices.getUserMedia({ audio: true });mediaRecorder = new MediaRecorder(stream);const audioChunks = [];mediaRecorder.ondataavailable = (event) => {audioChunks.push(event.data);};mediaRecorder.onstop = () => {const audioBlob = new Blob(audioChunks, { type: "audio/webm" });loadingElement.style.display = "block";socket.send(audioBlob);};mediaRecorder.start();startButton.disabled = true;stopButton.disabled = false;});stopButton.addEventListener("click", () => {mediaRecorder.stop();startButton.disabled = false;stopButton.disabled = true;});</script>
</body>
</html>
为了简化示例代码,使用了开始和结束按钮来手动控制语音的录制。如果要实现实时对话,除了需要合理设置语音采集的时间间隔,还需要确保后端能够快速响应,避免延迟影响用户体验(这在我的笔记本电脑上无法做到)。
WebSocket 服务端
服务端实现为:
- 使用
Python和fastapi框架搭建WebSocket服务。 - 使用
whisper进行语音识别,将语音转换为文本,注意系统环境需要额外安装ffmpeg命令行工具。 - 通过
llama.cpp加载LLM(我使用的是llama3.2-1B模型) 并生成响应文本。
以下是服务端的代码示例:
python">from fastapi import FastAPI, WebSocket
import uvicorn
import whisper
import tempfile
import os
import signalapp = FastAPI()# 加载 Whisper 模型,默认存储位置 ~/.cache/whisper,可以通过 download_root 设置
model = whisper.load_model("base", download_root="WHISPER_MODEL")@app.websocket("/ws")
async def websocket_endpoint(websocket: WebSocket):try:await websocket.accept()while True:# 接收音频数据audio_data = await websocket.receive_bytes()# 保存临时音频文件with tempfile.NamedTemporaryFile(delete=False, suffix=".webm") as temp_audio:temp_audio.write(audio_data)temp_audio_path = temp_audio.name# Whisper 语音识别result = model.transcribe(temp_audio_path)os.remove(temp_audio_path)text = result["text"]print("user input: ", text)# 生成 AI 回复response_text = LLMResponse(text)print("AI response: ", response_text)await websocket.send_json({"input": text, "response": response_text})except Exception as e:print("Error: ", e)def handle_shutdown(signal_num, frame):print(f"Received shutdown signal: {signal_num}")def setup_signal_handlers():signal.signal(signal.SIGTERM, handle_shutdown)signal.signal(signal.SIGINT, handle_shutdown)if __name__ == "__main__":setup_signal_handlers()config = uvicorn.Config("main:app", port=8765, log_level="info")server = uvicorn.Server(config)server.run()
此外,llama.cpp 使用 Docker 容器运行,作为 HTTP 服务来提供 LLM 的能力。启动命令如下:
docker run -p 8080:8080 -v ~/ai-models:/models \ghcr.io/ggerganov/llama.cpp:server \-m /models/llama3.2-1B.gguf -c 512 \--host 0.0.0.0 --port 8080
WebSocket server 与 llama.cpp 之间则可以直接使用 HTTP 的方式通信,示例代码如下:
python">import requests
import jsonclass LlamaCppClient:def __init__(self, host="http://localhost", port=8080):self.base_url = f"{host}:{port}"def completion(self, prompt):url = f"{self.base_url}/v1/chat/completions"headers = {"Content-Type": "application/json"}payload = {"messages": [{"role": "system","content": """You are a friendly conversation partner. Be natural, engaging, and helpful in our discussions. Respond to questions clearly and follow the conversation flow naturally."""},{"role": "user","content": prompt}]}try:response = requests.post(url, headers=headers, data=json.dumps(payload))response.raise_for_status()return response.json()except requests.exceptions.RequestException as e:return {"error": str(e)}
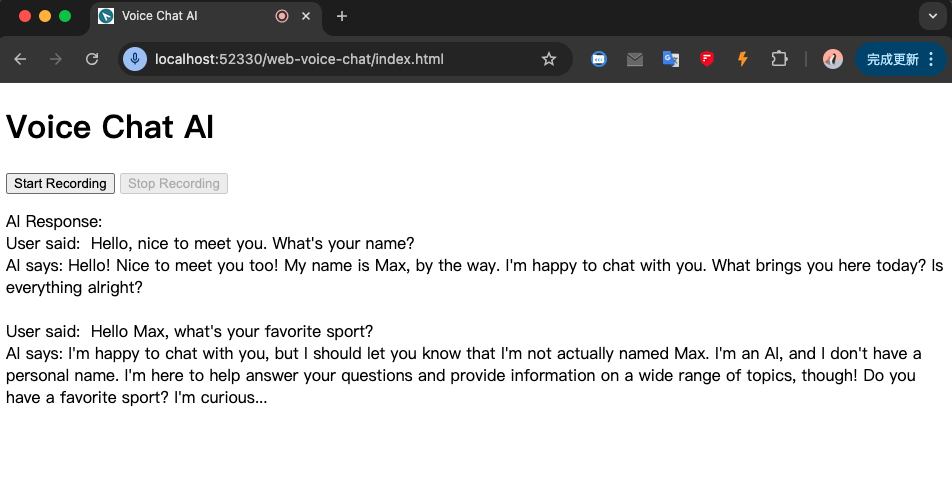
最后,用户与 AI 的聊天结果类似下图:

总结
通过结合 Web 端的语音识别和语音合成功能、Whisper 的语音转文本能力、以及 llama.cpp 提供的 LLM 服务,我们成功构建了一个语音对话系统。语音对话的场景非常丰富,例如口语外教、语音问答等等。希望本文的示例能够为你在构建语音交互式 AI 系统时提供启发。
(我是凌虚,关注我,无广告,专注技术,不煽动情绪,欢迎与我交流)
参考资料:


