1、Web服务器
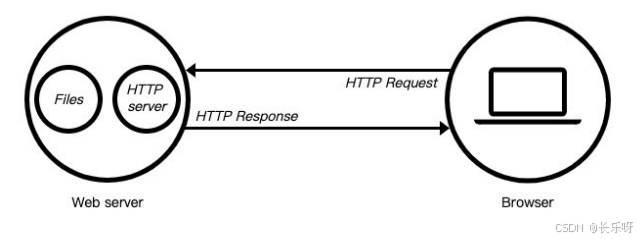
- 什么是Web服务器?
- 当应用程序(客户端)需要某一个资源时,可以向一台服务器,通过Http请求获取到这个资源;
- 提供资源的这个服务器,就是一个Web服务器;

- 目前有很多开源的Web服务器:Nginx、Apache(静态)、Apache Tomcat(静态、动态)、Node.js
2、http模块
2.1、简单使用
- 在Node中,提供web服务器的资源返回给浏览器,主要是通过http模块。
- 我们先简单对它做一个使用:
const http = require('http')// 创建一个http对应的服务器
const server = http.createServer((request, response) => {// request对象包含本次客户端请求的所有信息// 请求url、method、headers、携带的数据// response对象用于给客户端返回结果response.end('hello world')
})// 开启对应的服务器,并且告知需要监听的端口
// 监听端口时,监听1024以上的端口,666536以下的端口
// 1025~666535之间的端口
// 2个字节 =》256*256 =》65536 =》0~65535
server.listen(8000, () => {console.log('服务器已经开启了~');
})
2.2、创建服务器-可以创建多个服务器
- 创建服务器对象,我们是通过 createServer 来完成的
http.createServer会返回服务器的对象;- 底层其实是直接使用
new Server对象创建服务的。
- 那么,我们也可以通过Server来创建服务器对象:
const server2 = new http.Server((req, res) => {res.end('hello server2')
})server2.listen(9000, () => {console.log('服务器2启动成功~');
})
- 上面我们已经看到,创建Server时会传入一个回调函数,这个回调函数在被调用时会传入两个参数:
- req:request请求对象,包含请求相关的信息;
- res:response响应对象,包含我们要发送给客户端的信息;
2.3、监听主机和端口号
- Server通过listen方法来开启服务器,并且在某一个主机和端口上监听网络请求:
- 也就是当我们通过 ip:port的方式发送到我们监听的Web服务器上时;
- 我们就可以对其进行相关的处理;
- listen函数有三个参数:
- 端口port: 可以不传, 系统会默认分配端, 后续项目中我们会写入到环境变量中;
- 主机host: 通常可以传入localhost、ip地址127.0.0.1、或者ip地址0.0.0.0,默认是0.0.0.0;
- localhost:本质上是一个域名,通常情况下会被解析成127.0.0.1;
- 127.0.0.1:回环地址(Loop Back Address),表达的意思其实是我们主机自己发出去的包,直接被自己接收;
✓ 正常的数据库包经常 应用层 - 传输层 - 网络层 - 数据链路层 - 物理层 ;
✓ 而回环地址,是在网络层直接就被获取到了,是不会经常数据链路层和物理层的;
✓ 比如我们监听 127.0.0.1时,在同一个网段下的主机中,通过ip地址是不能访问的;- 0.0.0.0:
✓ 监听IPV4上所有的地址,再根据端口找到不同的应用程序;
✓ 比如我们监听 0.0.0.0时,在同一个网段下的主机中,通过ip地址是可以访问的;
- 回调函数:服务器启动成功时的回调函数;
2.4、开发中使用工具补充
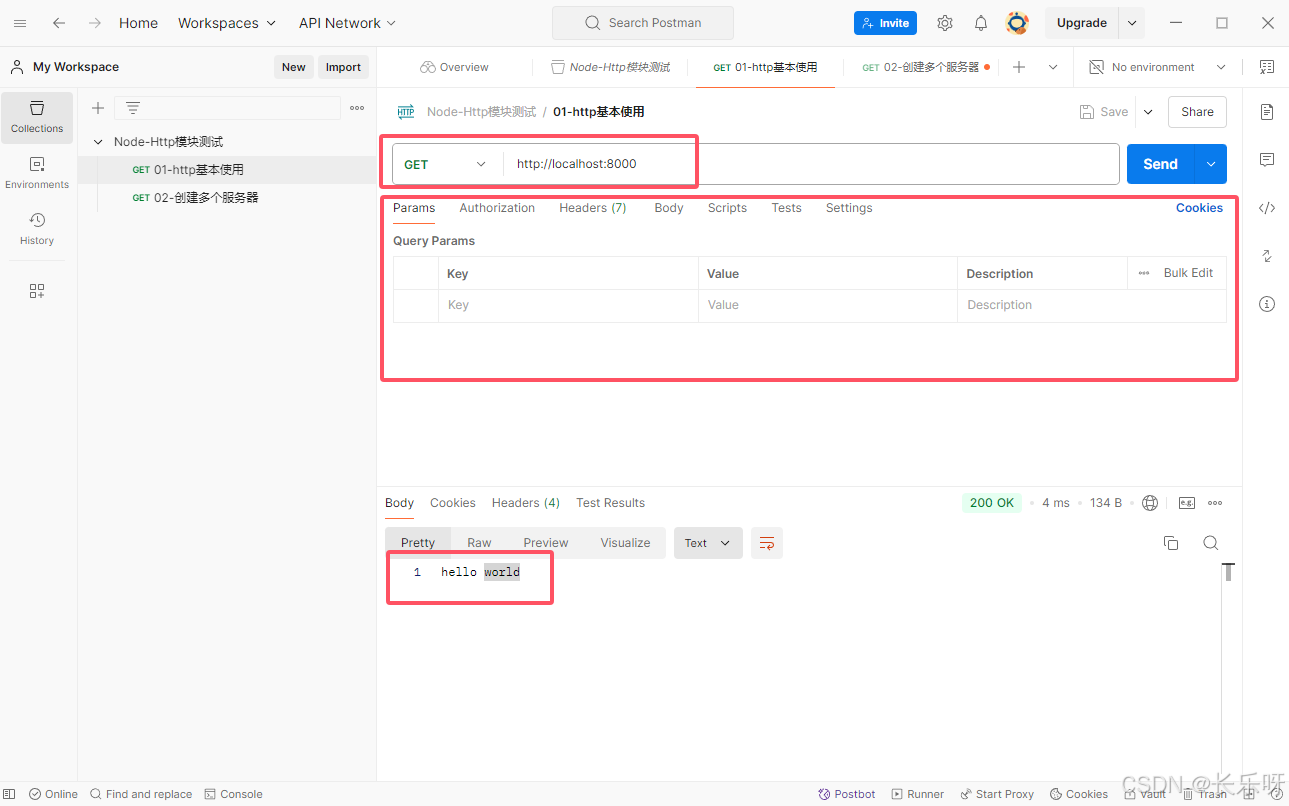
2.4.1、通过postman测试服务器请求
const http = require('http')// 1.创建server服务器
const server = http.createServer((req, res) => {console.log('服务器被访问~')res.end('hello world')
})// 2.开启server服务器
server.listen(8000, () => {console.log('服务器开启成功~')
})

- 通过浏览器访问localhost:8000时,服务器会被访问两次。
原因:
- 一次访问是我们正常访问localhost:8000;
- 一次是浏览器默认会访问localhost:8000/favicon.ico,导致的二次访问。
- 并且通过浏览器测试时,只能测试get请求,所以后续请求都放到postman中测试。
2.4.2、自动重启服务器-nodemon工具包的使用
- 安装(mon:monitor单词的缩写)
# 全局安装
npm i nodemon -g
- 使用:把之前的node命令改成nodemon命令:
nodemon [文件名称]
3、http服务器-request对象
3.1、request对象包含信息
- 在向服务器发送请求时,我们会携带很多信息,比如:
- 本次请求的URL,服务器需要根据不同的URL进行不同的处理;
- 本次请求的请求方式,比如GET、POST请求传入的参数和处理的方式是不同的;
- 本次请求的headers中也会携带一些信息,比如客户端信息、接受数据的格式、支持的编码格式等;
- 等等…
- 这些信息,Node会帮助我们封装到一个request的对象中,我们可以直接来处理这个request对象:
const http = require('http')const server = http.createServer((req, res) => {// request对象中包含哪些信息?// 1.url信息console.log(req.url);// 2.method信息(请求方式)console.log(req.method);// 3.headers信息(请求头信息)console.log(req.headers);res.end('hello world')
})server.listen(8000, () => {console.log('服务器启动成功~');
})
3.2、URL的处理
- 客户端在发送请求时,会请求不同的数据,那么会传入不同的请求地址:
- 比如 http://localhost:8000/login;
- 比如 http://localhost:8000/products;
- 服务器端需要根据不同的请求地址,作出不同的响应:
const http = require('http')const server = http.createServer((req, res) => {const url = req.urlif (url === '/login') {res.end('登录成功')} else if (url === '/products') {res.end('商品列表')}
})server.listen(8000, () => {console.log('服务器启动成功~');
})
3.3、method的处理
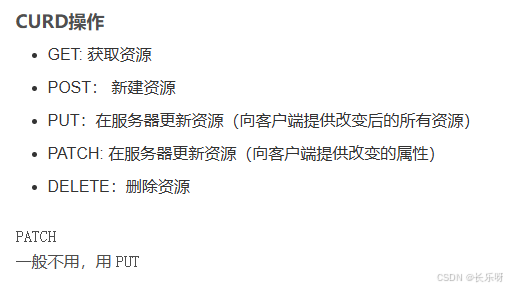
- 在Restful规范(设计风格)中,我们对于数据的增删改查应该通过不同的请求方式:
- GET:查询数据;
- POST:新建数据;
- PATCH:更新数据;
- DELETE:删除数据;

- 所以,我们可以通过判断不同的请求方式进行不同的处理。
- 比如创建一个用户:
- 请求接口为 /users;
- 请求方式为 POST请求;
- 携带数据 username和password;
3.4、request参数解析
3.4.1、解析query参数
- 那么如果用户发送的地址中还携带一些额外的参数呢?
- http://localhost:8000/login?name=why&password=123;
- 这个时候,url的值是 /login?name=why&password=123;
- 我们如何对它进行解析呢?使用内置模块url:
const http = require('http')
const url = require('url')
const qs = require('querystring')const server = http.createServer((req, res) => {// 1.参数一:query类型参数// /home/list?offset=100&size=20// 1.1.解析urlconst urlString = req.urlconst urlInfo = url.parse(urlString)// 1.2.解析query:offset=100&size=20const queryString = urlInfo.queryconst queryInfo = qs.parse(queryString)console.log(queryInfo.offset, queryInfo.size);res.end('hello world')
})server.listen(8000, () => {console.log('服务器启动成功~');
})
3.4.2、解析body参数
- 重点:request对象本质是上一个readable可读流
const http = require('http')const server = http.createServer((req, res) => {// 2.参数一:body类型参数req.setEncoding('utf-8')// request对象本质上是一个readable可读流let isLogin = falsereq.on('data', (data) => {const dataString = dataconst loginInfo = JSON.parse(dataString)if (loginInfo.name === '张三' && loginInfo.password === '666666') {isLogin = true} else {isLogin = false}})req.on('end', () => {if (isLogin) {res.end('登录成功')} else {res.end('登录失败')}})
})server.listen(8000, () => {console.log('服务器启动成功~');
})
3.4.3、Header参数
-
在request对象的header中也包含很多有用的信息,客户端会默认传递过来一些信息:

-
content-type是这次请求携带的数据的类型:
- application/x-www-form-urlencoded:表示数据被编码成以 ‘&’ 分隔的键 - 值对,同时以 ‘=’ 分隔键和值
- application/json:表示是一个json类型;
- text/plain:表示是文本类型;
- application/xml:表示是xml类型;
- multipart/form-data:表示是上传文件;
- content-length:文件的大小长度
- keep-alive:
- http是基于TCP协议的,但是通常在进行一次请求和响应结束后会立刻中断;
- 在http1.0中,如果想要继续保持连接:
✓ 浏览器需要在请求头中添加 connection: keep-alive;
✓ 服务器需要在响应头中添加 connection:keey-alive;
✓ 当客户端再次放请求时,就会使用同一个连接,直接一方中断连接;- 在http1.1中,所有连接默认是 connection: keep-alive的;
✓ 不同的Web服务器会有不同的保持 keep-alive的时间;
✓ Node中默认是5s中;
- accept-encoding:告知服务器,客户端支持的文件压缩格式,比如js文件可以使用gzip编码,对应 .gz文件;
- accept:告知服务器,客户端可接受文件的格式类型;
- user-agent:客户端相关的信息;
const http = require('http')const server = http.createServer((req, res) => {console.log(req.headers);console.log(req.headers['content-type']);const token = req.headers['authorization']console.log(token);res.end('查看headers的信息')
})server.listen(8000, () => {console.log('服务器启动成功~');
})
4、http服务器-response响应对象
4.1、返回响应结果
- 如果我们希望给客户端响应结果数据,可以通过两种方式:
- Write方法:这种方式是直接写出数据,但是并没有关闭流;
- end方法:这种方式是写出最后的数据,并且写出后会关闭流;
const http = require('http')const server = http.createServer((req, res) => {// res:response对象=>Writable可写流// 1、响应数据的方式一:writeres.write('hello world')res.write('哈哈哈哈哈')// 2、响应数据方法二:endres.end('hello world')
})server.listen(8000, () => {console.log('服务器启动成功~');
})
- 如果我们没有调用 end(备注:虽然response是一个可写流,但node内部对response做了处理,不能调用close方法),客户端将会一直等待结果:
- 所以客户端在发送网络请求时,都会设置超时时间。
4.2、返回状态码
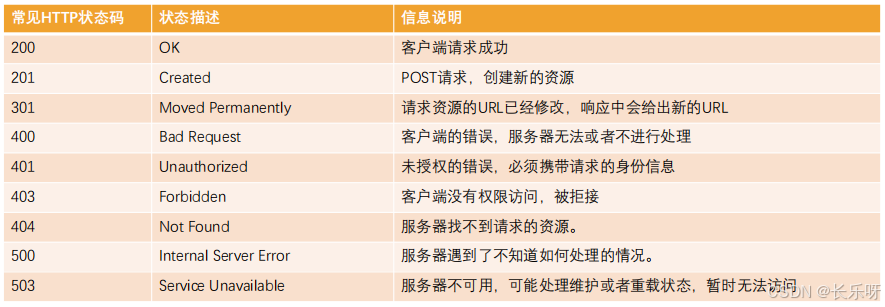
- Http状态码(Http Status Code)是用来表示Http响应状态的数字代码:
- Http状态码非常多,可以根据不同的情况,给客户端返回不同的状态码;
- MDN响应码解析地址:MDN响应码解析地址

const http = require('http')const server = http.createServer((req, res) => {// res:response对象=>Writable可写流// 响应状态码// 1、方式一:statusCode// res.statusCode = 403// 2、方式二:writeHead 响应头res.writeHead(401)res.end('hello world')
})server.listen(8000, () => {console.log('服务器启动成功~');
})
4.3、响应头Header
- 返回头部信息,主要有两种方式:
- res.setHeader:一次写入一个头部信息;
- res.writeHead:同时写入header和status;
const http = require('http')const server = http.createServer((req, res) => {// res:response对象=>Writable可写流// 设置header信息:数据的类型以及数据的编码格式// 1、单独设置某一个header// res.setHeader('Content-Type', 'text/plain;charset=utf8;')// 2、和http status code一起设置res.writeHead(200, {'Content-Type': 'text/plain;charset=utf8;'})const list = [{name: 'a', desc: '111',name: 'b', desc: '222'}]res.end(JSON.stringify(list))
})server.listen(8000, () => {console.log('服务器启动成功~');
})
- Header设置 Content-Type有什么作用呢?
- 默认客户端接收到的是字符串,客户端会按照自己默认的方式进行处理;

5、在node中发送网络请求
5.1、使用http模块发送网络请求
const http = require('http')const server = http.createServer((req, res) => {res.end('hello world')
})server.listen(8000, () => {console.log('服务器启动成功~');
})// 1、使用http模块发送get请求
// http.get('http://localhost:8000', (res) => {
//     // 从可读流中获取数据
//     res.on('data', (data) => {
//         const dataString = data.toString()
//         console.log(dataString, '请求的数据'); // hello world
//     })
// })// 2、使用http模块发送post请求
const req = http.request({method: 'POST',hostname: 'localhost',port: 8000
}, (res) => {res.on('data', (data) => {const dataString = data.toString()console.log(dataString, '请求的数据'); // hello world})
})req.end()
5.2、使用axios库发送网络请求
- axios库可以在浏览器中使用,也可以在Node中使用:
- 在浏览器中,axios使用的是封装xhr;
- 在Node中,使用的是http内置模块;
- 需安装:
npm i axios
const http = require('http')
const axios = require('axios')const server = http.createServer((req, res) => {res.end('hello world')
})server.listen(8000, () => {console.log('服务器启动成功~');
})// 3、使用axios发送网络请求
axios.get('http://localhost:8000').then(res => {console.log(res.data);
})
6、文件上传
6.1、错误的做法
通过这种方式,foo.png图片不能正确的打开,因为里面还包含了其他非图片的信息,如其他参数,boundary等。
const http = require('http')
const fs = require('fs')const server = http.createServer((req, res) => {// 创建writable的streamconst writeStream = fs.createWriteStream('./foo.png', {flags: 'a+'})req.on('data', (data) => {console.log(data);writeStream.write(data)})req.on('end', () => {console.log('数据传输完成');writeStream.close()res.end('文件上传成功~')})
})server.listen(8000, () => {console.log('服务器启动成功~');
})
6.2、正确的做法-通过postman上传文件
备注:看具体的文件上传后的数据,可以在vscode中通过debug查看。
const http = require('http')
const fs = require('fs')const server = http.createServer((req, res) => {req.setEncoding('binary')const boundary = req.headers['content-type'].split('; ')[1].replace('boundary=', '')console.log(boundary);// 客服端传递的数据是表单数据(请求体)let formData = ''let curSize = 0const fileSize = req.headers['content-length']req.on('data', (data) => {formData += data// 获取文件上传进度curSize += data.lengthres.write(`文件上传进度:${curSize/fileSize * 100}%\n`)})req.on('end', () => {// 1、截取从image/jpeg位置开始后面所有的数据const imgType = 'image/jpeg'const imageTypePosition = formData.indexOf(imgType) + imgType.lengthlet imageData = formData.substring(imageTypePosition)// 2、imageData开始位置会有两个空格imageData = imageData.replace(/^\s\s*/, '')// 3、替换最后的boundaryimageData = imageData.substring(0, imageData.indexOf(`--${boundary}--`))// 4、将imageData的数据存储到文件中fs.writeFile('./bar.png', imageData, 'binary', () => {console.log('文件存储成功');res.end('文件上传成功~')})})
})server.listen(8000, () => {console.log('服务器启动成功~');
})
6.3、正确的做法-通过浏览器上传文件
<!DOCTYPE html>
<html lang="en">
<head><meta charset="UTF-8"><meta name="viewport" content="width=device-width, initial-scale=1.0"><title>Document</title>
</head>
<body><input type="file"><button>上传</button><script src="https://cdn.jsdelivr.net/npm/axios/dist/axios.min.js"></script><script>// 文件上传的逻辑const btnDom = document.querySelector('button')btnDom.onclick = function() {// 1、创建表单对象const formData = new FormData()// 2、将选中的图片文件放入表单const inputDom = document.querySelector('input')formData.set('avatar', inputDom.files[0])// 3、发送post请求,将表单数据携带到服务器axios({method: 'post',url: 'http://localhost:8000',data: formData,headers: {'Content-Type': 'multipart/form-data'}})}</script>
</body>
</html>


