《python零基础入门》:python零基础入门学习
《shell》:shell学习
《terraform》持续更新中:terraform_Aws学习零基础入门到最佳实战
《k8》从问题中去学习k8s
《docker学习》暂未更新
《ceph学习》ceph日常问题解决分享
《日志收集》ELK+各种中间件
《linux》运维面试100问
《DBA》db的介绍使用(mysql、redis、mongodb...)
Ansible概述
Ansible是什么
# 介绍 Ansible是一个自动化统一配置管理工具,自动化主要体现在Ansible集成了丰富模块以及功能组件,可以通过一个命令完成一系列的操作,进而能减少重复性的工作和维护成本,可以提高工作效率。 # 主要功能: · 批量命令执行 · 批量安装服务 · 批量配置同步 · 批量任务执行 · 批量代码部署 # 优势及功能 1.远程执行 批量执行远程命令,可以对多台主机进行远程操作 2.配置管理 批量配置软件服务,可以进行自动化方式配置,服务的统一配置管理,和启停 3.事件驱动 通过Ansible的模块,对服务进行不同的事件驱动 比如: 1)修改配置后重启 2)只修改配置文件,不重启 3)修改配置文件后,重新加载 4)远程启停服务管理 4.管理公有云 通过API接口的方式管理公有云,不过这方面做的不如saltstack. saltstack本身可以通过saltcloud管理各大云厂商的云平台。 5.二次开发 因为语法是Python,所以便于运维进行二次开发。 6.任务编排 可以通过playbook的方式来统一管理服务,并且可以使用一条命令,实现一套架构的部署 7.跨平台,跨系统 几乎不受到平台和系统的限制,比如安装apache和启动服务 在Ubuntu上安装apache服务名字叫apache2 在CentOS上安装apache服务名字叫httpd 在CentOS6上启动服务器使用命令:/etc/init.d/nginx start 在CentOS7上启动服务器使用命令:systemctl start nginx # ansible读取顺序 1、$ANSIBLE_CONFIG 2、./ansible.cfg 3、~/.ansible.cfg 4、/etc/ansible/ansible.cfg
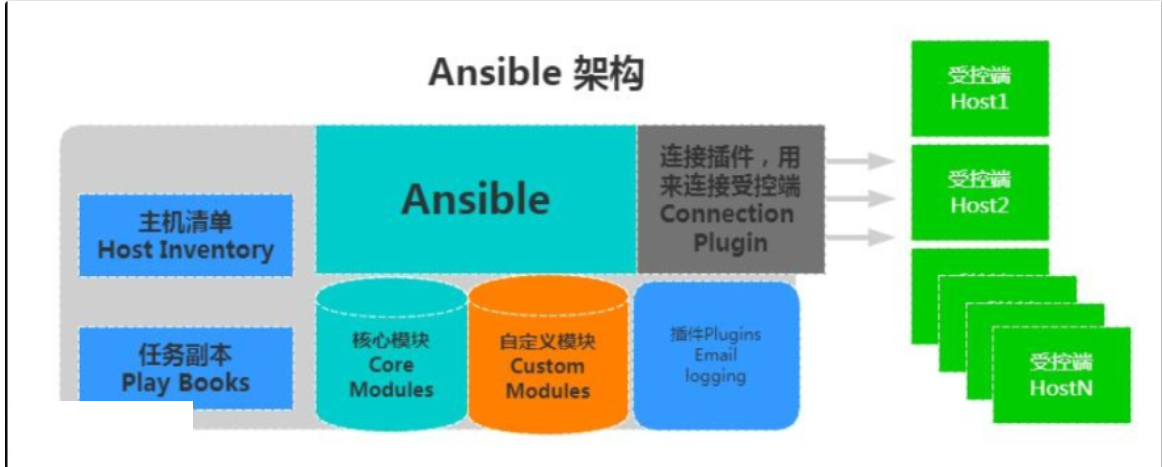
Ansible的架构
# 架构组成
1、连接插件connection plugins用于连接主机 用来连接被管理端
2、核心模块core modules连接主机实现操作, 它依赖于具体的模块来做具体的事情
3、自定义模块custom modules根据自己的需求编写具体的模块
4、插件plugins完成模块功能的补充
5、剧本playbookansible的配置文件,将多个任务定义在剧本中,由ansible自动执行
6、主机清单inventor定义ansible需要操作主机的范围,让ansible知道我都需要维护哪些主机
最重要的一点是 ansible是模块化的 它所有的操作都依赖于模块# ansible执行流程
1.Ansible读取playbook剧本,剧本中会记录对哪些主机执行哪些任务。
2.首先Ansible通过主机清单找到要执行的主机,然后调用具体的模块。
3.其次Ansible会通过连接插件连接对应的主机并推送对应的任务列表。
4.最后被管理的主机会将Ansible发送过来的任务解析为本地Shell命令执行。
Ansible同类型产品优缺点
# 同类产品介绍
1.puppet 学习难,安装ruby环境难,没有远程执行功能
2.ansible 轻量级,大规模环境下只通过ssh会很慢,串行的
3.saltstack 一般选择salt会使用C/S结构的模式,salt-master和salt-minion,并行的,大规模批量操作的情况下,会比Ansible速度快一些,底层使用的是zero-MQ消协队列# 面试提问:你们公司使用什么自动化运维工具
可针对saltstack和ansible做比较,两者各有优缺点
· 如saltstack不需要依赖ssh服务,当ssh服务停止,远程无法连接至服务器,还可通过saltstack对ssh服务启动,但需要依赖客户端,每台客户端中都需要安装saltstack,emmmmm也不绝对,比如saltstack安装时仅安装salt-ssh就和ansible一样支持ssh服务(这种方式很少使用,一般都是C/S结构),这样就不需要进行客户端安装。
· ansible不需要依赖客户端,但依赖ssh服务,一旦ssh服务停止,那么ansible也无法使用,并且修改任何相关文件,ansible也不需要启动任何服务,即改及用。
同类型产品saltstack介绍
# 注意:saltstack三个重要组成· salt-master 服务端安装· alt-minion 客户端安装· salt-ssh 使saltstack不需要依赖客户端,依赖ssh服务,和ansible一样# 1.安装服务端和客户端
[root@m01 ~]# yum install -y salt-master salt-minion# 2.客户端
[root@web01 ~]# yum install -y  salt-minion# 3.修改客户端的配置文件(客户端指定服务端ip)
[root@web01 ~]# vim /etc/salt/minion
master: 10.0.0.61
[root@m01 ~]# vim /etc/salt/minion
master: 10.0.0.61# 4.启动服务端,再启动客户端
[root@m01 ~]# systemctl start salt-master salt-minion
[root@web01 ~]# systemctl start salt-minion# 认证key
[root@m01 ~]# salt-key
Accepted Keys:
Denied Keys:
Unaccepted Keys:
m01
web01
Rejected Keys:### 认证1个key
[root@m01 ~]# salt-key -a web01
### 全部认证
[root@m01 ~]# salt-key -A# salt使用方法
## ping认证主机,*代表所有认证主机
[root@m01 ~]# salt '*' test.ping## 对所有认证主机执行创建文件操作
[root@m01 ~]# salt '*' cmd.run 'touch /root/zls123_456.txt'# 简单模块介绍
test
cmd
service
Ansible安装及主配置文件介绍
# 1.ansible使用必须具备epel源
[root@m01 ~]# wget -O /etc/yum.repos.d/epel.repo http://mirrors.aliyun.com/repo/epel-7.repo# 2.安装ansible
[root@m01 ~]# yum install -y ansible# 3.ansible配置文件介绍(一般只需要开启跳过检查主机指纹,其他按照默认即可)
[root@m01 ~]# cat /etc/ansible/ansible.cfg
#inventory      = /etc/ansible/hosts      #主机列表配置文件
#library        = /usr/share/my_modules/  #库文件存放目录
#remote_tmp     = ~/.ansible/tmp          #临时py文件存放在远程主机目录
#local_tmp      = ~/.ansible/tmp          #本机的临时执行目录
#forks          = 5                       #默认并发数
#sudo_user      = root                    #默认sudo用户
#ask_sudo_pass = True                     #每次执行是否询问sudo的ssh密码
#ask_pass      = True                     #每次执行是否询问ssh密码
#remote_port    = 22                      #远程主机端口
host_key_checking = False                 #跳过检查主机指纹(首次通过ssh服务连接,false为跳过)
log_path = /var/log/ansible.log           #ansible日志# 4.查看Ansible版本及模块路径
[root@m01 ~]# ansible --version
ansible 2.9.9config file = /etc/ansible/ansible.cfgconfigured module search path = [u'/root/.ansible/plugins/modules', u'/usr/share/ansible/plugins/modules']ansible python module location = /usr/lib/python2.7/site-packages/ansibleexecutable location = /usr/bin/ansiblepython version = 2.7.5 (default, Oct 30 2018, 23:45:53) [GCC 4.8.5 20150623 (Red Hat 4.8.5-36)]
Ansible Inventory
# ansible inventory 主机清单介绍
/etc/ansible/hosts是ansible默认主机资产清单文件,用于定义被管理主机的认证信息, 例如ssh登录用户名、密码以及key相关信息。Inventory文件中填写需要被管理的主机与主机组信息。还可以自定义Inventory主机清单的位置,使用-i指定文件位置即可。建议使用方式:场景三:主机组变量+主机+密钥
场景一:基于密码连接
[root@m01 ~]# cat /etc/ansible/hosts
建议:不要使用#方式一、IP+端口+用户+密码
[webs]
10.0.0.7 ansible_ssh_port=22 ansible_ssh_user=root ansible_ssh_pass='1'
10.0.0.8 ansible_ssh_port=22 ansible_ssh_user=root ansible_ssh_pass='1'#方式二、主机名+密码,此方式需要在/etc/hosts文件中写入web01和web02的对应ip地址信息
。。。。解释一下:下方web0[1:2]代表两个主机名web01和web02
[webs]
web0[1:2] ansible_ssh_pass='123456'#方式三、主机+端口+密码
[webs]
web0[1:2]
[webs:vars]
ansible_ssh_pass='123456'[root@m01 ~]# ansible webs -m ping -i ./hosts
10.0.0.8 | SUCCESS => {"ansible_facts": {"discovered_interpreter_python": "/usr/bin/python"},"changed": false,"ping": "pong"
}
10.0.0.7 | SUCCESS => {"ansible_facts": {"discovered_interpreter_python": "/usr/bin/python"},"changed": false,"ping": "pong"
}
场景二:基于密钥连接,需要先创建公钥和私钥,并下发公钥至被控端
#创建秘钥对
[root@m01 ~]# ssh-keygen#推送公钥
[root@m01 ~]# ssh--id -i ~/.ssh/id_rsa.pub root@172.16.1.7
[root@m01 ~]# ssh--id -i ~/.ssh/id_rsa.pub root@172.16.1.8
#方式一、主机+端口+密钥
[webs]
10.0.0.7:22
10.0.0.8[root@m01 ~]# ansible webs -m ping -i ./hosts
10.0.0.8 | SUCCESS => {"ansible_facts": {"discovered_interpreter_python": "/usr/bin/python"},"changed": false,"ping": "pong"
}
10.0.0.7 | SUCCESS => {"ansible_facts": {"discovered_interpreter_python": "/usr/bin/python"},"changed": false,"ping": "pong"
}#方式二、别名+主机+端口+密钥
[webs]
web01 ansible_ssh_host=10.0.0.7 ansible_ssh_port=22
web02 ansible_ssh_host=10.0.0.8[root@m01 ~]# ansible webs -m ping -i ./hosts
web02 | SUCCESS => {"ansible_facts": {"discovered_interpreter_python": "/usr/bin/python"},"changed": false,"ping": "pong"
}
web01 | SUCCESS => {"ansible_facts": {"discovered_interpreter_python": "/usr/bin/python"},"changed": false,"ping": "pong"
}
场景三:主机组使用方式
[root@m01 ~]# vim hosts
[db_group]
db01 ansible_ssh_host=10.0.0.51
db02 ansible_ssh_host=10.0.0.52[web_group]
web01 ansible_ssh_host=10.0.0.7
web02 ansible_ssh_host=10.0.0.8#查看指定组内主机数量
[root@m01 ~]# ansible web_group -m ping -i ./hosts  --list-hosthosts (2):web01web02[root@m01 ~]# ansible db_group -m ping -i ./hosts  --list-hosthosts (2):db01db02#方式一、主机组变量+主机+密码
[db_group]
db01 ansible_ssh_host=10.0.0.51
db02 ansible_ssh_host=10.0.0.52
[db_group:vars]
ansible_ssh_pass='1'#方式二、主机组变量+主机+密钥
[web_group]
web01 ansible_ssh_host=10.0.0.7
web02 ansible_ssh_host=10.0.0.8#定义多组,多组汇总整合
# lnmp组包括两个子组[db,web]
[lnmp:children]
db_group
web_group#最终配置文件
[root@m01 ~]# cat hosts
[db_group]
db01 ansible_ssh_host=10.0.0.51
db02 ansible_ssh_host=10.0.0.52[web_group]
web01 ansible_ssh_host=10.0.0.7
web02 ansible_ssh_host=10.0.0.8[lnmp:children]
db_group
web_group#查看多组
[root@m01 ~]# ansible all -m ping -i ./hosts  --list-hosthosts (4):db01db02web01web02
[root@m01 ~]# ansible lnmp -m ping -i ./hosts  --list-hosthosts (4):db01db02web01web02
ansible 的 ad-hoc(临时命令)
-
ad-hoc简而言之就是“临时命令”,执行完即结束,并不会保存
## ansible的选项
-m:指定模块
-a:指定动作
-i: 指定主机清单

# 查看指定模块帮助(输入后按EXAMPLE查找案例操作)
ansible-doc 模块名# 查看web_group组内对应主机
[root@m01 ~]# ansible web_group --list-host# 临时命令返回颜色指南:
绿色:被控端,主机没有发生更改
黄色:被控端,主机发生变更
粉色:ansible发出警告
红色:报错
模块
-
command
## 作用:执行系统命令
但是,不认识管道符等一些特殊字符
使用shell取代
-
shell
# 功能强大,很多命令都支持,但是不建议使用,不同功能用不同模块,必须cp可以用shell模块实现,但建议使用指定cp模块
[root@m01 ~]# ansible web01 -m shell -a 'df -h'
-
script
# 可使用管理端的脚本,直接对被管理端生效,无需将脚本复制到到被管理端,比如:客户端有100来台,只需将脚本保存在管理端,在管理端执行脚本,客户端都能受用。
[root@m01 ~]# ansible web01 -m script -a '/root/a.sh'
-
yum
# yum update -y nfs-utils
ansible web_group -m yum -a 'name=nfs-utils state=latest'# yum install -y net-tools
[root@m01 ~]# ansible web_group -m yum -a 'name=net-tools state=present'# yum remove -y tree
[root@m01 ~]# ansible web_group -m yum -a 'name=tree state=absent'# yum 指定网络的rpm包
yum install -y https://mirrors.aliyun.com/zabbix/zabbix/4.4/rhel/7/x86_64/zabbix-agent-4.4.4-1.el7.x86_64.rpm
[root@m01 ~]# ansible web_group -m yum -a 'name=https://mirrors.aliyun.com/zabbix/zabbix/4.4/rhel/7/x86_64/zabbix-agent-4.4.4-1.el7.x86_64.rpm state=present'# yum localinstall -y nginx-1.18.0-1.el7.ngx.x86_64.rpm
[root@m01 ~]# ansible backup -m yum -a 'name=/root/nginx-1.18.0-1.el7.ngx.x86_64.rpm state=present'## 掌握的方法:
name:指定服务名:yum install -y tree指定网络包:yum install -y https://mirrors.aliyun.com/zabbix/zabbix/4.4/rhel/7/x86_64/zabbix-agent-4.4.4-1.el7.x86_64.rpm指定本地包:yum local install -y nginx-1.18.0-1.el7.ngx.x86_64.rpmstate:present:正经安装absent:删除,卸载latest:安装最新版本
-
yum_repository
##添加yum仓库
[root@m01 ~]# ansible web_group -m yum_repository -a 'name=zls description=xxx baseurl=http://www.baidu.com gpgcheck=no enabled=yes'## 文件名跟仓库名不一样
[root@m01 ~]# ansible web_group -m yum_repository -a 'file=nginx name=zls description=xxx baseurl=http://www.baidu.com gpgcheck=no enabled=yes'## 删除yum仓库
[root@m01 ~]# ansible web_group -m yum_repository -a 'file=nginx name=zls state=absent'## 往同一个文件中添加不同的仓库
[root@m01 ~]# ansible web_group -m yum_repository -a 'file=zls name=zls2 description=ooo baseurl=http://www.google.com gpgcheck=no enabled=yes'#开起gpgcheck
[root@m01 ~]# ansible web_group -m yum_repository -a 'name=zls_epel description=EPEL file=test_zls baseurl=https://download.fedoraproject.org/pub/base/$releasever/$basearch/ gpgcheck=yes gpgkey=http://mirrors.aliyun.com/centos/RPM-GPG-KEY-CentOS-7' -i ./hosts## 掌握的方法:
name:指定仓库名字
state:present 创建absent 删除
file:指定文件名字
baseurl:指定镜像源
description:指定描述(repo文件中的name)
gpgcheck:秘钥检查yes:开启no:关闭
enabled:是否开启仓库yes:开启no:关闭
案例操作:
要求
通过61机器,给所有其他机器,添加nginx官方源。安装nginx
环境准备
| 主机名 | 外网ip | 角色 |
|---|---|---|
| m01 | 10.0.0.61 | 管理端 |
| web01 | 10.0.0.7 | 被管理端 |
| web02 | 10.0.0.8 | 被管理端 |
操作流程
1.安装ansible
# 1.修改epel源
[root@m01 ~]# wget -O /etc/yum.repos.d/epel.repo http://mirrors.aliyun.com/repo/epel-7.repo# 2.安装ansible
[root@m01 /]# yum install -y ansible
2.秘钥创建分发
# 1.在管理端生成密钥对
[root@m01 ~]# ssh-keygen# 2.将公钥发送到web01和web02
[root@m01 /]# ssh--id -i ~/.ssh/id_rsa.pub root@10.0.0.7
[root@m01 /]# ssh--id -i ~/.ssh/id_rsa.pub root@10.0.0.8
3.书写inventory(主机清单)
[root@m01 /]# vim /etc/ansible/hosts
[web]
web01 ansible_ssh_host=10.0.0.7 ansible_ssh_port=22
web02 ansible_ssh_host=10.0.0.8 ansible_ssh_port=22# 查看web组内有哪些主机
[root@m01 /]# ansible web --list-hosthosts (2):web01web02
4.添加nginx官方yum源
# 指定模块yum_repository,指定nginx源到web主机文件名为nginx,指定仓库名为nginx,指定注释信息为666,baseurl源,开启gpgcheck,开启yum源# 1.在管理机中批量创建repo文件,file就算不指定.repo结尾,默认也会自动帮忙加上.repo结尾
[root@m01 /]# ansible web -m yum_repository -a 'file=nginx.repo name=nginx description=666 baseurl=http://nginx.org/packages/centos/$releasever/$basearch/ gpgcheck=yes gpgkey=https://nginx.org/keys/nginx_signing.key enabled=yes'
web01 | CHANGED => {"ansible_facts": {"discovered_interpreter_python": "/usr/bin/python"}, "changed": true, "repo": "nginx", "state": "present"
}
web02 | CHANGED => {"ansible_facts": {"discovered_interpreter_python": "/usr/bin/python"}, "changed": true, "repo": "nginx", "state": "present"
}# 2.查看web主机中是否成功推送
[root@web01 yum.repos.d]# ll
total 12
-rw-r--r--. 1 root root 1913 May 27 23:54 CentOS-Base.repo
-rw-r--r--. 1 root root  664 May 11  2018 epel.repo
-rw-r--r--  1 root root  161 Jun  9 01:04 nginx.repo.repo
[root@web01 yum.repos.d]# cat nginx.repo.repo
[nginx]
baseurl = http://nginx.org/packages/centos/$releasever/$basearch/
enabled = 1
gpgcheck = 1
gpgkey = https://nginx.org/keys/nginx_signing.key
name = 666
[root@web02 yum.repos.d]# ll
total 12
-rw-r--r--. 1 root root 1913 May 27 23:54 CentOS-Base.repo
-rw-r--r--. 1 root root  664 May 11  2018 epel.repo
-rw-r--r--  1 root root  161 Jun  9 01:04 nginx.repo.repo
5.批量安装nginx
# 1.管理端批量对web安装nginx
[root@m01 ~]# ansible web -m yum -a 'name=nginx state=present'# 2.客户端检查是否安装
[root@m01 ~]# ansible web -m shell -a 'rpm -qa|grep nginx'
[WARNING]: Consider using the yum, dnf or zypper module rather than running 'rpm'.  If you need to use command because yum, dnf or zypper is insufficient you can add 'warn: false' to this command task
or set 'command_warnings=False' in ansible.cfg to get rid of this message.
web01 | CHANGED | rc=0 >>
nginx-1.18.0-1.el7.ngx.x86_64
web02 | CHANGED | rc=0 >>
nginx-1.18.0-1.el7.ngx.x86_64