个人主页:点我进入主页
专栏分类:C语言初阶 C语言进阶 数据结构初阶 Linux C++初阶 算法 C++进阶
欢迎大家点赞,评论,收藏。
一起努力,一起奔赴大厂
一.背景知识
1.1重谈地址空间
先看看地址空间的样子:
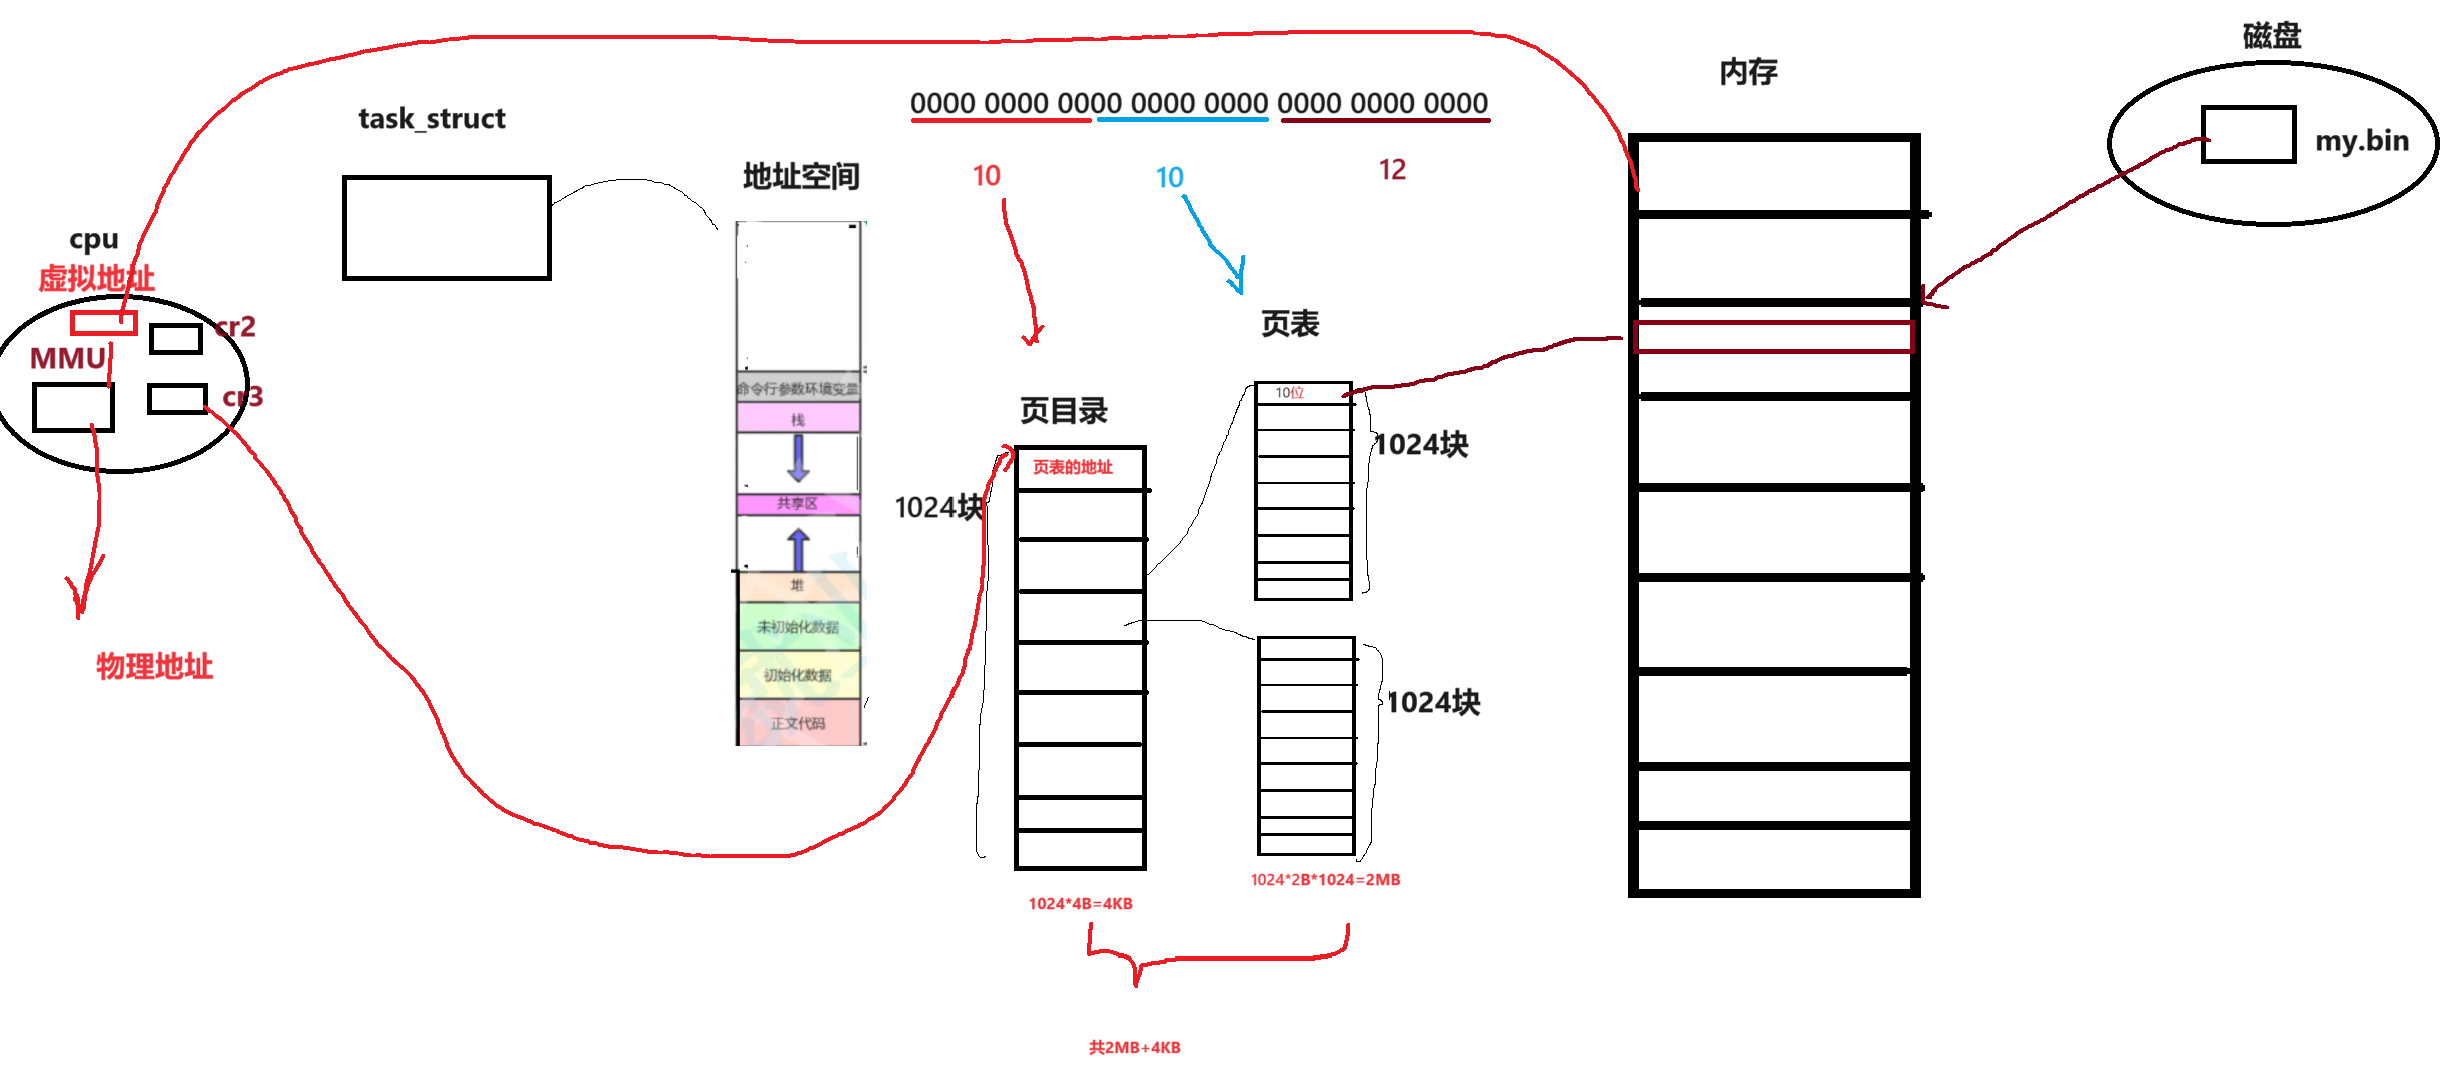
在操作系统中,内存不是以字节为单位,而是被分为很多块,每块的大小是**4kb,4kb?磁盘中的文件进行IO的基本单位就是4kb(8个扇区),操作系统是4G, 被分成(102410244/4=2^20)块。在操作系统中者知识巧合吗?显然不是,操作系统是被精心设计过的,例如在磁盘中,我们将一个可执行程序加载到内存中,它就是将每一个4kb分别加载到内存中的4kb中。在比如父子进程中 ,进行写时拷贝时拷贝的基本单位就是4kb,它不是一个字节一个字节的拷贝,这还和局部性原理有关**,因为当修改数据时,这个数据的附近数据也有很大的概率被修改。在物理内存中的一个内存块和磁盘中的一个4kb块被称为页框或者页帧。对于页表,真的是简单的一个框吗?我们以32位为例,共有4G个地址,如果每个地址都进行映射的话共有需要4G*9=36G,操作系统给的内存一般是4G,这显然是不够的,那是如何设计的呢?地址的高10位被制作为页目录,它里面存放的是页表的地址,共2^10=1024个,占10244B=4KB,页表共1024个,每个页表里存放的是次高10位,共占10241024*2B=2MB这就是页表的结构,共占2MB+4KB,在cpu中存在一个cr3寄存器来储存页目录的地址,也目录和页表共2^20次啊,刚好可以找到内存的每一个4kb的起始位置,每个4kb里又进行0-4095进行编号,而剩下的12位也刚好4096个,所以通过页目录和页表再通过低12位,可以找到内存的虚拟地址,再根据cpu中的MMU寄存器就可以找到物理地址。
1.2理解代码数据划分的本质
在地址空间中的正文部分,它限定了一批新的虚拟地址的范围。每一个函数都有自己对应的地址即使代码没有运行,函数就是连续的代码地址构成的代码块,一个函数对应一批虚拟地址。例如20个函数,就会将正文部分进行拆分位20块,同时它们也会拆分页表。
二.线程的概念
2.1Linux线程的实现
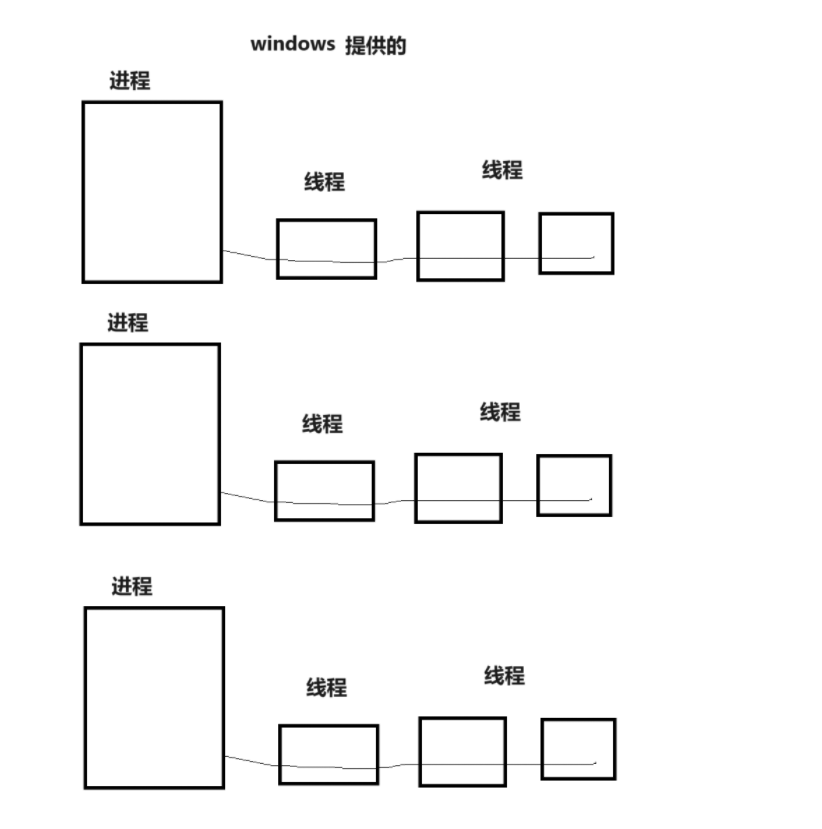
操作系统单独设计线程需要设计它的创建,销毁,调度,创建线程后 也需要对线程进行管理,先描述在组织。在windows中单独设计了一个线程,一个进程可以管理多个线程,它大概如下:
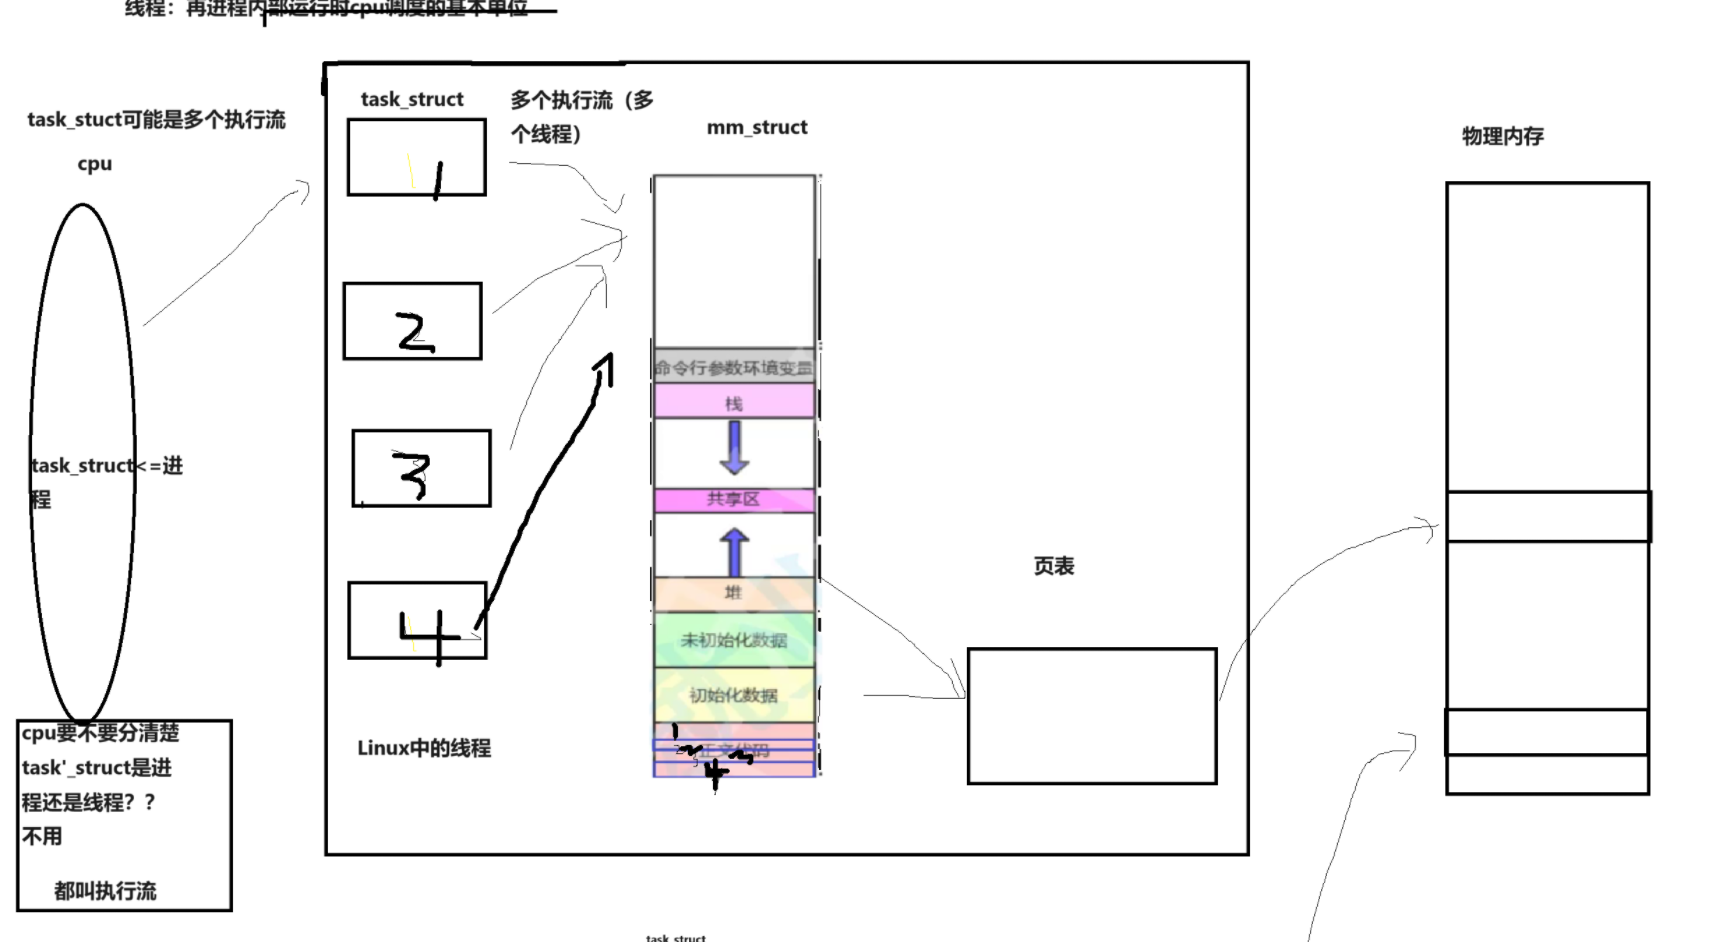
设计线程需要有对应的属性,线程的pid,优先级,上下文等,而进程也是有这些属性。Linux就是想要复用进程来模拟线程,这个线程就被称为轻量级进程。线程是进程内部调度cpu的基本单位。进程=内核数据结构+代码和数据,在内核中我们重新定义进程,进程是操作系统中承担分配系统资源的实体。。
2.2见一见线程(pthread_create)
线程创建的接口为:
int pthread_create(pthread_t *thread, const pthread_attr_t *attr,void *(*start_routine) (void *), void *arg);
一个个参数是pthread_t *类型的指针,是自己创建的,第二个参数我们不关心设置为空,第三个参数是一个函数指针,低四个参数是函数指针的参数。看下面代码是创建线程:
#include <iostream>
#include <string>
#include <unistd.h>
#include <pthread.h>void* threadStart(void*args)
{std::string name=static_cast<const char*>(args);while(true){std::cout<<"my name is "<<name<<std::endl;sleep(1);}
}
int main()
{pthread_t tid;pthread_create(&tid,nullptr,threadStart,(void *)"thread-1");//主线程while(true){std::cout<<"main thread running...."<<std::endl;sleep(1);}return 0;
}
由于查看的是线程,不是进程,所以需要使用指令:
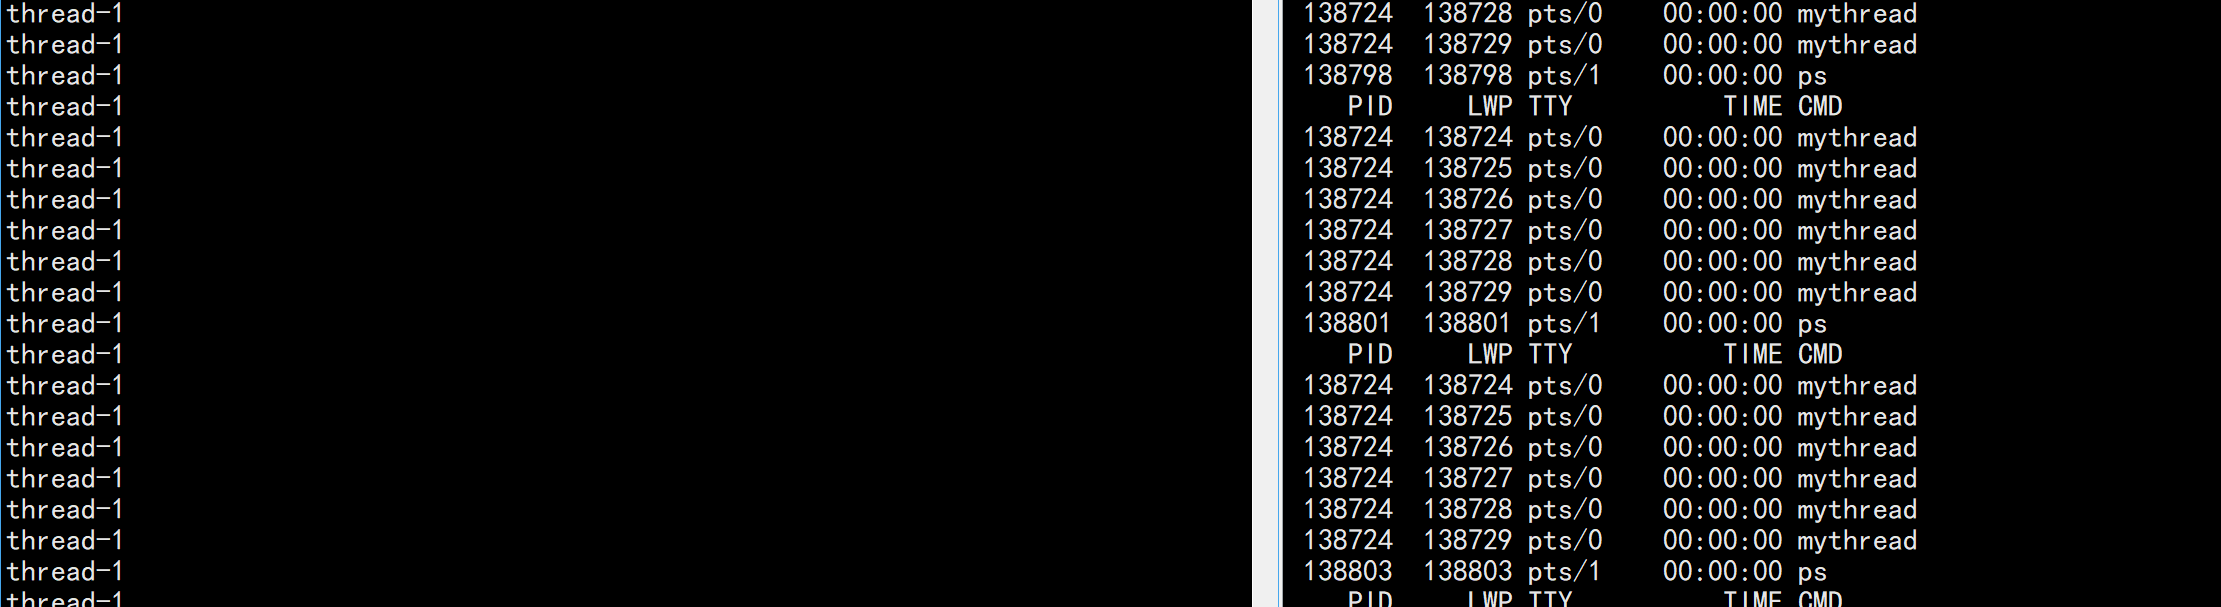
ps -aL
查看线程。代码运行结果如下:
针对这张表:
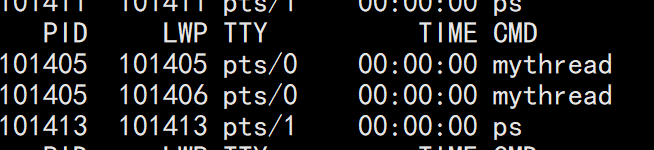
其中PID是一样的,这是因为只有一个进程,一个主线程和新线程都是这个进程中的,区分它们是通过LWP(轻量级进程)来区分的。
2.3已经有了多进程为什么还有多线程
这是因为进程创建销毁调度的成本高,每一步都需要对task_struct,地址空间,页表进行操作,而线程只需要对task_struct进程操作。那我为什么还要有多进程?这就和多线程本身有关,当一个进程异常返回时,这个进程就会返回,这就导致进程的健壮性不好。所以多线程和多进程都不可以互相替代,
2.4线程调度成本低,为什么???

这和硬件有关,cpu中有一个cache寄存器,他会缓存进程的热数据,当进程切换时这个些热数据都没有用处,需要全部替换,但是在线程切换时,由于数据是共享的,热数据就不需要替换,所以线程调度的成本低。
2.5线程私有的
线程既有公共的部分,也有私有的部分,其中最重要的就是私有部分中的两个:
- 一组寄存器 (线程切换时,保存线程的上下文)
- 栈区(线程运行时会形成临时变量,这些临时变量会保存到资金的栈区)
三.线程控制
3.1谈谈 g++ -o $@ $^ -std=c++11 -lpthread
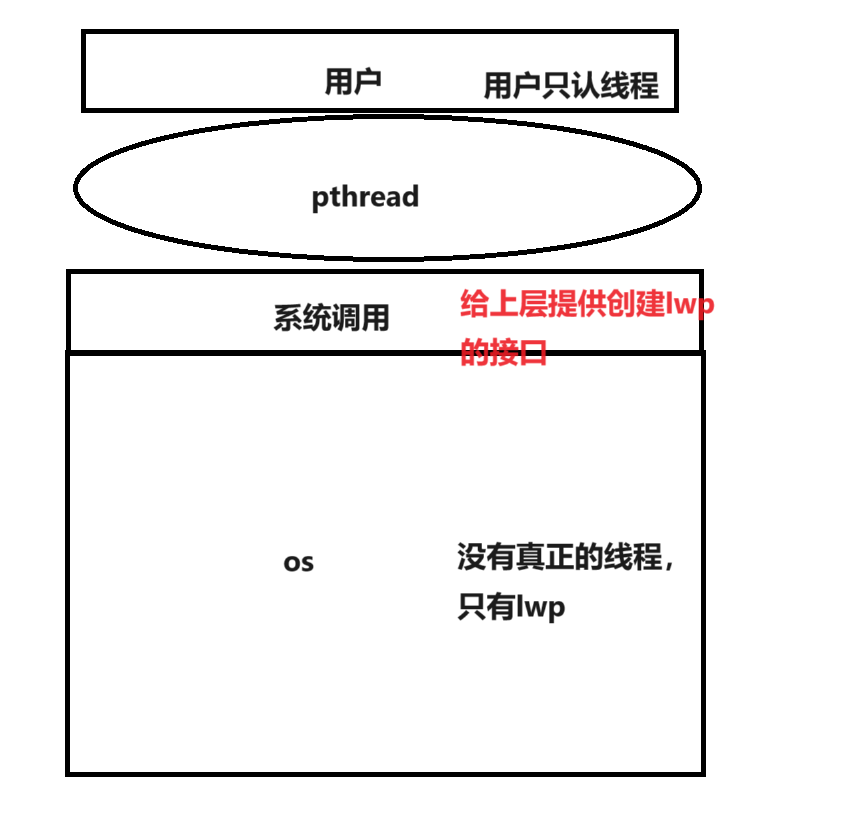
Linux操作系统中没有真正的线程,上层用户只认线程,但是操作系统只有轻量级进程,所以给出的系统调用只能对轻量级进程操作,所以需要pthread库,pthread库是操作系统自带的原生的动态库,我们使用时需要连接这个库。
3.2线程等待(pthread_join)
和进程一样,父进程需要等待子进程的退出,线程也是,需要主线等待新线程的退出,这需要系统调用:
int pthread_join(pthread_t thread, void **retval);
第一个参数是线程的id,第二个参数是返回值,不关心就为nullptr,关信就需要这个,
3.3八个问题
3.3.1 main线程和new线程哪一个先运行
并不知道,和父子进程一样,不确定。
3.3.2 我们希望谁最后退出?
当然是希望main线程最后退出。由于主线程退了,所有的线程都会退出,那些在主线程退出时没有退出的线程就会进入到类似于僵尸进程的状态,所以main线程需要对新线程进行等待,
看代码:
#include <iostream>
#include <string>
#include <unistd.h>
#include <pthread.h>void* threadStart(void*args)
{std::string name=static_cast<const char*>(args);int cur=10;while(cur){std::cout<<"my name is "<<name<<" cur: "<<cur<<std::endl;cur--;sleep(1);}std::cout<<name<<" quit..."<<std::endl;return nullptr;
}
int main()
{pthread_t tid;pthread_create(&tid,nullptr,threadStart,(void *)"thread-1");//主线程int n=pthread_join(tid,nullptr);if(n==0){std::cout<<"main thread wait success..."<<std::endl;}return 0;
}
代码运行结果如下:

3.3.3如何看待线程传入的参数
再次看看创建线程的系统调用:
int pthread_create(pthread_t *thread, const pthread_attr_t *attr,void *(*start_routine) (void *), void *arg);
它传入的参数类型是void*类型这是一个地址,既然是地址,可以传变量,类,函数等类型在这里我传一个变量为例,看代码:
#include <iostream>
#include <string>
#include <unistd.h>
#include <pthread.h>int gnum=1;
void* threadStart(void*args)
{int num=*(int*)args;std::cout<<num<<std::endl;return nullptr;
}int main()
{pthread_t tid;pthread_create(&tid,nullptr,threadStart,(void *)&gnum);//主线程int n=pthread_join(tid,nullptr);if(n==0){std::cout<<"main thread wait success..."<<std::endl;}return 0;
}
结果如下:

3.3.4如何看待线程函数的返回
3.3.4.1异常返回
给子进程一个野指针访问,看代码:
#include <iostream>
#include <string>
#include <unistd.h>
#include <pthread.h>void *threadStart(void *args)
{int *p=nullptr;*p=1;return nullptr;
}
int main()
{pthread_t tid;pthread_create(&tid, nullptr, threadStart, nullptr);// 主线程int n = pthread_join(tid, nullptr);if (n == 0){std::cout << "main thread wait success..." << std::endl;}return 0;
}
看看结果:

线程直接结束了,这是因为出现异常,会给进程发送信号,直接让进程结束了,所以我们看待线程的返回时只看待正确返回。
3.3.4.2线程的返回
直接看代码:
#include <iostream>
#include <string>
#include <unistd.h>
#include <pthread.h>class ThreadData
{
public:ThreadData(const std::string &name, int x, int y): _name(name), _x(x), _y(y){}int Sum(){return _x + _y;}std::string print(){return std::to_string(_x) + " " + "+ " + std::to_string(_y);}public:std::string _name;int _x;int _y;
};
class Data
{
public:std::string print(){return std::to_string(_x) + " " + "+ " + std::to_string(_y) + " " + "= " + std::to_string(_result);}public:int _x;int _y;int _result;
};void *threadStart(void *args)
{ThreadData *t = static_cast<ThreadData *>(args);Data *d = new Data;d->_x = t->_x;d->_y = t->_y;d->_result = t->Sum();std::cout << t->_name << ", " << t->print() << " = " << t->Sum() << std::endl;return (void *)d;
}
int main()
{ThreadData t("thread-1", 10, 20);pthread_t tid;pthread_create(&tid, nullptr, threadStart, (void *)&t);// 主线程Data *d;int n = pthread_join(tid, (void **)&d);if (n == 0){std::cout << "main thread wait success..." << std::endl;std::cout << d->print() << std::endl;}return 0;
}
运行结果如下:

成功等待。
3.3.5 创建多线程
#include <iostream>
#include <string>
#include <unistd.h>
#include <pthread.h>
#include <vector>void *threadStart(void *args)
{while(true){char *name = (char *)args;std::cout << name << " runing..." << std::endl;sleep(1);   }return nullptr;
}
int main()
{std::vector<pthread_t> tids;for (int i = 0; i < 5; i++){pthread_t tid;char name[128];sprintf(name, "thread-%d", i + 1);pthread_create(&tid, nullptr, threadStart, (void *)name);tids.emplace_back(tid);}// 主线程sleep(100);return 0;
}
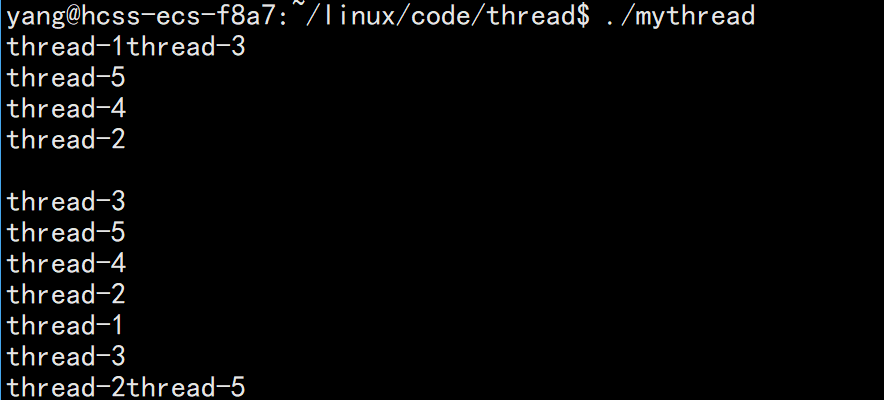
运行结果如下:
可以看到线程进行输出时1,2,3,4这几个线程几乎没有出现过,这是由于name在创建时使用的的时一份资源,后面会覆盖,导致name会被覆盖,如何解决呢?在name创建时使用new
char* name=new char(128);
运行结果如下:
3.3.6线程终止(pthread_cancel)
- return返回
- 线程取消
- pthread_exit()
注意exit不可以,由于exit是对进进程发送信号,所以会导致进程退出,所有的线程退出。
线程取消的系统调用:
int pthread_cancel(pthread_t thread);
线程取消既可以自己取消自己,但是一般是让main线程取消新线程,代码如下:
#include <iostream>
#include <string>
#include <unistd.h>
#include <pthread.h>
#include <vector>void *threadStart(void *args)
{while(true){char *name = (char *)args;std::cout << name << " runing..." << std::endl;sleep(1);   }return nullptr;
}
int main()
{std::vector<pthread_t> tids;for (int i = 0; i < 5; i++){pthread_t tid;char* name=new char(128);sprintf(name, "thread-%d", i + 1);pthread_create(&tid, nullptr, threadStart, (void *)name);tids.emplace_back(tid);}// 主线程sleep(2);for(auto& tid:tids){pthread_cancel(tid);std::cout<<"cancel: "<<tid<<std::endl;pthread_join(tid,nullptr);}sleep(100);return 0;
}
结果如下:

3.3.7线程分离(pthread_detach)
int pthread_detach(pthread_t thread);
pthread_t pthread_self(void);
3.3.8 tid
3.3.8.1线程控制块
tid是什么?是lwp吗?我们看看:
代码如下:
#include <iostream>
#include <string>
#include <unistd.h>
#include <pthread.h>
#include <vector>void*threadStart(void*args)
{pthread_t tid=pthread_self();while(true){std::cout<<"my tid: "<<tid<<std::endl;sleep(1); }return nullptr;
}
int main()
{pthread_t tid;pthread_create(&tid,nullptr,threadStart,nullptr);sleep(100);return 0;
}
结果如下:

显然不是,实际上tid是一个地址 。我们先理解一下库:
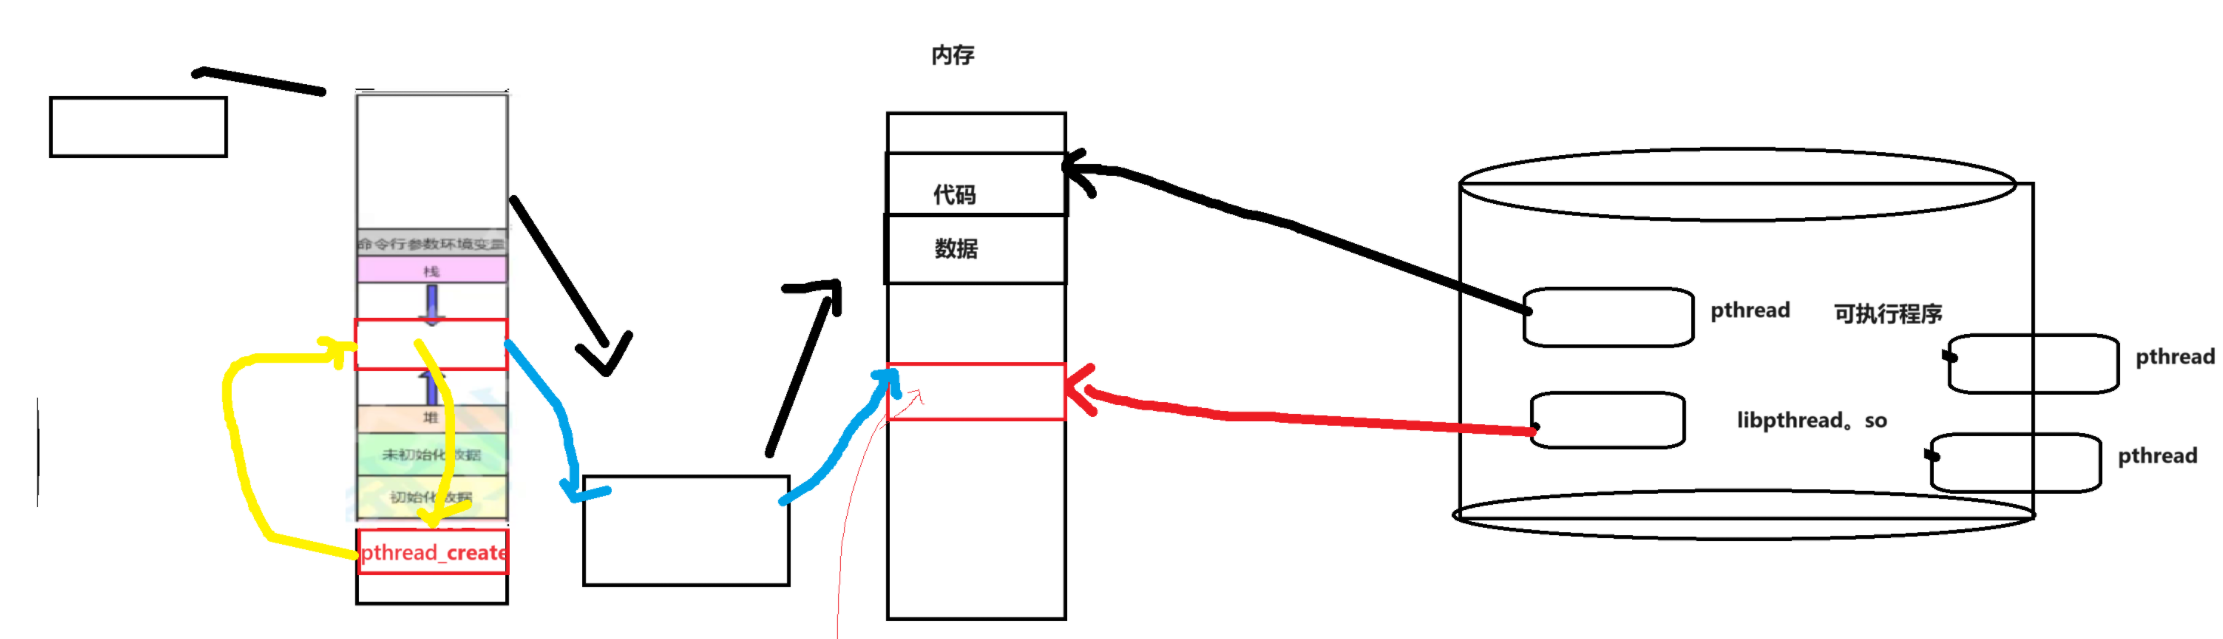
可执行程序加载到内存中,当需要pthread库时,先看看有没有加载到内存,没有的话加载到内存,然后将库加载到地址空间的共享区,当有其他线程时也可以使用内存中的库,不需要继续加载。
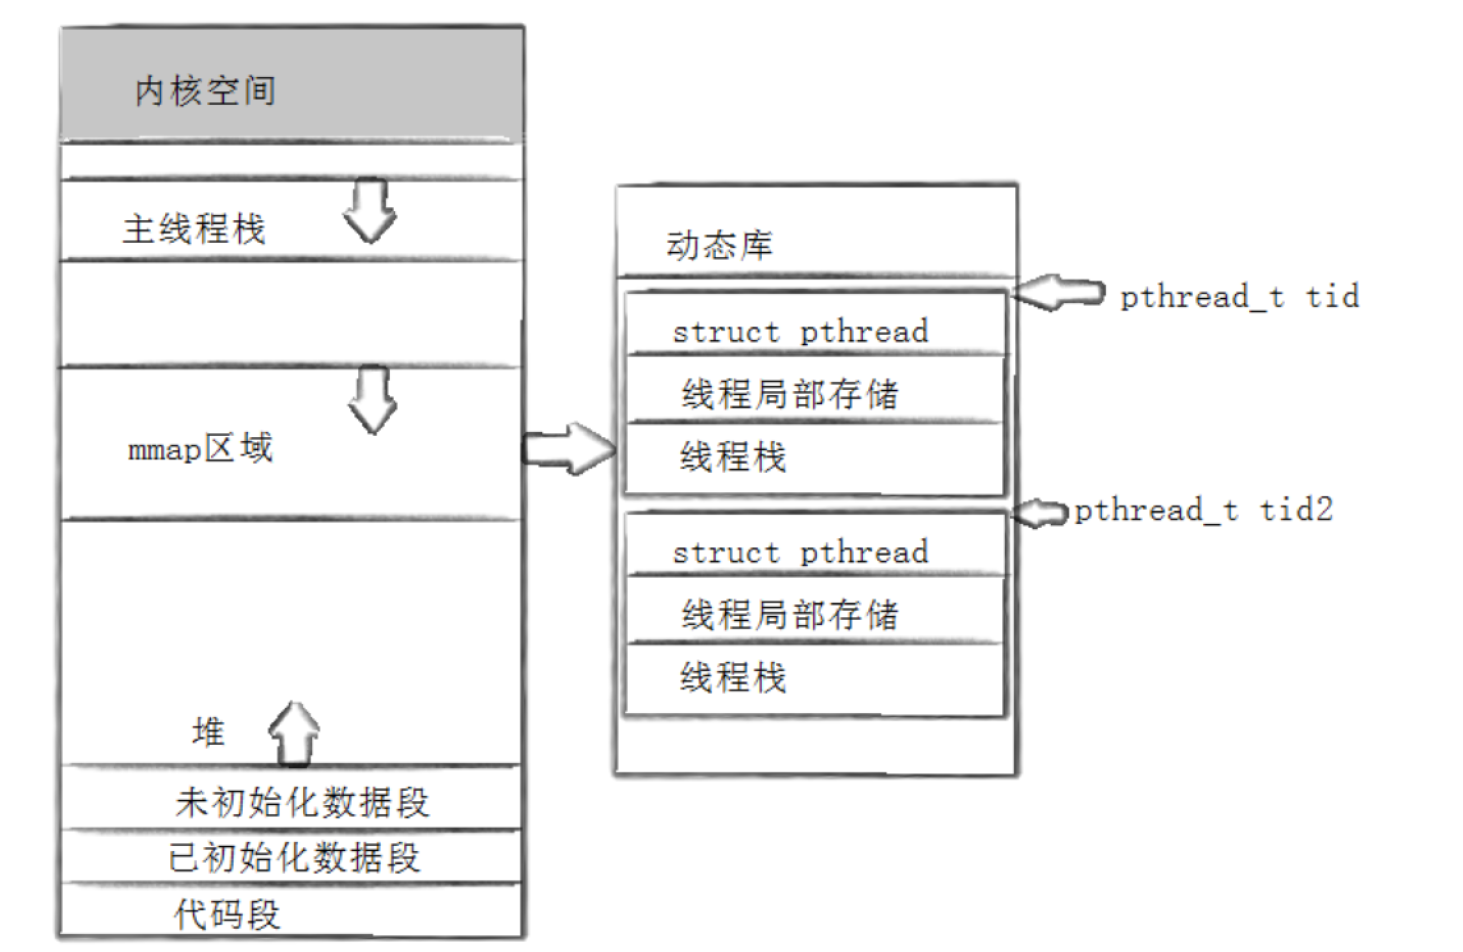
这张图是地址空间中的一部分,爱中tid就是mmap区域中 的一个tid,这个tid是一个结构体,对多个tid管理的方法就是先描述在组织,每当多一个tid,就加载一个结构体,特别注意这个tid是在pthread库中和文件的FILE类似,pthread_create就相当于open。所以tid就是地址空间中共享区的pthread库中维护的线程控制块的一个地址</。
3.3.8.2__thread
看代码:
#include <iostream>
#include <string>
#include <unistd.h>
#include <pthread.h>
#include <vector>int gval=100;
void*threadStart(void*args)
{pthread_t tid=pthread_self();while(true){std::cout<<"thread-1 thread gval:"<<gval<<" &gval: "<<&gval<<std::endl;gval++;sleep(1); }return nullptr;
}
int main()
{pthread_t tid;pthread_create(&tid,nullptr,threadStart,nullptr);while(true){std::cout<<"main thread gval:"<<gval<<" &gval: "<<&gval<<std::endl;sleep(1);}pthread_join(tid,nullptr);return 0;
}
运行结果为:
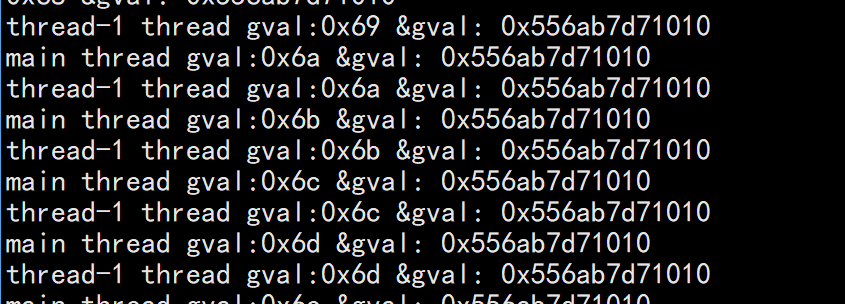
可以看到thread-1和main thrad的gval是同一个,gval是公共资源,那可以让gval成为私有的吗?可以将gval改为
__thread gval=100;
运行结果如下:

四.封装线程
//thread.hpp#pragma once#include <iostream>
#include <string>
#include <pthread.h>namespace ThreadMoudle
{class ThreadDate{public:ThreadDate(const std::string&name):_name(name){}std::string Name(){return _name;}private:std::string _name;};typedef void (*func_t)(void *);class Thread{private:void Excus(){_isrunning=true;_func(_td);_isrunning=false;}public:Thread(const std::string& name,func_t func,ThreadDate* td):_name(name),_func(func),_td(td){_isrunning=false;std::cout<<"create "<<name<<std::endl;}static void*ThreadTaks(void * args){Thread* t=static_cast<Thread*>(args);t->Excus();return nullptr;}bool Start(){int n=pthread_create(&_tid,nullptr,ThreadTaks,this);if(n!=0) return false;return true;}void Stop(){pthread_cancel(_tid);_isrunning=false;std::cout<<_name<<" stop"<<std::endl;}void Join(){pthread_join(_tid,nullptr);std::cout<<_name<<" join"<<std::endl;}private:std::string _name;pthread_t _tid;func_t _func;bool _isrunning;ThreadDate* _td;};
}//main.cc#include <iostream>
#include <string>
#include <unistd.h>
#include <pthread.h>
#include <vector>
#include "thread.hpp"int gnum=10000;
void ticks(void* tds )
{ThreadMoudle::ThreadDate* td=static_cast<ThreadMoudle::ThreadDate*>(tds);while(gnum>0){std::cout<<td->Name()<<" thicks:"<<gnum<<std::endl;gnum--;}
}
int main()
{std::vector<ThreadMoudle::Thread> threads;for(int i=0;i<5;i++){char*name=new char(128);sprintf(name,"thread-%d",i+1);ThreadMoudle::ThreadDate* td=new ThreadMoudle::ThreadDate(name);threads.emplace_back(name,ticks,td);}for(auto& thread:threads){thread.Start();}for(auto& thread:threads){thread.Join();}return 0;
}
代码运行结果如下:

可以看到运行的很快,而且会出现票为空的情况,这是为什么呢?
五.线程互斥
5.1线程封装出现的问题
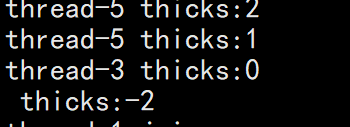
出现票为负数,这是为什么?看图:
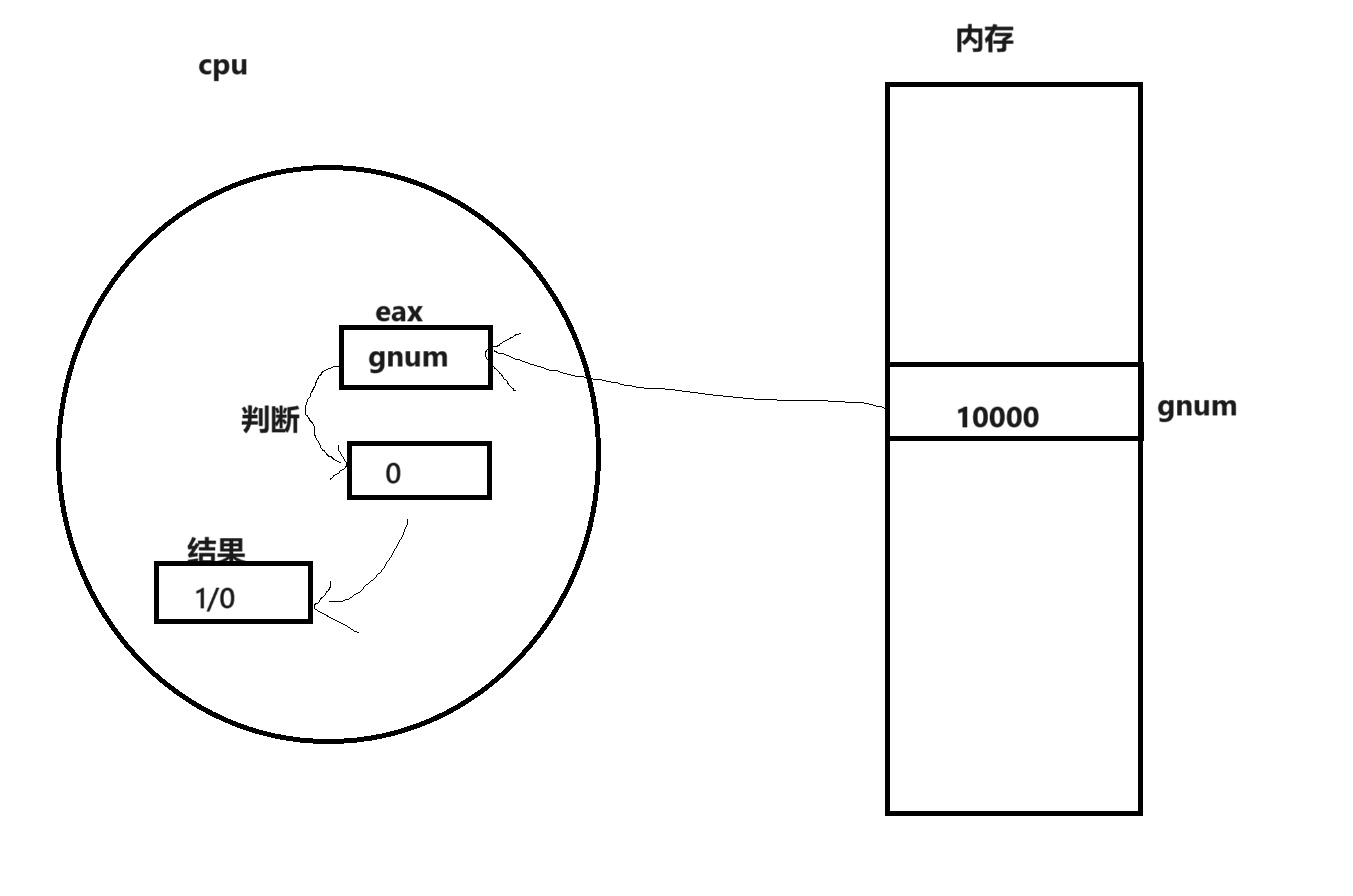
gnum是一个共享资源(临界资源),多个线程都可以访问,在进行判断时先将gnum的值放到寄存器中 ,此时判断为true正好进行线程的切换,由于cpu的寄存器只有一套,所以会保存cpu此时数据(属于线程私有的),切换到下一个线程,这是刚好为0,当这个线程回来时由于为true就会继续执行,导致出现负数。
5.2锁
如何解决上面的问题呢?这就需要我们的锁。
5.2.1认识锁和它的接口
//创建和销毁锁
pthread_mutex_t mutex = PTHREAD_MUTEX_INITIALIZER;//静态或全局申请,然后直接加锁和解锁,并且不需要destroy
int pthread_mutex_init(pthread_mutex_t *restrict mutex, const pthread_mutexattr_t *restrict
attr);
int pthread_mutex_destroy(pthread_mutex_t *mutex);
//上锁
int pthread_mutex_lock(pthread_mutex_t *mutex);
//解锁
int pthread_mutex_unlock(pthread_mutex_t *mutex);
5.2.2解决问题
将下面的代码替换一下:
//thread.hppclass ThreadDate{public:ThreadDate(const std::string&name,pthread_mutex_t *mutex):_name(name),_mutex(mutex){}std::string Name(){return _name;}void Lock(){pthread_mutex_lock(_mutex);}void UnLock(){pthread_mutex_unlock(_mutex);}~ThreadDate(){pthread_mutex_destroy(_mutex);}private:std::string _name;pthread_mutex_t *_mutex;};//main.ccvoid ticks(void* tds )
{ThreadMoudle::ThreadDate* td=static_cast<ThreadMoudle::ThreadDate*>(tds);td->Lock();while(gnum>0){std::cout<<td->Name()<<" thicks:"<<gnum<<std::endl;gnum--;}td->UnLock();
}
运行结果就不会出现负数的问题。
5.2.3加单分析一下
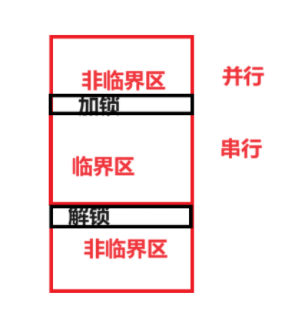
抢票的过程就是临界区,其余的是非临界区,在临界区开始前加锁,结束后解锁,加锁就是让多线程串行访问临界区,并且访问时其余线程不可访问这个临界区,这就形成了对临界区的保护(本质是对临界区代码进行保护),我们访问所有的资源,本质都是通过代码进行访问的,保护资源就是想办法把范围的代码进行保护。锁有下面几个特点:
- 加锁的范围一定要小,力度一定要大。
- 任何线程,进行抢票都必申请锁
- 所有的线程申请锁,前提是所有的线程都能看到这个锁,所以锁本身就是一个临界资源,所以加锁的过程必须是原子的
- 原子性:要么不做,要做就直接做完没有中间态
- 如果一个锁被申请失败,那么就会被阻塞
- 如果一个锁申请成功,就继续运行
- 一个线程申请成功了,执行临界区的代码了,执行临界区代码期间可以进行线程的切换。
5.3原理角度理解锁
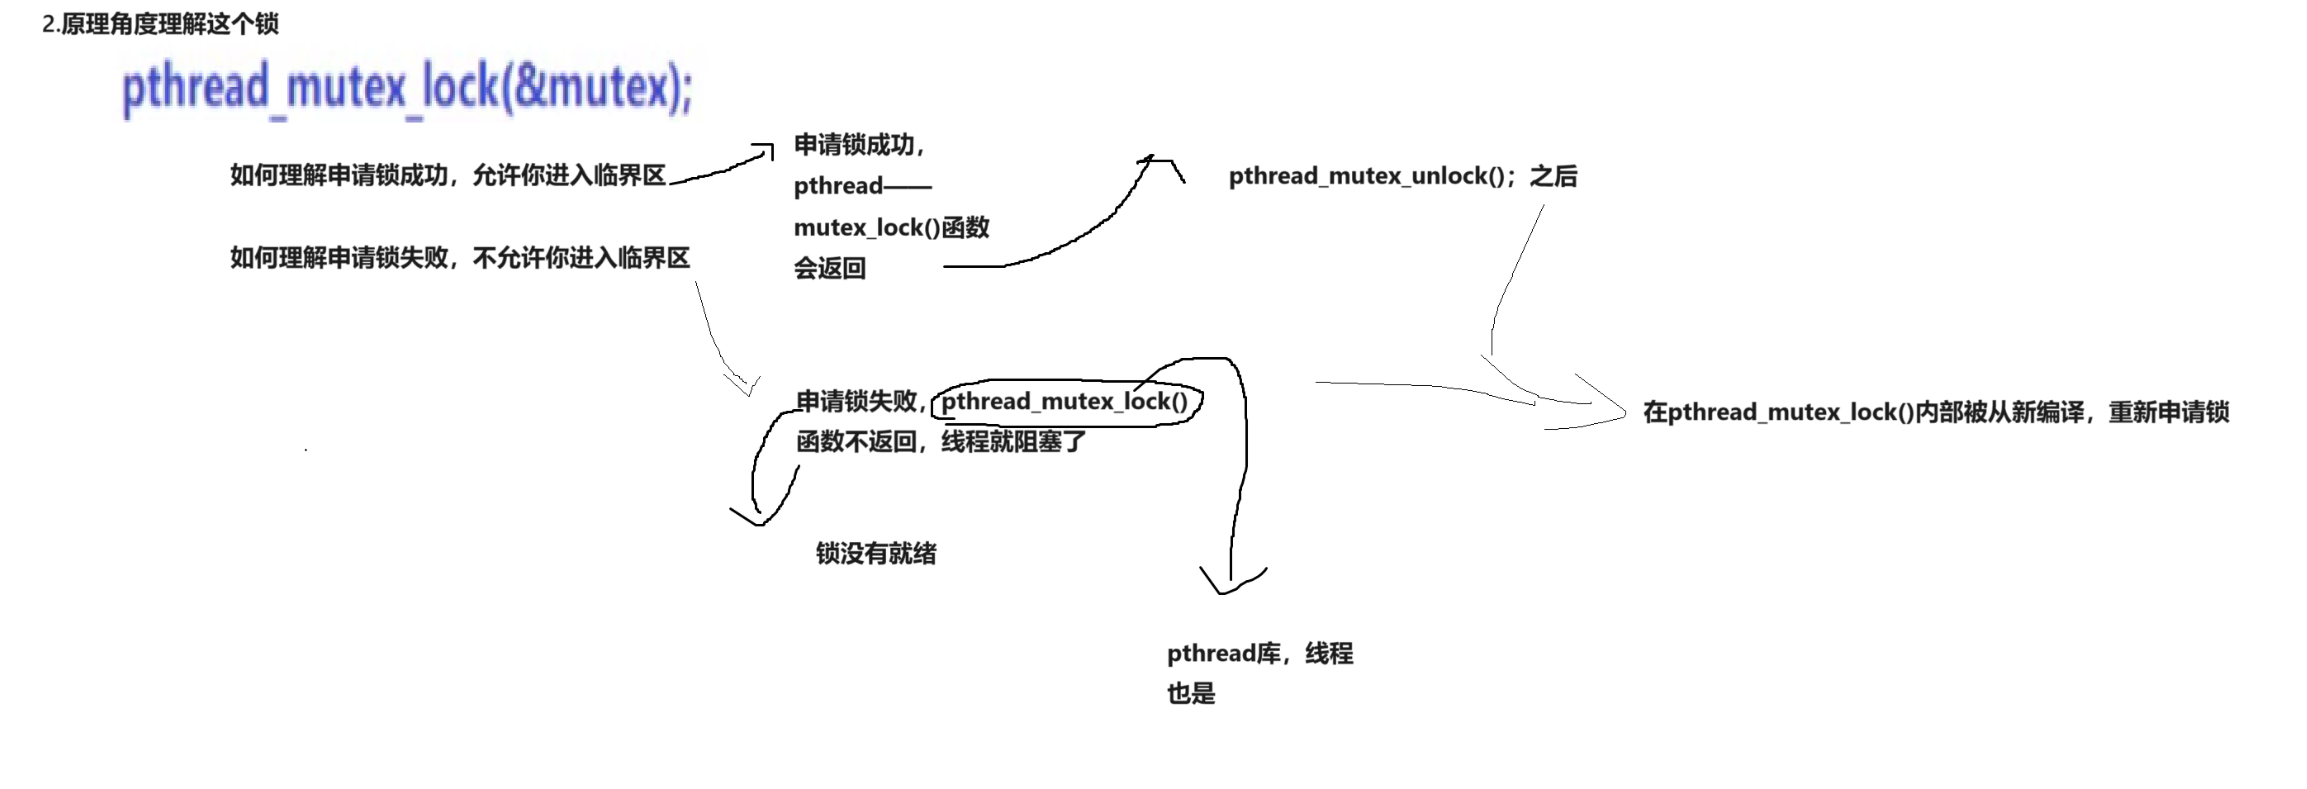
先对所进行申请,申请成功之后lock函数返回,进入临界区,运行结束后unlock之后,线程重现申请锁,如果申请失败,就会阻塞,重现申请锁。
5.4实现角度理解锁
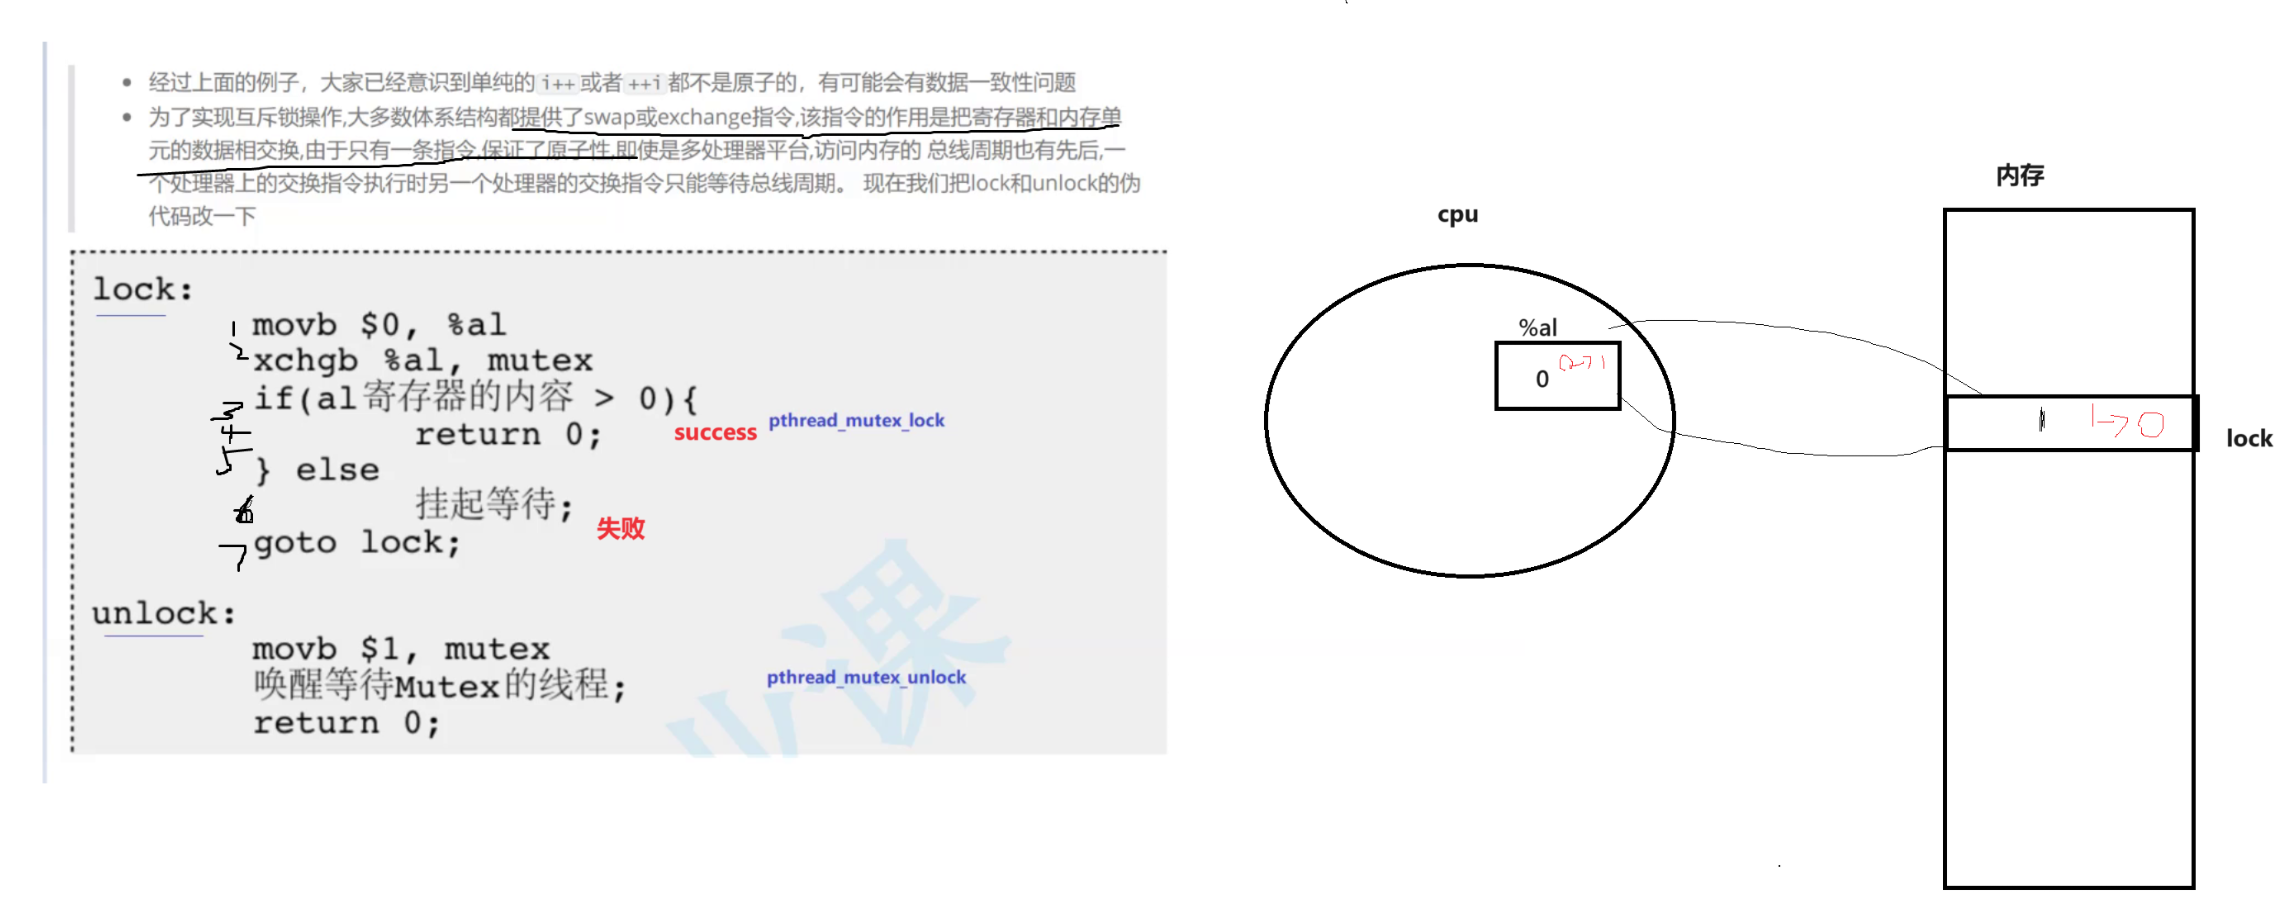
先对lock的汇编语言进行编号,%al是一个寄存器,$0是%al寄存器的数据,lock初始值为1,第二句是将%al的数据和lock的数据进行交换,此时%al就获得了这个1,也就是竟真到这个锁,现在lock里的内容为0其余线程剪不断交换也是0,直到这个线程解锁,将1交换回去,才会有新的线程竞争到锁。
关于线程的结论:
- CPU的寄存器只有一套,内所有的线程共享,但是寄存器里面的数据是线程私有的,属于执行流的上下文。
- cpu在执行代码时一定要有对应的载体,线程或者进程
- 数据在内存中,被所有的线程共享。
六.线程同步
6.1简单理解一下

在互斥中会出现一个问题,那就是当一个线程的竞争能力特别强时,会出现一些问题,例如当一个线程给任务,其余的线程领取和解决任务,但是由于发送任务的线程竞争能力弱,会导致没有任务,这就会造成出现问题,那如何解决这个问题呢?条件变量。例如下面场景:
#include <iostream>
#include <string>
#include <unistd.h>
#include <pthread.h>
#include <vector>pthread_mutex_t mutex = PTHREAD_MUTEX_INITIALIZER;
void *rundom(void *args)
{std::string name = static_cast<char *>(args);while (true){pthread_mutex_lock(&mutex);std::cout << name << std::endl;sleep(1);pthread_mutex_unlock(&mutex);}
}
int gnum = 5;
int main()
{std::vector<pthread_t> tids;for (int i = 0; i < gnum;i++){pthread_t tid;char *name = new char[1024];sprintf(name, "thread-%d", i + 1);pthread_create(&tid, nullptr, rundom, (void *)name);tids.push_back(tid);}for (int i = 0; i < gnum; i++){pthread_join(tids[i], nullptr);}return 0;
}
运行结果如下:
这就是线程1的竞争能力太强导致的,关闭锁就是如下:
也就是说虽然逻辑上合理,但是却存在一些问题,就是分配不合理,而条件变量就可以解决这个问题。
6.2条件变量接口
//初始化
pthread_code_t mutex = PTHREAD_CODE_INITIALIZER;
int pthread_cond_init(pthread_cond_t *restrict cond,const pthread_condattr_t *restrict
attr);
//销毁
int pthread_cond_destroy(pthread_cond_t *cond);
//等待
int pthread_cond_wait(pthread_cond_t *restrict cond,pthread_mutex_t *restrict mutex);
//唤醒
int pthread_cond_broadcast(pthread_cond_t *cond);
int pthread_cond_signal(pthread_cond_t *cond);
6.3代码实现
#include <iostream>
#include <string>
#include <unistd.h>
#include <pthread.h>
#include <vector>pthread_mutex_t mutex = PTHREAD_MUTEX_INITIALIZER;
pthread_cond_t cond=PTHREAD_COND_INITIALIZER;
void *rundom(void *args)
{std::string name = static_cast<char *>(args);while (true){pthread_mutex_lock(&mutex);pthread_cond_wait(&cond,&mutex);std::cout << name << std::endl;usleep(1000);pthread_mutex_unlock(&mutex);}
}
int gnum = 5;
int main()
{std::vector<pthread_t> tids;for (int i = 0; i < gnum;i++){pthread_t tid;char *name = new char[1024];sprintf(name, "thread-%d", i + 1);pthread_create(&tid, nullptr, rundom, (void *)name);tids.push_back(tid);}while(true){pthread_cond_signal(&cond);sleep(1);}for (int i = 0; i < gnum; i++){pthread_join(tids[i], nullptr);}return 0;
}
代码如下:
七.生产者消费者模型
7.1简介
生产者消费者模型需要满足“321”原则,这个“321”原则是
- 一个交易场所(一段内存空间)
- 两种角色(生产者,消费者)
- 三种关系(生产者和生产者-互斥,消费者和消费者-互斥,生产者和消费者-互斥和同步)
7.2阻塞队列

阻塞队列和普通的队列差别就是,当阻塞队列为空时,从队列中获取元素就会被阻塞,直到在队列中放入元素。当队列满时往队列中存放数据就会被就会被阻塞,直到有元素从队列中取出来。阻塞队列分为单生产,单消费和多生产,多消费的模式。下面是代码实现”
//block_queue.hpp#pragma once#include <iostream>
#include <pthread.h>
#include <unistd.h>
#include <queue>int gcap = 5;
template <class T>
class BlockQueue
{
private:bool IsFull(){return _block_queue.size() == _max_cap;}bool IsEmpty(){return _block_queue.size() == 0;}public:BlockQueue(int max_cap = gcap): _max_cap(max_cap){pthread_mutex_init(&_mutex, nullptr);pthread_cond_init(&_p, nullptr);}void Pop(T *out){pthread_mutex_lock(&_mutex);while (IsEmpty()){pthread_cond_wait(&_c, &_mutex);}*out = _block_queue.front();_block_queue.pop();pthread_mutex_unlock(&_mutex);pthread_cond_signal(&_p);}void Push(T *in){pthread_mutex_lock(&_mutex);while (IsFull()){pthread_cond_wait(&_p, &_mutex);}_block_queue.push(*in);pthread_mutex_unlock(&_mutex);pthread_cond_signal(&_c);}~BlockQueue(){pthread_mutex_destroy(&_mutex);pthread_cond_destroy(&_p);}private:std::queue<T> _block_queue;int _max_cap;pthread_mutex_t _mutex;pthread_cond_t _p;pthread_cond_t _c;
};//Task.hpp#pragma once#include <iostream>
#include <string>class Task
{
public:Task(){}Task(int x, int y) : _x(x), _y(y){}void Excus(){_result=_x+_y;}void operator()(){Excus();}std::string debug(){std::string msg = std::to_string(_x) + "+" + std::to_string(_y) + "=?";return msg;}std::string result(){std::string msg = std::to_string(_x) + "+" + std::to_string(_y) + "=" + std::to_string(_result);return msg;}private:int _x;int _y;int _result;
};//main.cc#include <iostream>
#include <stdlib.h>
#include <time.h>
#include <pthread.h>
#include "block_queue.hpp"
#include "Task.hpp"void* Productor(void *args)
{// pushBlockQueue<Task> *bq = static_cast<BlockQueue<Task> *>(args);while (true){int x = rand() % 10;int y = rand() % 10;Task t(x, y);bq->Push(&t);std::cout <<"Protuctor-> "<<t.debug() << std::endl;sleep(1);}return nullptr;
}
void* Consumer(void *args)
{// popBlockQueue<Task> *bq = static_cast<BlockQueue<Task> *>(args);while (true){Task t;bq->Pop(&t);t();std::cout <<"Consumer-> "<<t.result() << std::endl;sleep(2);}return nullptr;}
int main()
{srand(time(0));BlockQueue<Task> *bq = new BlockQueue<Task>();pthread_t c, p;pthread_create(&p, nullptr, Productor, (void *)bq);pthread_create(&c, nullptr, Consumer, (void *)bq);// pthread_create(&c, nullptr, Consumer, (void *)bq);// pthread_create(&c, nullptr, Consumer, (void *)bq);pthread_join(p, nullptr);pthread_join(c, nullptr);return 0;
}
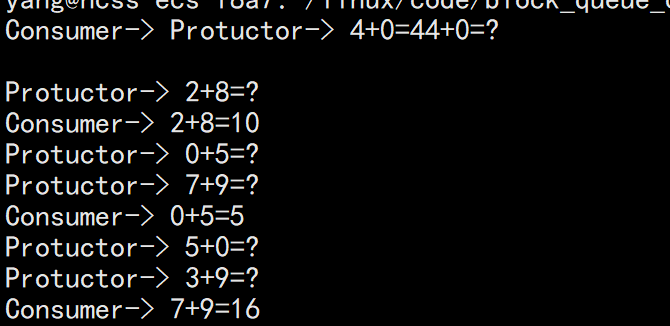
特别注意的是Push和Pop时需要while进行判断是不是空,满,当有多个线程阻塞到条件变量时,一旦使用的是全部唤醒就会造成问题。这也是维护消费者和消费者,生产者和生产者的关系。
运行结果如下:
7.3信号量
7.3.1系统调用
int sem_init(sem_t *sem, int pshared, unsigned int value);
int sem_destroy(sem_t *sem);
int sem_wait(sem_t *sem);
int sem_post(sem_t *sem);
7.3.2信号量简介
**信号量可以被视为计数器,它是一种预定机制,信号量主要处理线程的同步和互斥。在这里我们引入一个环形队列,这是一个生产者消费者模型。生产者关注的资源就是空间,消费者关注的的资源是数据,所以需要两个信号量,**代码:
//RingQueue.hpp#pragma once#include <iostream>
#include <vector>
#include <semaphore.h>template <class T>
class RingQueue
{
private:void P(sem_t& _sem){sem_wait(&_sem);}void V(sem_t& _sem){sem_post(&_sem);}
public:RingQueue(int max_cap=5):_max_cap(max_cap),_ring_queue(max_cap){sem_init(&_date_sem,0,0);sem_init(&_space_sem,0,_max_cap);pthread_mutex_init(&_c,nullptr);pthread_mutex_init(&_p,nullptr);}void Pop(T* out){P(_date_sem);pthread_mutex_lock(&_c);*out=_ring_queue[_c_step];_c_step++;_c_step%=_max_cap;pthread_mutex_unlock(&_c);V(_space_sem);}void Equeue(const T& in){P(_space_sem);pthread_mutex_lock(&_p);_ring_queue[_p_step] = in;_p_step++;_p_step %= _max_cap;pthread_mutex_unlock(&_p);V(_date_sem);}~RingQueue(){sem_destroy(&_date_sem);sem_destroy(&_space_sem);pthread_mutex_destroy(&_c);pthread_mutex_destroy(&_p);}
private:int _max_cap;std::vector<T> _ring_queue;int _c_step;int _p_step;sem_t _date_sem;sem_t _space_sem;pthread_mutex_t _c;pthread_mutex_t _p;};//Tads.hpp#pragma once#include <iostream>
#include <string>class Task
{
private:void Excus(){_result=_x+_y;}
public:Task(){}Task(int x, int y) : _x(x), _y(y){}void operator()(){Excus();}std::string debug(){std::string msg = std::to_string(_x) + "+" + std::to_string(_y) + "=?";return msg;}std::string result(){std::string msg = std::to_string(_x) + "+" + std::to_string(_y) + "=" + std::to_string(_result);return msg;}private:int _x;int _y;int _result;
};//main.cc#include <iostream>
#include <vector>
#include <pthread.h>
#include "RingQueue.hpp"
#include "Task.hpp"
#include <unistd.h>
#include <time.h>
void *Productor(void *args)
{// pushRingQueue<Task> *rq = static_cast<RingQueue<Task> *>(args);while (true){int x=rand()%10+1;int y=rand()%10+1;Task t(x,y);rq->Equeue(t);std::cout<<"Productor-> "<<t.debug()<<std::endl;sleep(1);}return nullptr;
}
void *Consumer(void *args)
{// popRingQueue<Task> *rq = static_cast<RingQueue<Task> *>(args);while (true){Task t;rq->Pop(&t);t();std::cout<<"Construm-> "<<t.result()<<std::endl;}return nullptr;
}
int main()
{srand(time(nullptr));RingQueue<Task> *rq = new RingQueue<Task>();pthread_t c, p1,p2,p3;pthread_create(&c, nullptr, Consumer, (void *)rq);pthread_create(&p1, nullptr, Productor, (void *)rq);//pthread_create(&p2, nullptr, Productor, (void *)rq);//pthread_create(&p3, nullptr, Productor, (void *)rq);pthread_join(c, nullptr);pthread_join(p1, nullptr);//pthread_join(p2, nullptr);//pthread_join(p3, nullptr);return 0;
}
其中最重要的就是P操作和V操作,P操作就是申请信号量,当这个信号量为0时就会阻塞,当大于0时就会减1;V操作就是将信号量加1。
7.4线程池
线程池就是开多个线程,然后给线程任务。下面是代码实现:
//ThreadPthread.hpp#pragma once#include <iostream>
#include <vector>
#include <queue>
#include <pthread.h>
#include "thread.hpp"
#include <functional>
#include <unistd.h>int gdeflatenum = 5;
template <class T>
class ThreadPool
{
private:void LockThread(){pthread_mutex_lock(&_mutex);}void UnLockThread(){pthread_mutex_unlock(&_mutex);}public:void task(const std::string &name){while (true){//停止时,需要运行完当前的任务,然后结束(任务队列为空,且要结束)LockThread();while (_task_queue.empty() && _isrunning){_sleep_thread_num++;pthread_cond_wait(&_cond, &_mutex);_sleep_thread_num--;}if (_task_queue.empty() && !_isrunning){std::cout<<name<<" quit..."<<std::endl;UnLockThread();break;}T t = _task_queue.front();_task_queue.pop();UnLockThread();t();std::cout << name << ": " << t.result() << std::endl;}}ThreadPool(int num = gdeflatenum): _num(num), _isrunning(false), _sleep_thread_num(0){pthread_mutex_init(&_mutex, nullptr);pthread_cond_init(&_cond, nullptr);}void Init(){func_t func = std::bind(&ThreadPool::task, this, std::placeholders::_1);for (int i = 0; i < _num; i++){std::string name = "thread-" + std::to_string(i + 1);_thread.emplace_back(name, func);}}void Start(){_isrunning = true;for (auto &thread : _thread){thread.Start();}}void Equeue(const T &in){LockThread();_task_queue.push(in);if (_sleep_thread_num > 0)pthread_cond_signal(&_cond);UnLockThread();}void Stop(){LockThread();_isrunning=false; pthread_cond_broadcast(&_cond);//当所有的线程都谁睡眠时,需要我们群不唤醒UnLockThread();}~ThreadPool(){pthread_mutex_destroy(&_mutex);pthread_cond_destroy(&_cond);}private:std::vector<Thread> _thread;int _num;std::queue<T> _task_queue;bool _isrunning;int _sleep_thread_num;pthread_mutex_t _mutex;pthread_cond_t _cond;
};//thread.hpp#pragma once#include <iostream>
#include <string>
#include <pthread.h>
#include <functional>using func_t = std::function<void(const std::string&)>;class Thread
{
private:void Excus(){_isrunning = true;_func(_name);_isrunning = false;}public:Thread(const std::string &name, func_t func): _name(name), _func(func){_isrunning = false;std::cout << "create " << name << std::endl;}static void *ThreadTaks(void *args){Thread *t = static_cast<Thread *>(args);t->Excus();return nullptr;}bool Start(){int n = pthread_create(&_tid, nullptr, ThreadTaks, this);if (n != 0)return false;return true;}void Stop(){pthread_cancel(_tid);_isrunning = false;std::cout << _name << " stop" << std::endl;}void Join(){pthread_join(_tid, nullptr);std::cout << _name << " join" << std::endl;}private:std::string _name;pthread_t _tid;func_t _func;bool _isrunning;
};//Task.hpp#pragma once#include <iostream>
#include <string>class Task
{
public:Task(){}Task(int x, int y) : _x(x), _y(y){}void Excus(){_result=_x+_y;}void operator()(){Excus();}std::string debug(){std::string msg = std::to_string(_x) + "+" + std::to_string(_y) + "=?";return msg;}std::string result(){std::string msg = std::to_string(_x) + "+" + std::to_string(_y) + "=" + std::to_string(_result);return msg;}private:int _x;int _y;int _result;
};//main.cc#include <iostream>
#include <vector>
#include "ThradPool.hpp"
#include "Task.hpp"
#include "thread.hpp"int gnum = 5;
int main()
{ThreadPool<Task> tp;tp.Init();tp.Start();Task t(1, 2);int cur=10;while (cur--){tp.Equeue(t);sleep(1);}tp.Stop();sleep(2);return 0;
}
代码主要是初始化线程,启动线程,线程结束,初始化线程最重要的就是bind进行参数绑定,结束需要线程运行的函数来配合实现,线程结束需要满足任务队列为空且线程执行完了任务,此时线程处于睡眠和刚刚运行完的状态,我们设置一个标记,来记录线程是否在运行,当我们想要停止时,设置为否,这样就可以配合初始化线程来实现线程的结束(由于线程可以处在睡眠状态,所以需要我们去唤醒)。
7.5 日志
#pragma once#include <iostream>
#include <string>
#include <time.h>
#include <sys/types.h>
#include <unistd.h>
#include <sys/stat.h>
#include <fcntl.h>
#include <stdarg.h>enum
{DEBUG = 1,INFO,WARNING,ERROR,TATLE
};
class LogMessage
{
public:std::string GetCurrTime(){time_t now = time(nullptr);struct tm *curr_time = localtime(&now);char buffer[128];snprintf(buffer, sizeof(buffer), "%d-%d-%d %d:%d:%d",curr_time->tm_year + 1900,curr_time->tm_mon + 1,curr_time->tm_mday,curr_time->tm_hour,curr_time->tm_min,curr_time->tm_sec);return buffer;}public:std::string _level;pid_t _pid;std::string _filenaem;std::string _curr_time;int _filenum;std::string _message;
};
#define SCREEN_TYEP 1
#define FILE_TYPE 2class Log
{
private:std::string LevelToString(int level){switch (level){case DEBUG:return "DEBUG";break;case INFO:return "INFO";break;case WARNING:return "WARNING";break;case ERROR:return "ERROR";break;case TATLE:return "TATLE";break;}}std::string Flush(const LogMessage &lm){char buffer[1024];sprintf(buffer, "[%s][%d][%s][%d][%s] %s",lm._level.c_str(),lm._pid,lm._filenaem.c_str(),lm._filenum,lm._curr_time.c_str(),lm._message.c_str());return buffer;}void FlushToSCREEN(const LogMessage &lm){std::cout << Flush(lm);}void FlushToFILE(const LogMessage &lm){std::string s = Flush(lm);int fd = open(_flush_filename.c_str(), O_CREAT | O_APPEND|O_WRONLY,0666);if (fd < 0)return;write(fd, s.c_str(), s.size());close(fd);}void FlushLog(const LogMessage &lm){switch (_type){case SCREEN_TYEP:FlushToSCREEN(lm);break;case FILE_TYPE:FlushToFILE(lm);break;}}public:Log(int type, const std::string &filename): _type(type), _flush_filename(filename){}Log(int type = SCREEN_TYEP): _type(type){}void EnableType(int newtype){_type = newtype;}void logmessage(const std::string &filename, int filenum, int level, const char *format, ...){LogMessage lm;lm._level = LevelToString(level);lm._pid = getpid();lm._filenaem = filename,lm._curr_time = lm.GetCurrTime();lm._filenum = filenum;//可变参数的接受参数va_list ap;va_start(ap, format);char log_info[1024];vsnprintf(log_info, sizeof(log_info), format, ap);va_end(ap);lm._message = log_info;FlushLog(lm);}private:int _type;std::string _flush_filename;
};
Log lg(SCREEN_TYEP,"LOG.txt");
#define LOG(level, format, ...)\
do\
{\lg.logmessage(__FILE__,__LINE__,level,format, ##__VA_ARGS__);   \//需要##否则空时会出现问题。
} while (0)#define EnableToScreen() \
do\
{\lg.EnableType(SCREEN_TYEP);\
}while(0)
#define EnableToFILE() \
do\
{\lg.EnableType(FILE_TYPE);\
}while(0)
我们将输出信息改为日志,其中关键的就是可变参数的接受参数,以及#define的使用,使用方法就是:LOG(DEBUG, “finish task done ,task is %s\n”, t.result().c_str());
八.读者写着问题
同样遵循321原则,但是关系有些不同,读者和写着之间是互斥和同步,写者和写者之间是互斥,读者和读者之间是协调(没关系)。需要的接口如下:
//初始化
int pthread_rwlock_init(pthread_rwlock_t *restrict rwlock,const pthread_rwlockattr_t
*restrict attr);
//销毁
int pthread_rwlock_destroy(pthread_rwlock_t *rwlock);
//加锁和解锁
int pthread_rwlock_rdlock(pthread_rwlock_t *rwlock);
int pthread_rwlock_wrlock(pthread_rwlock_t *rwlock);
int pthread_rwlock_unlock(pthread_rwlock_t *rwlock);
代码实现和互斥锁类似。(读者只是读,不会将数据销毁)。
九.自旋锁
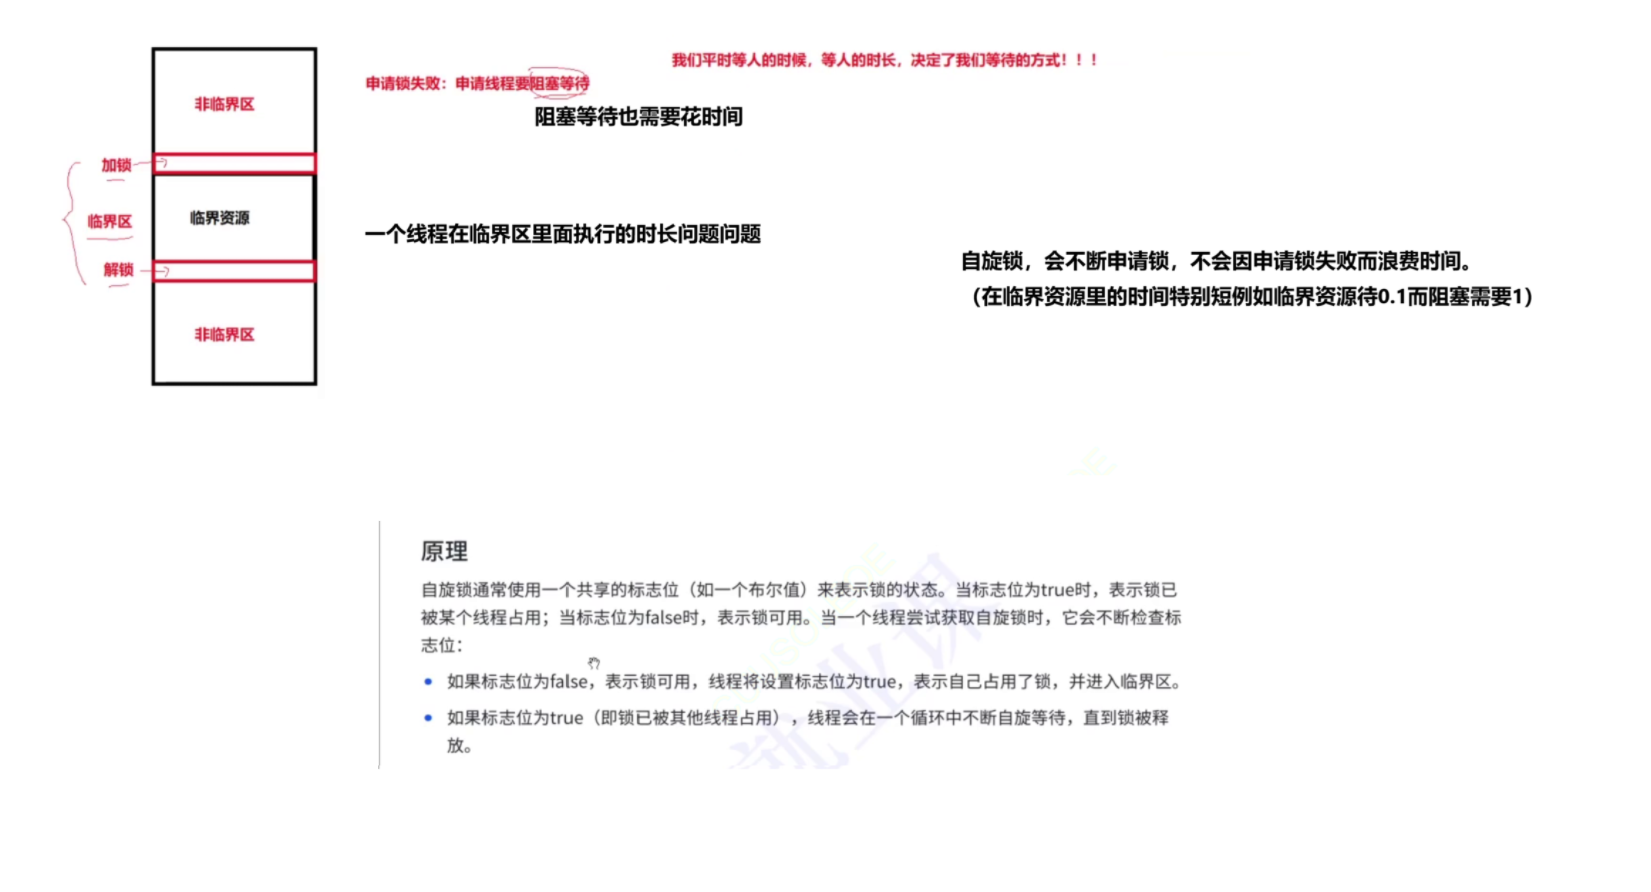
//初始化
int pthread_spin_init(pthread_spinlock_t *lock, int pshared);
//销毁
int pthread_spin_destroy(pthread_spinlock_t *lock);
//加锁和解锁
int pthread_spin_lock(pthread_spinlock_t *lock);
int pthread_spin_unlock(pthread_spinlock_t *lock);
十.死锁
死锁是指在一组进程中的各个进程均占有不会释放的资源,但因互相申请被其他进程所站用不会释放的资
源而处于的一种永久等待状态。
死锁四个必要条件
- 互斥条件:一个资源每次只能被一个执行流使用
- 请求与保持条件:一个执行流因请求资源而阻塞时,对已获得的资源保持不放
- 不剥夺条件:一个执行流已获得的资源,在末使用完之前,不能强行剥夺
- 循环等待条件:若干执行流之间形成一种头尾相接的循环等待资源的关系
避免死锁
- 破坏死锁的四个必要条件
- 加锁顺序一致
- 避免锁未释放的场景
- 资源一次性分配
    char log_info[1024];vsnprintf(log_info, sizeof(log_info), format, ap);va_end(ap);lm._message = log_info;FlushLog(lm);
}
private:
int _type;
std::string _flush_filename;
};
Log lg(SCREEN_TYEP,“LOG.txt”);
#define LOG(level, format, …)
do
{
lg.logmessage(FILE,LINE,level,format, ##VA_ARGS); //需要##否则空时会出现问题。
} while (0)
#define EnableToScreen()
do
{
lg.EnableType(SCREEN_TYEP);
}while(0)
#define EnableToFILE()
do
{
lg.EnableType(FILE_TYPE);
}while(0)
> 我们将输出信息改为日志,其中关键的就是可变参数的接受参数,以及#define的使用,使用方法就是:LOG(DEBUG, "finish task done ,task is %s\n", t.result().c_str());# 八.读者写着问题 同样遵循321原则,但是关系有些不同,读者和写着之间是互斥和同步,写者和写者之间是互斥,读者和读者之间是协调(没关系)。需要的接口如下:```cpp
//初始化
int pthread_rwlock_init(pthread_rwlock_t *restrict rwlock,const pthread_rwlockattr_t
*restrict attr);
//销毁
int pthread_rwlock_destroy(pthread_rwlock_t *rwlock);
//加锁和解锁
int pthread_rwlock_rdlock(pthread_rwlock_t *rwlock);
int pthread_rwlock_wrlock(pthread_rwlock_t *rwlock);
int pthread_rwlock_unlock(pthread_rwlock_t *rwlock);
代码实现和互斥锁类似。(读者只是读,不会将数据销毁)。
九.自旋锁
[外链图片转存中…(img-6ybCaTAR-1725335888763)]
//初始化
int pthread_spin_init(pthread_spinlock_t *lock, int pshared);
//销毁
int pthread_spin_destroy(pthread_spinlock_t *lock);
//加锁和解锁
int pthread_spin_lock(pthread_spinlock_t *lock);
int pthread_spin_unlock(pthread_spinlock_t *lock);
十.死锁
死锁是指在一组进程中的各个进程均占有不会释放的资源,但因互相申请被其他进程所站用不会释放的资
源而处于的一种永久等待状态。
死锁四个必要条件
- 互斥条件:一个资源每次只能被一个执行流使用
- 请求与保持条件:一个执行流因请求资源而阻塞时,对已获得的资源保持不放
- 不剥夺条件:一个执行流已获得的资源,在末使用完之前,不能强行剥夺
- 循环等待条件:若干执行流之间形成一种头尾相接的循环等待资源的关系
避免死锁
- 破坏死锁的四个必要条件
- 加锁顺序一致
- 避免锁未释放的场景
- 资源一次性分配


