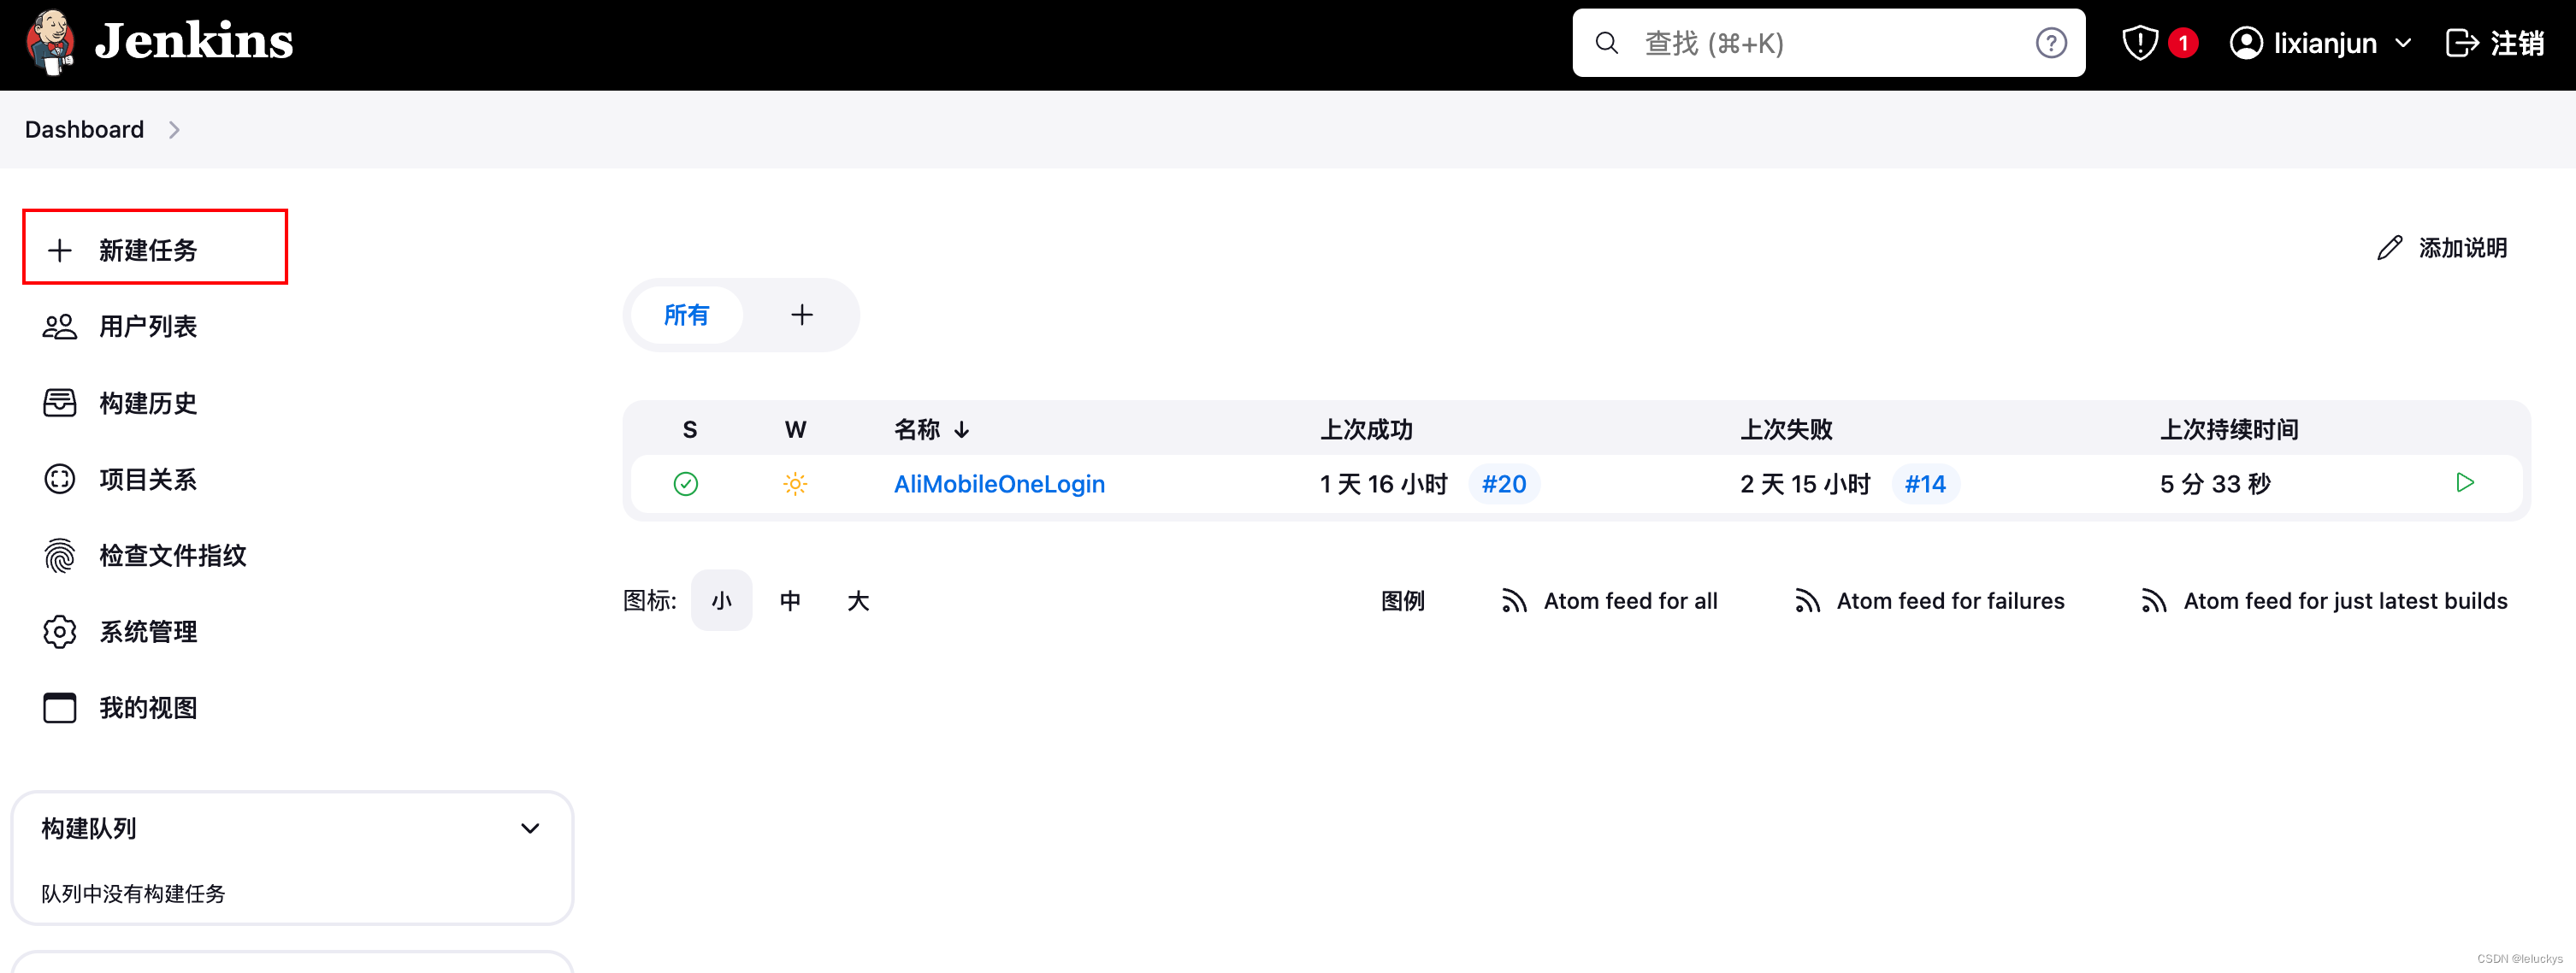
第一步 新建任务
第二步 输入项目名称和选择自由风格的软件项目点击确定
 第三步 配置下项目地址和账号密码

第四步 配置 build steps 选择 shell 脚本

第五步 shell 配置 (注意shell 必须以#!/bin/sh开头,否则会报 找不到shell 命令的错)
#!/bin/shblack=$(tput setaf 0)
red=$(tput setaf 1)
green=$(tput setaf 2)
yellow=$(tput setaf 3)
blue=$(tput setaf 4)
reset=$(tput sgr0)color_cyan="\033[0;36m"
color_red="\033[41;37m"
color_default="\033[0;m"function echo_log() {echo -e "${color_cyan}$*${color_default}"
}function echo_error() {echo -e "${color_red}$*${color_default}"
}RunCommand() {echo_log "-> ♦♦♦♦♦ $* ♦♦♦♦♦<-""$@"return $?
}function delete_white_space() {echo -n  "$1" | sed  's/^[ t]*//;s/[ t]*$//'
}
function log_separator() {echo_log "----------------------------执行新的任务------------------------------"
}Root=`pwd`
basedir=`cd $(dirname $0); pwd -P`
#current_file="${basedir##*/}"
current_file="AliMobileOneLogin"
RepoName='dp_base_ios_spec'
SpecName=$current_file'.podspec'
SpecPath=$Root/$SpecName
spec_sources='https://cdn.cocoapods.org/'# 自增,满10进1increment_version () {declare -a part=( ${1//\./ } )declare    newdeclare -i carry=1for (( CNTR=${#part[@]}-1; CNTR>=0; CNTR-=1 )); dolen=${#part[CNTR]}new=$((part[CNTR]+carry))[ ${#new} -gt $len ] && carry=1 || carry=0[ $CNTR -gt 0 ] && part[CNTR]=${new: -len} || part[CNTR]=${new}donenew="${part[*]}"echo  "${new// /.}"}#验证版本号格式verify_input_tag_format(){local tag_version=$1if [ -z $tag_version ]; thenecho ${red}"请输入正确的tag 版本号,例如:0.0.1 / 1.0.0 / 1.0.0-bate1"${reset}exit 1else# release的正则reg='^[0-9]{1,4}\.[0-9]{1,4}\.[0-9]{1,4}.*$'# reg='^(0|[1-9][1-9]*)\.(0|[1-9][1-9]*)\.(0|[1-9][1-9]*)(?:-((?:0|[1-9][0-9]*|[0-9]*[a-zA-Z-][0-9a-zA-Z-]*)(?:\.(?:0|[1-9][0-9]*|[0-9]*[a-zA-Z-][0-9a-zA-Z-]*))*))?(?:\+([0-9a-zA-Z-]+(?:\.[0-9a-zA-Z-]+)*))?$'if [[ "$tag_version" =~ $reg ]]; thenecho ${blue}"tag版本号正确,格式验证通过"${reset}elseecho ${red}"请输入正确的tag 版本号,例如:0.0.1 / 1.0.0 / 1.0.0-bate1"${reset}exit 1fifi}#验证版本号是否存在verify_input_tag_exist(){local tag_version=$1touch .tag_list_filetempListFilePath=$Root/.tag_list_fileecho ${blue}"1========================================================="${tempListFilePath}git fetch --tagsgit tag -l |sort -r > $tempListFilePathexist="0"while read linedotag_number=$lineecho ${blue}"2========================================================="${tag_number}echo ${yellow}"3========================================================="${tempListFilePath}if [[ $tag_number == $tag_version ]]; thenexist="1"breakfidone < $tempListFilePathif [[ $exist == "1" ]]; thenecho ${red}"tag版本号 ${tag_version} 已经存在,请重新执行!"${reset}exit 1elseecho ${blue}"tag版本号正确,格式验证通过"${reset}firm $tempListFilePath 2> /dev/null}#    #修改podspec文件版本号
#    change_spec_version()
#    {
#        local tag_version=$1
#        while read line
#        do
#            reg="^s.version"
#            if [[ "$line" =~ $reg ]]; then
#                sed -i "" "s/${line}/s.version        = \'$tag_version\'/g" $SpecPath
#            fi
#        done < $SpecPath
#        cat $SpecPath
#    }#修改podspec文件版本号
function change_spec_version()
{local tag_version=$1local specPath=$2echo_log "podspec路径$specPath"echo_log "要修改的版本号$tag_version"while read linedoreg="^s.version"if [[ "$line" =~ $reg ]]; thensed -i "" "s/${line}/s.version        = \'$tag_version\'/g" $specPathfidone < $specPathcat $specPath
}#提交git及打tagfunction update_git_tags(){RunCommand cd $1if [ -n "$(git status -s)" ];thenRunCommand git add -A && git commit -m "$new_tag_version"if [[ $? -ne 0 ]]; thenecho_error "'git add -A && git commit -m' failed,请检查错误信息 $1"exit 1fiRunCommand git tag $new_tag_versionRunCommand git push origin --tags && git push origin masterRunCommand git fetch --allif [[ $? -ne 0 ]]; thenecho_error "'git push origin' failed,请检查错误信息 $1"exit 1fi
elseecho_error "似乎有异常,Git没有变更的内容  $1"exit 1
fi}
#拷贝打包完的frameworke文件到指定路径下copy_framework_to_target_file(){echo ${green}"====================== 开始拷贝文件 ===================="${reset}local tag_version=$1#目标地址target_file_Path=$Root'/Frameworks'#拷贝地址file_Path=${Root}'/'$current_file'-'${tag_version}copy_Path=${file_Path}'/ios'if [ ! -d  "$target_file_Path" ]; thenmkdir  $target_file_Pathecho ${green}"========================创建文件夹成功================================="${reset}elseecho ${green}"========================文件夹已经存在================================="${reset}fiecho ${green}"====================== 生成的文件路径$copy_Path ===================="${reset}echo ${green}"====================== 要拷贝的目标文件路径 $target_file_Path===================="${reset}# 拷贝生成的framework文件到目标文件cp  -rf  $copy_Path/*  $target_file_Path/#删除自动生成的framework文件目录rm -rf $file_Path}#------------------- 脚本开始 --------------------echo ${green}"========================================================="${reset}echo ${green}"====================== 开始发布组件 ======================="${reset}echo ${green}"========================================================="${reset}echo $current_file## >-------------------------开始编译处理-------------------------------------------<
echo_log ">>>打印路径"RunCommand cd $Root
export LANG=en_US.UTF-8
export LANGUAGE=en_US.UTF-8
export LC_ALL=en_US.UTF-8
last_commit=$(git log --pretty=format:'%h %s (%an, %ar)' -n 5 | tr '\n' ' ';)
echo_log "最近一次提交记录:$last_commit"## >----------------------------------更新Git Tag版本号 spec索引库处理----------------------------------log_separator
echo_log "更新git tags版本号 spec索引库处理"old_tag_version="1.0.0"RunCommand git describe --tags `git rev-list --tags --max-count=1`#TAG=$(git describe --tags $(git rev-list --tags --max-count=1))
#
# echo $TAGif [[ $? -ne 0 ]]; thenecho_log "当前仓库没有git --tags,就使用默认的初始版本号 1.0.0"
elseold_tag_version="$(git describe --tags `git rev-list --tags --max-count=1`)"
fi
echo_log "当前版最新tag为:$old_tag_version"prebetal=`echo $old_tag_version | cut -d '-' -f 1`
new_tag_version="$(increment_version $prebetal)"
echo_log "当前组件版本号:${old_tag_version} 新的版本号:${new_tag_version}"change_spec_version $new_tag_version $SpecPathRunCommand update_git_tags $Root#------------------- 版本号输入和校验 --------------------
#verify_input_tag_format $TagVersion
#verify_input_tag_exist $TagVersion
#change_spec_version $TagVersionTagVersion=$new_tag_versionecho ${green}"RepoNameRepoName===========${RepoName}=============================================="${reset}echo ${green}"SpecPathSpecPath===========${RepoName}===================${SpecPath}==========================="${reset}pod lib lint --sources=${spec_sources}  --use-libraries --allow-warnings --no-cleanif [[ $? != 0 ]]; thengit push origin --delete $TagVersiongit tag -d $TagVersionecho ${red}"本地校验失败"${reset}exit 1elseecho ${red}"本地校验成功"${reset}fipod lib lint --sources=${spec_sources}  --use-libraries --allow-warnings --no-cleanif [[ $? != 0 ]]; thengit push origin --delete $TagVersiongit tag -d $TagVersionecho ${red}"远程校验失败"${reset}exit 2elseecho ${red}"远程校验成功"${reset}fi#   pod repo push ${RepoName} 'CommonUtil.podspec' --sources=${spec_sources} --allow-warnings --verbose --use-libraries --skip-import-validation --skip-tests
#    if [[ $? != 0 ]]; then
#        git push origin --delete $TagVersion
#        git tag -d $TagVersion
#        echo ${red}"repo push 失败"${reset}
#        exit 3
#     else
#         echo ${red}"repo push成功"${reset}
#    fiecho ${green}"========================================================="${reset}
echo ${green}"====================== 开始打包framework ===================="${reset}
echo ${green}"========================================================="${reset}pod package ${SpecName}  --force --exclude-deps --no-mangle --spec-sources=${spec_sources}copy_framework_to_target_file  $TagVersionecho ${green}"========================================================="${reset}echo ${green}"====================== 打包framework完成 ===================="${reset}echo ${green}"========================================================="${reset}git add .git commit -m "发布组件打包framework:$TagVersion"git pushgit tag -d "$TagVersion"git push origin --delete tag "$TagVersion"git tag -a $TagVersion -m "$TagVersion"git push origin $TagVersionecho ${green}"========================================================="${reset}
echo ${green}"====================== 组件发布完成 ======================="${reset}
echo ${green}"========================================================="${reset}#pod package AliMobileOneLogin.podspec  --force –embedded  --exclude-deps --no-mangle --spec-sources=https://cdn.cocoapods.org/
第六步 点击立即构建 在构建历史里面查看构建日志


第六步 查看编译状态和产物


到这里,jenkins 配置shell脚本打包组件的完整配置流程就已经完成