C#版Facefusion ,换脸器和增强器
目录
说明
效果
项目
调用代码
下载
说明
Facefusion是一款最新的开源AI视频/图片换脸项目。是原来ROOP的项目的延续。项目官方介绍只有一句话,下一代换脸器和增强器。
代码实现参考
https://github.com/facefusion/facefusion
https://github.com/hpc203/facefusion-onnxrun
效果

项目
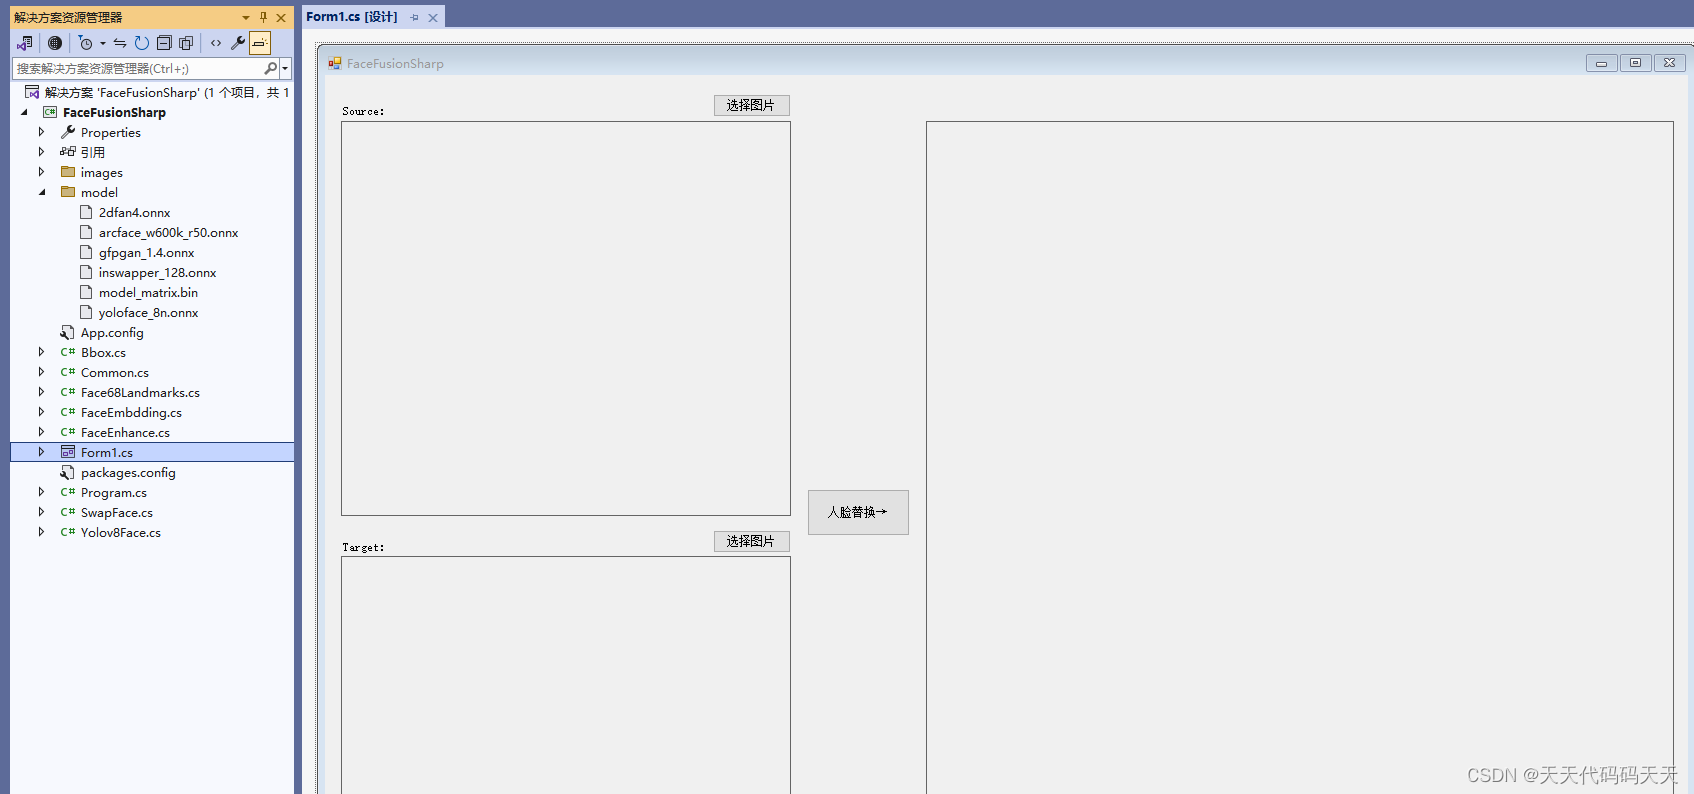
调用代码
using OpenCvSharp;
using OpenCvSharp.Extensions;
using System;
using System.Collections.Generic;
using System.Drawing;
using System.Windows.Forms;
namespace FaceFusionSharp
{
public partial class Form1 : Form
{
public Form1()
{
InitializeComponent();
}
string fileFilter = "*.*|*.bmp;*.jpg;*.jpeg;*.tiff;*.tiff;*.png";
string startupPath = "";
string source_path = "";
string target_path = "";
Yolov8Face detect_face;
Face68Landmarks detect_68landmarks;
FaceEmbdding face_embedding;
SwapFace swap_face;
FaceEnhance enhance_face;
private void button2_Click(object sender, EventArgs e)
{
OpenFileDialog ofd = new OpenFileDialog();
ofd.Filter = fileFilter;
if (ofd.ShowDialog() != DialogResult.OK) return;
pictureBox1.Image = null;
source_path = ofd.FileName;
pictureBox1.Image = new Bitmap(source_path);
}
private void button3_Click(object sender, EventArgs e)
{
OpenFileDialog ofd = new OpenFileDialog();
ofd.Filter = fileFilter;
if (ofd.ShowDialog() != DialogResult.OK) return;
pictureBox2.Image = null;
target_path = ofd.FileName;
pictureBox2.Image = new Bitmap(target_path);
}
private void button1_Click(object sender, EventArgs e)
{
if (pictureBox1.Image == null || pictureBox2.Image == null)
{
return;
}
pictureBox3.Image = null;
Application.DoEvents();
Mat source_img = Cv2.ImRead(source_path);
Mat target_img = Cv2.ImRead(target_path);
List<Bbox> boxes;
boxes = detect_face.detect(source_img);
int position = 0; //一张图片里可能有多个人脸,这里只考虑1个人脸的情况
//List<Point2f> face_landmark_5of68 = new List<Point2f>();
List<Point2f> face68landmarks = detect_68landmarks.detect(source_img, boxes[position]);
//绘图
//Cv2.Rectangle(source_img, new OpenCvSharp.Point(boxes[0].xmin, boxes[0].ymin), new OpenCvSharp.Point(boxes[0].xmax, boxes[0].ymax), new Scalar(255, 0, 0), 2);
//foreach (Point2f item in face68landmarks)
//{
// Cv2.Circle(source_img, (int)item.X, (int)item.Y, 4, new Scalar(0, 255, 0), -1);
//}
//Cv2.ImShow("source_img", source_img);
List<float> source_face_embedding = face_embedding.detect(source_img, face68landmarks);
boxes = detect_face.detect(target_img);
position = 0; //一张图片里可能有多个人脸,这里只考虑1个人脸的情况
List<Point2f> target_landmark_5;
target_landmark_5 = detect_68landmarks.detect(target_img, boxes[position]);
//绘图
//Cv2.Rectangle(target_img, new OpenCvSharp.Point(boxes[0].xmin, boxes[0].ymin), new OpenCvSharp.Point(boxes[0].xmax, boxes[0].ymax), new Scalar(255, 0, 0), 2);
//foreach (Point2f item in target_landmark_5)
//{
// Cv2.Circle(target_img, (int)item.X, (int)item.Y, 4, new Scalar(0, 255, 0), -1);
//}
//Cv2.ImShow("target_img", target_img);
Mat swapimg = swap_face.process(target_img, source_face_embedding, target_landmark_5);
Mat resultimg = enhance_face.process(swapimg, target_landmark_5);
//pictureBox3.Image = swapimg.ToBitmap();
pictureBox3.Image = resultimg.ToBitmap();
// Cv2.ImShow("resultimg", resultimg);
}
private void Form1_Load(object sender, EventArgs e)
{
detect_face = new Yolov8Face("model/yoloface_8n.onnx");
detect_68landmarks = new Face68Landmarks("model/2dfan4.onnx");
face_embedding = new FaceEmbdding("model/arcface_w600k_r50.onnx");
swap_face = new SwapFace("model/inswapper_128.onnx");
enhance_face = new FaceEnhance("model/gfpgan_1.4.onnx");
target_path = "images/target.jpg";
source_path = "images/5.jpg";
//target_path = "images/5.jpg";
//source_path = "images/14.jpg";
pictureBox1.Image = new Bitmap(source_path);
pictureBox2.Image = new Bitmap(target_path);
}
}
}
using OpenCvSharp;
using OpenCvSharp.Extensions;
using System;
using System.Collections.Generic;
using System.Drawing;
using System.Windows.Forms;namespace FaceFusionSharp
{public partial class Form1 : Form{public Form1(){InitializeComponent();}string fileFilter = "*.*|*.bmp;*.jpg;*.jpeg;*.tiff;*.tiff;*.png";string startupPath = "";string source_path = "";string target_path = "";Yolov8Face detect_face;Face68Landmarks detect_68landmarks;FaceEmbdding face_embedding;SwapFace swap_face;FaceEnhance enhance_face;private void button2_Click(object sender, EventArgs e){OpenFileDialog ofd = new OpenFileDialog();ofd.Filter = fileFilter;if (ofd.ShowDialog() != DialogResult.OK) return;pictureBox1.Image = null;source_path = ofd.FileName;pictureBox1.Image = new Bitmap(source_path);}private void button3_Click(object sender, EventArgs e){OpenFileDialog ofd = new OpenFileDialog();ofd.Filter = fileFilter;if (ofd.ShowDialog() != DialogResult.OK) return;pictureBox2.Image = null;target_path = ofd.FileName;pictureBox2.Image = new Bitmap(target_path);}private void button1_Click(object sender, EventArgs e){if (pictureBox1.Image == null || pictureBox2.Image == null){return;}pictureBox3.Image = null;Application.DoEvents();Mat source_img = Cv2.ImRead(source_path);Mat target_img = Cv2.ImRead(target_path);List<Bbox> boxes;boxes = detect_face.detect(source_img);int position = 0; //一张图片里可能有多个人脸,这里只考虑1个人脸的情况//List<Point2f> face_landmark_5of68 = new List<Point2f>();List<Point2f> face68landmarks = detect_68landmarks.detect(source_img, boxes[position]);//绘图//Cv2.Rectangle(source_img, new OpenCvSharp.Point(boxes[0].xmin, boxes[0].ymin), new OpenCvSharp.Point(boxes[0].xmax, boxes[0].ymax), new Scalar(255, 0, 0), 2);//foreach (Point2f item in face68landmarks)//{//    Cv2.Circle(source_img, (int)item.X, (int)item.Y, 4, new Scalar(0, 255, 0), -1);//}//Cv2.ImShow("source_img", source_img);List<float> source_face_embedding = face_embedding.detect(source_img, face68landmarks);boxes = detect_face.detect(target_img);position = 0; //一张图片里可能有多个人脸,这里只考虑1个人脸的情况List<Point2f> target_landmark_5;target_landmark_5 = detect_68landmarks.detect(target_img, boxes[position]);//绘图//Cv2.Rectangle(target_img, new OpenCvSharp.Point(boxes[0].xmin, boxes[0].ymin), new OpenCvSharp.Point(boxes[0].xmax, boxes[0].ymax), new Scalar(255, 0, 0), 2);//foreach (Point2f item in target_landmark_5)//{//    Cv2.Circle(target_img, (int)item.X, (int)item.Y, 4, new Scalar(0, 255, 0), -1);//}//Cv2.ImShow("target_img", target_img);Mat swapimg = swap_face.process(target_img, source_face_embedding, target_landmark_5);Mat resultimg = enhance_face.process(swapimg, target_landmark_5);//pictureBox3.Image = swapimg.ToBitmap();pictureBox3.Image = resultimg.ToBitmap();// Cv2.ImShow("resultimg", resultimg);}private void Form1_Load(object sender, EventArgs e){detect_face = new Yolov8Face("model/yoloface_8n.onnx");detect_68landmarks = new Face68Landmarks("model/2dfan4.onnx");face_embedding = new FaceEmbdding("model/arcface_w600k_r50.onnx");swap_face = new SwapFace("model/inswapper_128.onnx");enhance_face = new FaceEnhance("model/gfpgan_1.4.onnx");target_path = "images/target.jpg";source_path = "images/5.jpg";//target_path = "images/5.jpg";//source_path = "images/14.jpg";pictureBox1.Image = new Bitmap(source_path);pictureBox2.Image = new Bitmap(target_path);}}
}
下载
exe可运行程序下载
