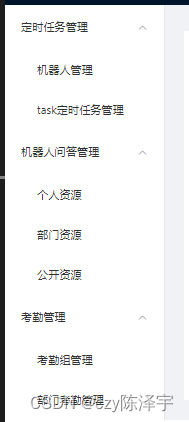
实现一个简单的动态路由:
1、先定义菜单页面组件的结构,使用的是elementUI的NavMenu 导航菜单
javascript"><template><div><el-menu default-active="1" router><el-submenu :index="item.path" v-for="item in menu_data" router><template slot="title"><i :class="item.meta.icon"></i>{{ item.meta.title }}</template><el-menu-item :index="childItem.path" v-for="childItem in item.children" :key="childItem.name">{{ childItem.meta.title }}</el-menu-item></el-submenu></el-menu></div>
</template><script>
export default {data () {return {menu_data: [{name: '定时任务管理',icon: 'location',path: '/home/robotManage',child: [{name: '机器人管理',path: '/home/robotManage',},{name: '定时任务管理',path: '/home/timerTask',},],},{name: '资源管理',icon: 'github',path: '/home/robotPerson',child: [{name: '个人资源',path: '/home/robotPerson',},{name: '部门资源',path: '/home/robotPart',},{name: '公开资源',path: '/home/robotOpen',},],},{name: '考勤组管理',icon: 'laptop',path: 'home/department',child: [{name: '部门考勤管理',path: '/home/department',},{name: '考勤组管理',path: '/home/group',},],},],}
}
</script>
效果:

2、路由部分的代码,定义需要的路由,router中index.js。
javascript">import Vue from 'vue'
import VueRouter from 'vue-router'
// 引入路由组件
import robotManage from '@/views/robotManage'
import timerTask from '@/views/timerTask'
import getmsg from '@/views/getmsg'
import login from '@/components/login.vue'
import home from '@/views/home.vue'
import robotPerson from '@/views/robotPerson.vue'
import robotPart from '@/views/robotPart.vue'
import robotOpen from '@/views/robotOpen'
import group from '@/views/group'
import department from '@/views/department'// 配置路由
export  default new VueRouter({// 路由routes: [// 登录{path: '/',name: 'login',component: login,},// home{path: '/home',name: 'home',component: home,children: [// 机器人管理{path: '/home/robotManage',name: 'robotManage',component: robotManage,},// 时间管理{path: '/home/timerTask',name: 'timerTask',component: timerTask},// 收集简书地址链接{path: '/home/getmsg',name: 'getmsg',component: getmsg},// 机器人个人问答页面{path: '/home/robotPerson',name: 'robotPerson',component: robotPerson},// 机器人部门问答页面{path: '/home/robotPart',name: 'robotPart',component: robotPart},// 机器人公开问答页面{path: '/home/robotOpen',name: 'robotOpen',component: robotOpen},{path: '/home/group',  // 路由参数component: group, // 对应的页面组件},{path: '/home/department',component: department},]},],
})
3、定义store,在state中增加属性menu_data
javascript">import Vue from 'vue'
import Vuex from 'vuex'
Vue.use(Vuex)export default new Vuex.Store({state: {menu_data: []},mutations: {setMenuData (state, data) {state.menu_data = data}}
})
4、在router路由中使用前置路由守卫beforeEach获取数据,并且提交到store。
在前置路由守卫中,用用户动态路由接口,拿到后台传递过来的该用户的菜单权限数据,把原来定义的menu_data数据换成该用户的菜单权限数据。
这一步是在router中发起用户动态路由请求,并且把获取到的用户的菜单权限数据提交到store
javascript">// 前置路由守卫:to是要进入的目标路由对象,from是当前导航正在离开的路由,next函数用于放行或跳转路由
router.beforeEach((to, from, next) => {// 首先放行路由next()// 然后发起请求reqGetRouter().then((res) => {// 用于触发一个 mutation从而实现state状态更新,// 第一个参数是mutations中定义的方法名,第二个为需要传递的数据store.commit('setMenuData', res.data)console.log(store.state.menu_data, '前置路由守卫调用接口后获取的状态')}).catch((error) => {console.error('请求路由数据失败:', error)})
})
5、data里面的属性menu_data不能直接返回了,需通过computed来返回,并且返回的值是从store里面获取的
javascript">computed:{menu_data:{get(){return this.$store.state.menu_data}}
}
6、完整代码
javascript"><template><el-menu default-active="1" router><el-submenu :index="item.path" v-for="item in menu_data" router><template slot="title"><i :class="item.meta.icon"></i>{{ item.meta.title }}</template><el-menu-item :index="childItem.path" v-for="childItem in item.children" :key="childItem.name">{{ childItem.meta.title }}</el-menu-item></el-submenu></el-menu>
</template><script>
export default {computed: {menu_data: {get () {return this.$store.state.menu_data}}}
}
</script>


