小伙伴们大家好,本片文章将会讲解 哈希函数与哈希 之 哈希桶解决哈希冲突 的相关内容。
如果看到最后您觉得这篇文章写得不错,有所收获,麻烦点赞👍、收藏🌟、留下评论📝。您的支持是我最大的动力,让我们一起努力,共同成长!
🎉系列文章: 1. 闭散列的线性探测实现哈希表
文章目录
- `0. 前言`
- `1. 何为开散列`
- ==<font color = blue><b>🎧1.1 开散列的概念🎧==
- ==<font color = blue><b>🎧1.2 开散列哈希表图示🎧==
- `2. 开散列哈希表的实现`
- `3. 字符串哈希与仿函数`
- `4.哈希桶实现哈希表完整代码`
0. 前言
在上一篇文章中我们详细描述了如何用 开放寻址法(闭散列)的线性探测 的方法来实现哈希表。此篇文章我们将用 开散列的哈希桶 来实现哈希表。
1. 何为开散列
🎧1.1 开散列的概念🎧
开散列法又叫链地址法(开链法),首先对关键码集合用 散列函数计算散列地址,具有相同地址的关键码归于同一子集合,每一个子集合称为一个桶,各个桶中的元素通过一个单链表链接起来,各链表的头结点存储在哈希表中。
🎧1.2 开散列哈希表图示🎧
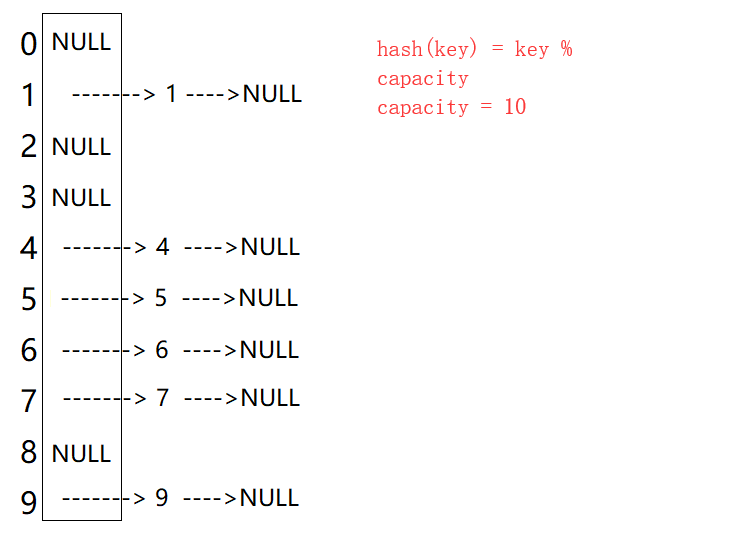
插入元素44
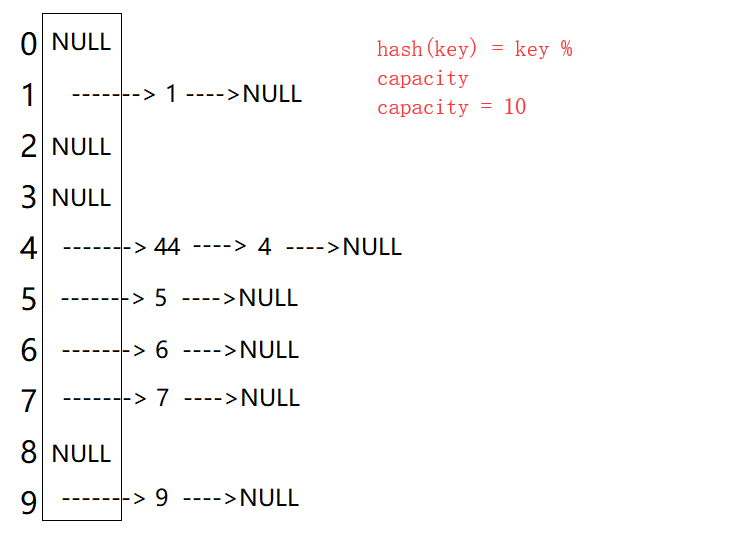
从上图可以看出,开散列中每个桶中放的都是发生哈希冲突的元素。
2. 开散列哈希表的实现
🎧2.1 开散列哈希表的结构🎧
很明显,这个哈希表中存储了一个指针数组,我们可以用vector来实现,数组中的每个位置存储了一个节点类型的指针,每个节点相当于是链表的一个节点,即:节点中有一个链表类型的指针,还有一个存放值的位置。
哈希节点和哈希表结构代码:
// 定义节点类型
template<class K, class V>
struct HashNode
{// 存储值的位置pair<K, V> _kv;// 节点类型指针HashNode<K, V>* _next;HashNode(const pair<K,V>& kv):_kv(kv),_next(nullptr){}
};// 定义哈希表,第三个模板类型是仿函数,上一篇文章讲过
template<class K, class V, class HashFunc = HashFunc<K>>
class HashTable
{
public:typedef HashNode<K, V> Node;HashTable(size_t n = 10){_tables.resize(n);}
private:// 指针数组vector<Node*> _tables;// 存储的元素个数size_t _n = 0;
};
🎧2.2 哈希桶插入Insert🎧
插入元素的思路:
- 利用 哈希函数 计算出 要插入的值应该存放在哪个桶里面;
- 之后在对应的桶中进行链表的头插:
- 首先
new一个哈希表的节点newnode; - 让
newnode->_next= _tables[i]; - 再让
newnode当作头:_tables[i] = newnode;
- 首先
++_n;
关于哈希桶的扩容:
在线性探测中,当负载因子 load_factor 在 0.75 0.75 0.75 左右的时候就要进行扩容,但是在哈希桶中,我们可以适当让负载因子大一点,在STL库中,哈希桶的扩容是当负载因子等于 1 1 1 的时候进行扩容,即: n = = t a b l e . s i z e ( ) n == table.size() n==table.size()。
注意:哈希桶中的负载因子是可以大于1的,因为一个桶中可能存储的不止一个值。
扩容思路1:
我们可以继续利用在线性探测的扩容思路:
- 新定义一个
HashTable的对象newht,表的容量还是两倍; - 遍历原始的
HashTable中的vector _tables:- 如果
_tables[i]不为空,那么就调用newht.Insert()函数;- 定义一个节点类型的指针
Node* cur = _tables[i]; - 调用
newht.Insert(cur->_kv); - 再让
cur = cur->_next;
- 定义一个节点类型的指针
- 如果
_tables[i]为空,就让i++;
- 如果
- 直到
i == _tables.size(),则newht插入完成; - 最后两个
_tables进行交换:_tables.swap(newht._tables);
但是这样扩容虽然可以,但是会很麻烦,因为:
- 由于每个哈希节点是
new出来的,因此不能直接使用vector的析构函数,要自己写一个析构函数,不然会有内存泄漏; - 每次调用
newht.Insert()的时候都会重新new一个节点,原始的节点都会被释放,因此这样操作就会很麻烦编译器。
扩容代码(version1):
// 手动进行析构
~HashTable()
{for (size_t i = 0; i < _tables.size(); ++i){Node* cur = _tables[i];Node* next = nullptr;while (cur){next = cur->_next;delete cur;cur = next;}}
}// 扩容代码
if (_n == _tables.size())
{// 方法1:新定义一个对象size_t newsize = 2 * _tables.size();HashTable<K, V> newht(newsize);for (size_t i = 0; i < _tables.size(); i++){Node* cur = _tables[i];Node* next = nullptr;while (cur){next = cur->_next;newht.Insert(cur->_kv);cur = next;}}_tables.swap(newht._tables);
}
扩容思路2:
- 定义一个新表
vector newtables,表的容量还是两倍; - 遍历旧表,如果当前位置不为空,在新表中进行插入,思路如下:
- 定义一个哈希节点指针
Node* cur = _tables[i]; - 通过
cur->_kv.first和 哈希函数 计算出 应该插入到新表的哪个桶中(hashi); - 由于插入之后会找不到下一个节点的位置,所以应该再定义一个
Node* next = cur->next; - 在新表中头插
cur,还是同样的思路:- 让
cur->_next = newtables[hashi](cur的下一个指向原始的头节点); - 接着让
newtables[hashi] = cur(让cur当头); - 插入完成让
cur = next; - 直到
cur == nullptr,说明此桶中的节点都在新表中插入完成;
- 让
- 让旧表中的
_tables[i] = nullptr; (这部也可以不做,因为表不会调用析构函数,但是最好还是置空一下)
- 定义一个哈希节点指针
- 如果当前位置为空,则
i++; - 直到
i == _tables.size(),说明此表的所有元素在新表中插入完成; - 最后两表进行交换:
_tables.swap(newtables);
扩容代码(version2):
if (_n == _tables.size())
{vector<Node*> newtable;// 两倍的旧表容量size_t newsize = 2 * _tables.size();newtable.resize(newsize);for (size_t i = 0; i < _tables.size(); ++i){Node* cur = _tables[i];Node* next = nullptr;while (cur){// 记录下一个位置next = cur->_next;// 计算在新表中的位置size_t hashi = cur->_kv.first % newtable.size();// cur的下一个位置指向原来的头cur->_next = newtable[hashi];// cur当头newtable[hashi] = cur;// 更新cur的位置cur = next;}// 旧表置空_tables[i] = nullptr;}_tables.swap(newtable);
}
完整的插入逻辑代码:
bool Insert(const pair<K, V>& kv)
{// 这边就是上一篇文章的仿函数HashFunc hf;// 查找思路待会实现if (Find(kv.first)){return false;}// 判断负载因子扩容// 负载因子为1扩容if (_n == _tables.size()){// 方法1:新定义一个对象/*size_t newsize = 2 * _tables.size();HashTable<K, V> newht(newsize);for (size_t i = 0; i < _tables.size(); i++){Node* cur = _tables[i];Node* next = nullptr;while (cur){next = cur->_next;newht.Insert(cur->_kv);cur = next;}}_tables.swap(newht._tables);*/// 方法2:新定义一个表vector<Node*> newtable;size_t newsize = 2 * _tables.size();newtable.resize(newsize);for (size_t i = 0; i < _tables.size(); ++i){Node* cur = _tables[i];Node* next = nullptr;while (cur){next = cur->_next;size_t hashi = hf(cur->_kv.first) % newtable.size();cur->_next = newtable[hashi];newtable[hashi] = cur;cur = next;}_tables[i] = nullptr;}_tables.swap(newtable);}size_t hashi = hf(kv.first) % _tables.size();Node* newnode = new Node(kv);// 头插newnode->_next = _tables[hashi];_tables[hashi] = newnode;++_n;return true;
}
🎧2.3 哈希桶查找Find🎧
查找实现思路如下:
- 根据
key和 哈希函数计算出对应的桶(hashi); - 在此桶中进行寻找:
- 定义一个哈希节点类型的指针
Node* cur = _tables[hashi]; - 一直向后寻找,直到找到或者
cur == nullptr(没有此元素)。 - 找到返回此位置的指针,找不到返回空。
- 定义一个哈希节点类型的指针
完整的查找逻辑代码:
Node* Find(const K& key)
{HashFunc hf;// 根据 `key` 和 哈希函数计算出对应的桶(`hashi`)size_t hashi = hf(key) % _tables.size();Node* cur = _tables[hashi];while (cur){if (cur->_kv.first == key){return cur;}else{cur = cur->_next;}}return nullptr;
}
🎧2.4 哈希桶删除Erase🎧
删除实现思路如下:
- 根据
key和 哈希函数计算出对应的桶(hashi); - 在此桶中进行查找,这里要考虑要删除的节点的前一个节点是否为空;
- 如果前一个节点不为空,直接让
prev->_next = cur->_next; - 如果前一个节点为空,就让
_tables[i] = cur->_next; delete cur; cur = nullptr;- 如果一直到
cur == nullptr最后都未曾找到,则返回false; - 最后
--_n。
完整的删除逻辑代码:
bool Erase(const K& key)
{HashFunc hf;//  根据 `key` 和 哈希函数计算出对应的桶(`hashi`);size_t hashi = hf(key) % _tables.size();Node* cur = _tables[hashi];Node* prev = nullptr;while (cur){if (cur->_kv.first == key){// 如果前一个节点为空,就让 `_tables[i] = cur->_next`;if (prev == nullptr){_tables[hashi] = cur->_next;}// 如果前一个节点为空,就让 `_tables[i] = cur->_next`else{prev->_next = cur->_next;}delete cur;return true;}else{prev = cur;cur = cur->_next;}}return false;
}
3. 字符串哈希与仿函数
字符串哈希我们上一篇文章讲过::
- 当我们插入数字的类型,例如:
double、float、int、 char、unsigned用的是一种类型的哈希函数; - 当我们插入字符串类型
string的时候用的是另一种类型的哈希函数; - 🔎遇到这种情况的时候我们一般用仿函数来解决问题!!!🔍
因此我们要加一个仿函数的模板参数:class HashFunc
对于数字类型的仿函数代码:
template<class K>
struct Hash
{size_t operator()(const K& key){// 强转即可return (size_t)key;}
};
对于string类型的仿函数代码:
这里先写一下,待会再细谈:
struct StringFunc
{size_t operator()(const string& str){size_t ret = 0;for (auto& e : str){ret *= 131;ret += e;}return ret;}
};
由于string类型的哈希我们经常用,因此可以用模板的特化,并将此模板用缺省参数的形式传递,这样我们就不用在每次用的时候传入仿函数了。
template<class K>
struct Hash
{size_t operator()(const K& key){return (size_t)key;}
};template<>
struct Hash<string>
{size_t operator()(const string& str){size_t ret = 0;for (auto& e : str){ret *= 131;ret += e;}return ret;}
};
4.哈希桶实现哈希表完整代码
#pragma once
#include <iostream>
#include <vector>
using namespace std;template<class K>
struct HashFunc
{size_t operator()(const K& key){return (size_t)key;}
};template<>
struct HashFunc<string>
{size_t operator()(const string& str){size_t hash_value = 0;for (auto& e : str){hash_value = hash_value * 131 + e;}return hash_value;}
};namespace hash_bucket
{template<class K, class V>struct HashNode{pair<K, V> _kv;HashNode<K, V>* _next;HashNode(const pair<K,V>& kv):_kv(kv),_next(nullptr){}};template<class K, class V, class HashFunc = HashFunc<K>>class HashTable{public:typedef HashNode<K, V> Node;HashTable(size_t n = 10){_tables.resize(n);}~HashTable(){for (size_t i = 0; i < _tables.size(); ++i){Node* cur = _tables[i];Node* next = nullptr;while (cur){next = cur->_next;delete cur;cur = next;}}}bool Insert(const pair<K, V>& kv){HashFunc hf;if (Find(kv.first)){return false;}// 判断负载因子扩容// 负载因子为1扩容if (_n == _tables.size()){// 方法1:新定义一个对象/*size_t newsize = 2 * _tables.size();HashTable<K, V> newht(newsize);for (size_t i = 0; i < _tables.size(); i++){Node* cur = _tables[i];Node* next = nullptr;while (cur){next = cur->_next;newht.Insert(cur->_kv);cur = next;}}_tables.swap(newht._tables);*/// 方法2:新定义一个表vector<Node*> newtable;size_t newsize = 2 * _tables.size();newtable.resize(newsize);for (size_t i = 0; i < _tables.size(); ++i){Node* cur = _tables[i];Node* next = nullptr;while (cur){next = cur->_next;size_t hashi = hf(cur->_kv.first) % newtable.size();cur->_next = newtable[hashi];newtable[hashi] = cur;cur = next;}_tables[i] = nullptr;}_tables.swap(newtable);}size_t hashi = hf(kv.first) % _tables.size();Node* newnode = new Node(kv);// 头插newnode->_next = _tables[hashi];_tables[hashi] = newnode;++_n;return true;}Node* Find(const K& key){HashFunc hf;size_t hashi = hf(key) % _tables.size();Node* cur = _tables[hashi];while (cur){if (cur->_kv.first == key){return cur;}else{cur = cur->_next;}}return nullptr;/*for (size_t i = 0; i < _tables.size(); i++){Node* cur = _tables[i];Node* next = nullptr;while (cur){next = cur->_next;if (cur->_kv.first == key){return cur;}else{cur = next;}}}return nullptr;*/}bool Erase(const K& key){HashFunc hf;size_t hashi = hf(key) % _tables.size();Node* cur = _tables[hashi];Node* prev = nullptr;while (cur){if (cur->_kv.first == key){if (prev == nullptr){_tables[hashi] = cur->_next;}else{prev->_next = cur->_next;}delete cur;return true;}else{prev = cur;cur = cur->_next;}}return false;//for (size_t i = 0; i < _tables.size(); ++i)//{//	Node* prev = nullptr;//	Node* cur = _tables[i];//	//Node* next = nullptr;//	while (cur)//	{//		if (cur->_kv.first == key)//		{//			if (prev == nullptr)//			{//				_tables[i] = cur->_next;//			}//			else//			{//				prev->_next = cur->_next;//			}//			delete cur;//			return true;//		}//		else//		{//			prev = cur;//			cur = cur->_next;//		}//	}//}//return false;}private:vector<Node*> _tables;size_t _n = 0;};void HashTest1(){int a[] = { 10001,11,55,24,19,12,31,93,67,26 };HashTable<int, int> ht;for (auto e : a){ht.Insert(make_pair(e, e));}ht.Insert(make_pair(32, 32));//ht.Insert(make_pair(32, 32));ht.Erase(31);ht.Erase(10001);}void HashTest2(){string arr[] = { "苹果", "西瓜", "苹果", "西瓜", "苹果", "苹果", "西瓜","苹果", "香蕉", "苹果", "香蕉","苹果","草莓", "苹果","草莓" };HashTable<string, string> countMap;for (auto& e : arr){countMap.Insert(make_pair(e, e));}}
}