一、简介
1.什么是playbook
Ansible Playbook 是设定自动化任务的一种蓝图,可在无需人工干预或有限干预的前提下执行复杂的 IT 操作。Ansible Playbook 对一组或一类共同构成 Ansible 清单的主机执行。
Ansible Playbook 本质上是一些框架,是一些预先编写的代码,开发人员可以用作临时模板或起始模板。Ansible Playbook 常被用于自动化 IT 基础架构(例如,操作系统和 Kubernetes 平台)、网络、安全系统,以及开发人员角色(例如 Git)。
Ansible Playbook 可以帮助 IT 人员进行应用、服务、服务器节点或其他设备的编程,无需花费人力去从头创建所有事物。Ansible Playbook 及其中的条件、变量和任务,都可以无限期保存、分享或重复使用。
2.playbook组成
(1)Tasks:任务,即通过 task 调用 ansible 的模板将多个操作组织在一个 playbook 中运行
(2)Variables:变量
(3)Templates:模板
(4)Handlers:处理器,当changed状态条件满足时,(notify)触发执行的操作
(5)Roles:角色
二、应用实例
先修改一下主机清单文件
vim /etc/ansible/hosts

1.基础命令
1.编写 ceshi1.yaml 文件
---
- name: install httpdgather_facts: falsehosts: webremote_user: roottasks:- name: connection ceshiping:- name: disable firewalldservice: name=firewalld state=stopped- name: install apacheyum: name=httpd state=latest- name: install treeyum: name=tree- name: install config filecopy: src=/opt/httpd.conf dest=/etc/httpd/conf/httpd.confnotify: "restart httpd"- name: start httpd serviceservice: enabled=true name=httpd state=startedhandlers:- name: restart httpdservice: name=httpd state=restarted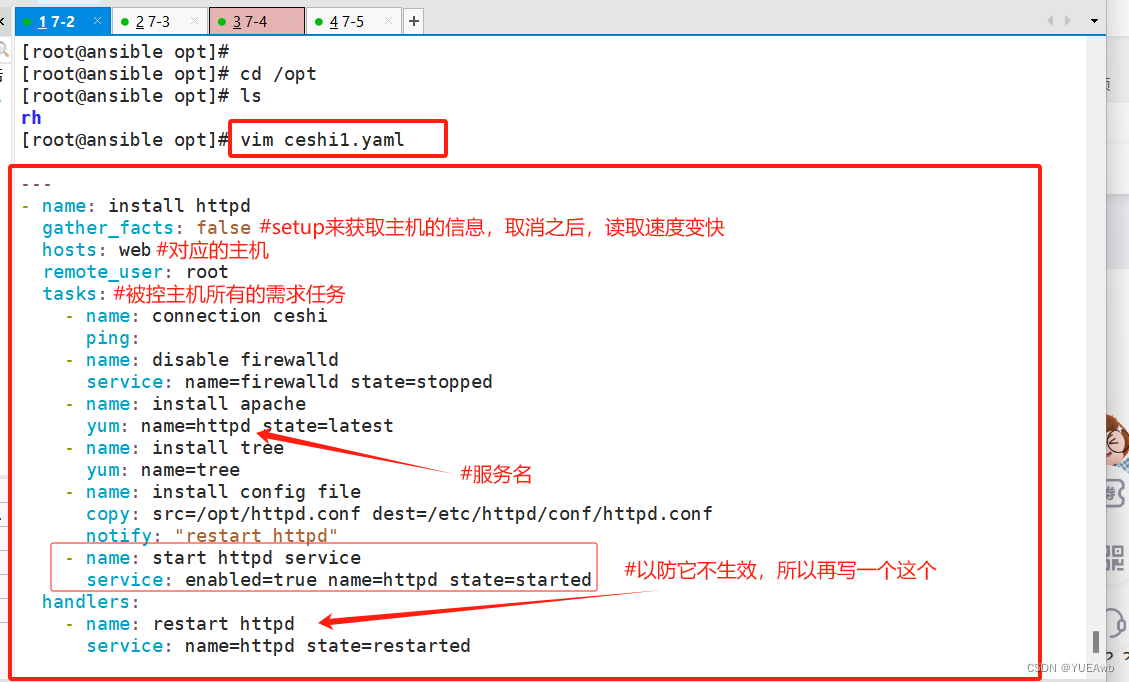
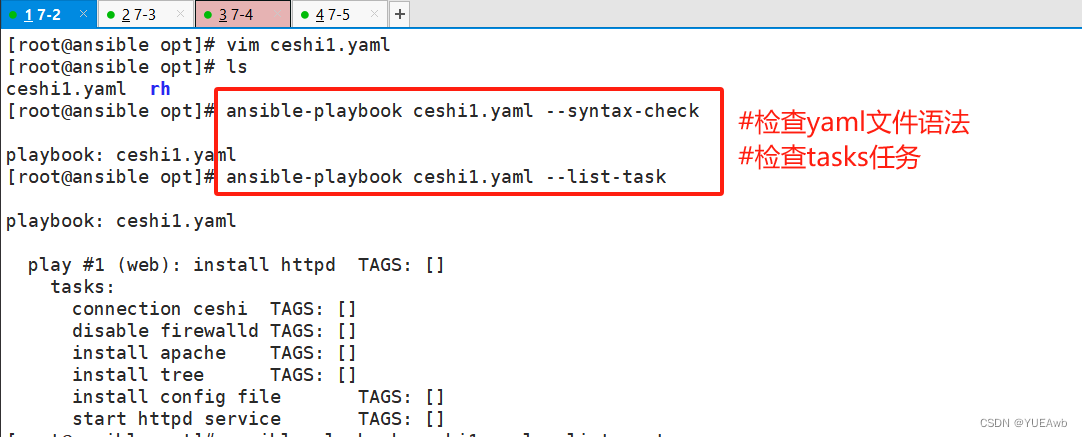
2.运行Playbook
[root@ansible opt]# ansible-playbook ceshi1.yaml --syntax-check[root@ansible opt]# ansible-playbook ceshi1.yaml --list-task
[root@ansible opt]# ansible-playbook ceshi1.yaml --list-host

运行playbook
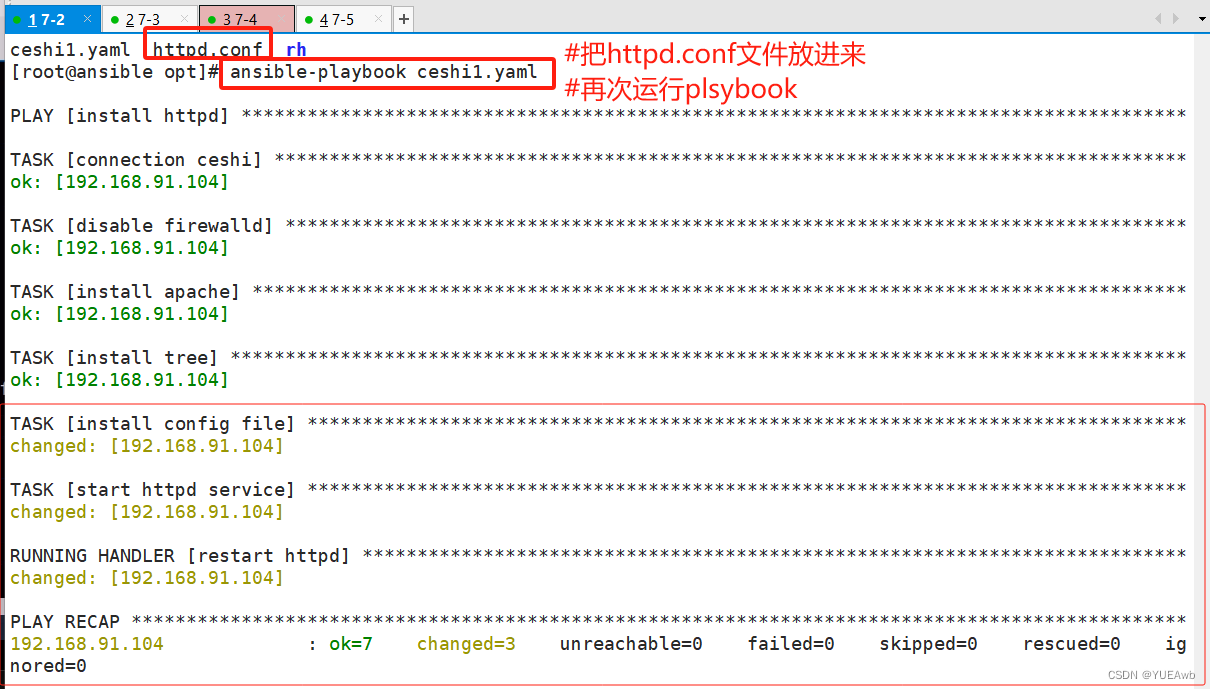
[root@ansible opt]# ansible-playbook ceshi1.yaml

因为我们在yaml文件中写了
- name: install config file
copy: src=/opt/httpd.conf dest=/etc/httpd/conf/httpd.conf#但是我们没有httpd.conf文件,所以报错了
#把文件放进来就好了
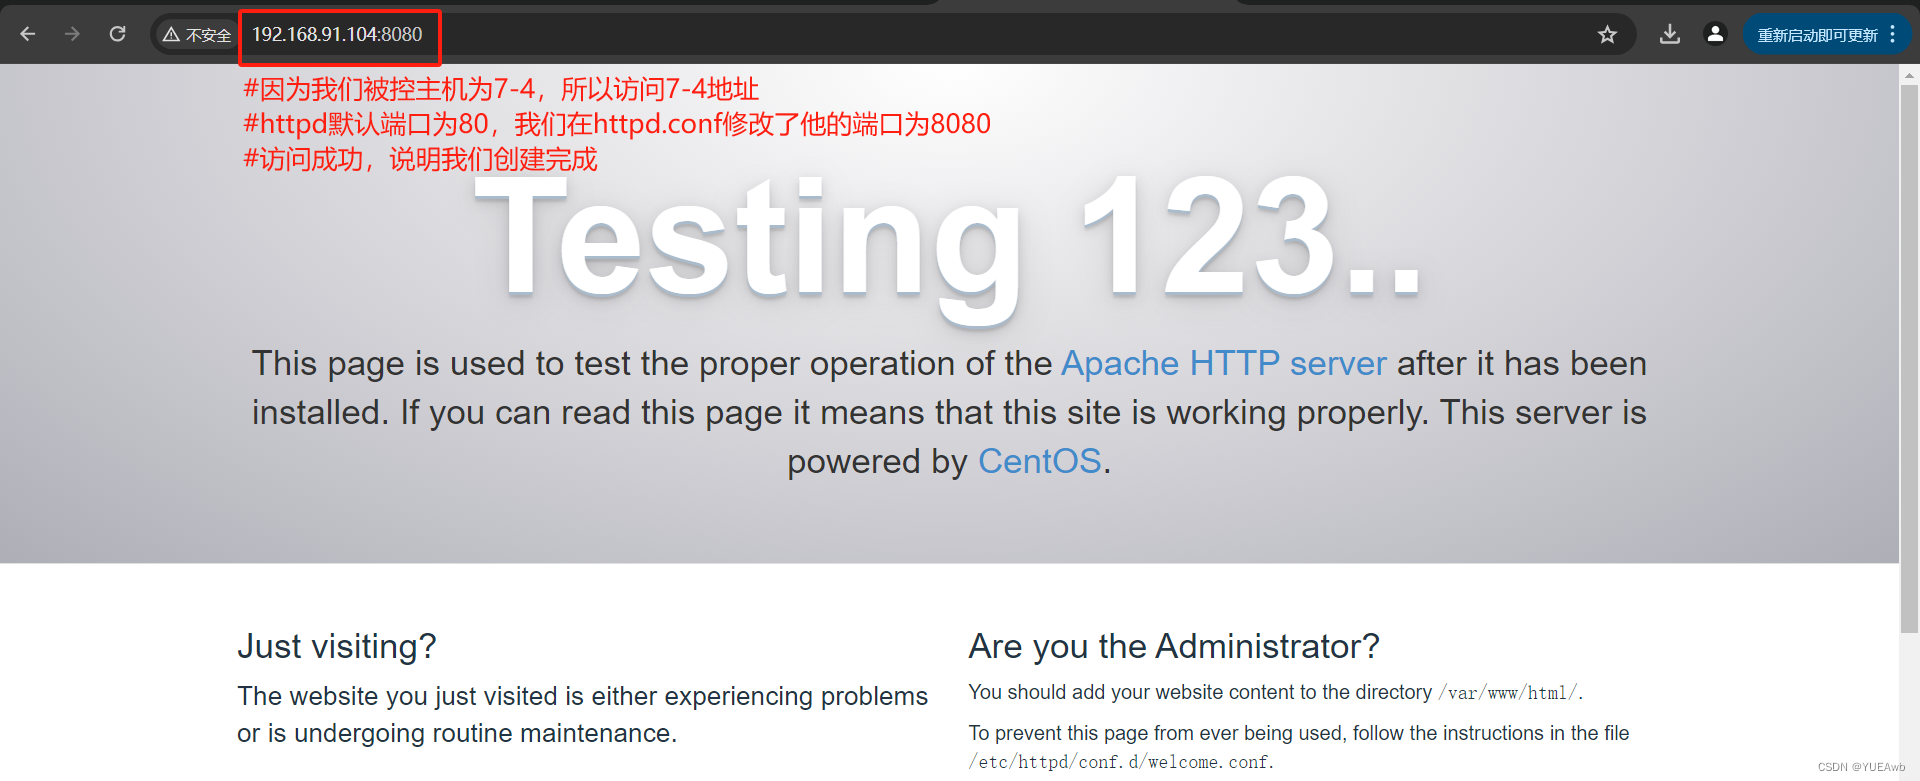
浏览器访问
2.定义、引用变量
目的:
当我们服务发生改变时,只需要更改变量,不需要重新去写新的代码
1.编写ceshi2.yaml文件
7-2修改
---
- name: bianlianghosts: webremote_user: rootvars:- groupname: aa- username: nginxtasks:- name: create_groupgroup: name={{groupname}} system=yes gid=306- name: create useruser: name={{username}} uid=306 group={{groupname}}- name: copy filecopy: content="{{ansible_default_ipv4}}" dest=/opt/aa.txt

执行文件
[root@ansible opt]# ansible-playbook ceshi2.yaml -e "username=xzq"

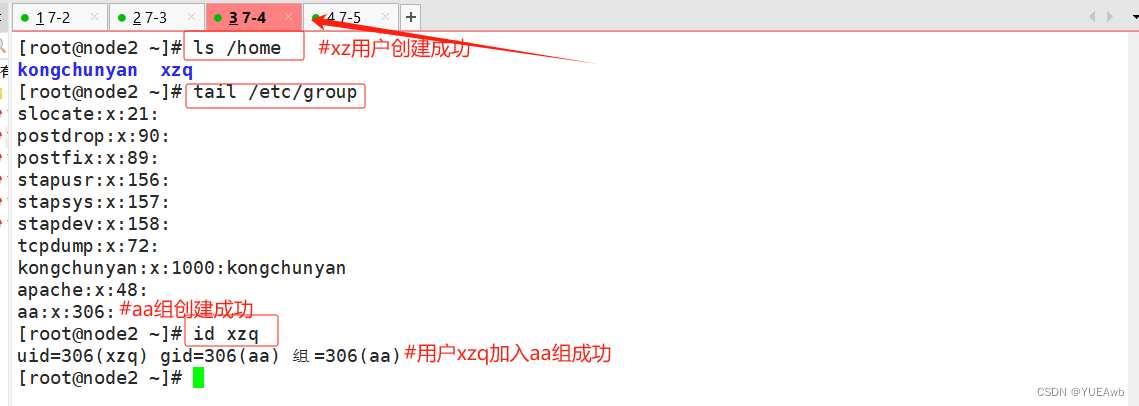
7-4查看结果

3.指定远程主机sudo切换用户
当ssh不允许root用户登录时,打开普通用户sudo提权
1.编写ceshi3.yaml文件
7-2修改
---
- hosts: webremote_user: zhangsanbecome: yesbecome_user: root

2.修改被控主机sudoers文件
被控主机7-4修改
[root@localhost ~]# useradd zhangsan
[root@localhost ~]# ls /home
kongchunyan  zhangsan
[root@localhost ~]# passwd zhangsan

修改sudoers配置文件,加入zhangsan用户
vim /etc/sudoers


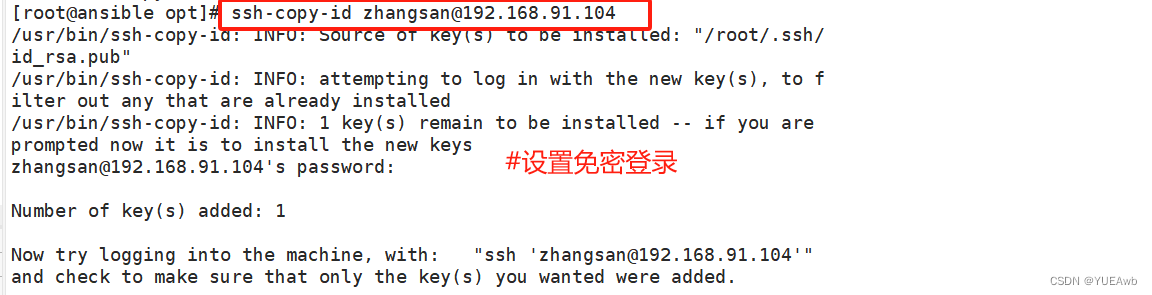
3.给zhangsan做免密登录
ssh-copy-id zhangsan@192.168.91.104
测试一下
[root@ansible opt]# ssh zhangsan@192.168.91.104

4.运行看结果
ansible-playbook ceshi3.yaml -K
ansible-playbook是一种定义的任务方式,再编写playbook时可以使用变量来传数据
playbook引用变量指的是:在playbook中使用变量,代理静态常量值,来实现动态的配置过程,通过引用变量,可以使playbook更具有灵活性和可重复性
{{name}}来引用变量
4.when条件判断
在Ansible中,提供的唯一一个通用的条件判断是when指令,当when指令的值为true时,则该任务执行,否则不执行该任务。
//when一个比较常见的应用场景是实现跳过某个主机不执行任务或者只有满足条件的主机执行任务
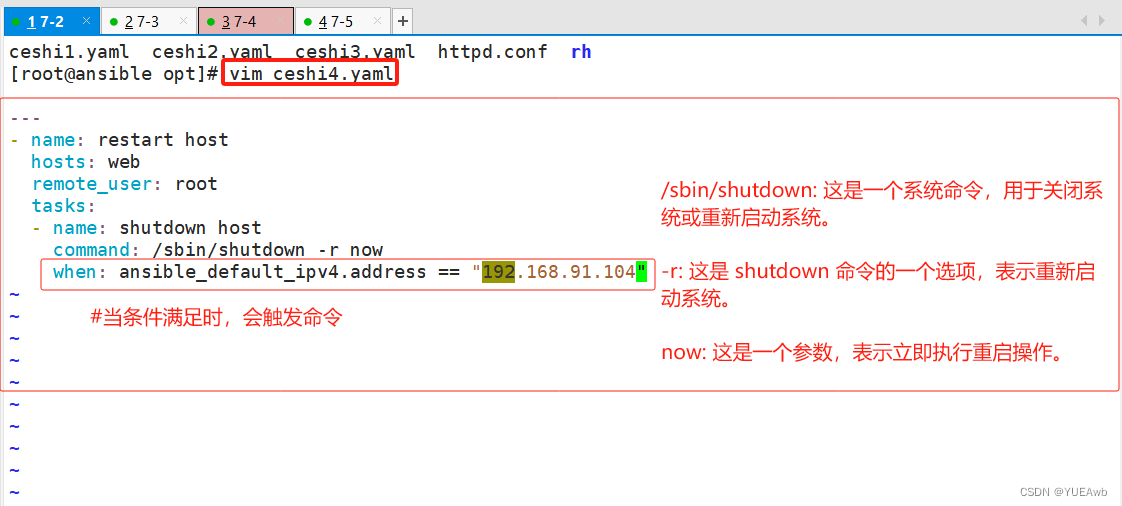
1.编写ceshi4.yaml文件
---
- name: restart hosthosts: webremote_user: roottasks:- name: shutdown hostcommand: /sbin/shutdown -r nowwhen: ansible_default_ipv4.address == "192.168.91.104"
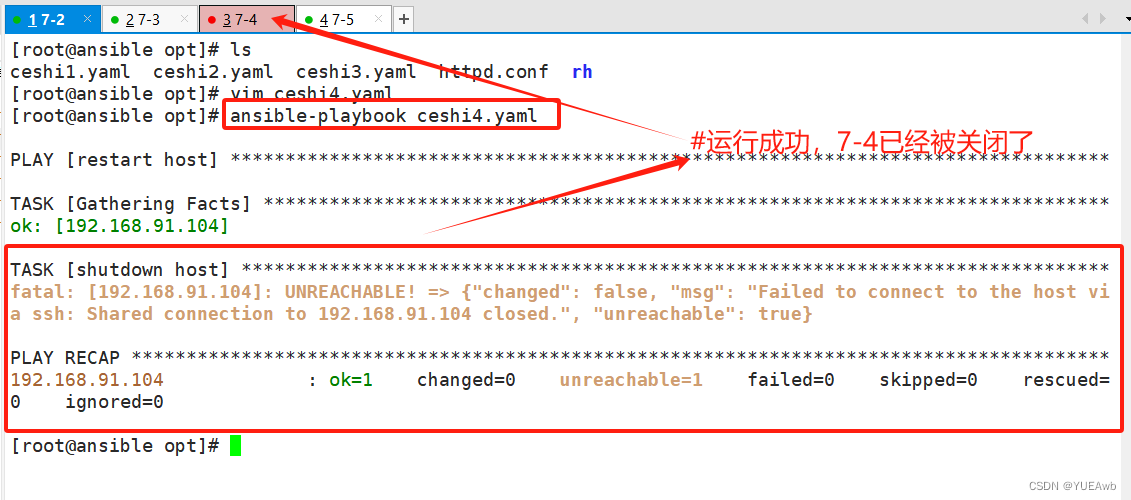
运行看结果
用来进行条件判断的关键字,作用是,只在你指定条件下,会执行下面的任务,当条件为真时,任务就会被执行,否则,任务会被跳过
5.迭代
Ansible提供了很多种循环结构,一般都命名为with_items,作用等同于 loop 循环。
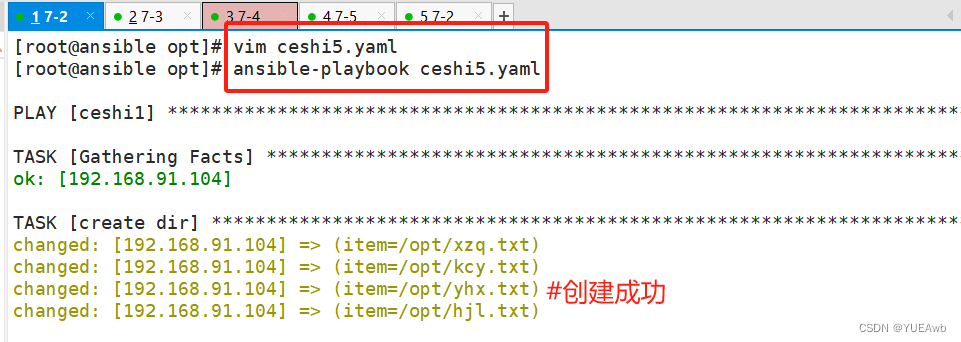
1.编写ceshi5.yaml文件
遍历创建目录
---
- name: ceshi1hosts: webtasks:- name: create dirfile: path={{item}} state=directorywith_items:- /opt/xzq- /opt/kcy- /opt/yhx- /opt/hjl

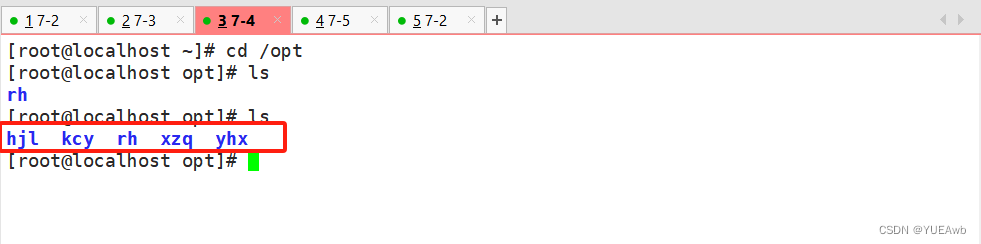
运行查看结果

修改一下,创建文件
---
- name: ceshi1hosts: webtasks:- name: create dirfile: path={{item}} state=touchwith_items:- /opt/xzq.txt- /opt/kcy.txt- /opt/yhx.txt- /opt/hjl.txt

运行看结果

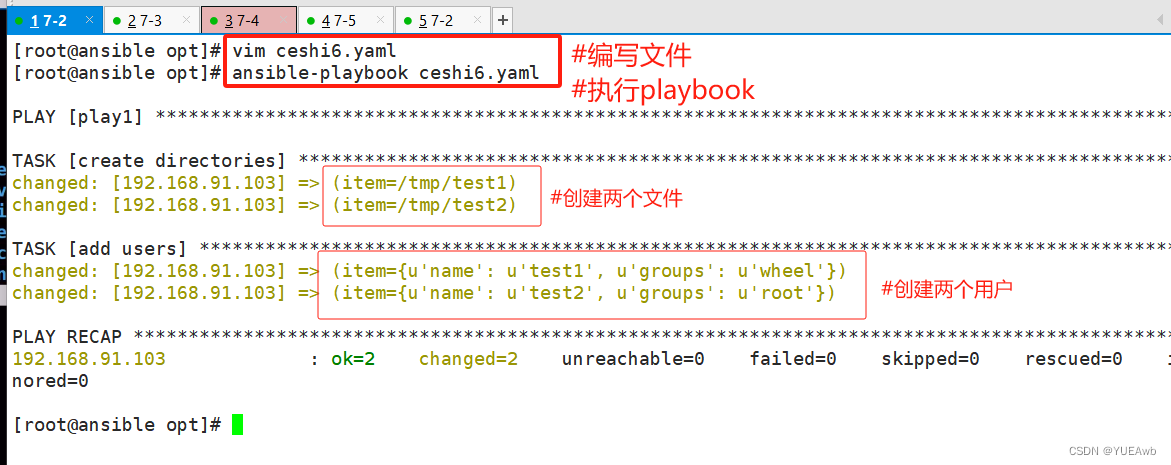
2.编写ceshi6.yaml文件
遍历创建目录和用户
---
- name: play1hosts: node1gather_facts: flasetasks:- name: create directoriesfile:path: "{{item}}"state: directorywith_items:- /tmp/test1- /tmp/test2- name: add usersuser: name={{item.name}} state=present groups={{item.groups}}with_items:- name: test1groups: wheel- name: test2groups: root

运行看结果

6.Templates模块
Jinja是基于Python的模板引擎。Template类是Jinja的一个重要组件,可以看作是一个编译过的模板文件,用来产生目标文本,传递Python的变量给模板去替换模板中的标记。
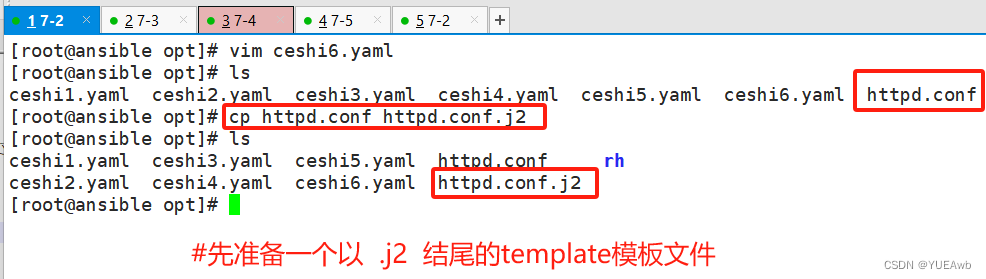
1.修改配置文件

修改内容


2.修改主机清单文件

修改内容

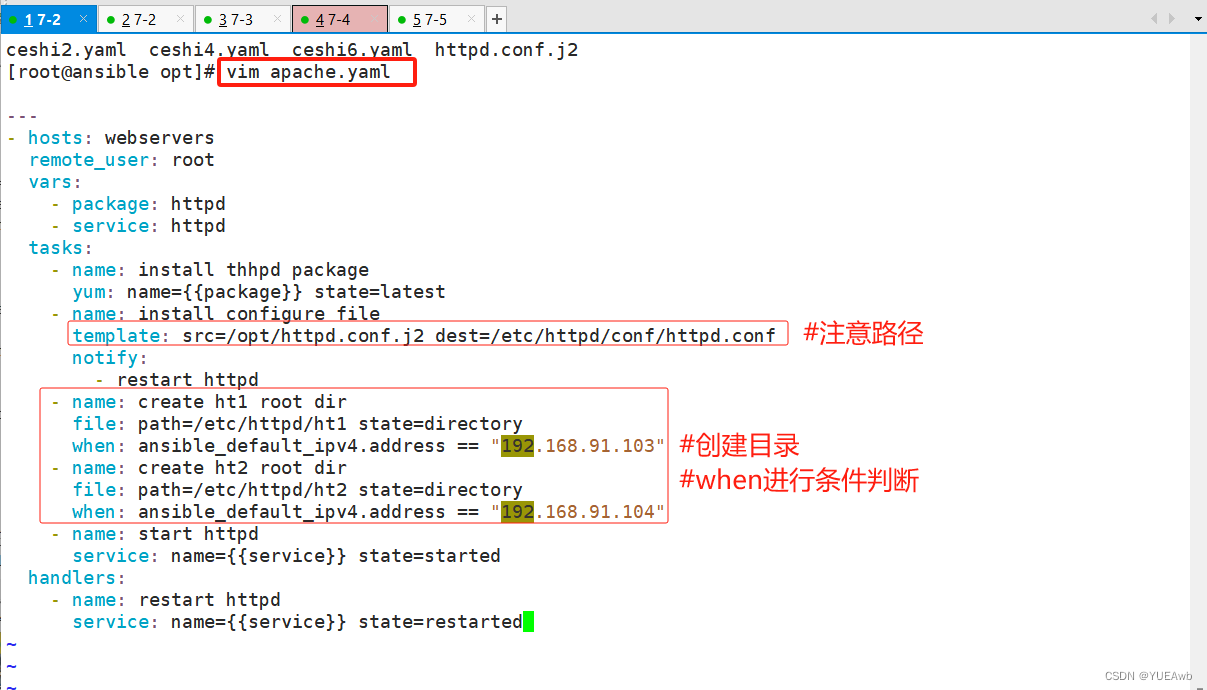
3.编写playbook文件
---
- hosts: webserversremote_user: rootvars:- package: httpd- service: httpdtasks:- name: install thhpd packageyum: name={{package}} state=latest- name: install configure filetemplate: src=/opt/httpd.conf.j2 dest=/etc/httpd/conf/httpd.confnotify:- restart httpd- name: create ht1 root dirfile: path=/etc/httpd/ht1 state=directorywhen: ansible_default_ipv4.address == "192.168.91.103"- name: create ht2 root dirfile: path=/etc/httpd/ht2 state=directorywhen: ansible_default_ipv4.address == "192.168.91.104"- name: start httpdservice: name={{service}} state=startedhandlers:- name: restart httpdservice: name={{service}} state=restarted
4.执行playbook文件
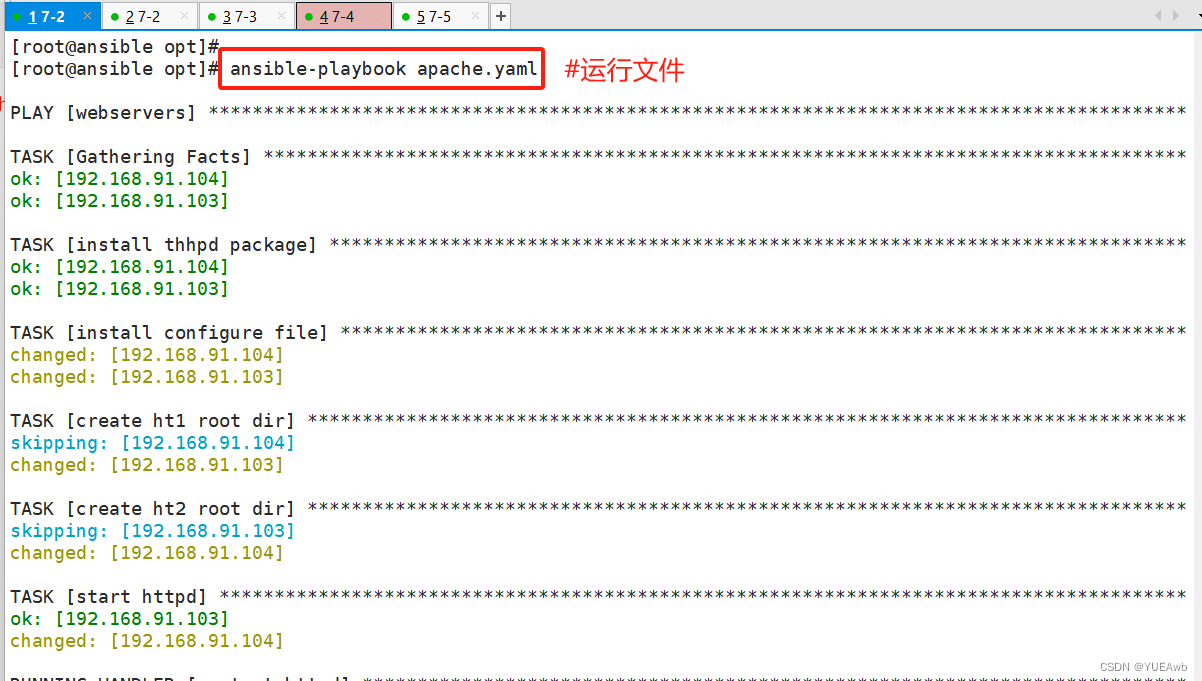
5.验证结果
两台httpd可以分别监听80和81端口,各自目录页创建成功


7.tags模块
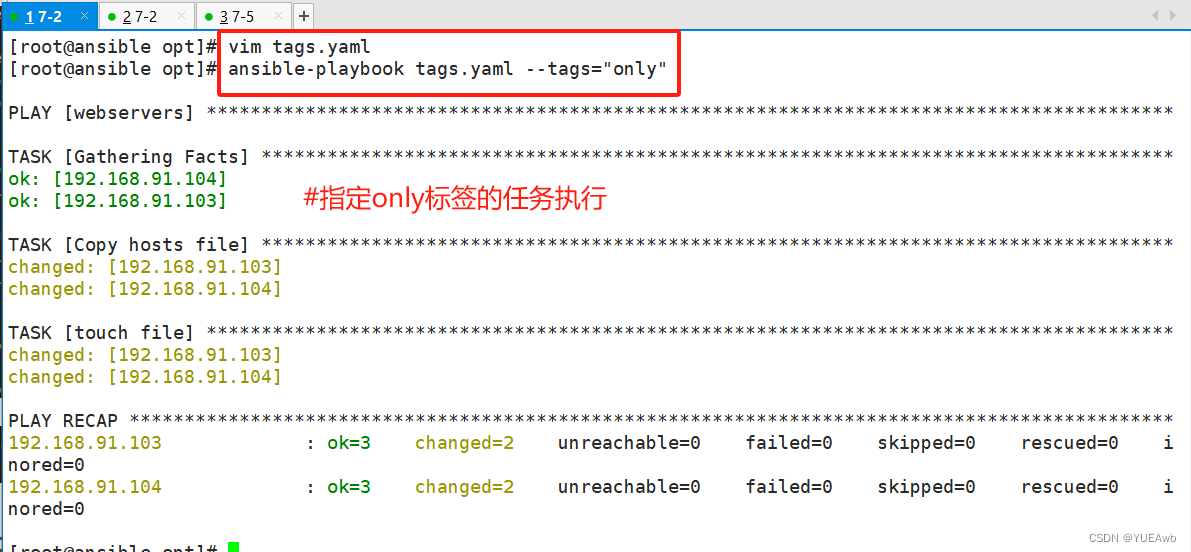
1. 可以在一个playbook中为某个或某些任务定义“标签”,在执行此playbook时通过ansible-playbook命令使用--tags选项能实现仅运行指定的tasks。
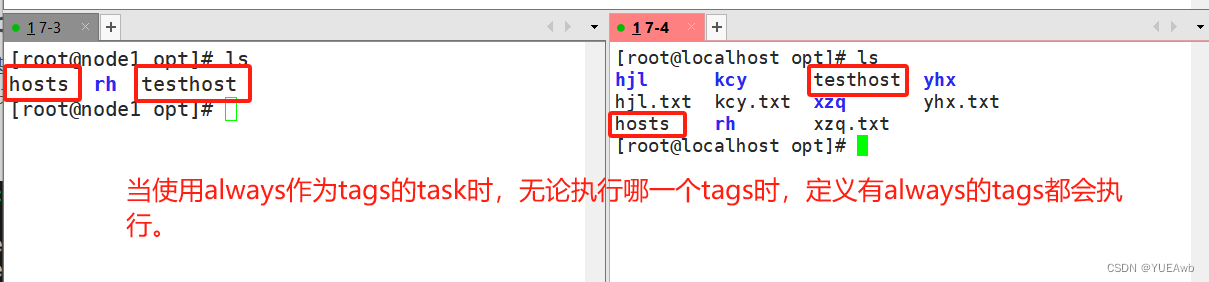
2. playbook还提供了一个特殊的tags为always。作用就是当使用always当tags的task时,无论执行哪一个tags时,定义有always的tags都会执行。
1.编写tags.yaml文件
---
- hosts: webserversremote_user: roottasks:- name: Copy hosts filecopy: src=/etc/hosts dest=/opt/hoststags:- only- name: touch filefile: path=/opt/testhost state=touchtags:- always

2.运行看结果
3.编写测试运行顺序
[root@ansible opt]# vim tags.yaml ---
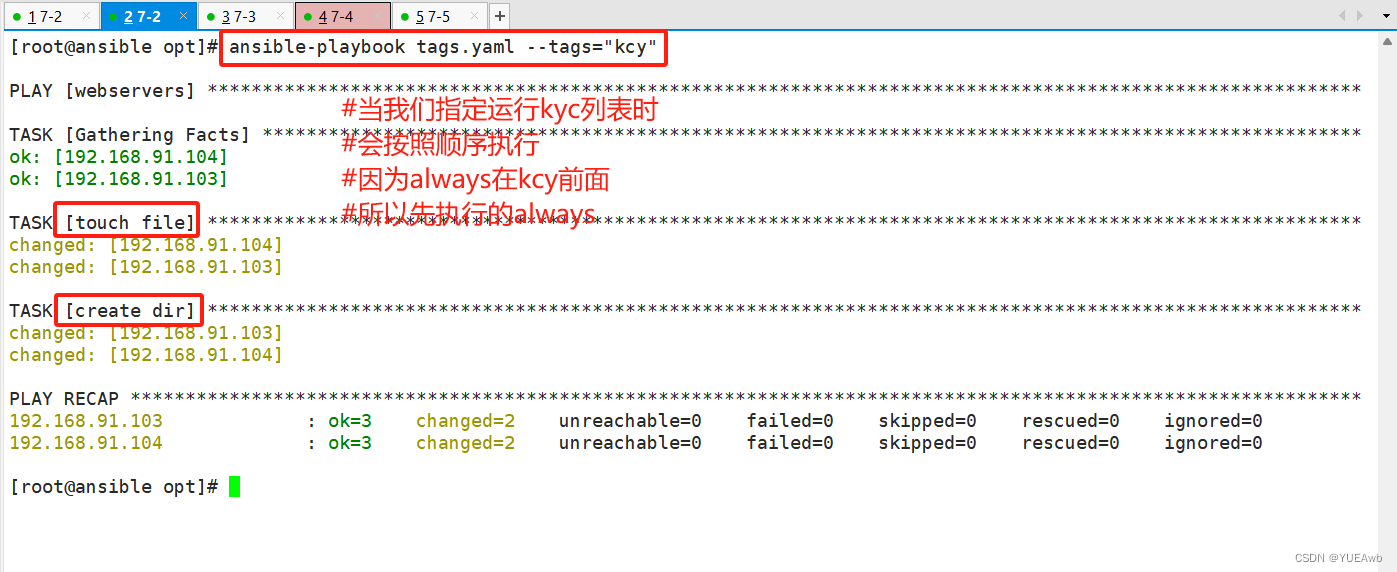
- hosts: webserversremote_user: roottasks:- name: Copy hosts filecopy: src=/etc/hosts dest=/opt/hoststags:- only- name: touch filefile: path=/opt/testhost state=touchtags:- always- name: create dirfile: path=/opt/kcy state=directorytags:- kcy

运行查看顺序
8.Roles模块
Ansible为了层次化、结构化地组织Playbook,使用了角色(roles),roles可以根据层次型结构自动装载变量文件、task以及handlers等。简单来讲,roles就是通过分别将变量、文件、任务、模块及处理器放置于单独的目录中,并可以便捷地include它们。roles一般用于基于主机构建服务的场景中,但也可以用于构建守护进程等场景中。
1.创建以各角色名称命令的3个全局变量目录
[root@ansible roles]# mkdir /etc/ansible/roles/nginx
[root@ansible roles]# mkdir /etc/ansible/roles/mysql
[root@ansible roles]# mkdir /etc/ansible/roles/php
2.在每个角色命令的目录中分别创建files、handlers、tasks、templates、meta、defaults和vars目录
mkdir /etc/ansible/roles/nginx/{files,templates,tasks,handlers,vars,defaults,meta}
mkdir /etc/ansible/roles/mysql/{files,templates,tasks,handlers,vars,defaults,meta}
mkdir /etc/ansible/roles/php/{files,templates,tasks,handlers,vars,defaults,meta}

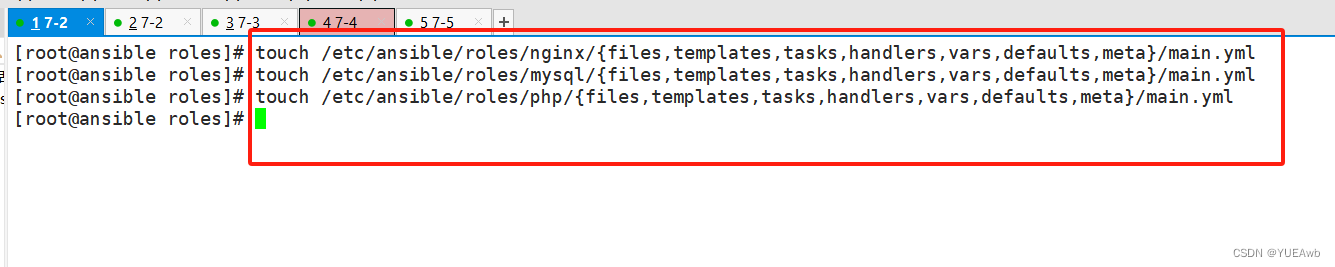
3.创建main.yml文件
touch /etc/ansible/roles/nginx/{files,templates,tasks,handlers,vars,defaults,meta}/main.yml
touch /etc/ansible/roles/mysql/{files,templates,tasks,handlers,vars,defaults,meta}/main.yml
touch /etc/ansible/roles/php/{files,templates,tasks,handlers,vars,defaults,meta}/main.yml
4.tree查看结构
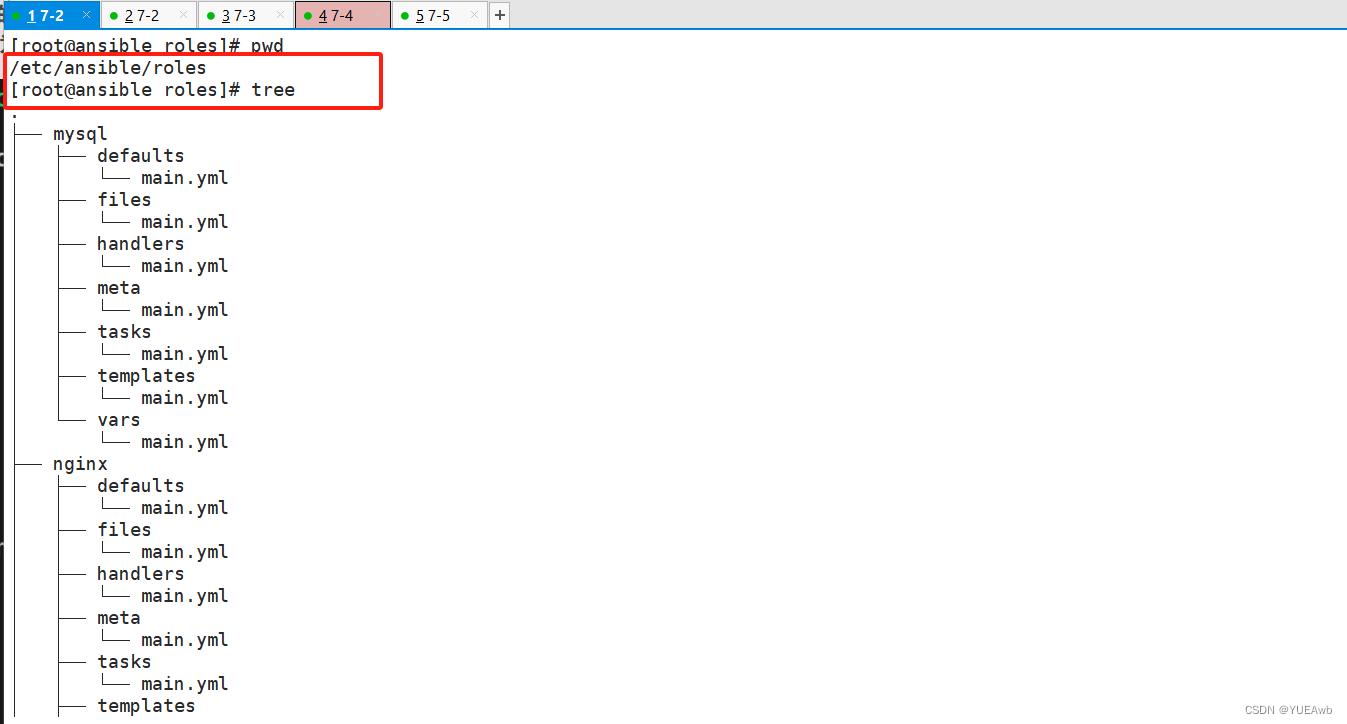
roles 内各目录含义解释
● files:用来存放由 copy 模块或 script 模块调用的文件。
● templates:用来存放 jinjia2 模板,template 模块会自动在此目录中寻找 jinjia2 模板文件。
● tasks:此目录应当包含一个 main.yml 文件,用于定义此角色的任务列表,此文件可以使用 include 包含其它的位于此目录的 task 文件。
● handlers:此目录应当包含一个 main.yml 文件,用于定义此角色中触发条件时执行的动作。
● vars:此目录应当包含一个 main.yml 文件,用于定义此角色用到的变量。
● defaults:此目录应当包含一个 main.yml 文件,用于为当前角色设定默认变量。
● meta:此目录应当包含一个 main.yml 文件,用于定义此角色的特殊设定及其依赖关系。

5.环境准备
先添加一下主机清单

因为我们之前修改了7-5的ssh端口,改回来


进行免密登录

试一下免密登录

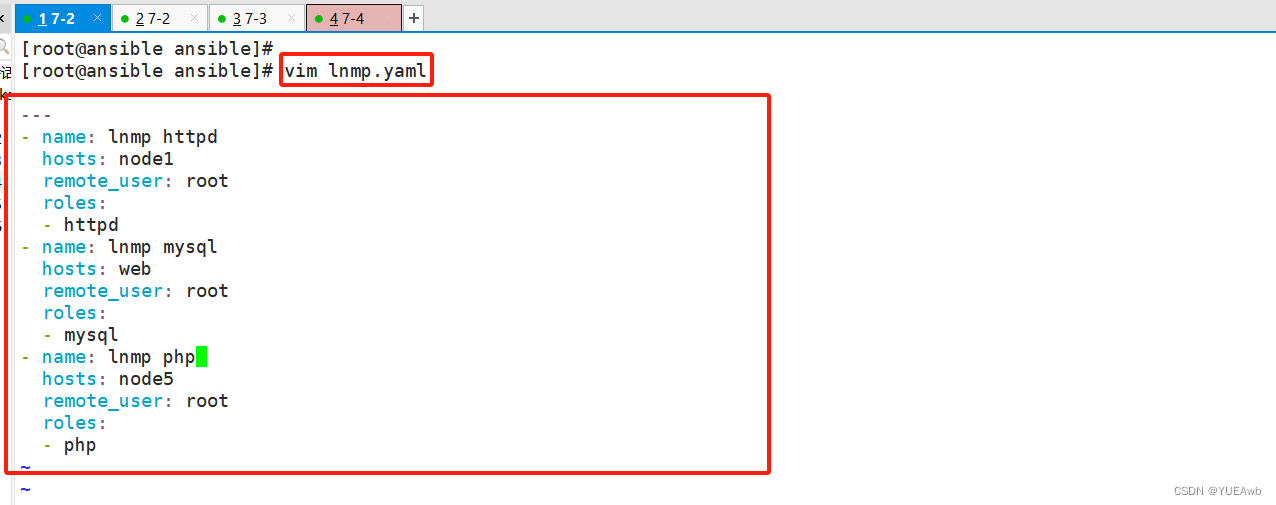
6.编写lnmp.yaml文件,针对不同主机去调用不同的角色
[root@ansible ansible]# vim lnmp.yaml ---
- name: lnmp httpdhosts: node1remote_user: rootroles:- httpd
- name: lnmp mysqlhosts: webremote_user: rootroles:- mysql
- name: lnmp phphosts: node5remote_user: rootroles:- php
运行文件

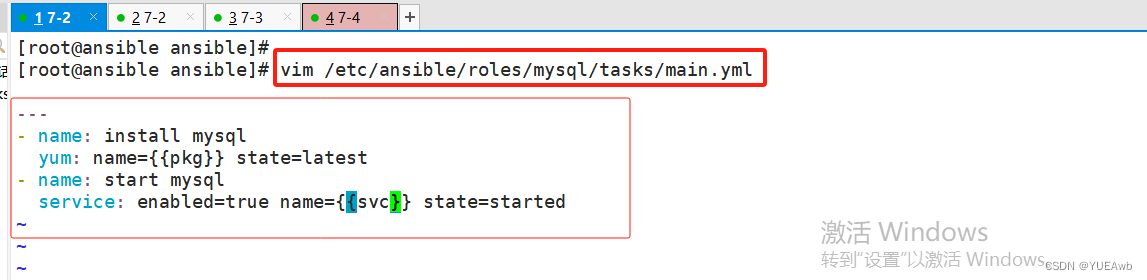
7.编写mysql模块
[root@ansible ansible]# vim /etc/ansible/roles/mysql/tasks/main.yml ---
- name: install mysqlyum: name={{pkg}} state=latest
- name: start mysqlservice: enabled=true name={{svc}} state=started
编写vars变量
[root@ansible ansible]# vim /etc/ansible/roles/mysql/vars/main.yml pkg:- mariadb- mariadb-server
svc: mariadb

8.编写httpd模块
[root@ansible ansible]# vim /etc/ansible/roles/httpd/tasks/main.yml ---
- name: install apacheyum: name={{pkg}} state=latest
- name: start apacheservice: enabled=true name={{svc}} state=started

编写vars变量
[root@ansible ansible]# vim /etc/ansible/roles/httpd/vars/main.yml pkg: httpd
svc: httpd

9.编写php模块
[root@ansible ansible]# vim /etc/ansible/roles/php/tasks/main.yml ---
- name: install phpyum: name={{pkg}} state=latest
- name: start php-fpmservice: enabled=true name={{svc}} state=started

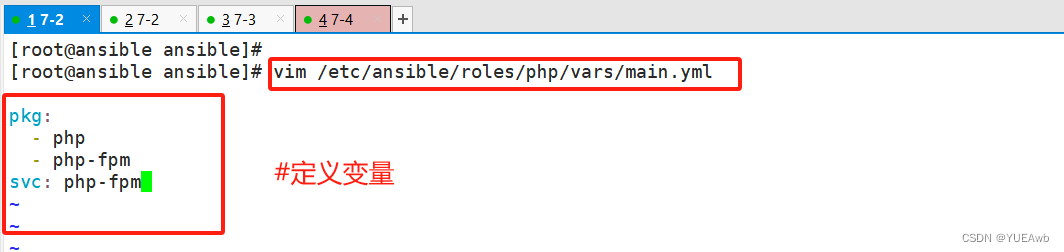
编写vars变量
[root@ansible ansible]# vim /etc/ansible/roles/php/vars/main.yml pkg:- php- php-fpm
svc: php-fpm
10.再次运行一下lnmp.yaml文件
[root@ansible ansible]# ansible-playbook lnmp.yaml

11.查看安装结果


三、roles编写lnmp分布式剧本
3.1编写mysql
1.编写tasks/main.yml文件
/etc/ansible/roles/mysql/tasks/main.yml
[root@ansible tasks]# vim /etc/ansible/roles/mysql/tasks/main.yml ---
- include: init.yml- name: install mysql repo firstyum: name={{repo}}- name: install mysql repo secondshell: "sed -i 's#gpgcheck=1#gpgcheck=0' /etc/yum.repos.d/mysql-community.repo"
- name: install mysql appyum: name={{app}}- name: mysql startservice: name=mysqld state=started enabled=1- name: first passwordshell: mysql -uroot -p"{{passwd}}" --connect-expired-password -e "ALTER USER 'root'@'localhost' IDENTIFIED BY '123';"- name: sudo loginshell: mysql -uroot -p123 -e "grant all privileges on *.* to root@'%' identified by '123' with grant option;"

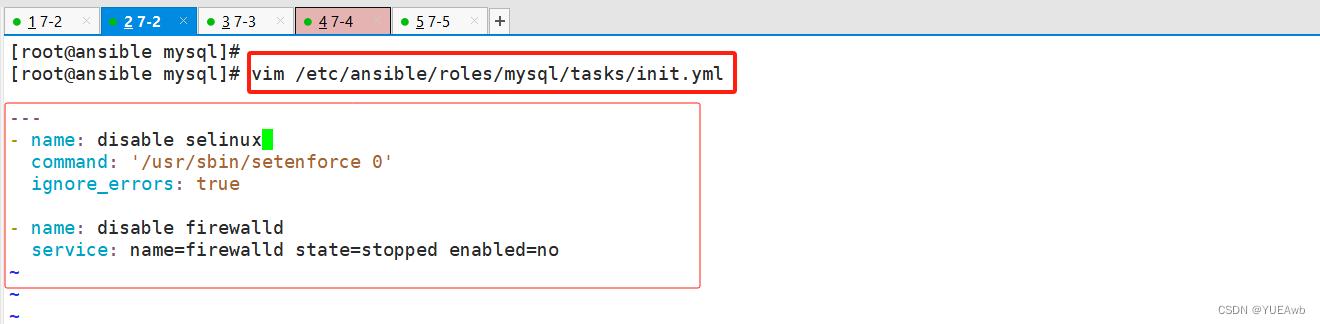
2.编写tasks/init.yml文件
/etc/ansible/roles/mysql/tasks/init.yml
[root@ansible mysql]# vim /etc/ansible/roles/mysql/tasks/init.yml ---
- name: disable selinuxcommand: '/usr/sbin/setenforce 0'ignore_errors: true- name: disable firewalldservice: name=firewalld state=stopped enabled=no
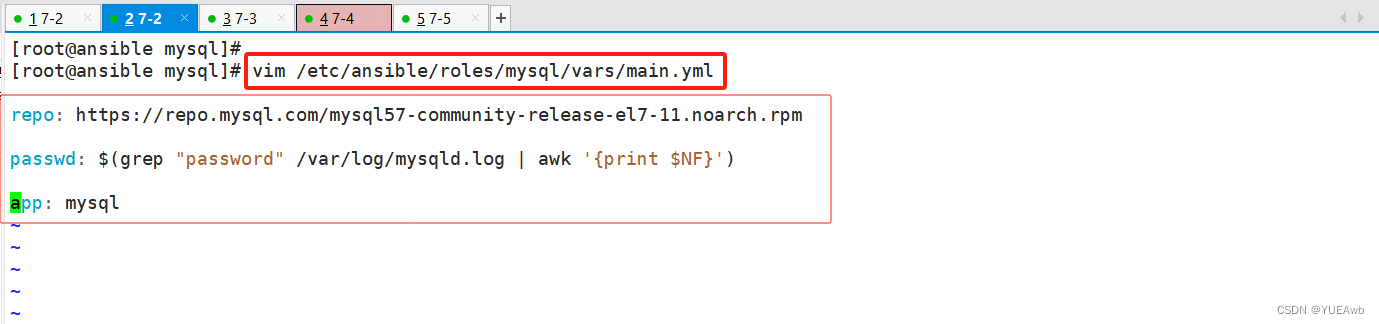
3.编写vars/main.yml定义变量
/etc/ansible/roles/mysql/vars/main.yml
[root@ansible mysql]# vim /etc/ansible/roles/mysql/vars/main.yml repo: https://repo.mysql.com/mysql57-community-release-el7-11.noarch.rpmpasswd: $(grep "password" /var/log/mysqld.log | awk '{print $NF}')app: mysql
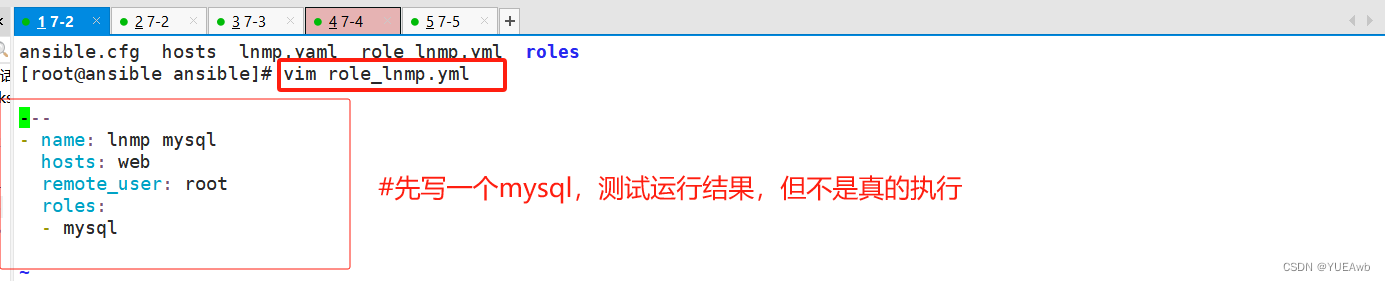
4.测试运行结果,并不是真的执行任务
[root@ansible ansible]# vim role_lnmp.yml ---
- name: lnmp mysqlhosts: webremote_user: rootroles:- mysql
之前安装了mysql,先删除
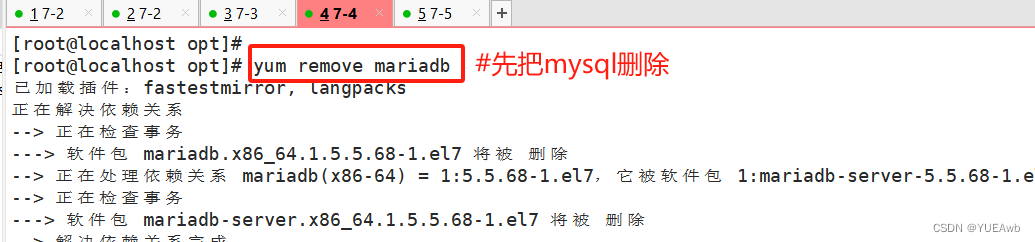
运行文件,看结果
ansible-playbook role_lnmp.yml -C

3.2编写nginx
[root@ansible roles]# ls
httpd  mysql  php
[root@ansible roles]# cp httpd/ -r nginx
[root@ansible roles]# ls
httpd  mysql  nginx  php
[root@ansible roles]#

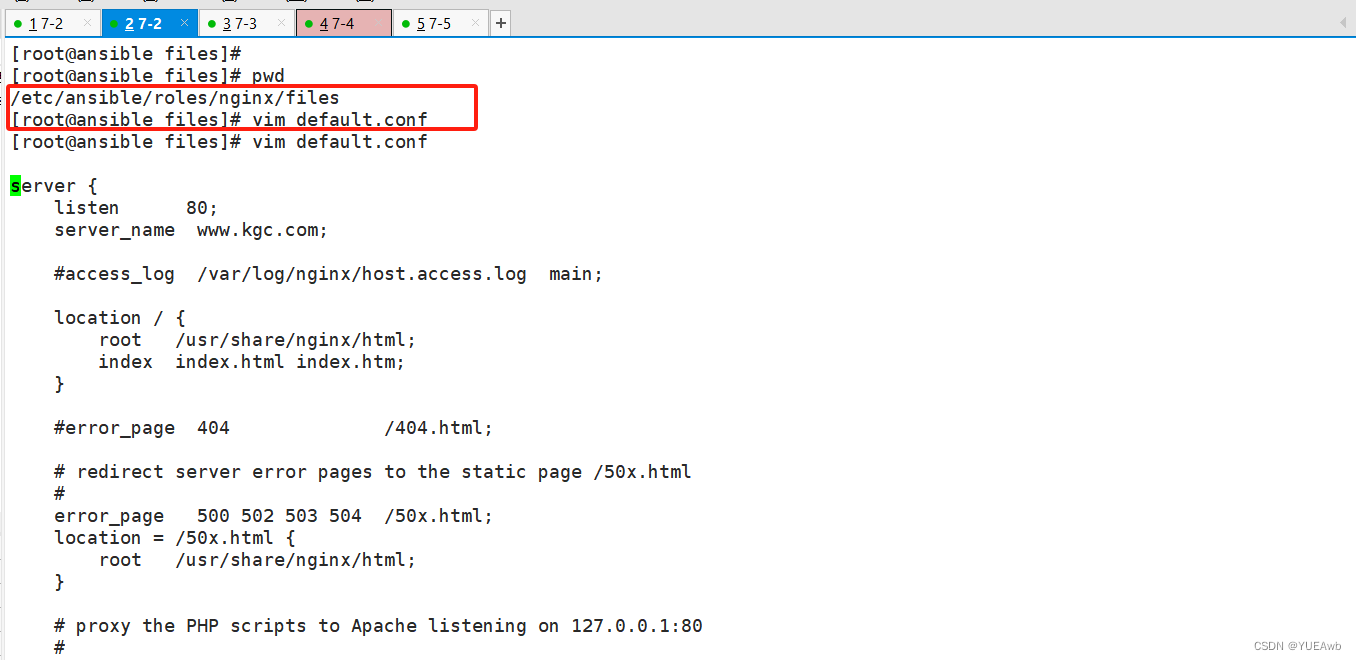
1.编写files/default.conf
files:用来存放由 copy 模块或 script 模块调用的文件。
/etc/ansible/roles/nginx/files/default.conf
server {listen      80;server_name  www.kgc.com;#access_log  /var/log/nginx/host.access.log  main;location / {root   /usr/share/nginx/html;index  index.html index.htm;}#error_page  404              /404.html;# redirect server error pages to the static page /50x.html#error_page   500 502 503 504  /50x.html;location = /50x.html {root   /usr/share/nginx/html;}# proxy the PHP scripts to Apache listening on 127.0.0.1:80##location ~ \.php$ {#    proxy_pass   http://127.0.0.1;#}# pass the PHP scripts to FastCGI server listening on 127.0.0.1:9000#location ~ \.php$ {root           /www;fastcgi_pass   192.168.91.104:9000;fastcgi_index  index.php;fastcgi_param  SCRIPT_FILENAME  $document_root$fastcgi_script_name;include        fastcgi_params;}# deny access to .htaccess files, if Apache's document root# concurs with nginx's one##location ~ /\.ht {#    deny  all;#}
}

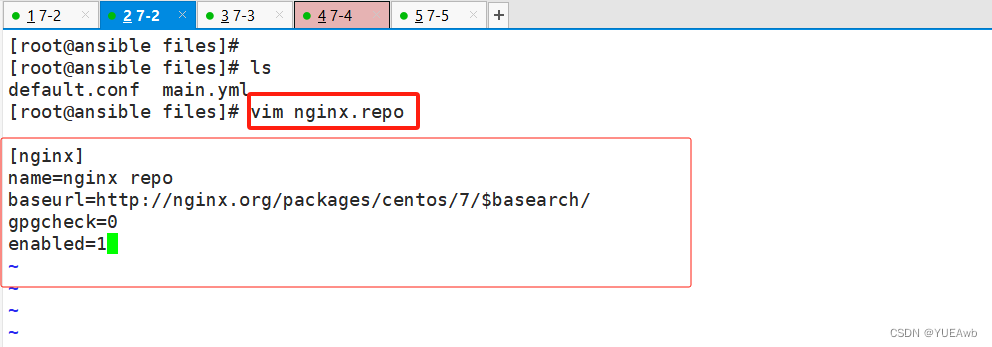
2.编写files/nginx.repo
/etc/ansible/roles/nginx/files/nginx.repo
[root@ansible files]# vim nginx.repo[nginx]
name=nginx repo
baseurl=http://nginx.org/packages/centos/7/$basearch/
gpgcheck=0
enabled=1
3.编写handlers/main.yml
handlers:此目录应当包含一个 main.yml 文件,用于定义此角色中触发条件时执行的动作。
/etc/ansible/roles/nginx/handlers/main.yml
vim /etc/ansible/roles/lnmp/nginx/handlers/main.yml- name: restart nginxservice: name={{svc}} state=restarted
4.编写tasks/main.yml文件
/etc/ansible/roles/nginx/tasks/main.yml
[root@ansible tasks]# vim main.yml - name: disable selinuxcommand: '/usr/sbin/setenforce 0'ignore_errors: true- name: disable firewalldservice: name=firewalld state=stopped enabled=no- name: upload nginx repocopy: src=nginx.repo dest=/etc/yum.repos.d/nginx.repo- name: install nginxyum: name={{app}} state=latest- name: prepare httpd configuration filecopy: src=default.conf dest=/etc/nginx/conf.d/default.confnotify: "restart nginx"- name: start nginxservice: name={{svc}} state=started enabled=yes

5.编写vars/main.yml文件
/etc/ansible/roles/nginx/vars/main.yml
[root@ansible vars]# vim main.yml app: nginx
svc: nginx

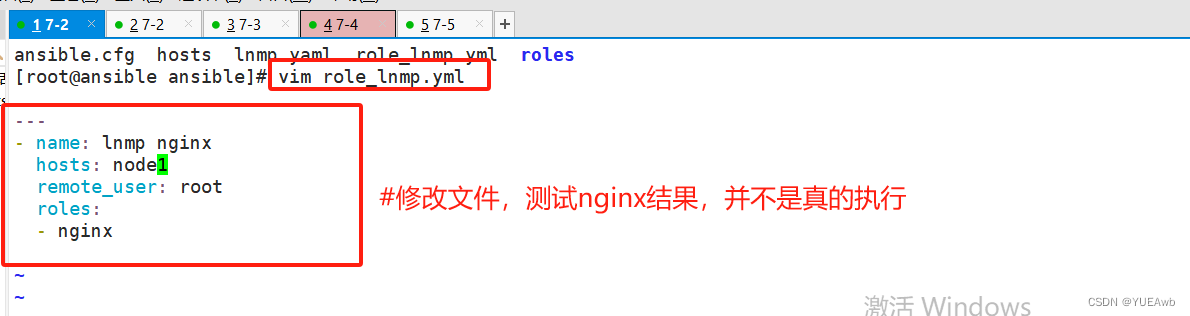
6.测试运行结果,并不是真的执行任务
[root@ansible ansible]# vim role_lnmp.yml ---
- name: lnmp nginxhosts: node1remote_user: rootroles:- nginx
3.3编写php
1.编写files/index.php文件
/etc/ansible/roles/php/files/index.php
[root@ansible files]# vim index.php<?php
$link=mysqli_connect('192.168.91.104','root','123');
if($link) echo "<h1>Success!!</h1>";
else echo "Fail!!";
?>

2.编写files/www.conf文件
/etc/ansible/roles/php/files/www.conf
; Start a new pool named 'www'.
[www]; Unix user/group of processes
; Note: The user is mandatory. If the group is not set, the default user's group
;       will be used.
; RPM: apache Choosed to be able to access some dir as httpd
user = php
; RPM: Keep a group allowed to write in log dir.
group = php; The address on which to accept FastCGI requests.
; Valid syntaxes are:
;   'ip.add.re.ss:port'    - to listen on a TCP socket to a specific IPv4 address on
;                            a specific port;
;   '[ip:6:addr:ess]:port' - to listen on a TCP socket to a specific IPv6 address on
;                            a specific port;
;   'port'                 - to listen on a TCP socket to all addresses
;                            (IPv6 and IPv4-mapped) on a specific port;
;   '/path/to/unix/socket' - to listen on a unix socket.
; Note: This value is mandatory.
listen = 192.168.91.104:9000; Set listen(2) backlog.
; Default Value: 511 (-1 on FreeBSD and OpenBSD)
;listen.backlog = 511; Set permissions for unix socket, if one is used. In Linux, read/write
; permissions must be set in order to allow connections from a web server. Many
; BSD-derived systems allow connections regardless of permissions.
; Default Values: user and group are set as the running user
;                 mode is set to 0660
;listen.owner = nobody
;listen.group = nobody
;listen.mode = 0660
; When POSIX Access Control Lists are supported you can set them using
; these options, value is a comma separated list of user/group names.
; When set, listen.owner and listen.group are ignored
;listen.acl_users =
;listen.acl_groups =; List of addresses (IPv4/IPv6) of FastCGI clients which are allowed to connect.
; Equivalent to the FCGI_WEB_SERVER_ADDRS environment variable in the original
; PHP FCGI (5.2.2+). Makes sense only with a tcp listening socket. Each address
; must be separated by a comma. If this value is left blank, connections will be
; accepted from any ip address.
; Default Value: any
listen.allowed_clients = 192.168.91.104; Specify the nice(2) priority to apply to the pool processes (only if set)
; The value can vary from -19 (highest priority) to 20 (lower priority)
; Note: - It will only work if the FPM master process is launched as root
;       - The pool processes will inherit the master process priority
;         unless it specified otherwise
; Default Value: no set
; process.priority = -19; Choose how the process manager will control the number of child processes.
; Possible Values:
;   static  - a fixed number (pm.max_children) of child processes;
;   dynamic - the number of child processes are set dynamically based on the
;             following directives. With this process management, there will be
;             always at least 1 children.
;             pm.max_children      - the maximum number of children that can
;                                    be alive at the same time.
;             pm.start_servers     - the number of children created on startup.
;             pm.min_spare_servers - the minimum number of children in 'idle'
;                                    state (waiting to process). If the number
;                                    of 'idle' processes is less than this
;                                    number then some children will be created.
;             pm.max_spare_servers - the maximum number of children in 'idle'
;                                    state (waiting to process). If the number
;                                    of 'idle' processes is greater than this
;                                    number then some children will be killed.
;  ondemand - no children are created at startup. Children will be forked when
;             new requests will connect. The following parameter are used:
;             pm.max_children           - the maximum number of children that
;                                         can be alive at the same time.
;             pm.process_idle_timeout   - The number of seconds after which
;                                         an idle process will be killed.
; Note: This value is mandatory.
pm = dynamic; The number of child processes to be created when pm is set to 'static' and the
; maximum number of child processes when pm is set to 'dynamic' or 'ondemand'.
; This value sets the limit on the number of simultaneous requests that will be
; served. Equivalent to the ApacheMaxClients directive with mpm_prefork.
; Equivalent to the PHP_FCGI_CHILDREN environment variable in the original PHP
; CGI.
; Note: Used when pm is set to 'static', 'dynamic' or 'ondemand'
; Note: This value is mandatory.
pm.max_children = 50; The number of child processes created on startup.
; Note: Used only when pm is set to 'dynamic'
; Default Value: min_spare_servers + (max_spare_servers - min_spare_servers) / 2
pm.start_servers = 5; The desired minimum number of idle server processes.
; Note: Used only when pm is set to 'dynamic'
; Note: Mandatory when pm is set to 'dynamic'
pm.min_spare_servers = 5; The desired maximum number of idle server processes.
; Note: Used only when pm is set to 'dynamic'
; Note: Mandatory when pm is set to 'dynamic'
pm.max_spare_servers = 35; The number of seconds after which an idle process will be killed.
; Note: Used only when pm is set to 'ondemand'
; Default Value: 10s
;pm.process_idle_timeout = 10s;; The number of requests each child process should execute before respawning.
; This can be useful to work around memory leaks in 3rd party libraries. For
; endless request processing specify '0'. Equivalent to PHP_FCGI_MAX_REQUESTS.
; Default Value: 0
;pm.max_requests = 500; The URI to view the FPM status page. If this value is not set, no URI will be
; recognized as a status page. It shows the following informations:
;   pool                 - the name of the pool;
;   process manager      - static, dynamic or ondemand;
;   start time           - the date and time FPM has started;
;   start since          - number of seconds since FPM has started;
;   accepted conn        - the number of request accepted by the pool;
;   listen queue         - the number of request in the queue of pending
;                          connections (see backlog in listen(2));
;   max listen queue     - the maximum number of requests in the queue
;                          of pending connections since FPM has started;
;   listen queue len     - the size of the socket queue of pending connections;
;   idle processes       - the number of idle processes;
;   active processes     - the number of active processes;
;   total processes      - the number of idle + active processes;
;   max active processes - the maximum number of active processes since FPM
;                          has started;
;   max children reached - number of times, the process limit has been reached,
;                          when pm tries to start more children (works only for
;                          pm 'dynamic' and 'ondemand');
; Value are updated in real time.
; Example output:
;   pool:                 www
;   process manager:      static
;   start time:           01/Jul/2011:17:53:49 +0200
;   start since:          62636
;   accepted conn:        190460
;   listen queue:         0
;   max listen queue:     1
;   listen queue len:     42
;   idle processes:       4
;   active processes:     11
;   total processes:      15
;   max active processes: 12
;   max children reached: 0
;
; By default the status page output is formatted as text/plain. Passing either
; 'html', 'xml' or 'json' in the query string will return the corresponding
; output syntax. Example:
;   http://www.foo.bar/status
;   http://www.foo.bar/status?json
;   http://www.foo.bar/status?html
;   http://www.foo.bar/status?xml
;
; By default the status page only outputs short status. Passing 'full' in the
; query string will also return status for each pool process.
; Example:
;   http://www.foo.bar/status?full
;   http://www.foo.bar/status?json&full
;   http://www.foo.bar/status?html&full
;   http://www.foo.bar/status?xml&full
; The Full status returns for each process:
;   pid                  - the PID of the process;
;   state                - the state of the process (Idle, Running, ...);
;   start time           - the date and time the process has started;
;   start since          - the number of seconds since the process has started;
;   requests             - the number of requests the process has served;
;   request duration     - the duration in µs of the requests;
;   request method       - the request method (GET, POST, ...);
;   request URI          - the request URI with the query string;
;   content length       - the content length of the request (only with POST);
;   user                 - the user (PHP_AUTH_USER) (or '-' if not set);
;   script               - the main script called (or '-' if not set);
;   last request cpu     - the %cpu the last request consumed
;                          it's always 0 if the process is not in Idle state
;                          because CPU calculation is done when the request
;                          processing has terminated;
;   last request memory  - the max amount of memory the last request consumed
;                          it's always 0 if the process is not in Idle state
;                          because memory calculation is done when the request
;                          processing has terminated;
; If the process is in Idle state, then informations are related to the
; last request the process has served. Otherwise informations are related to
; the current request being served.
; Example output:
;   ************************
;   pid:                  31330
;   state:                Running
;   start time:           01/Jul/2011:17:53:49 +0200
;   start since:          63087
;   requests:             12808
;   request duration:     1250261
;   request method:       GET
;   request URI:          /test_mem.php?N=10000
;   content length:       0
;   user:                 -
;   script:               /home/fat/web/docs/php/test_mem.php
;   last request cpu:     0.00
;   last request memory:  0
;
; Note: There is a real-time FPM status monitoring sample web page available
;       It's available in: @EXPANDED_DATADIR@/fpm/status.html
;
; Note: The value must start with a leading slash (/). The value can be
;       anything, but it may not be a good idea to use the .php extension or it
;       may conflict with a real PHP file.
; Default Value: not set
;pm.status_path = /status; The ping URI to call the monitoring page of FPM. If this value is not set, no
; URI will be recognized as a ping page. This could be used to test from outside
; that FPM is alive and responding, or to
; - create a graph of FPM availability (rrd or such);
; - remove a server from a group if it is not responding (load balancing);
; - trigger alerts for the operating team (24/7).
; Note: The value must start with a leading slash (/). The value can be
;       anything, but it may not be a good idea to use the .php extension or it
;       may conflict with a real PHP file.
; Default Value: not set
;ping.path = /ping; This directive may be used to customize the response of a ping request. The
; response is formatted as text/plain with a 200 response code.
; Default Value: pong
;ping.response = pong; The access log file
; Default: not set
;access.log = log/$pool.access.log; The access log format.
; The following syntax is allowed
;  %%: the '%' character
;  %C: %CPU used by the request
;      it can accept the following format:
;      - %{user}C for user CPU only
;      - %{system}C for system CPU only
;      - %{total}C  for user + system CPU (default)
;  %d: time taken to serve the request
;      it can accept the following format:
;      - %{seconds}d (default)
;      - %{miliseconds}d
;      - %{mili}d
;      - %{microseconds}d
;      - %{micro}d
;  %e: an environment variable (same as $_ENV or $_SERVER)
;      it must be associated with embraces to specify the name of the env
;      variable. Some exemples:
;      - server specifics like: %{REQUEST_METHOD}e or %{SERVER_PROTOCOL}e
;      - HTTP headers like: %{HTTP_HOST}e or %{HTTP_USER_AGENT}e
;  %f: script filename
;  %l: content-length of the request (for POST request only)
;  %m: request method
;  %M: peak of memory allocated by PHP
;      it can accept the following format:
;      - %{bytes}M (default)
;      - %{kilobytes}M
;      - %{kilo}M
;      - %{megabytes}M
;      - %{mega}M
;  %n: pool name
;  %o: output header
;      it must be associated with embraces to specify the name of the header:
;      - %{Content-Type}o
;      - %{X-Powered-By}o
;      - %{Transfert-Encoding}o
;      - ....
;  %p: PID of the child that serviced the request
;  %P: PID of the parent of the child that serviced the request
;  %q: the query string
;  %Q: the '?' character if query string exists
;  %r: the request URI (without the query string, see %q and %Q)
;  %R: remote IP address
;  %s: status (response code)
;  %t: server time the request was received
;      it can accept a strftime(3) format:
;      %d/%b/%Y:%H:%M:%S %z (default)
;      The strftime(3) format must be encapsuled in a %{<strftime_format>}t tag
;      e.g. for a ISO8601 formatted timestring, use: %{%Y-%m-%dT%H:%M:%S%z}t
;  %T: time the log has been written (the request has finished)
;      it can accept a strftime(3) format:
;      %d/%b/%Y:%H:%M:%S %z (default)
;      The strftime(3) format must be encapsuled in a %{<strftime_format>}t tag
;      e.g. for a ISO8601 formatted timestring, use: %{%Y-%m-%dT%H:%M:%S%z}t
;  %u: remote user
;
; Default: "%R - %u %t \"%m %r\" %s"
;access.format = "%R - %u %t \"%m %r%Q%q\" %s %f %{mili}d %{kilo}M %C%%"; The log file for slow requests
; Default Value: not set
; Note: slowlog is mandatory if request_slowlog_timeout is set
slowlog = /var/log/php-fpm/www-slow.log; The timeout for serving a single request after which a PHP backtrace will be
; dumped to the 'slowlog' file. A value of '0s' means 'off'.
; Available units: s(econds)(default), m(inutes), h(ours), or d(ays)
; Default Value: 0
;request_slowlog_timeout = 0; The timeout for serving a single request after which the worker process will
; be killed. This option should be used when the 'max_execution_time' ini option
; does not stop script execution for some reason. A value of '0' means 'off'.
; Available units: s(econds)(default), m(inutes), h(ours), or d(ays)
; Default Value: 0
;request_terminate_timeout = 0; Set open file descriptor rlimit.
; Default Value: system defined value
;rlimit_files = 1024; Set max core size rlimit.
; Possible Values: 'unlimited' or an integer greater or equal to 0
; Default Value: system defined value
;rlimit_core = 0; Chroot to this directory at the start. This value must be defined as an
; absolute path. When this value is not set, chroot is not used.
; Note: chrooting is a great security feature and should be used whenever
;       possible. However, all PHP paths will be relative to the chroot
;       (error_log, sessions.save_path, ...).
; Default Value: not set
;chroot =; Chdir to this directory at the start.
; Note: relative path can be used.
; Default Value: current directory or / when chroot
;chdir = /var/www; Redirect worker stdout and stderr into main error log. If not set, stdout and
; stderr will be redirected to /dev/null according to FastCGI specs.
; Note: on highloaded environement, this can cause some delay in the page
; process time (several ms).
; Default Value: no
;catch_workers_output = yes; Clear environment in FPM workers
; Prevents arbitrary environment variables from reaching FPM worker processes
; by clearing the environment in workers before env vars specified in this
; pool configuration are added.
; Setting to "no" will make all environment variables available to PHP code
; via getenv(), $_ENV and $_SERVER.
; Default Value: yes
;clear_env = no; Limits the extensions of the main script FPM will allow to parse. This can
; prevent configuration mistakes on the web server side. You should only limit
; FPM to .php extensions to prevent malicious users to use other extensions to
; exectute php code.
; Note: set an empty value to allow all extensions.
; Default Value: .php
;security.limit_extensions = .php .php3 .php4 .php5 .php7; Pass environment variables like LD_LIBRARY_PATH. All $VARIABLEs are taken from
; the current environment.
; Default Value: clean env
;env[HOSTNAME] = $HOSTNAME
;env[PATH] = /usr/local/bin:/usr/bin:/bin
;env[TMP] = /tmp
;env[TMPDIR] = /tmp
;env[TEMP] = /tmp; Additional php.ini defines, specific to this pool of workers. These settings
; overwrite the values previously defined in the php.ini. The directives are the
; same as the PHP SAPI:
;   php_value/php_flag             - you can set classic ini defines which can
;                                    be overwritten from PHP call 'ini_set'.
;   php_admin_value/php_admin_flag - these directives won't be overwritten by
;                                     PHP call 'ini_set'
; For php_*flag, valid values are on, off, 1, 0, true, false, yes or no.; Defining 'extension' will load the corresponding shared extension from
; extension_dir. Defining 'disable_functions' or 'disable_classes' will not
; overwrite previously defined php.ini values, but will append the new value
; instead.; Default Value: nothing is defined by default except the values in php.ini and
;                specified at startup with the -d argument
;php_admin_value[sendmail_path] = /usr/sbin/sendmail -t -i -f www@my.domain.com
;php_flag[display_errors] = off
php_admin_value[error_log] = /var/log/php-fpm/www-error.log
php_admin_flag[log_errors] = on
;php_admin_value[memory_limit] = 128M; Set session path to a directory owned by process user
php_value[session.save_handler] = files
php_value[session.save_path]    = /var/lib/php/session
php_value[soap.wsdl_cache_dir]  = /var/lib/php/wsdlcache

3.编写handlers/main.yml
/etc/ansible/roles/php/handlers/main.yml
[root@ansible handlers]# vim main.yml - name: reload php-fpmservice: name={{svc}} state=restarted

4.编写tasks/main.yml
/etc/ansible/roles/php/tasks/main.yml
- name: disable selinuxcommand: '/usr/sbin/setenforce 0'ignore_errors: true- name: disable firewalldservice: name=firewalld state=stopped enabled=no- name: install php repoyum: name={{repo}}- name: install php appyum: name={{app}}ignore_errors: true- name: add php useruser: name=php shell=/sbin/nologin- name: create /www dirfile: path=/www state=directory- name: copy index.phpcopy: src=index.php dest=/www/index.php- name: copy configuration filecopy: src=www.conf dest=/etc/php-fpm.d/www.confnotify: reload php-fpm- name: modify php.inishell: "sed -i 's#;date.timezone =#date.timezone = Asia/shanghai#' /etc/php.ini"- name: start php-fpmservice: name={{svc}} state=started enabled=yes
5.编写vars/main.yml文件
/etc/ansible/roles/php/main.yml
[root@ansible php]# vim vars/main.yml app:
- php72w
- php72w-cli
- php72w-common
- php72w-devel
- php72w-embedded
- php72w-gd
- php72w-mbstring
- php72w-pdo
- php72w-xml
- php72w-fpm
- php72w-mysqlnd
- php72w-opcachesvc: php-fpmrepo:
- http://dl.fedoraproject.org/pub/epel/epel-release-latest-7.noarch.rpm
- http://mirror.webtatic.com/yum/el7/webtatic-release.rpm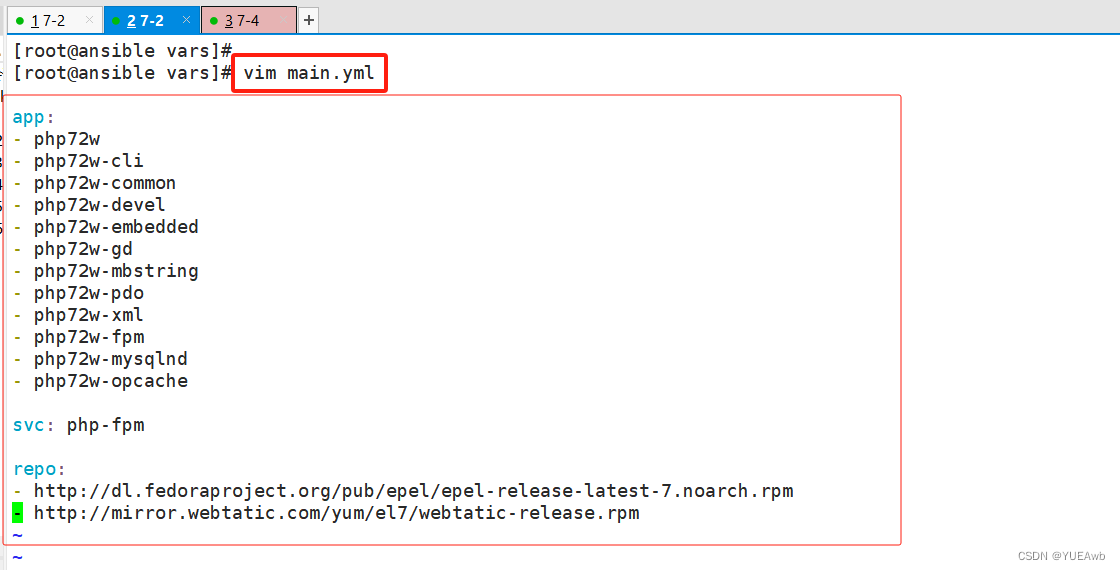
3.4编写启动文件
[root@ansible ansible]# vim role_lnmp.yml ---
- name: lnmphosts: webremote_user: rootroles:- nginx- mysql- php
3.5启动并测试
[root@ansible ansible]# ansible-playbook role_lnmp.yml