文章目录
- 菜单栏
- 创建菜单栏
- 在菜单栏中添加菜单
- 创建菜单项
- 添加分割线
- 工具栏
- 创建工具栏
- 设置停靠位置
- 创建工具栏的同时指定停靠位置
- 使用QToolBar类提供的setAllowedAreas函数来设置停靠位置
- 设置浮动属性
- 设置移动属性
- 状态栏
- 状态栏的创建
- 在状态栏中显示实时消息
- 在状态栏中显示永久消息
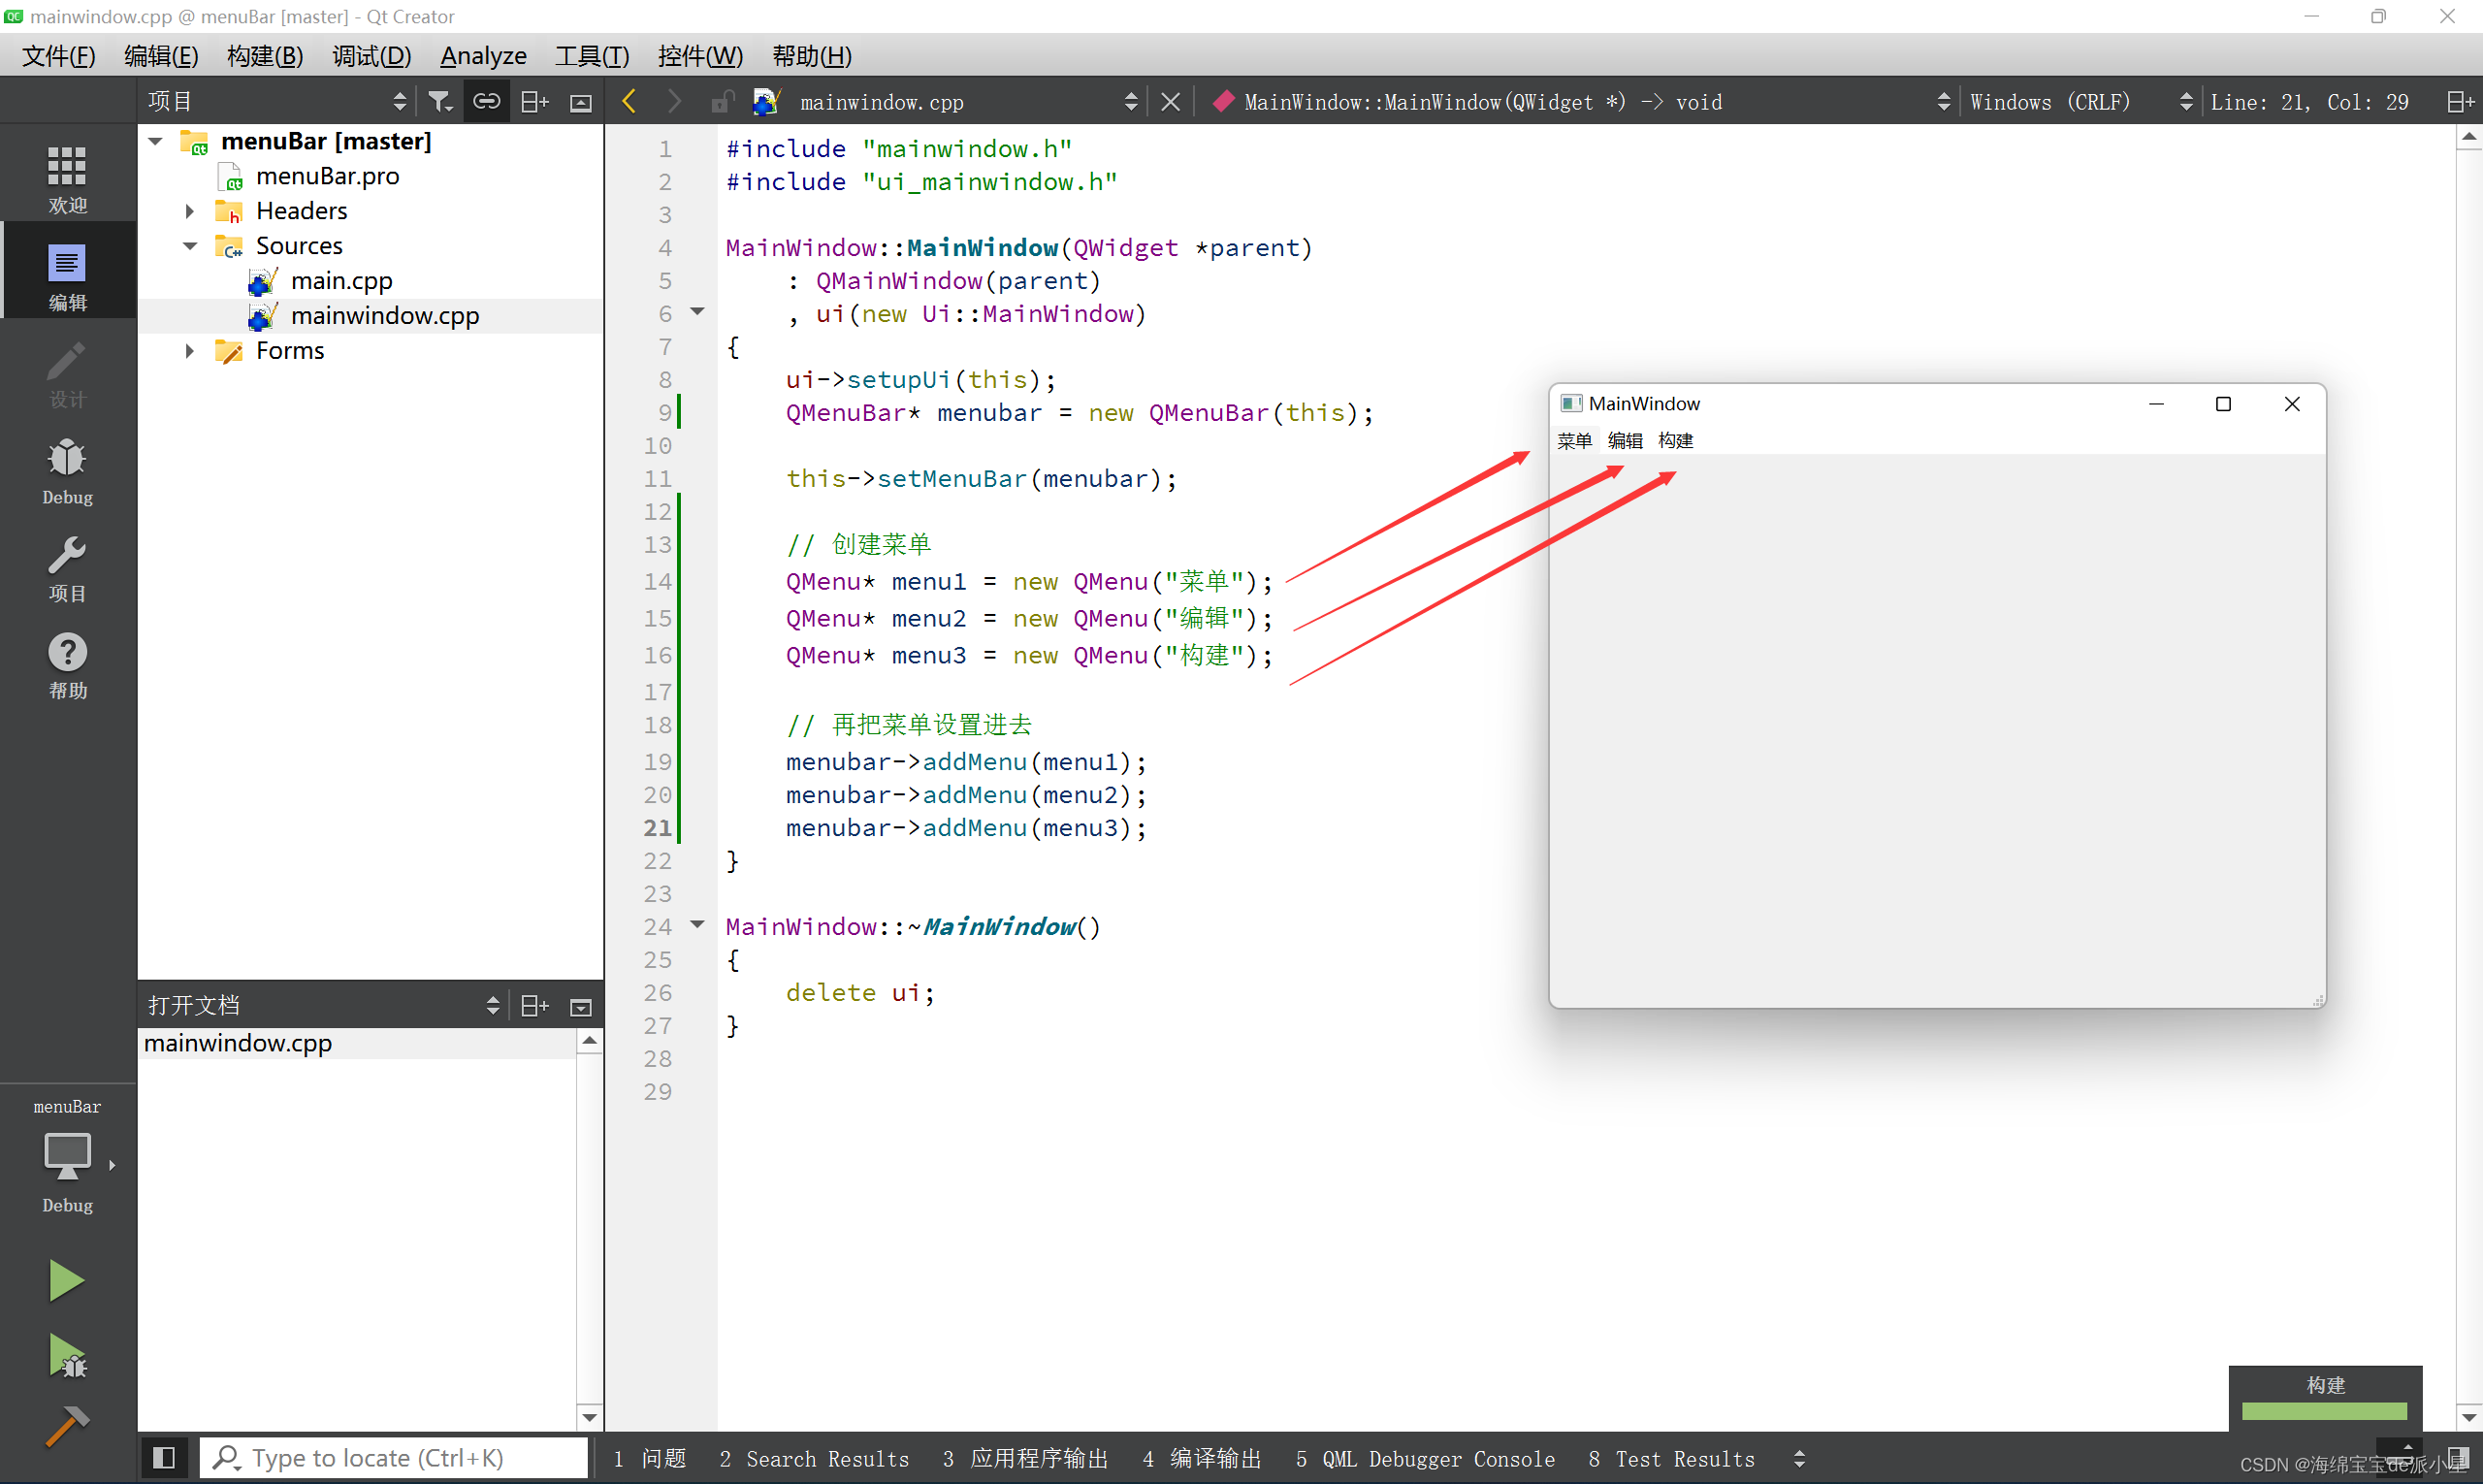
菜单栏
创建菜单栏
#include "mainwindow.h"
#include "ui_mainwindow.h"MainWindow::MainWindow(QWidget *parent): QMainWindow(parent), ui(new Ui::MainWindow)
{ui->setupUi(this);QMenuBar* menubar = new QMenuBar(this);this->setMenuBar(menubar);
}MainWindow::~MainWindow()
{delete ui;
}
在菜单栏中添加菜单
创建菜单:
#include "mainwindow.h"
#include "ui_mainwindow.h"MainWindow::MainWindow(QWidget *parent): QMainWindow(parent), ui(new Ui::MainWindow)
{ui->setupUi(this);QMenuBar* menubar = new QMenuBar(this);this->setMenuBar(menubar);// 创建菜单QMenu* menu1 = new QMenu("菜单");QMenu* menu2 = new QMenu("编辑");QMenu* menu3 = new QMenu("构建");// 再把菜单设置进去menubar->addMenu(menu1);menubar->addMenu(menu2);menubar->addMenu(menu3);
}MainWindow::~MainWindow()
{delete ui;
}
创建菜单项
#include "mainwindow.h"
#include "ui_mainwindow.h"MainWindow::MainWindow(QWidget *parent): QMainWindow(parent), ui(new Ui::MainWindow)
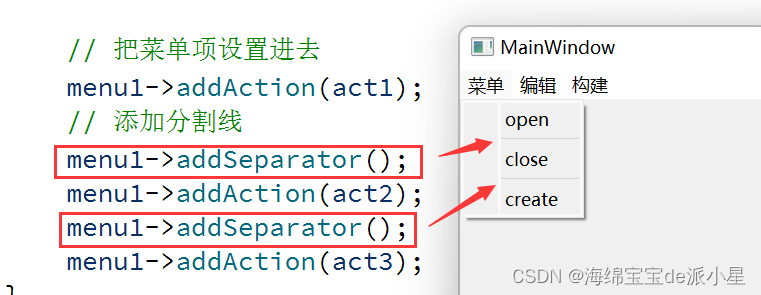
{ui->setupUi(this);QMenuBar* menubar = new QMenuBar(this);this->setMenuBar(menubar);// 创建菜单QMenu* menu1 = new QMenu("菜单");QMenu* menu2 = new QMenu("编辑");QMenu* menu3 = new QMenu("构建");// 再把菜单设置进去menubar->addMenu(menu1);menubar->addMenu(menu2);menubar->addMenu(menu3);// 创建菜单项QAction* act1 = new QAction("open");QAction* act2 = new QAction("close");QAction* act3 = new QAction("create");// 把菜单项设置进去menu1->addAction(act1);menu1->addAction(act2);menu1->addAction(act3);
}MainWindow::~MainWindow()
{delete ui;
}
添加分割线
可以使用addSeparator来添加分割线:
工具栏
创建工具栏
调用addToolBar函数来创建工具栏:
#include "mainwindow.h"
#include "ui_mainwindow.h"
#include <QToolBar>MainWindow::MainWindow(QWidget *parent): QMainWindow(parent), ui(new Ui::MainWindow)
{ui->setupUi(this);QToolBar* toolbar1 = new QToolBar(this);QToolBar* toolbar2 = new QToolBar(this);this->addToolBar(toolbar1);this->addToolBar(toolbar2);}MainWindow::~MainWindow()
{delete ui;}
设置停靠位置
工具栏停靠位置的设置有两种方式,一种是在创建的时候选择停靠位置,一种是使用setAllowedAreas函数来设置
创建工具栏的同时指定停靠位置
在创建工具栏的同时,就可以设置工具栏的停靠位置,对于这个来说默认的位置是在窗口的最上面,也可以自己来设置:
#include "mainwindow.h"
#include "ui_mainwindow.h"
#include <QToolBar>MainWindow::MainWindow(QWidget *parent): QMainWindow(parent), ui(new Ui::MainWindow)
{ui->setupUi(this);// 创建工具栏QToolBar* toolbar1 = new QToolBar(this);QToolBar* toolbar2 = new QToolBar(this);// 设置一下位置this->addToolBar(Qt::LeftToolBarArea, toolbar1);this->addToolBar(Qt::RightToolBarArea, toolbar2);}MainWindow::~MainWindow()
{delete ui;}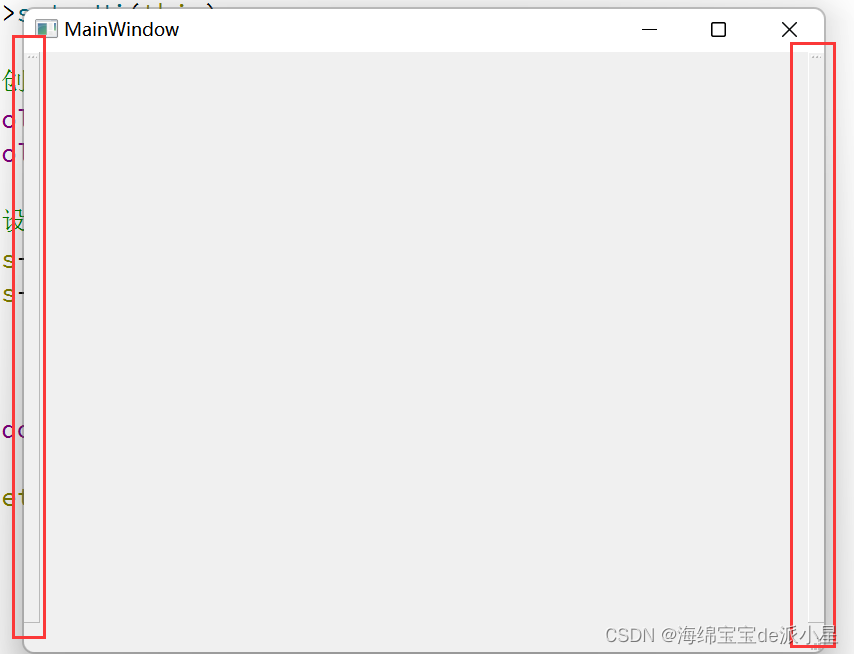
使用QToolBar类提供的setAllowedAreas函数来设置停靠位置
#include "mainwindow.h"
#include "ui_mainwindow.h"
#include <QToolBar>MainWindow::MainWindow(QWidget *parent): QMainWindow(parent), ui(new Ui::MainWindow)
{ui->setupUi(this);// 创建工具栏QToolBar* toolbar1 = new QToolBar(this);QToolBar* toolbar2 = new QToolBar(this);// 设置一下位置this->addToolBar(toolbar1);this->addToolBar(toolbar2);// 只允许在左侧停靠toolbar1->setAllowedAreas(Qt::LeftToolBarArea);// 只允许在右侧停靠toolbar2->setAllowedAreas(Qt::RightToolBarArea);}MainWindow::~MainWindow()
{delete ui;}
设置浮动属性
#include "mainwindow.h"
#include "ui_mainwindow.h"
#include <QToolBar>MainWindow::MainWindow(QWidget *parent): QMainWindow(parent), ui(new Ui::MainWindow)
{ui->setupUi(this);// 创建工具栏QToolBar* toolbar1 = new QToolBar(this);QToolBar* toolbar2 = new QToolBar(this);// 设置一下位置this->addToolBar(toolbar1);this->addToolBar(toolbar2);// 只允许在左侧停靠toolbar1->setAllowedAreas(Qt::LeftToolBarArea);// 只允许在右侧停靠toolbar2->setAllowedAreas(Qt::RightToolBarArea);// 允许和不允许工具栏浮动toolbar1->setFloatable(true);toolbar2->setFloatable(false);}MainWindow::~MainWindow()
{delete ui;}
设置移动属性
移动属性如果设置为false,表示的是停靠位置的操作就不会生效,可以理解为是一个总开关
#include "mainwindow.h"
#include "ui_mainwindow.h"
#include <QToolBar>MainWindow::MainWindow(QWidget *parent): QMainWindow(parent), ui(new Ui::MainWindow)
{ui->setupUi(this);// 创建工具栏QToolBar* toolbar1 = new QToolBar(this);QToolBar* toolbar2 = new QToolBar(this);// 设置一下位置this->addToolBar(toolbar1);this->addToolBar(toolbar2);// 只允许在左侧停靠toolbar1->setAllowedAreas(Qt::LeftToolBarArea);// 只允许在右侧停靠toolbar2->setAllowedAreas(Qt::RightToolBarArea);// 允许和不允许移动toolbar1->setMovable(true);toolbar2->setMovable(false);}MainWindow::~MainWindow()
{delete ui;}
状态栏
状态栏是输出简要消息的区域,一般用于主窗口的底部,一个窗口中最多只能有一个状态栏
可以显示有实时消息,永久消息,进度消息等
状态栏的创建
#include "mainwindow.h"
#include "ui_mainwindow.h"MainWindow::MainWindow(QWidget *parent): QMainWindow(parent), ui(new Ui::MainWindow)
{ui->setupUi(this);// 创建状态栏QStatusBar* stbar = statusBar();// 把状态栏放到窗口中setStatusBar(stbar);
}MainWindow::~MainWindow()
{delete ui;
}
在状态栏中显示实时消息
可以使用showMessage来实现
#include "mainwindow.h"
#include "ui_mainwindow.h"
#include <QStatusBar>MainWindow::MainWindow(QWidget *parent): QMainWindow(parent), ui(new Ui::MainWindow)
{ui->setupUi(this);// 创建状态栏QStatusBar* stbar = statusBar();// 把状态栏放到窗口中setStatusBar(stbar);// 在状态栏中显示2s的消息stbar->showMessage("Hello_Qt", 2000);
}MainWindow::~MainWindow()
{delete ui;
}
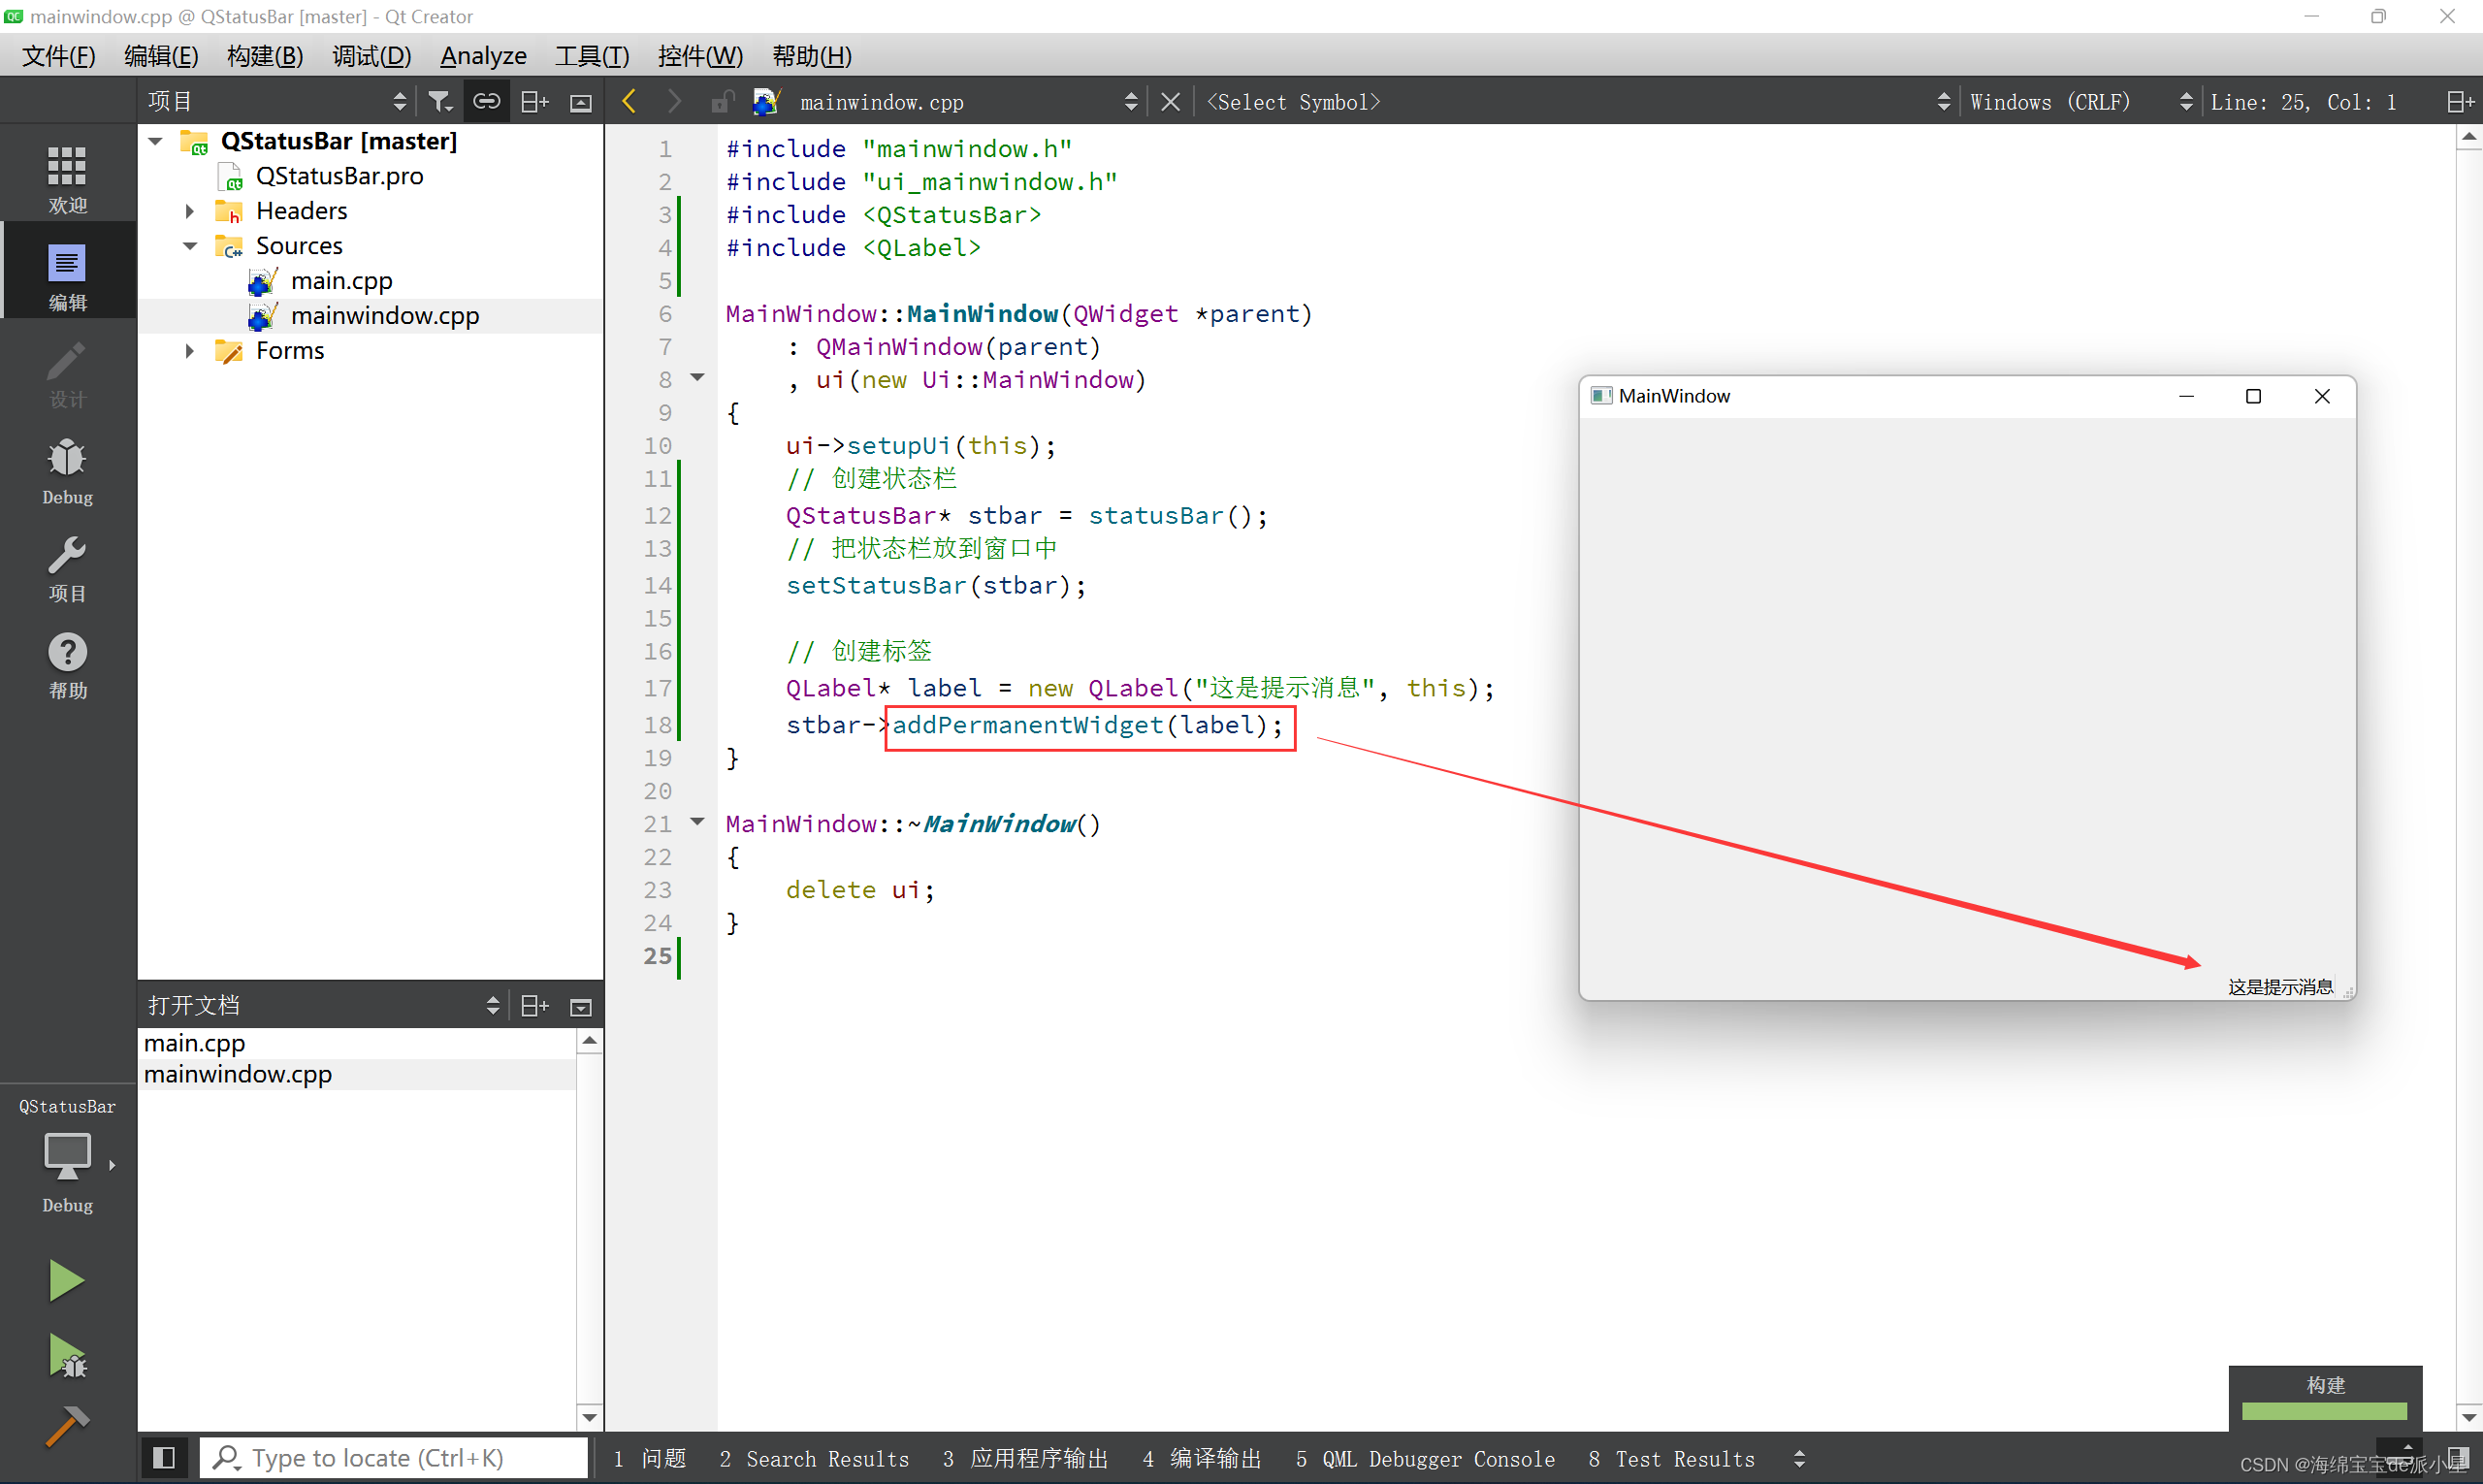
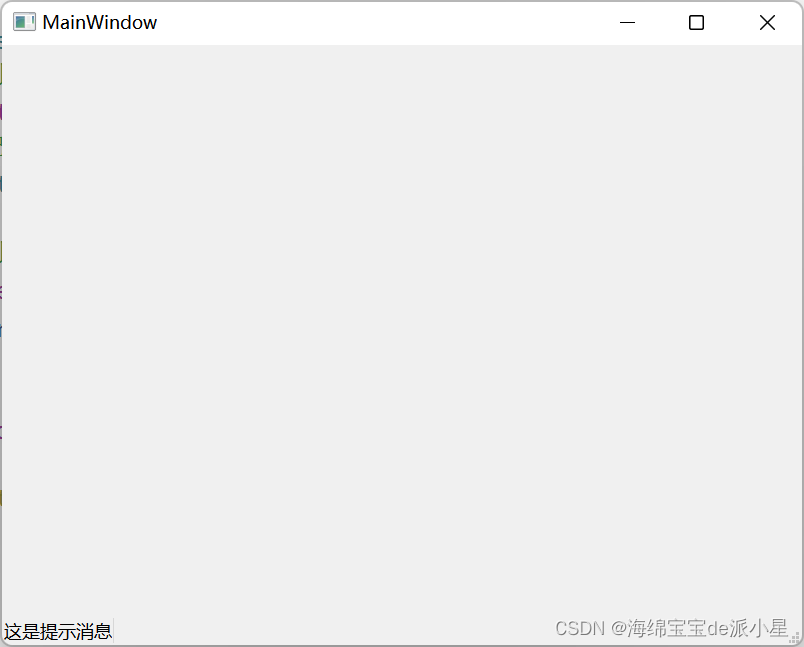
在状态栏中显示永久消息
简单的设计方案是,把消息用标签来提示
#include "mainwindow.h"
#include "ui_mainwindow.h"
#include <QStatusBar>
#include <QLabel>MainWindow::MainWindow(QWidget *parent): QMainWindow(parent), ui(new Ui::MainWindow)
{ui->setupUi(this);// 创建状态栏QStatusBar* stbar = statusBar();// 把状态栏放到窗口中setStatusBar(stbar);// 创建标签QLabel* label = new QLabel("这是提示消息", this);stbar->addWidget(label);
}MainWindow::~MainWindow()
{delete ui;
}
也可以放到右侧