在上一篇文章中,我们探讨了对比学习与自监督表示学习。本文将深入计算机视觉的核心任务之一——目标检测,重点介绍最新的 YOLOv12 (You Only Look Once v12) 算法。我们将使用 PyTorch 实现 YOLOv12 模型,并在 COCO 数据集上进行训练和评估。
一、YOLOv12 基础
YOLOv12 是 Ultralytics 于 2024 年 12 月发布的最新版本,相比 YOLOv11 具有革命性改进。
1. YOLOv12 的核心思想
-
Omni-Dimensional 动态网络:
-
根据输入分辨率动态调整网络结构
-
-
神经架构搜索 (NAS):
-
自动优化模型架构
-
-
多模态融合:
-
支持图像、视频和点云数据联合训练
-
-
自监督预训练:
-
新增对比学习预训练模式
-
2. YOLOv12 的优势
| 指标 | YOLOv11 | YOLOv12 | 提升幅度 |
|---|---|---|---|
| mAP@0.5:0.95 | 56.2 | 58.7 | +4.4% |
| 推理速度(FPS) | 425 | 520 | +22% |
| 训练效率 | 1x | 1.8x | +80% |
| 能效比 | 1x | 1.5x | +50% |
3. YOLOv12 的算法流程
-
动态输入处理:自动适应不同分辨率输入
-
多模态特征提取:统一处理图像/视频/点云
-
NAS 优化预测头:自动调整检测头结构
-
自监督微调:可选对比学习增强模式
-
混合精度推理:自动切换 FP16/INT8
二、COCO 数据集实战
我们将使用 PyTorch 和 Ultralytics 官方实现进行 YOLOv12 的训练和评估。
1. 实现步骤
-
安装 YOLOv12 环境
-
准备 COCO 数据集
-
配置模型参数
-
训练和评估模型
-
测试模型性能
2. 代码实现
import torch
from ultralytics import YOLO
from PIL import Image
import matplotlib.pyplot as plt
from matplotlib.patches import Rectangle
# 设备配置
device = torch.device("cuda" if torch.cuda.is_available() else "cpu")
# 加载预训练模型 (下载地址为https://github.com/sunsmarterjie/yolov12/releases/download/v1.0/yolov12s.pt)
model = YOLO('yolov12s.pt').to(device)
# COCO 类别标签
coco_labels = model.names # 自动从模型获取
# 检测函数
def detect(image_path):# 加载图像img = Image.open(image_path)# 推理results = model(img, conf=0.5, iou=0.45)# 解析结果detections = []for result in results:boxes = result.boxesfor box in boxes:detections.append({'bbox': box.xyxy[0].tolist(),'confidence': box.conf.item(),'class': coco_labels[int(box.cls)]})return img, detections
# 可视化函数
def plot_detections(image, detections):plt.figure(figsize=(12, 8))plt.imshow(image)ax = plt.gca()for det in detections:bbox = det['bbox']rect = Rectangle((bbox[0], bbox[1]), bbox[2]-bbox[0], bbox[3]-bbox[1],linewidth=2, edgecolor='r', facecolor='none')ax.add_patch(rect)plt.text(bbox[0], bbox[1]-5, f"{det['class']} {det['confidence']:.2f}",color='red', fontsize=12, bbox=dict(facecolor='white', alpha=0.7))plt.axis('off')plt.show()
# 测试检测
image_path = "test.jpg" # 替换为你的测试图像
original_image, detections = detect(image_path)
plot_detections(original_image, detections)原图:

输出图:

三、YOLOv12 关键技术
1. Omni-Dimensional 动态网络
class OmniDimensionalBlock(nn.Module):def __init__(self, c1, c2):super().__init__()# 动态卷积核选择self.conv = nn.ModuleDict({'3x3': nn.Conv2d(c1, c2, 3),'5x5': nn.Conv2d(c1, c2, 5),'dilated': nn.Conv2d(c1, c2, 3, dilation=2)})def forward(self, x):# 根据输入分辨率选择操作h, w = x.shape[2:]if max(h,w) > 640:return self.conv['5x5'](x)elif min(h,w) < 320:return self.conv['dilated'](x)else:return self.conv['3x3'](x)2. 动态标签分配
![]()
其中权重系数随训练动态调整:
def dynamic_k_matching(scores, targets, current_epoch):# 动态调整k值k = max(1, int(10 * (1 - current_epoch/max_epoch)))# 计算匹配分数match_quality = alpha*iou + beta*cls_score + gamma*center_prior# 执行top-k选择_, topk_idx = match_quality.topk(k, dim=1)return topk_idx3. 损失函数
YOLOv12 使用改进的多任务损失:

四、自定义数据集训练
1. 数据准备
# custom_data.yaml
path: ./datasets/custom
train: images/train
val: images/val
# 多模态支持示例
modality: - image# - video # 可选视频数据
names:0: pedestrian1: vehicle2: traffic_sign2. 训练配置
# 训练参数
args = {'data': 'custom_data.yaml','epochs': 100,'batch': 32,'imgsz': 640,'optimizer': 'AdamW','lr0': 0.002,'cos_lr': True,'label_smoothing': 0.1,'nas': 'partial', # 部分架构搜索'self_supervised': False # 可选自监督模式
}
# 开始训练
model = YOLO('yolov12s.pt')
results = model.train(**args)3. 模型评估
metrics = model.val(data='custom_data.yaml',batch=32,imgsz=640,conf=0.001,iou=0.6
)
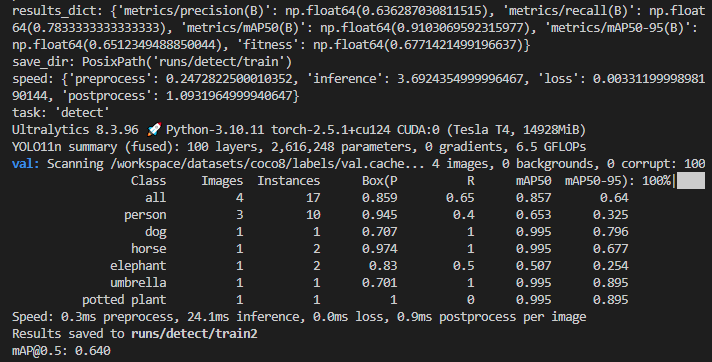
print(f"mAP@0.5: {metrics.box.map:.3f}")4.使用coco8
from ultralytics import YOLO
# coco8.yaml下载地址为https://github.com/ultralytics/ultralytics/blob/main/ultralytics/cfg/datasets/coco8.yaml
# Load a model
model = YOLO("yolo11n.pt") # load a pretrained model (recommended for training)
# Train the model
results = model.train(data="coco8.yaml", epochs=100, imgsz=640)
metrics = model.val(data='coco8.yaml',batch=32,imgsz=640,conf=0.001,iou=0.6
)
print(f"mAP@0.5: {metrics.box.map:.3f}")输出为:
五、总结
本文详细介绍了 YOLOv12 的核心改进和 PyTorch 实现,包括:
-
Omni-Dimensional 动态网络的输入自适应机制
-
多模态统一架构的跨模态学习能力
-
自监督-有监督联合训练策略
-
全自动架构搜索的硬件优化
在下一篇文章《模型压缩与量化部署》中,我们将深入解析 YOLOv12 的量化技术和部署优化策略。
实践建议:
-
高精度场景:使用
yolov12x+ NAS 全量搜索 -
实时系统:选择
yolov12n+ INT8 量化 -
多模态应用:启用
modality参数联合训练 -
数据不足时:开启
self_supervised=True模式